Advanced GitOps Workshop
- Advanced GitOps Workshop
1. Overview
The Advanced GitOps tutorial, presented by Akuity, will take you through creating a self-service multi-tenant Kubernetes environment using Argo CD and GitHub Actions. The tutorial will cover the following topics:
-
Automating
Applicationgeneration usingApplicationSets. -
Using GitHub for Single Sign-on (SSO).
-
Managing manifests for promotion between environments.
-
Enabling self-service environment creation for teams.
Naturally, the Argo CD configuration is managed by the cluster administrators. However, developers will not need administrators to create their environments. With GitOps, teams can self-onboard, leveraging Helm Charts provided by the administrators to abstract the resources that comprise an environment and pull requests to propose the creation of and changes to them.
1.1. Prerequisites
The tutorial assumes you have experience working with Kubernetes, GitOps, GitHub Actions (or a similar CI engine), and Argo CD. Given such, some underlying concepts won't be explained during this tutorial.
The tutorial requires that you have the following:
-
a dedicated Kubernetes cluster with Cluster Admin access.
-
This tutorial can be completed with a local Kubernetes cluster on your machine and does not require a publicly accessible cluster, only egress traffic (i.e., internet access). Consider using Docker Desktop and kind.
-
Admin access is required to create namespaces and cluster roles.
-
-
a GitHub Account - you will use this to:
-
host public repositories for the control plane, demo application, and deployment configuration.
-
use GitHub Codespaces to run Terraform for repository setup.
-
run GitHub Actions. (The repositories are public, so there is no cost.)
-
create an Argo CD instance on the Akuity Platform.
-
-
the Kubernetes command-line tool, kubectl.
-
a local IDE with access set up to your GitHub.
tipThroughout this tutorial, all changes to repositories can be done from your browser by changing
github.comtogithub.devin the URL for the repository. See the GitHub docs for more details. -
a browser with internet access.
This tutorial shows placeholder text between less-than and greater-than symbols (i.e., <...>), indicating that you must substitute it with the value relevant to your scenario.
<username>- Your GitHub username.
2. Repositories
The tutorial will use the following repositories:
-
The
control-planerepository defines the desired state of the Kubernetes platform and enables self-service onboarding for teams. It contains the following directories:argocd- configuration for Argo CD (e.g.,Applications,AppProjects)charts- local and Umbrella Helm Charts.clusters- cluster-specific configurations (e.g.,ClusterSecretStore).teams- a folder for each team.
-
The
demo-apprepository contains the source code for a simple Golang application packaged into a container image used to demonstrate Argo CD driven GitOps processes and CI. -
The
demo-app-deployrepository uses Kustomize to define the manifests to deploy thedemo-appand contains the following directories:base/- the application manifests agnostic to any environment.deployment.yaml- defines theDeployment.service.yaml- defines theService.
env/- the overlays specific to environments.dev/stage/prod/
2.1. Automated Repository Setup
You will run Terraform in a GitHub Codespace to setup the repositories and add a token to the GitHub Actions secrets of them.
- Open the
automated-repo-setuprepo in GitHub Codespaces.
- Navigate to akuity-adv-gitops-workshop/automated-repo-setup.
- Click Code.
- Click Create codespace on main
- Generate a GitHub Personal Access Token (PAT).
- Navigate to https://github.com/settings/tokens/new.
- Or from the UI:
- https://github.com/settings/profile
Developer settingsat the bottom of the left hand menuPersonal access tokens->Tokens (classic)Generate new token->Generate new token (classic)
- Or from the UI:
- Set Note to
adv-gitops-workshop. - Set the Expiration to
7 days. - Under "Select scopes", select:
repowrite:packagesuser:emaildelete_repo- optional, include if you want to use Terraform to clean up the repos after the workshop.
- Click Generate token at the bottom of the page.
- Copy the generated PAT.
- Use Terraform to create the repositories.
- Run
terraform applyin the terminal of the Codespace. - When prompted for
var.github_token, paste the PAT.
- Review the plan, type
yesthen hitreturn/enterapply it. - This will result in the creation of three GitHub repositories under your account.
What is the purpose of the github_release.setup-complete resource?
At this point, the Codespace can be stopped.
- Hit cmd/ctrl + shift + p.
- Enter
>codespaces: Stop Current Codespace. - Hit return/enter.
2.2. Building Images
To deploy an application using Argo CD, you need a container image. It would be boring if you deployed a pre-built image, so you will build one specific to you!
You are going to leverage GitHub Actions to build an image and push it to the GitHub Container Registry (GHCR). The workflow is already defined in the repository and was triggered by the demo-app repository creation.
- View the image created in the GitHub Packages page.
- Navigate to
https://github.com/<username>/demo-app/pkgs/container/demo-app
- Navigate to
The demo-app image is avaiable at ghcr.io/<username>/demo-app with the latest and the commit ID (SHA) tags.
If the GitHub Actions workflow fails to push the demo-app image to the repo with the response 403, either the token is missing the write:packages scope or the package already exists for the user and the repository and not added to it.
3. Argo CD Setup
The control plane setup assumes that you have already prepared a Kubernetes cluster with internet access.
3.1. Creating an Argo CD Instance
The tutorial demonstrates deploying resources to clusters connected to Argo CD. You will create an Argo CD instance using the Akuity Platform to simplify the installation and connecting clusters.
Sign up for a free 14-day trial of the Akuity Platform!
-
Log into the Akuity Platform with your GitHub account.
- If you don't already have an organization (i.e., it's your first time logging in), create one naming it using your GitHub username.
-
Create an Argo CD instance on the Akuity Platform with the name
adv-gitops(or any permitted string). -
Enable Declarative Management for the Argo CD instance.
Declarative Management enables using the Akuity Platform with the App of Apps pattern and ApplicationSets by exposing the in-cluster destination. Using the in-cluster destination means an Application can create other Applications in the cluster hosting Argo CD.
-
Connect your Kubernetes cluster by creating an agent named
workshop.cautionUsing the name
workshopis crucial because the manifests provided for the tutorial assume this is thedestination.nameavailable forApplications in Argo CD. -
Enable the
adminuser, generate the password.
4. Cluster Bootstrapping
4.1. Automating Application Creation with ApplicationSets
Each cluster will get two addons (kyverno and external-secrets), the cluster-specific configurations, and Namespaces for the teams. Each requires an Application in Argo CD to install them into each cluster.
Manually creating Applications is error-prone and tedious. Scripting config management tools can automate the process, but there is a better way. ApplicationSets template Applications and populate them using generators.
These are the ApplicationSets in the control-plane repo:
-
argocd/clusters-appset.yamlwill generate anApplicationfor each cluster registered to Argo CD (excluding thein-cluster) and point it to theclusters/{{name}}folder in thecontrol-planerepo. -
argocd/addons-appset.yamlwill generate anApplicationfor each combination of cluster registered to Argo CD (excluding thein-cluster) and Helm Chart folder in thelistgenerator.# generators- list:elements: # The value in the pairs below are the folder name from `charts/`.- addonChart: external-secrets- addonChart: kyverno- clusters:selector:matchExpressions:- {key: 'akuity.io/argo-cd-cluster-name', operator: NotIn, values: [in-cluster]}The
addons-values.yamlfile from thecluster/folder is passed to each Helm Chart. Using Umbrella charts (setting sub-charts as dependencies in the local chart), the same values file can be passed to each chart, without fear of conflicts.# cluster/{{name}}/addons-values.yamlexternal-secrets: {}kyverno: {}# values file from cluster foldersource:helm:valueFiles:- '../../clusters/{{name}}/addons-values.yaml' -
argocd/teams-appset.yamlwill generate anApplicationfor each folder inteams/. The resultingApplicationwill use theteamHelm Chart (in thecharts/ folder) with thevalues.yamlfrom the team's folder.# File structure of the `teams` folder.teams/<username>/values.yaml# ApplicationSet `git` generator.- git:repoURL: https://github.com/<username>/control-planerevision: HEADdirectories:- path: "teams/*"# Application spec template using the values file.source:helm:releaseName: '{{path.basename}}' # The team name.valueFiles:- '../../{{path}}/values.yaml' # The team's folder. -
In the
teamHelm Chart, therepo-appset.yamltemplate will create anApplicationSetfor each item in thereposvalue. Each one will generate anApplicationfor the repository name and all the folders found underenv/.{{- range .Values.repos }}---apiVersion: argoproj.io/v1alpha1kind: ApplicationSetmetadata:name: '{{ $.Release.Name }}-{{ . | trimSuffix "-deploy" }}'spec:generators:- git:repoURL: 'https://github.com/{{ $.Values.githubOrg | default $.Release.Name }}/{{ . }}'revision: HEADdirectories:- path: env/*template:metadata:name: '{{ $.Release.Name }}-{{ . | trimSuffix "-deploy" }}-{{`{{path.basename}}`}}'spec:project: '{{ $.Release.Name }}'source:repoURL: 'https://github.com/{{ $.Values.githubOrg | default $.Release.Name }}/{{ . }}'targetRevision: 'HEAD'path: '{{`{{path}}`}}'destination:name: '{{ $.Values.cluster }}'namespace: '{{ $.Release.Name }}-{{`{{path.basename}}`}}'syncPolicy:automated: {}{{- end }}- Notice the use of
{{`{{in thepathof the template; this is to prevent Helm from interpreting theApplicationSettemplate ({{path}}) syntax during templating of the chart.
- Notice the use of
4.2. Bootstrapping with App of Apps
To enable the GitOps process, a top-level Application is used to manage the Argo CD configuration and propagate repository changes to the argocd namespace on the in-cluster destination (i.e., the Akuity Platform control plane).
-
Navigate to the Argo CD UI.
-
Create an Application to manage the Argo CD configuration using the
argocd-app.yamlmanifest at the root of thecontrol-planerepo.-
Click + NEW APP.
-
Click EDIT AS YAML.
-
Paste the contents of
argocd-app.yaml. -
Click SAVE.
-
Click CREATE.
-
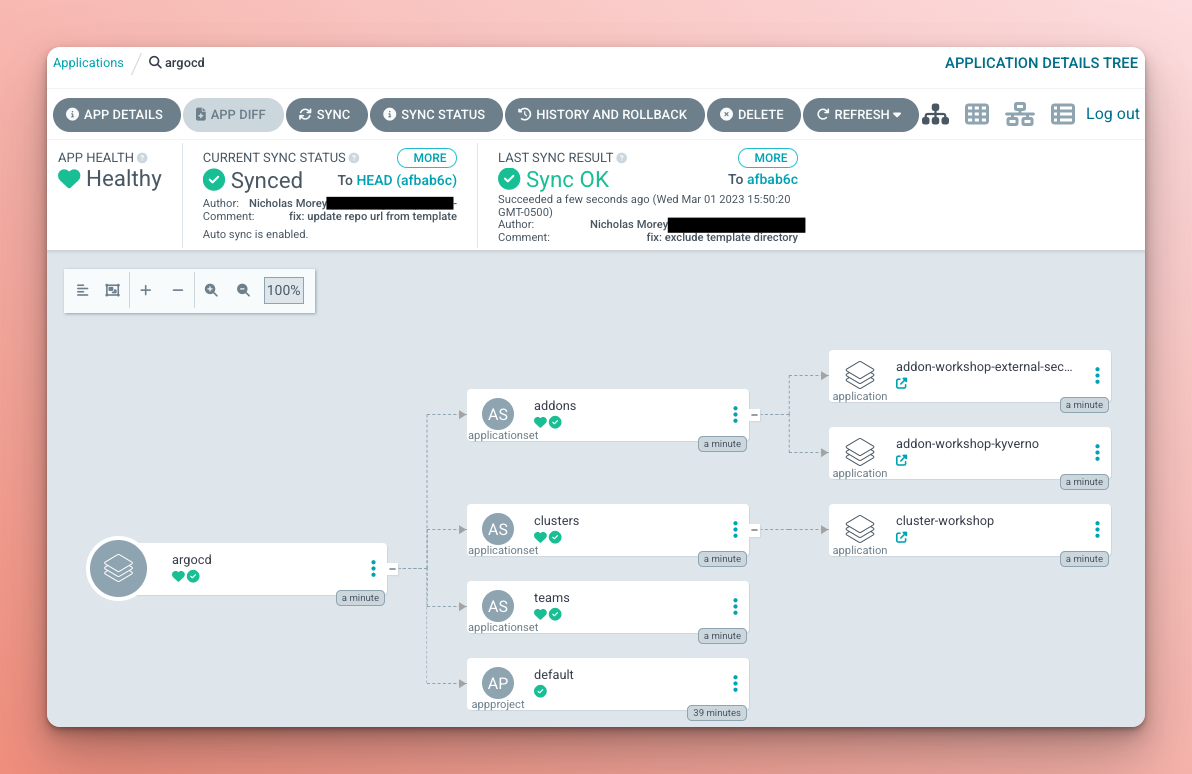
After creating the argocd Application, the automated sync policy deployed the addons, clusters, teams ApplicationSets, along with the default AppProject (assuming ownership of the existing project).
The clusters ApplicationSet generated an Application for the workshop cluster, which created a couple of Kyverno ClusterPolicy resources and an External Secrets SecretStore.
The addons ApplicationSet generated a Kyverno and External Secrets Application for the workshop cluster.
The addons create the CRDs on which resources in the cluster Application depend. This setup relies on the sync retry mechanism to make the resources eventually consistent.
5. Self-service Teams
Each team needs an AppProject, a Namespace for each environment, and Applications. A team can request to create these resources, but they are ultimately managed by the administrators who approve the Pull Request.
The teams are provided with a Helm Chart, charts/teams to abstract the concepts of Namespaces, AppProjects, and ApplicationSets. Instead, they must create a new folder under teams/ and add the example values.yaml from teams/USERNAME.
5.1. Creating a Team Environment
You will create a team for the tutorial using your GitHub username.
-
Open the
control-planerepository. -
Copy the
teams/EXAMPLEfolder and create a new folder with your GitHub username, converting to lowercase if required. (i.e.,teams/<username>) -
Commit the changes to the
mainbranch.
Once the teams ApplicationSet has detected the change in Git, it will create an Application for the Namespaces on the cluster, the AppProject for the team, and an ApplicationSet for each repo in the values.yaml.
On the Applications page of Argo CD, select the team's project on the filter to experience what they would see.
The demo-app is deployed using the latest tag to each namespace. Check out the Deployment logs to confirm that your <username> is being printed.
Why is a separate Application used to create the Namespace resources instead of using the CreateNamespace sync option?
6. Rendered Manifests
Using config management tools, like Kustomize, makes it much easier to maintain the environment-specific configuration. However, it also makes it much more challenging to determine what exactly changed in the resulting manifests. This is a critical requirement for production environments. Luckily there is a solution for this, the Rendered Manifests pattern!
The idea is to create a branch with plain YAML manifests generated by the config management tool (i.e., Kustomize). The process of maintaining rendered manifests branches, of course, should be automated. A Continuous Integration system, like GitHub Actions, is a perfect tool for this task.
6.1. Adding Render Manifests to the demo-app-deploy Repo
The demo-app-deploy repo contains the application's manifests, so you'll add a workflow to generate the rendered manifests.
-
Navigate to your
demo-app-deployrepo. -
Open
.github/workflows/rendered-manifests.yaml:-
Uncomment the
render-manifestsjob. -
Delete the
placeholderjob. -
Commit and push the changes.
-
Once the workflow is created, it will create a branch for each environment and push the rendered manifests to the branch.
-
-
Navigate to your
control-planerepository to update theteamHelm Chart (charts/team) to use the rendered manifests from the branches.-
Open the file
charts/team/templates/repo-appset.yaml. -
Update the
spec.template.spec.source.targetRevisionto{{ "{{" }}path{{ "}}" }} -
Update the
spec.template.spec.source.pathto./
-
# charts/team/templates/repo-appset.yaml

apiVersion: argoproj.io/v1alpha1
kind: ApplicationSet
metadata:
  name: '{{ $.Release.Name }}-{{ . | trimSuffix "-deploy" }}'
spec:
  template:
    spec:
      source:
--      targetRevision: 'HEAD'
--      path: '{{ "{{" }}path{{ "}}" }}'
++      targetRevision: '{{ "{{" }}path{{ "}}" }}'
++      path: './'
Wait for the ApplictionSet to reconcile and see that nothing changes in the Applications since the rendered manifests are the same as what was already deployed.
7. Automating Image Tag Updates
Updating the image tag in the kustomization.yaml is boring, and no one likes to make trivial tag changes manually. To make the process more efficient, you are going to automate this process with GitHub Actions!
7.1. Automating the dev Environment
The dev environment is intended to track the trunk of the repository (i.e., the main branch), and there is minimal impact if a change breaks the application. Given this, you will automate the deployment to dev each time a new build is created in the demo-app repo.
-
Navigate to your
demo-apprepository. -
Uncomment the
deploy-devjob in.github/workflows/ci.yamlworkflow file:
  deploy-dev:
    runs-on: ubuntu-latest
    needs: build-image
    steps:
    - uses: imranismail/setup-kustomize@v1

    - name: Update env/dev image with Kustomize
      run: |
        git config --global user.name "Deploy Bot"
        git config --global user.email "no-reply@akuity.io"
        git clone https://bot:${{ secrets.DEPLOY_PAT }}@github.com/${{ github.repository_owner }}/demo-app-deploy.git
        cd demo-app-deploy/env/dev
        kustomize edit set image ghcr.io/${{ github.repository_owner }}/demo-app:${{ github.sha }}
        git commit -a -m "chore(dev): deploy demo-app:${{ github.sha }}"
        git notes append -m "image: ghcr.io/${{ github.repository_owner }}/demo-app:${{ github.sha }}"
        git push origin "refs/notes/*" --force && git push --force
- Commit and push the changes, then watch the action run!
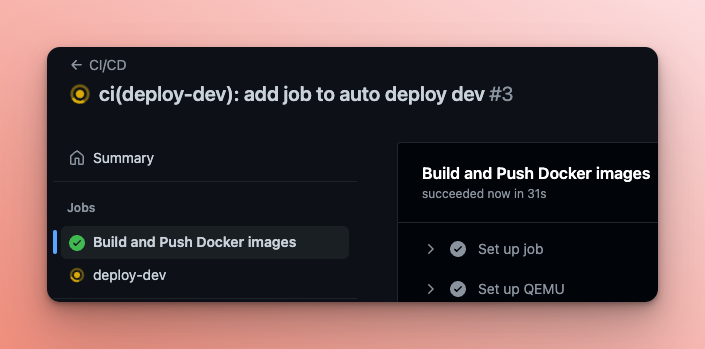
When the workflow completes (successfully), check out the latest commit on your demo-app-deploy repo.
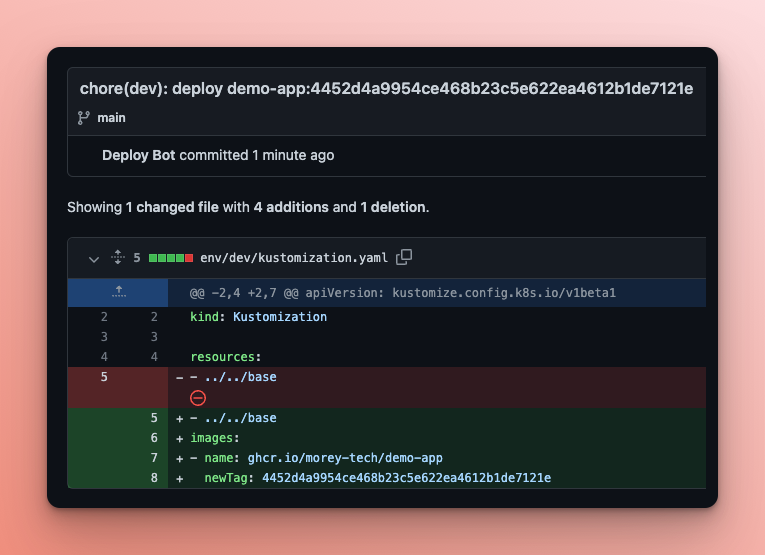
Once changes are pushed, the CI workflow will build a new image and update the dev environment with the corresponding image tag. Developers no longer need to manually change deployment manifests to update the dev environment.
7.2. Automating Promotion to stage and prod
Updating the manifests for the stage and prod deployments requires a more careful process, but it can also be automated.
-
Allow GitHub Actions to create and approve pull requests on the
demo-apprepo.-
Navigate to:
https://github.com/<username>/demo-app-deploy/settings/actions -
Under Workflow permissions, check the box for Allow GitHub Actions to create and approve pull requests.
-
Click Save.
-
-
In your
demo-app-deployrepo, open.github/workflows/promote.yaml:-
Uncomment the
promote-image-changejob. -
Delete the
placeholderjob. -
Commit and push the changes.
While the workflow is running, read on to learn more about the logic.
Engineers might make arbitrary changes in the deployment repository, but you must automate only the image change. To distinguish between the image change and other changes, it uses git notes to explicitly annotate the image promotion commit. The workflow checks the commit note, and if it contains the note that matches the
image: <image>pattern, then propagates the image change to the staging and production environments.Remember the approval step requirement. The approval step is implemented using GitHub Pull Request. Instead of updating the production environment directly, workflow pushes the changes to the
auto-promotion-prodbranch and creates a pull request, so to approve the change approver needs to merge the pull request. -
-
To demonstrate the
promotionworkflow, make a change in yourdemo-apprepo. Some suggestions:- Add another exclamation mark to the output.
- Change the colour of the text.
- Break it somehow, promote that bug into
prodat17:00on a Friday, then see how quickly you can get the fix to prod.- The real challenge is creating the bug since it fails fast (can't just be a syntax error because the build will fail.)
- Use the colour
brownas it is invalid. This fix (and the initial feature depending on the fix) will be out to prod in~2:30. Plus, there was no actual downtime since the pod never became healthy, and the original replicaSet stayed up.
8. Summary
To summarize what you've built so far, you have a multi-tenant Argo CD instance. The instance is managed using a GitOps-based process where engineers can self-onboard their team by creating a pull request. Each application development team independently manages their application by maintaining a separate deployment repository. Deployment manifests are generated using Kustomize, allowing engineers to avoid duplications and efficiently introduce environment-specific changes.
The simple image tag changes are fully automated using the CI pipelines. On top of this, teams leverage the "rendered manifests" pattern that turns to get Git history into a traceable audit log of every infrastructure change. Believe it or not, you've achieved more than many companies in several years.
9. Clean Up
Complete this clean-up checklist after completing the tutorial. After doing so, you can follow the tutorial from the start again.
- Delete the Argo CD instance on the Akuity Platform.
- Delete the
control-plane,demo-app, anddemo-app-deployrepos.- This step can be completed by running
terraform destoryin the Codespace used during the automated repo setup.
- This step can be completed by running
- Delete the
workshopcluster. - Delete the
demo-apppackage from your GitHub account. - Delete GitHub PATs generated.
10. Bonus Question Answers
-
The repositories have a GitHub Actions workflow (
update-placeholders.yaml) to update placeholder text in the files from the repository templates. The challenge is that theDEPLOY_PAT, created in the same Terraform apply, needs to exist before the workflow can be run. Thegithub_release.setup-completeresource creates a tag namedsetup-completeon the repositories to trigger the workflow and itdepends_onthegithub_actions_secret.deploy-patresource, which ensures that the workflow is run after the GitHub Secret is added. -
The
AppProjectfor the team only permits creating resources in the specified cluster and namespaces matching the pattern<team-name>-*. This means thatNamespaceresources can't be created byApplications in the team's project. Instead a seperateApplicationis created in thedefaultproject, which does permitNamespaceresources.