GitHub Commit Status Notifications for Argo CD
Notifications can be self-implemented by Argo CD users, for example, by using Resource Hooks. The hook is a pod that runs before or after the Application is synced, making it convenient for sending a notification. However, this requires every engineer to find answers to questions like:
- How to get the notification service credentials?
- Where to store the credentials?
- What should be a notifiction message?
- Where to send it?
Most answers are the same for every team except notification destinations. That is why it is better to leverage the Argo CD Notifications controller that enables configuring notifications in a centralized way and for end users to specify where and when to send notifications.
If you haven't already created an Argo CD instance, sign up for a 14-day free trial of the Akuity Platform and check out our Getting Started guide!
1. Setting Up the GitHub Notification Service
Argo CD Notifications supports integration with various notification services like Slack, PagerDuty, OpsGenie and more.
Typical examples are sending Slack or Email notifications; however, this tutorial will use the GitHub service to add Argo CD to commit statuses.
-
-
Set GitHub App name to
argocd-notifications-<username>, replacing<username>with your GitHub username.cautionGitHub App names are globally unique, so including the
<username>is essential. -
Set Homepage URL to
https://<instance-id>.cd.akuity.cloud/, replacing<instance-id>with the ID for the Argo CD instance on the Akuity Platform.https://<instance-id>.cd.akuity.cloud/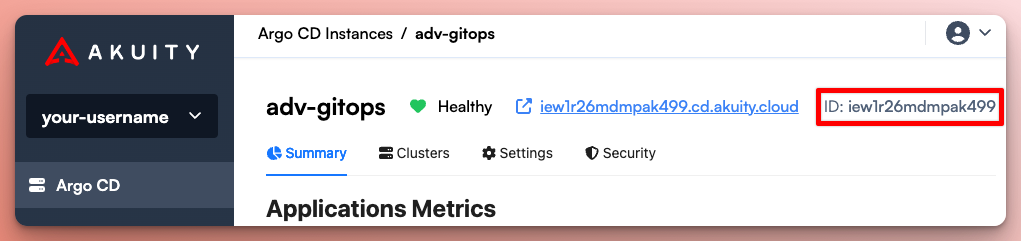
-
Set Authorization callback URL to
https://<instance-id>.cd.akuity.cloud/api/dex/callback, replacing<instance-id>with the ID for the Argo CD instance on the Akuity Platform.https://<instance-id>.cd.akuity.cloud/api/dex/callbacknote<instance-id>is used as a default placeholder for demo purposes when you first create your instance on the Akuity Platform. However, the actual URL can be customized and set to anything, depending on how you configure your Akuity sub-domain or FQDN. -
Under the "Webhook" section, deselect the Active option.
-
Under the "Permissions" section, expand the Repository permissions > Commit statuses, select the
Read and writeaccess level. -
Click Create GitHub App.
-
-
Generate a private key for the GitHub App.
-
Navigate to:
https://github.com/settings/apps/argocd-notifications-<username>, replacing<username>with your GitHub username. -
Under Private keys, click Generate a private key.
-
The
.pemfile containing the private key will download to your machine.
-
-
Install the GitHub App in your GitOps repo.
-
Navigate to
https://github.com/settings/apps/argocd-notifications-<username>/installations, replacing<username>with your GitHub username. -
Click Install.
-
Select Only select repositories.
-
Select your GitOps repo.
-
Click Install.
-
Copy the installation ID from the URL
https://github.com/settings/installations/<install-id>
-
-
Configure the notification service in the settings for the Argo CD instance on the Akuity Platform.
-
From the Argo CD instance on the Akuity Platform, navigate to Settings > Notifications.
-
Go to the YAML Editor tab.
-
Paste the following snippet replacing:
-
<app-id>with the App ID in the settings of the GitHub App. -
<install-id>with the value copied from the installation URL in the previous step.
service.github: |appID: <app-id>installationID: <install-id>privateKey: $github-privateKeytrigger.on-deployed: |- description: Application is synced and healthy. Triggered once per commit.oncePer: app.status.operationState.syncResult.revisionsend:- app-deployedwhen: app.status.operationState.phase in ['Succeeded'] andapp.status.health.status == 'Healthy'template.app-deployed: >message: |Application {{.app.metadata.name}} is now running new version of deployments manifests.github:status:state: successlabel: "argo-cd/{{.app.metadata.name}}"targetURL: "{{.context.argocdUrl}}/applications/{{.app.metadata.name}}?operation=true" -
-
Go to the Secrets tab.
-
Add the key
github-privateKeyand paste the contents of the.pemfile containing the Private Key for the GitHub App as the value. -
Click Save.
-
You can think about triggers as a function that continuously checks the Argo CD application state and returns true if the notification should be sent. The notification is sent when trigger's return value changes from false to true so that the user gets notified about an event only once when it happens.
trigger.on-deployed: |
  - description: Application is synced and healthy. Triggered once per commit.
    oncePer: app.status.operationState.syncResult.revision
    send:
      - app-deployed
    when: app.status.operationState.phase in ['Succeeded'] and
      app.status.health.status == 'Healthy'
In the triggers configuration, you might notice the send field. This field specifies the notification template that should be used to generate the notification content.
template.app-deployed: >
  message: |
    Application {{.app.metadata.name}} is now running new version of deployments manifests.
  github:
    status:
      state: success
      label: "argo-cd/{{.app.metadata.name}}"
      targetURL: "{{.context.argocdUrl}}/applications/{{.app.metadata.name}}?operation=true"
Templates are using Go templates syntax. The template configuration includes the message field that is common for all notification services. You might configure service-specific fields like email.subject or slack.attachements for customized notifications for each notification service.
2. Adding the Notification Subscription
Once templates and notifications are configured in Argo CD, the end users must create a subscription. To subscribe to notifications, add the following annotation to your Application:
-
To subscribe to "notifications" (setting commit statues), open the
Applicationmanifest in your GitOps repo, or edit it in the Argo CD UI. -
Add the following annotation to the
metadataof theApplication:
metadata:
  annotations:
    notifications.argoproj.io/subscribe.on-deployed.github: ""
- Commit and push the changes to the repo.
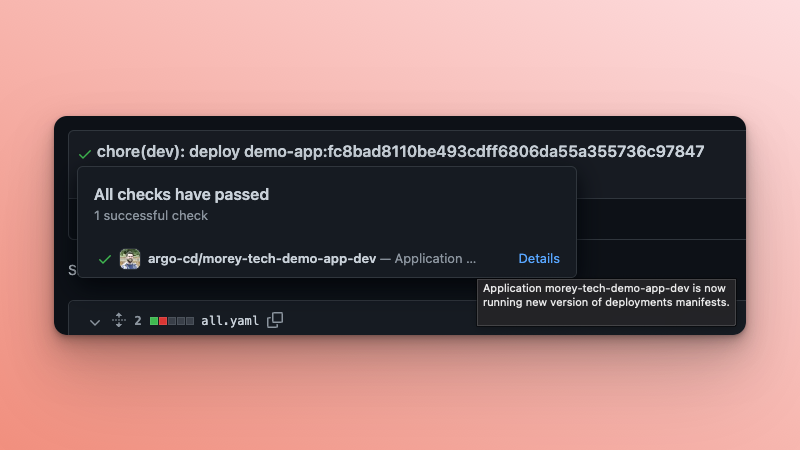
Go ahead and trigger a change in the source of your Application. Once the new image has been built, the rendered manifests are updated on the GitOps repo, and the Application has been synced and healthy, the commit will show a status check with a link to the operation in Argo CD.
Next Steps
Congratulations! You have now have the GitHub commit status links back to the related Argo CD Application.
If you are just starting out with Argo CD, consider using your new Argo CD instance to complete our Introduction to Argo CD tutorial.
However, if you are experienced but looking to expand you skills, check out our Advanced GitOps Workshop.