Cluster Add-ons with ApplicationSets
- 1. Overview
- 2. Creating the Workshop Environment
- 3. Enabling Cluster Add-ons
- 4. Deploying Applications
1. Overview
Managing clusters at scale requires standardization and automation. Tasks that looked trivial with a handful of clusters become a burden when managing tens or even hundreds of them.
How did we get here? Read the backstory here.
Backstory by from the perspective of a cluster administrator named Nick.
While scrolling through Slack one morning, Nick got a ping that one of the product teams wanted to do performance testing on their application because of a new feature launch that ties together many different services. They are worried about how the influx of traffic might effect the environment. Given this fear, Nick decided to provision an environment dedicated to performance testing, base the stage environment.
Right now, they are using a cluster for each environment (dev, stage, and prod) with folders for each one that contains the Argo CD Applications for the “add-ons” (a standard set of Kubernetes resources used by applications, expected to be on every cluster).

Adding this new environment with a new cluster requires lots of copying and pasting of Argo CD Applications from an existing cluster configuration to a folder for the new one, and changing any details specific to the cluster (e.g. cluster name). While not a huge burden at this scale, it’s easy to forget to change something.
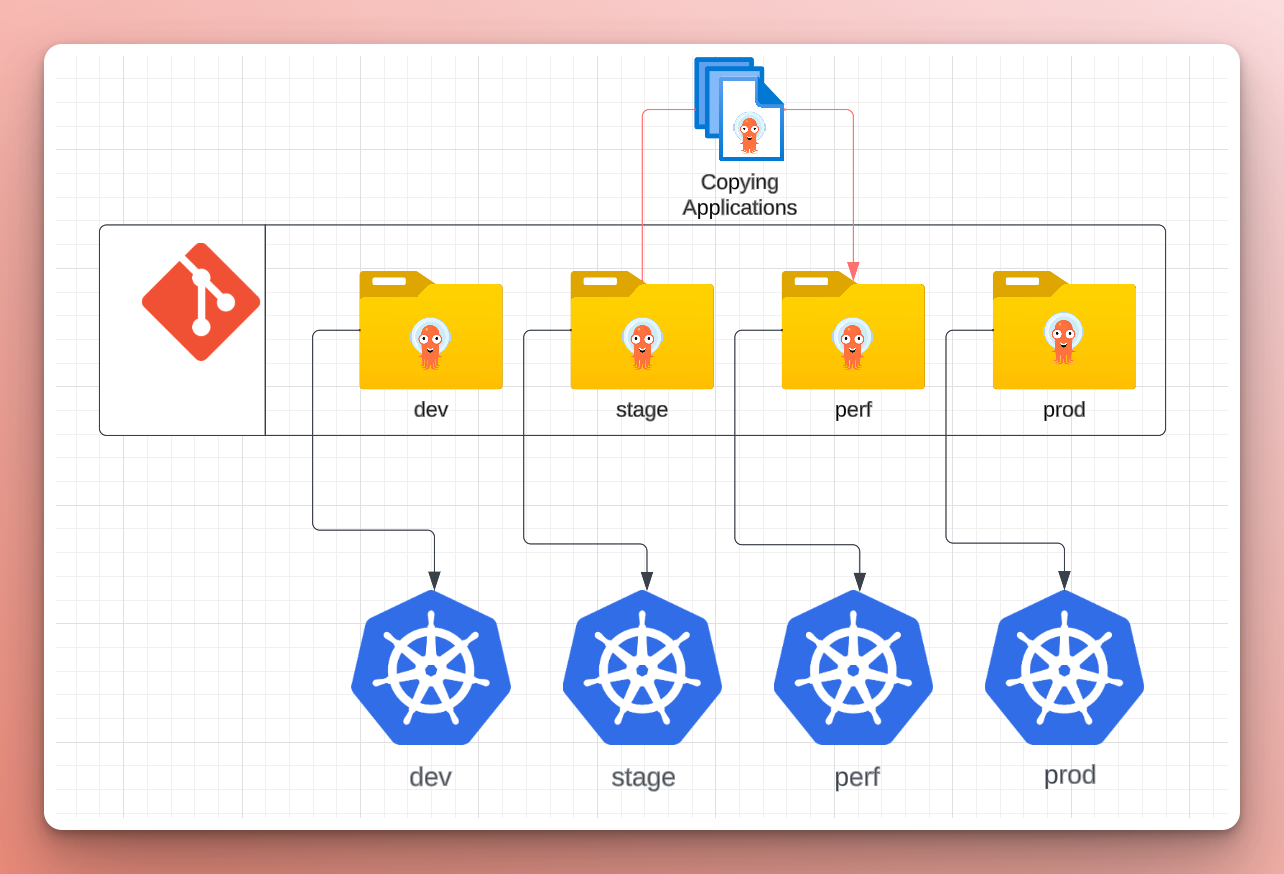
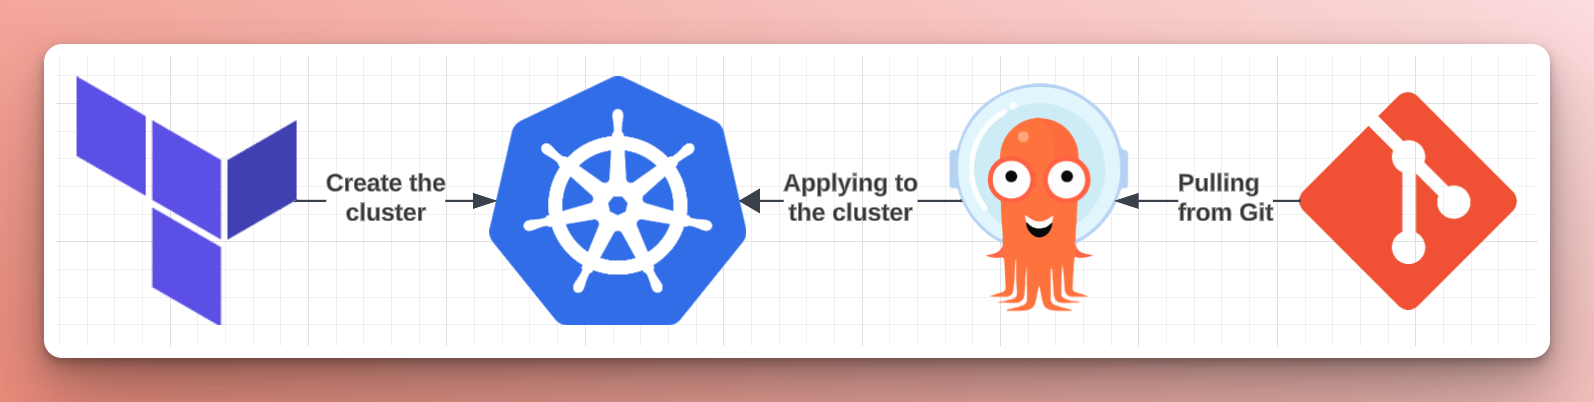
Nick updated the Terraform configuration to set up the new perf environment and create the cluster. Nick added the cluster to the central Argo CD instance and created the App-of-Apps to deploy the Applications from the cluster’s folder in their GitOps repo. Then, Nick confirmed that all of the Applications were synced and healthy.
After handing over the reins to the product team, Nick got a ping on Slack from a developer who deployed their application to the perf environment, but it’s not working the way it did in stage. After some investigation, Nick found that, in the transition to the new cluster, the Application for cert-manager pointed to the values file of the stage cluster. The values file contained the wrong subdomain, leading to the DNS challenge failing when the dev’s application requested a new cert—a minor oversight when copying over the Argo CD Applications for the new cluster’s add-ons.

Nick thinks to himself, there must be a better way! A life without toil. 💡
In this tutorial presented by Akuity, attendees will learn how to leverage ApplicationSets, a powerful Argo CD feature, to streamline the deployment of a standard set of "add-ons" (like Sealed Secrets, cert-manager, and Kyverno) to each cluster. We will address the dynamic nature of clusters by demonstrating how they can "opt-in" to specific tooling and configurations, allowing for flexibility without sacrificing standardization.
Manually creating Applications is error-prone and tedious. Especially if the Applications are nearly identical aside from a few values that can be determined automatically. ApplicationSets template Applications and populate them using generators.
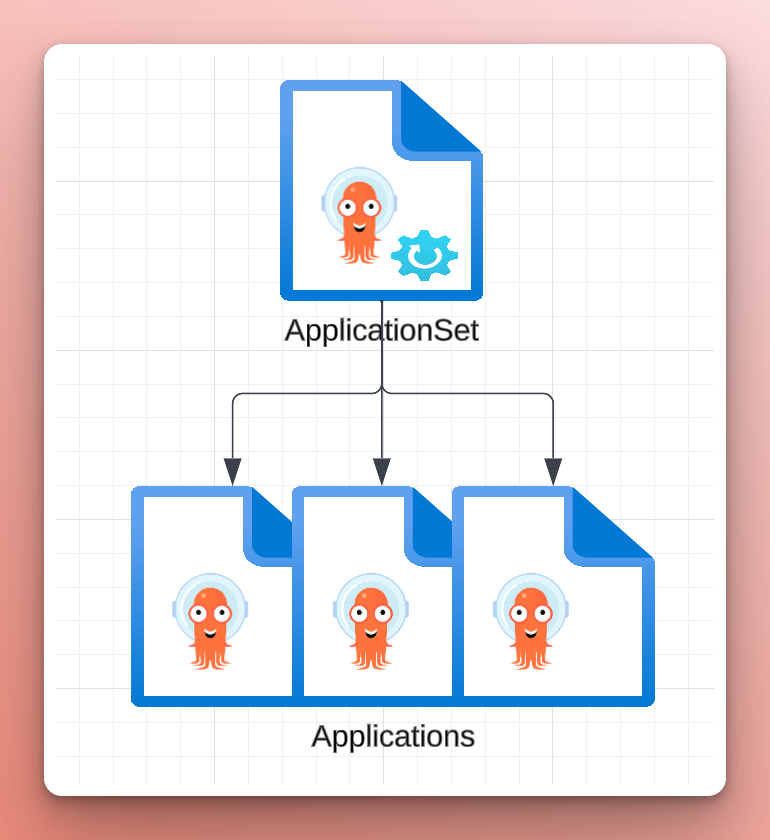
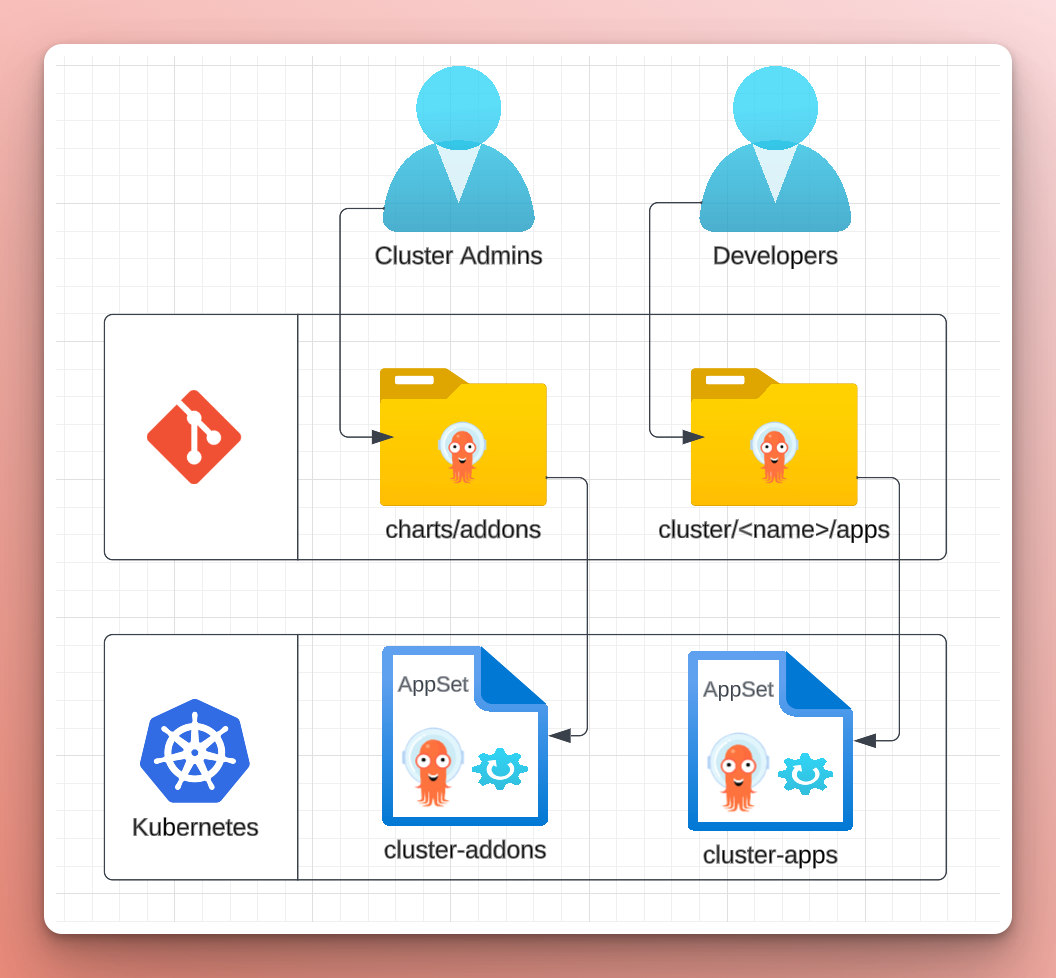
In the control-plane repo, the bootstrap folder contains two ApplicationSets, one for the cluster add-ons (cluster-addons-appset.yaml) and one for the cluster apps (cluster-apps-appset). The distinction between "add-ons" and "apps" is delineation between cluster admin and developer. The cluster admin is primarily responsible for the "add-ons" as they are central to cluster and used by many other teams. The developers are responsible for their apps.
1.1. Prerequisites
The tutorial assumes you have experience working with Kubernetes, GitOps, and Argo CD. Given such, some underlying concepts won't be explained during this tutorial.
The tutorial requires that you have the following:
-
a GitHub Account.
-
the ability to run a
devcontainer. Either:- using GitHub Codespaces,
- locally with the VS Code Dev Containers extension and Docker,
- or with DevPod.
-
a browser with internet access.
2. Creating the Workshop Environment
2.1. Kubernetes Clusters using devcontainer
To demonstrate multi-cluster management, you will create an environment for this workshop using a devcontainer. The devcontainer will be built based on the specification in the devcontainer.json in the workshop repo. Then, it will start up two minikube clusters named dev and prod.
- GitHub Codespace
- VSCode (local)
The easiest way to get started is with GitHub Codespaces (especially if you are on conference wifi).
![]()
Alternatively, you can run the workshop using the VS Code Dev Containers extension and Docker on your machine.
-
Clone the akuity-cluster-addons-workshop/control-plane repo to your machine.
-
Open the
control-planerepository in VSCode. -
Ensure you have installed the Dev Containers extension.
-
Run the
Dev Containers: Open Folder in Container...command in VSCode and select the local folder.Shift + Command/Ctrl + P+Dev Containers: Open Folder in Container...
2.2. Akuity Platform Sign Up
This scenario demonstrates deploying applications to a cluster external to Argo CD.
Similar to how the GitHub repo is hosting the Helm charts, which describe what resources to deploy into Kubernetes, the Akuity Platform will host the Application manifests, which represent how to deploy the resources into the cluster. Along with Argo CD, which will implement the changes on the cluster.
Sign up for a free 30-day trial of the Akuity Platform!
-
Create an account on the Akuity Platform.
-
To log in with GitHub SSO, click "Continue with GitHub".
You can also use Google SSO or an email and password combo.
- Click
Authorize akuityio .
-
Click the
create or join link. -
Click
+ New organization in the upper right hand corner of the dashboard. -
Name your organization following the rules listed below the
Organization Name field.
2.3. Create your Argo CD Instance
You can create your Argo CD instance using the Akuity Platform Dashboard or CLI by choosing between the tabs below.
- Bash Script
- CLI
- Dashboard
-
Log into the
akuityCLI.akuity login-
Open the link displayed: https://akuity-training.us.auth0.com/activate
-
Enter the code displayed.
-
-
Run the Bash script.
./.devcontainer/setup-akuity-platform.sh
-
Check your
akuityCLI version.akuity version -
Log into the
akuityCLI.akuity login-
Open the link displayed: https://akuity-training.us.auth0.com/activate
-
Enter the code displayed.
-
-
Set your organization name in the
akuityconfig in one command using some bash-fu:akuity config set --organization-id=$(akuity org list | awk 'NR==2 {print $1}') -
Create the Argo CD instance on the Akuity Platform
akuity argocd apply -f akuity-platform/ -
Apply the agent install manifests to the clusters.
kubectx k3d-dev && \akuity argocd cluster get-agent-manifests \--instance-name=cluster-addons dev | kubectl apply -f -kubectx k3d-prod && \akuity argocd cluster get-agent-manifests \--instance-name=cluster-addons prod | kubectl apply -f - -
From the Akuity Platform Dashboard, in the top, next to the Argo CD instance name and status, click the instance URL (e.g.,
<instance-id>.cd.akuity.cloud) to open the Argo CD login page in a new tab. -
Enter the username
adminand the passwordakuity-argocd. -
Log into the
argocdCLIargocd login \"$(akuity argocd instance get cluster-addons -o json | jq -r '.id').cd.training.akuity.cloud" \--username admin \--password akuity-argocd \--grpc-web
-
Navigate to
Argo CD . -
Click
+ Create in the upper right hand corner of the dashboard. -
Name your instance following the rules listed below the
Instance Name field. -
(Optionally) Choose the Argo CD version you want to use.
-
Click
+ Create .
At this point, your Argo CD instance will begin initializing. The start-up typically takes under 2 minutes.
2.3.1. Configure Your Instance
While the instance is initializing, you can prepare it for the rest of the lab.
-
In the dashboard for the Argo CD instance, click
Settings . -
On the inner sidebar, under "Security & Access", click
System Accounts . -
Enable the "Admin Account" by clicking the toggle and clicking
Confirm on the prompt. -
Then, for the
adminuser, clickSet Password . -
Enter the password
akuity-argocd, then clickSubmit . -
In the top, next to the Argo CD instance name and status, click the instance URL (e.g.,
<instance-id>.cd.akuity.cloud) to open the Argo CD login page in a new tab. -
Enter the username
adminand the passwordakuity-argocd. -
Log into the
argocdCLIargocd login \"<instance-id>.cd.training.akuity.cloud" \--username admin \--password akuity-argocd \--grpc-web
2.3.2. Deploy an Agent to the Cluster
You must connect the cluster to Argo CD to deploy the application resources. The Akuity Platform uses an agent-based architecture for connecting external clusters. So, you will provision an agent and deploy it to the cluster.
-
Back on the Akuity Platform, in the top left of the dashboard for the Argo CD instance, click
Clusters . -
In the top right, click
Connect a cluster . -
Enter the
devname as the "Cluster Name". -
In the bottom right, click
Connect Cluster . -
To get the agent install command, click
Copy to Clipboard . Then, in the bottom right,Done . -
Open your terminal and set the cluster context to
devby running:cluster-dev -
Paste and run the command against the cluster. The command will create the
akuitynamespace and deploy the resources for the Akuity Agent. -
Check the pods in the
akuitynamespace. Wait for theRunningstatus on all pods (approx. 1 minute).% kubectl get pods -n akuityNAME READY STATUS RESTARTS AGEakuity-agent-<replicaset-id>-<pod-id> 1/1 Running 0 65sakuity-agent-<replicaset-id>-<pod-id> 1/1 Running 0 65sargocd-application-controller-<replicaset-id>-<pod-id> 2/2 Running 0 65sargocd-notifications-controller-<replicaset-id>-<pod-id> 1/1 Running 0 65sargocd-redis-<replicaset-id>-<pod-id> 1/1 Running 0 65sargocd-repo-server-<replicaset-id>-<pod-id> 1/1 Running 0 64sargocd-repo-server-<replicaset-id>-<pod-id> 1/1 Running 0 64sRe-run the
kubectl get pods -n akuitycommand to check for updates on the pod statuses. -
Back on the Clusters dashboard, confirm that the cluster shows a green heart before the name, indicating a healthy status.
-
Repeat these steps for the
prodcluster.
2.3.3. Bootstrapping Argo CD
To deploy the ApplicationSets that will automate the creation of Applications for your clusters, you will manually create an initial bootstrap Application.
-
Navigate to the UI of your Argo CD instance.
-
Create an
Applicationto manage the Argo CD configuration using thebootstrap-app.yamlmanifest in the workshopcontrol-planerepo.-
Click
+ NEW APP . -
Click
EDIT AS YAML . -
Paste the contents of
bootstrap-app.yaml. -
Click
SAVE . -
Click
CREATE .
-
You now have a fully-managed Argo CD instance 🎉
After the bootstrap Application automatically syncs, it will create two ApplicationSets: cluster-addons and cluster-apps. Notice that they do not create any Applications. Each cluster can opt-in to add-ons, meaning that nothing is deployed unless the cluster indicates that it should be.
3. Enabling Cluster Add-ons
3.1. addons ApplicationSets
For each add-on there is a corresponding ApplicationSet.
bootstrap:
  - appset-addon-cert-manager.yaml
  - appset-addon-external-secrets.yaml
  - appset-addon-kyverno.yaml
Each ApplicationSet will use the cluster generator to create an Application per cluster registered to Argo CD, but only if two conditions are met:
-
The cluster name (from the
akuity.io/argo-cd-cluster-namelabel) is notin-cluster. This condition prevents Argo CD from attempting to deploy add-ons to the cluster it is running in. -
The cluster contains a label in the format
enable_<add_on_name>. This ensures that cluster's opt-in to add-ons, rather than deploying add-ons to every cluster by default.
generators:
- clusters:
    selector:
      matchExpressions:
      # Don't deploy addons to cluster running Argo CD (i.e. the Akuity Platform).
      - {key: 'akuity.io/argo-cd-cluster-name', operator: NotIn, values: [in-cluster]}

      # Check annotation to see if addon is enabled.
      - key: enable_cert_manager
        operator: In
        values: ['true']
The results from the generator look like:
- name: prod
  nameNormalized: prod
  server: https://cluster-prod:8001
  metadata:
    labels:
      key: value
    annotations:
      key: value
The labels and annotations are sourced from the cluster configuration, which on the Akuity Platform is defined in the Cluster resource (or from the Dashboard).
apiVersion: argocd.akuity.io/v1alpha1
kind: Cluster
metadata:
  name: dev
  labels:
    environment: "dev"
    enable_cert_manager: true
In addition to the selectors on the clusters generator, it includes values which are added to each result for use in the Application template. The addonChartVersion value is used to specify the version of the Helm chart to deploy.
generators:
- clusters:
    values:
      # Default chart version
      addonChartVersion: v1.13.1
These values are used in combination with a top-level merge generator to enable specifying the Helm chart version based on the environment (arbitrary groupings of clusters).
generators:
  - merge:
      mergeKeys: [server]
      generators:
      # ... (main cluster generator)
      - clusters:
          selector:
            matchLabels:
              environment: dev
          values:
            addonChartVersion: v1.14.5
The merge generator will combine the results from the two generators based on the server key. The values on the main clusters generator become the default.
The addons are sourced directly from the Helm chart repositories, along with values files from a Git repository. Traditionally to accomplish this combination would require using a Helm umbrella chart or specifying the values in the Application manifest. However, here you will take advantage of the multiple sources feature added in Argo CD version 2.6.
sources:
  # Helm chart source.
  - repoURL: 'https://charts.jetstack.io'
    chart: 'cert-manager'
    targetRevision: '{{.values.addonChartVersion}}'
    helm:
      releaseName: 'cert-manager'
      ignoreMissingValueFiles: true
      valueFiles:
      - '$values/clusters/{{.name}}/addons/cert-manager.yaml'

  # Helm valueFiles source.
  - repoURL: 'https://github.com/akuity-cluster-addons-workshop/control-plane'
    targetRevision: 'HEAD'
    ref: values
The first source is for the Helm chart repository, which uses the addonChartVersion from the generator as the targetRevision for the Helm chart.
Then, each cluster can specify overrides to the defaults values with a file with the same name as the add-on in the clusters/<cluster-name>/addons/ folder (e.g. for the prod cluster and cert-manager add-on, the values file would be clusters/prod/addons/cert-manager.yaml).
clusters/
  dev/
    addons/
      cert-manager.yaml
The second source will fetch the cluster-specific values file from the GitOps repository for use with the first source. The ref value in the second source sets the name (values) to target files in it from other sources. The first source uses this in the helm.valueFiles to tell Argo CD to reference the second source as the root and then includes the path to the values file in that source.
ref: values
#...
helm:
  valueFiles:
  - '$values/clusters/{{.name}}/addons/cert-manager.yaml'
3.2. Enable the cert-manager Add-on for dev
You'll start by deploying the cert-manager add-on for the dev cluster by adding the enable_cert_manager: true label to the cluster configuration.
- CLI
- Dashboard
Run the following command:
akuity argocd cluster update \
  --instance-name=cluster-addons dev \
  --label enable_cert_manager=true
-
Navigate to the
Clusters dashboard for your Argo CD instance on the Akuity Platform. -
Click the settings cog on the right side of the
devcluster. -
Under the "Labels" section click
Add Label . -
Set the key to
enable_cert_managerand the value totrue -
Click
Update Cluster .
Return to Argo CD UI to see the cluster-addons ApplicationSet immediately create the addons-dev-cert-manager Application, which will deploy cert-manager to the dev cluster.
It's using the Helm Umbrella chart from the charts/add-ons/cert-manager folder of the control-plane repo.
4. Deploying Applications
4.1. cluster-apps ApplicationSet
The apps are unique to each cluster, so they are located in cluster/<cluster-name/apps folder.
Similar to the cluster-addons ApplicationSet, the cluster-apps ApplicationSet uses the cluster generator to create an Application for each cluster.
generators:
- clusters:
    selector:
      matchExpressions:
      - {key: 'akuity.io/argo-cd-cluster-name', operator: NotIn, values: [in-cluster]}
      - key: ready
        operator: In
        values: ['true']
Using the same selector technique, the creation of the Application is gated using the ready: true label in the cluster configuration. Once the cluster contains this label, the ApplicationSet generates an app-<cluster-name> Application which points to the cluster/<cluster-name>/apps folder (using the name attribute supplied by the cluster generator).
metadata:
  name: 'apps-{{name}}'
...
  source:
    repoURL: https://github.com/akuity-cluster-addons-workshop/control-plane
    targetRevision: HEAD
    path: 'clusters/{{name}}/apps'
The Application is configured to take any plain Kubernetes manifest in the folder and deploy it to the Argo CD control-plane (i.e. the in-cluster destination in the argocd namespace). Therefore, it is expected to contain Argo CD manifests (e.g. Application, ApplicationSet, and AppProject).
source:
  ...
  directory:
    recurse: true
destination:
  name: 'in-cluster'
  namespace: 'argocd'
4.2. Mark the Cluster as Ready
Now that the add-ons have been deployed to the cluster, you'll add the ready: true label to the cluster configuration mark the cluster as ready for Applications.
- CLI
- Dashboard
Run the following command:
akuity argocd cluster update \
  --instance-name=cluster-addons dev \
  --label ready=true
-
Navigate to the
Clusters dashboard for your Argo CD instance on the Akuity Platform. -
Click the settings cog on the right side of the
devcluster. -
Under the "Labels" section click
Add Label . -
Set the key to
readyand the value totrue -
Click
Update Cluster .
Return to Argo CD UI to see the cluster-apps ApplicationSet immediately create the guestbook-dev Application from the clusters/dev/apps/ folder in the control-plane repo.