Kargo Quickstart
This quickstart will walk you through implementing Kargo with the Akuity Platform, to manage the promotion of applications in a declarative fashion.
After completing this tutorial, you will have a Kubernetes cluster, with Applications deployed using an Argo CD control plane, and environment promotions managed by Kargo.
- 1. Prerequisites
- 2. Setting up Your Environment
- 3. Using Kargo For Promotions
- 4. Integrating Argo CD
- 5. Summary
1. Prerequisites
To follow this tutorial make sure you have minimal working knowledge of the following concepts:
The tutorial requires that you also have a GitHub Account. You will use it to:
- host a public repo for Argo CD and Kargo
- utilize GitHub Codespaces for the workshop environment. Ensure that you have a quota available. The free tier includes 4 vCPU at 30 hours a month.
- create a free account on the Akuity Platform.
The tutorial was written and tested using the following tool and component versions:
- Argo CD: v2.10.1
- Kargo: v0.5.2
- Docker Desktop: 4.13.1
- Kubernertes: v1.29.1
- kind: v0.22.0
1.1. GitHub PAT Setup
A GitHub Personal Access Token (PAT), is needed for creating/updating/pushing images and image changes to the GitHub Container Registry (ghcr). Kargo also needs this PAT to write back changes to the GitHub repo we will be working with.
- Navigate to https://github.com/settings/tokens/new.
- Or from the UI:
- https://github.com/settings/profile
Developer settingsat the bottom of the left hand menuPersonal access tokens->Tokens (classic)Generate new token->Generate new token (classic)
- Set
Note tokargo-quickstart. - Set the
Expiration to7 days. - Under "Select scopes", select:
repowrite:packagesuser:email
- Click
Generate token at the bottom of the page. - Copy the generated PAT.
2. Setting up Your Environment
In this section, you will be setting up your test environment using GitHub Codespaces and setting up an account on the Akuity Platform.
2.1. Create the Repository from a Template
We have created a sample repo that holds everything you need in order to get started with Kargo. We will also be using this repo in a Codespace as a test environment.
-
Click this link or click "Use this template" from the
https://github.com/akuity/kargo-quickstart-templaterepo main page. -
Ensure the desired "Owner" is selected (e.g., your account and not an organization).
-
Enter a unique name for the "Repository name".
-
Then click
Create repository from template . -
Next, you will start a new Codespace by clicking the green
Code button on the repo page, selecting theCodespaces tab, and then selectingCreate codespace on main .
If you have other Codespaces running, you may run into usage limits. Shutdown Codespaces that you are not using, while doing this tutorial.
The Codespace will open in another browser tab with information about the progress of setting it up. Once it is done, you should see a terminal in the browser with the repo open.
2.1.1. Verify Environment
Part of the Codespace setup was to install all necessary tools, which includes setting up kind, kubectl, and kargo cli tools. You can verify that the environment is ready by going through the following steps:
-
Verify that
k3dis installed and running a Kubernetes cluster.k3d cluster listYou should see the following output:
NAME               SERVERS   AGENTS   LOADBALANCER
kargo-quickstart 1/1 0/0 true -
Check that the cluster works by running
kubectl get nodes.% kubectl get nodes
NAME STATUS ROLES AGE VERSION
k3d-kargo-quickstart-server-0 Ready control-plane,master 64s v1.28.8+k3s1Fetching the nodes will demonstrate that
kubectlcan connect to the cluster and query the API server. The node should be in the "Ready" status. -
Export your GitHub PAT in the
KARGO_QUICKSTART_PATenvironment variable.export KARGO_QUICKSTART_PAT=<your github pat>You will be using your GitHub PAT later in this tutorial.
2.1.2. Create Image Repository
This tutorial will show you how to promote image updates with Kargo. This means we will be using an image in your GitHub Container Registry (ghcr).
The free tier of ghcr is capped at 500MB images. This is enough for what you are going to be testing with. If you run into any issues, please check your Packages tab in your GitHub account page found on https://github.com/<your-username>
The easiest way to create a new ghcr.io image repository is by retagging/pushing an existing image with your GitHub username.
-
Login to
ghcrusing your GitHub Username and your GitHub PATdocker login --username ${GITHUB_USER} --password ${KARGO_QUICKSTART_PAT} ghcr.io -
Create the example image in your account using the
docker buildx imagetoolscommand.docker buildx imagetools create ghcr.io/akuity/guestbook:latest -t ghcr.io/${GITHUB_USER}/guestbook:v0.0.1You will now have a guestbook container image repository
https://github.com/users/${GITHUB_USER}/packages/container/package/guestbook
2.2. Akuity Platform Sign Up
In this scenario you will sign up for the Akuity Platform and create a Kargo instance.
As GitHub is being used to host our sample environment, the Akuity Platform will be used to host our Kargo instance. To do that, you will have to sign up for a free trial.
-
Create an account on the Akuity Platform.
-
To log in with GitHub SSO, click "Continue with GitHub".
You can also use Google SSO or an email and password combination.
- Set up an
Organization .
Before you create a Kargo instance, you will need to create an organization (if you do not already have one).
-
Click the
create or join link. -
Click
+ New organization in the upper right-hand corner of the dashboard. -
Name your organization following the rules listed below the
Organization Name field.
2.3. Create a Kargo Instance
-
Navigate to
Kargo . -
Click
+ Create in the upper right-hand corner of the dashboard. -
Name your instance following the rules listed below the
Instance Name field. -
(Optionally) Choose the Kargo version you want to use. It is recommended to use the default one.
-
Click
Create .
It will take several seconds to create your new Kargo instance (See
2.4. Connect a Kargo Agent
After your new Kargo instance is created successfully ( See
-
Navigate to
Kargo →your instance →Agents . -
Click
+ Register an agent to add a Kargo Agent. -
Input your
Agent Name . -
Leave
Self-hosted Kargo Agent disabled.
You can also self-host the Kargo agent on your own Kubernetes cluster. This is usually needed when your cluster is behind a firewall. You do this by enabling the Self-hosted Kargo Agent option.
Select the self-hosted agent option if Kargo needs to run Kubernetes Jobs as part of testing/verification, or if Kargo needs to interface with private, self-hosted services including:
- private Git servers
- internally accessible metric providers (e.g. self-hosted Prometheus)
- self-managed Argo CD
- Leave
Akuity Managed Argo CD empty for now.
Kargo can interface with Argo CD instances to sync applications, reflect application health, and verify successful sync operations during promotion.
-
Leave
Set as Default Shard enabled. -
Click
Connect .
After installing the agent into your Kargo instance, you should see the agent listed in the Akuity dashboard go from Progressing to a green heart icon with the status of Healthy next to the agent name.
2.5. Enable the Kargo admin Account
The Kargo instances you create inside the Akuity Platform do not enable the admin user by default. For this tutorial, we will need to enable the admin account.
To enable the admin user on a Kargo instance:
-
Navigate to
Kargo →your instance →Settings →System Accounts . -
Enable the
Admin Account switch. -
Specify a custom password and click
Save
2.6. Accessing Kargo
Kargo comes with a feature-rich web UI that can be used to manage and visualize your CD pipelines. We will be using both the web-based UI and CLI to interact with Kargo.
2.6.1. Kargo Web UI
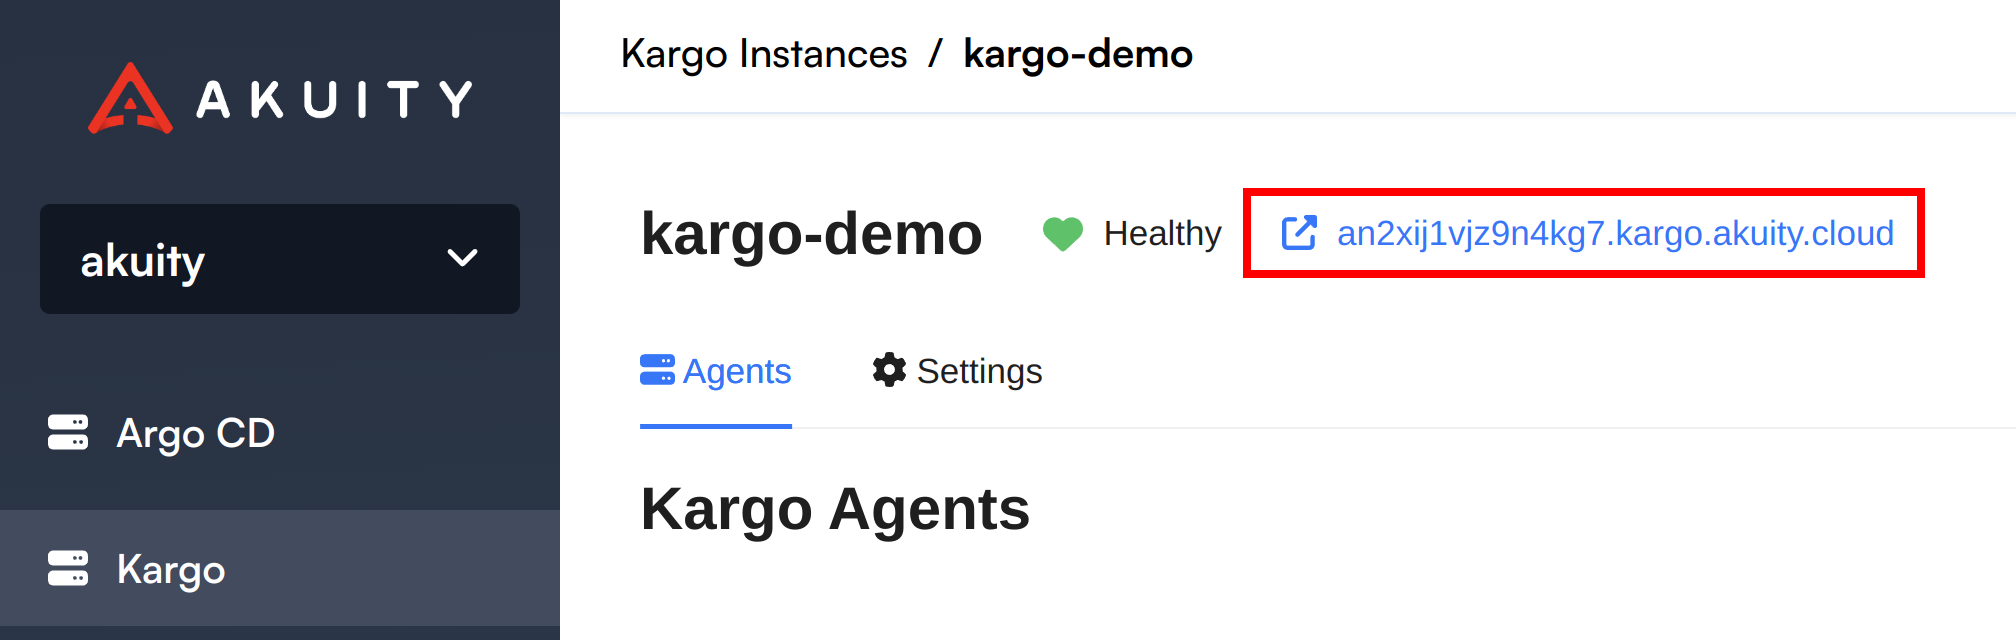
-
Click on the
instance-id.kargo.akuity.cloud . -
Log in with the username
adminand the password set in the enabling theadminuser section.
2.6.2. Kargo CLI
Since the kargo CLI is going to be used, we will need to set it up.
The kargo CLI is already preinstalled in the Codespace. You can log in by using the kargo login command.
kargo login <instance_url> \
--admin \
--password <password>
3. Using Kargo For Promotions
Kargo handles promotion by monitoring repositories (Git, Image, Helm) for changes and making the necessary commits to your Git repository, leaving the reconciliation to the Argo CD GitOps controller. Furthermore, Kargo will also verify these promotions once they are deployed.
For more information about Kargo and the concepts behind it, please see the official documentation
In the following sections, you will explore how Kargo handles stage-to-stage promotions using GitOps.
3.1. Adding Repository Secret
In order for Kargo to manage the progression of Freight from stage to stage, Kargo will often require read/write permissions on private GitOps repositories and read-only permissions on private container image and/or Helm chart repositories.
Also, Kargo has a concept called a
Since Kargo needs to write back to the Git repository, it will need access to the GitHub PAT to interact with it.
Make sure you are logged-in to the Kargo API as described in the Kargo CLI section
-
Create a Kargo
Project calledkargo-simplekargo create project kargo-simple -
Create Git credentials with the
kargoCLI in thekargo-simpleproject.kargo create credentials github-creds \
--project kargo-simple --git \
--username ${GITHUB_USER} --password ${KARGO_QUICKSTART_PAT} \
--repo-url https://github.com/${GITHUB_REPOSITORY} -
Create Image credentials with the
kargoCLI in thekargo-simpleproject.kargo create credentials ghcr-creds \
--project kargo-simple --image \
--username ${GITHUB_USER} --password ${KARGO_QUICKSTART_PAT} \
--repo-url ghcr.io/${GITHUB_USER}/guestbook
3.2. Kargo Setup
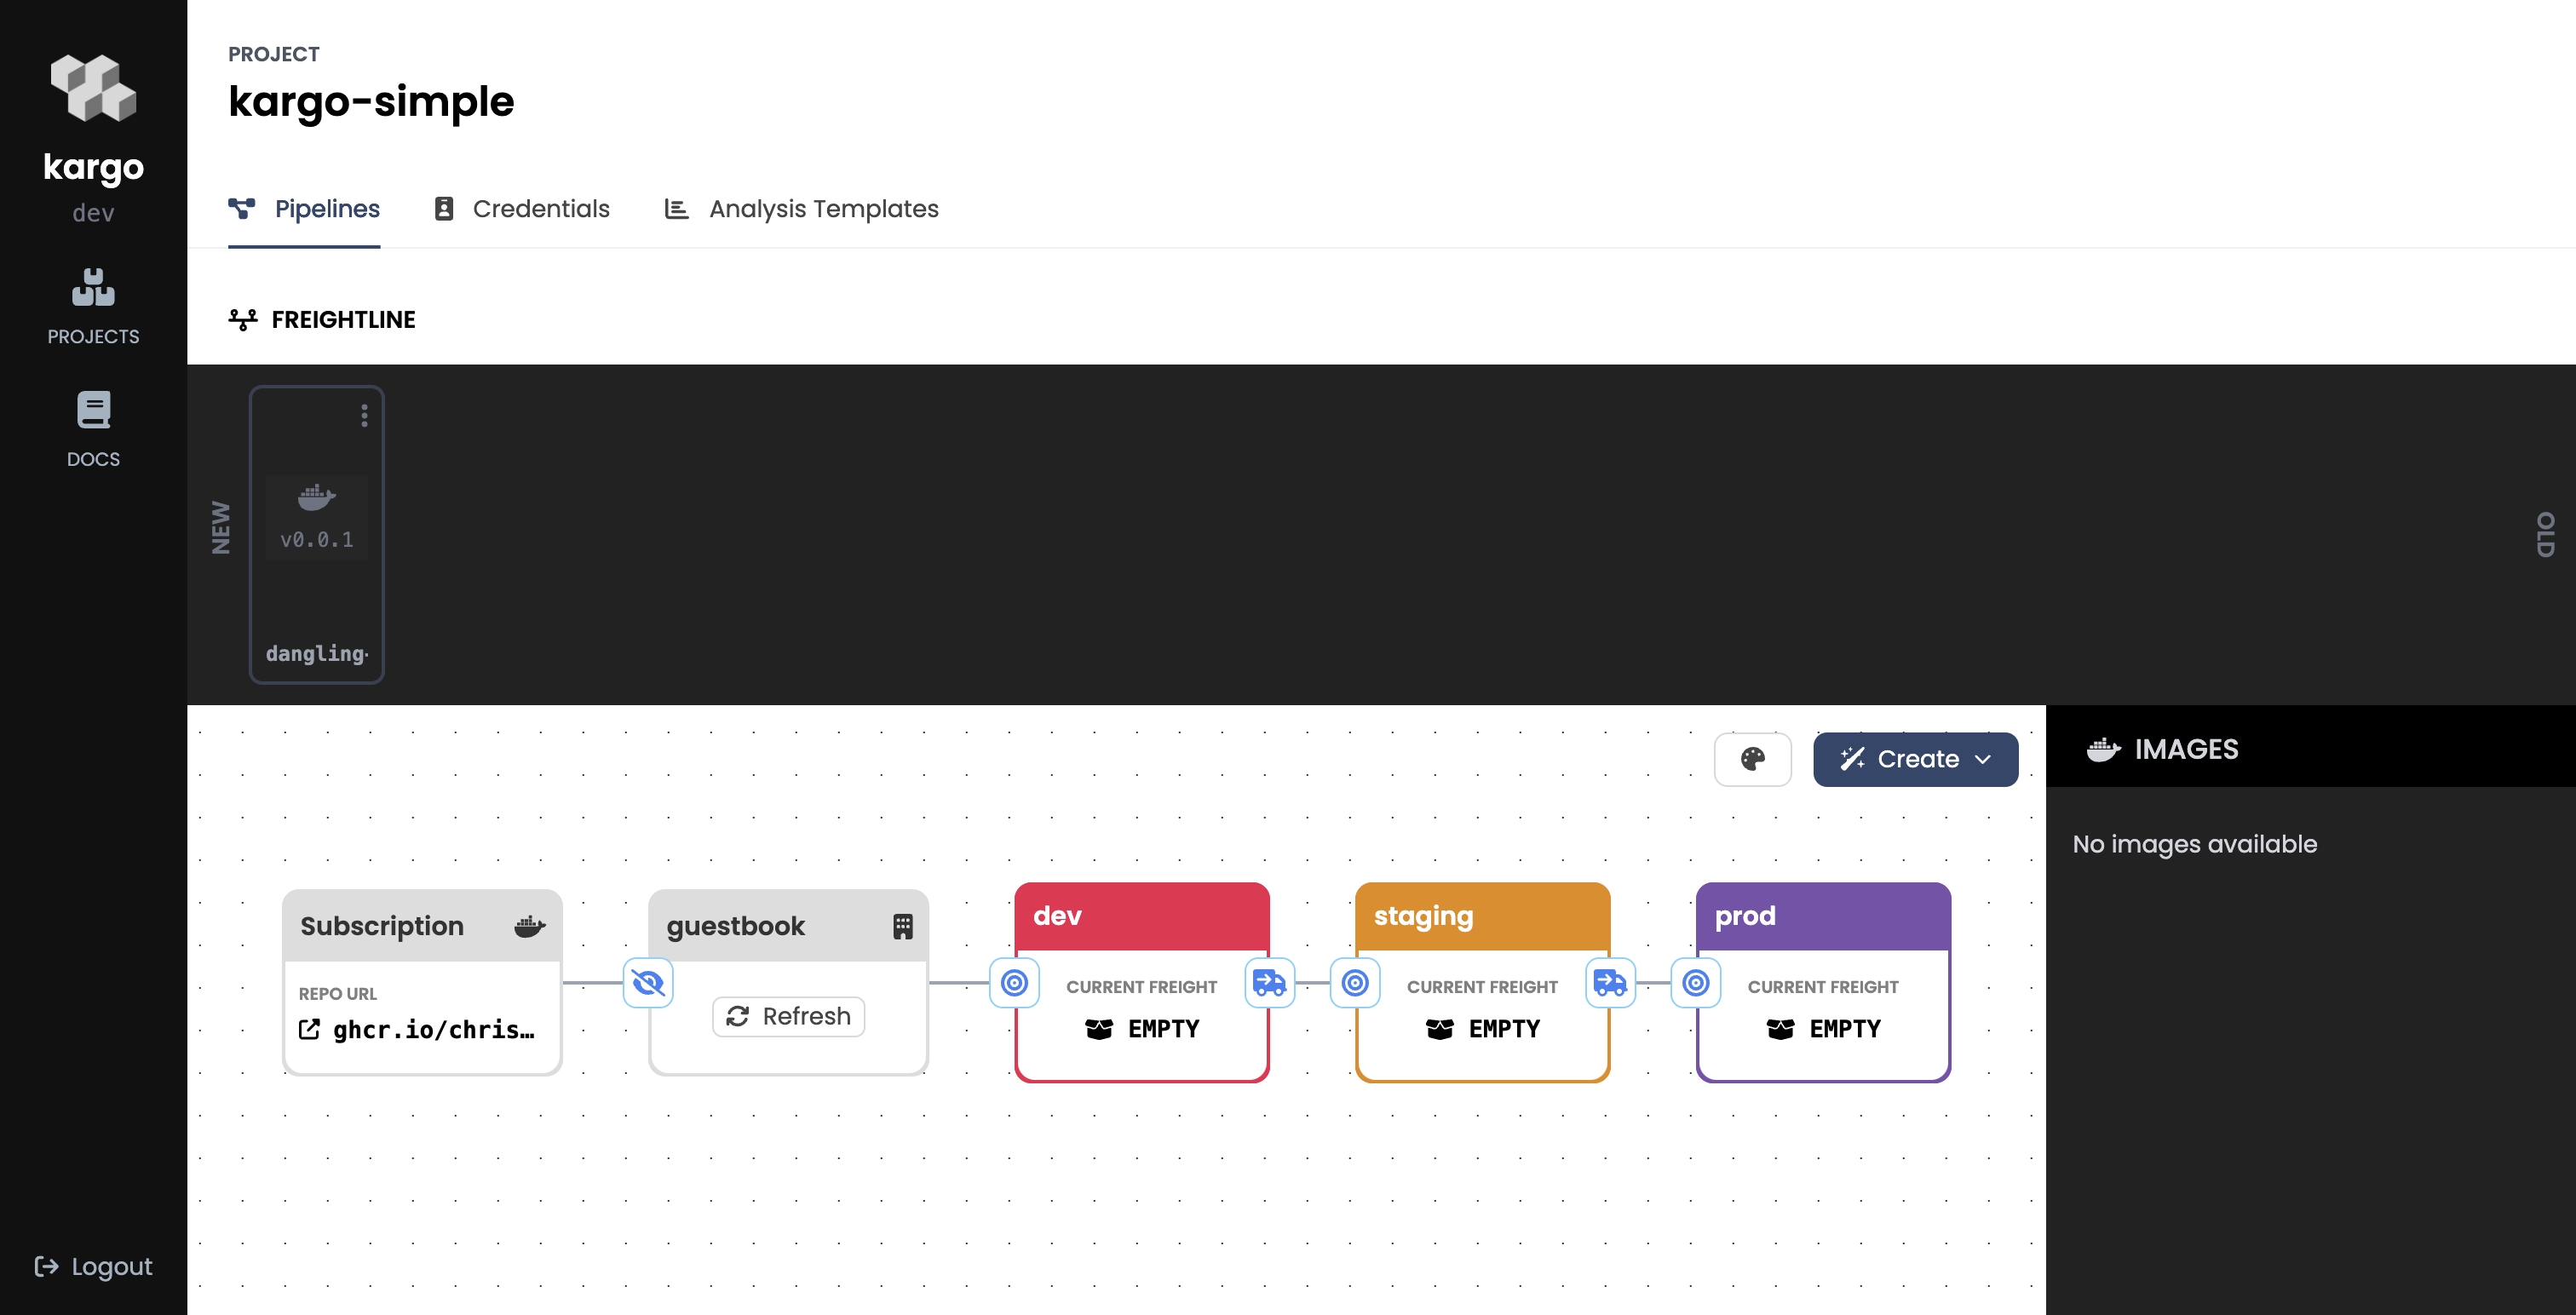
This section focuses on getting Kargo-specific objects created. In the end of this section, you will have a CD Pipeline made possible by Kargo primitives that will be set up along this section of this quickstart tutorial. In the end, there will be a Project (which we covered in the previous section), Warehouse, and Stages
3.2.1. Kargo Project
In the section where your GitHub PAT was added to Kargo, we went through the concept of a Project. To reiterate, a Kargo Project is a logical collection of related objects; it is also the basic level of organization and tenancy. Furthermore, RBAC rules are also defined at the project level and project administrators may use projects to define policies, such as whether a stage is eligible for automatic promotions of new freight.
In the previous section a Kargo Project called kargo-simple was created using the kargo CLI; and a walkthrough how you can create a Project in the Kargo UI was also demonstrated. However, you can also create a Project declaratively.
In the root of the Git repository you created based on the template, you should see the following file kargo/project.yaml.
apiVersion: kargo.akuity.io/v1alpha1
kind: Project
metadata:
  name: kargo-simple
Applying this declaratively, would look something like this.
-
Ensure you are logged into your Kargo instance
kargo login <instance_url> \
--admin \
--password <password> -
Create Git credentials with the
kargoCLI in thekargo-simpleproject.kargo apply -f ./kargo/project.yaml
💡 It is OK to run kargo apply even if you have already created the Project
You should be able to see the kargo-simple listed when you run the kargo get projects command.
$ kargo get projects
NAME           PHASE   AGE
kargo-simple   Ready   22h
3.2.2. Kargo Warehouse
A Kargo Warehouse is where promotable artifacts are staged before they move into the CD Pipeline. Before we get into what a Warehouse is, it is important that you know what a Freight is.
Freight is a set of references to one or more versioned artifacts, which may include one or more Container Images, Kubernetes Manifests from Git, and/or Helm Charts. A collection of these versioned artifacts is what is known as Freight, and it is promoted together as a single promotable unit. You can think of Freight as a "meta-artifact".
Now that you are familiar with Freight, you can understand what a Kargo Warehouse is. A Warehouse not only stages Freight, but it also defines where this Freight comes from via a subscription. A subscription defines where a particular artifact comes from along with any filtering rules.
In the root of the Git repository you created based on the template, you should see the following Warehouse file kargo/warehouse.yaml.
apiVersion: kargo.akuity.io/v1alpha1
kind: Warehouse
metadata:
  name: guestbook
  namespace: kargo-simple
spec:
  subscriptions:
  - image:
      repoURL: ghcr.io/${GITHUB_USER}/guestbook
      tagSelectionStrategy: SemVer
In this scenario, the Warehouse will be subscribed to the ghcr image repo we created earlier. We are using a filtering rule of tagSelectionStrategy set to SemVer, meaning that Kargo will only look for new images that are tagged using Semantic Versioning
For more information about Warehouse filtering rules see the official documentation.
-
Create the
Warehouseby applying the manifest in your repository.kargo apply -f ./kargo/warehouse.yaml -
Verify that the
Warehousewas created with thekargo get warehousescommand.kargo get warehouses --project kargo-simple
NAME SHARD AGE
guestbook 14m
3.2.3. Kargo Stages
Kargo Stages are a key component to a Kargo CD Pipeline. With traditional CI/CD pipelines, the objective is to promote something from environment to environment. When you hear the term "environment", what you envision will depend significantly on your perspective. A developer may think "It's this specific version of the app that's running" and someone in Operations may think "It's a collection of VPCs, Firewall Rules, and a Region in the Cloud".
To eliminate confusion, Kargo avoids the term "environment" altogether in favor of stage.
The important feature of a stage is that its name ("test" or "prod," for instance) denotes an application instance's purpose and not necessarily its location.
What is important to note is that a Kargo CD Pipelines are created by linking Stages and Warehouses together to create a DAG for your delivery pipeline. Promotion of artifacts moves them into their respective Stages by verifying that they were promoted successfully in the previous step.
In short:
Stages subscribe to aWarehouseto get promotable artifactsStages can also subscribe to one or many otherStage(s) to get those same artifacts.
In the root of the Git repository you created based on the template, you should see the following Stages file kargo/stages.yaml.
Take a look at the first Stage called dev
apiVersion: kargo.akuity.io/v1alpha1
kind: Stage
metadata:
  name: dev
  namespace: kargo-simple
  annotations:
    kargo.akuity.io/color: red
spec:
  requestedFreight:
  - origin:
      kind: Warehouse
      name: guestbook
    sources:
      direct: true
  promotionMechanisms:
    gitRepoUpdates:
    - repoURL: https://github.com/${GITHUB_USER}/${GITHUB_REPO}
      writeBranch: main
      kustomize:
        images:
        - image: ghcr.io/${GITHUB_USER}/guestbook
          path: app/env/dev
Here, the dev Stage is subscribed to the Warehouse we just created (where the Warehouse is subscribed to the Image repository). When the artifacts are promoted, Kargo runs a kustomize edit set image (denoted in the .spec.promotionMechanisms) in the specified Git repository to the specified path. In short, Kargo commits new image versions back into a respository.
The dev Stage gets its artifacts from the Warehouse; but the downstream Stages get those same artifacts presented to them only by subscribing to each other.
For example, the staging Stage is subscribed to the dev Stage
apiVersion: kargo.akuity.io/v1alpha1
kind: Stage
metadata:
  name: staging
  namespace: kargo-simple
  annotations:
    kargo.akuity.io/color: amber
spec:
  requestedFreight:
  - origin:
      kind: Warehouse
      name: guestbook
    sources:
      stages:
      - dev
# ...snip
And the prod Stage is subscribed to the staging Stage
apiVersion: kargo.akuity.io/v1alpha1
kind: Stage
metadata:
  name: prod
  namespace: kargo-simple
  annotations:
    kargo.akuity.io/color: violet
spec:
  requestedFreight:
  - origin:
      kind: Warehouse
      name: guestbook
  sources:
    stages:
    - staging
  promotionMechanisms:
    gitRepoUpdates:
    - repoURL: https://github.com/${GITHUB_USER}/${GITHUB_REPO}
      writeBranch: main
      kustomize:
        images:
        - image: ghcr.io/${GITHUB_USER}/guestbook
          path: app/env/prod
      pullRequest: {}
Another thing to notice is that the prod Stage is configured to create a pull request, instead of committing directly to the tracked branch. We will go over this in a later section of this tutorial.
-
To create the
Stages, apply the manifest in your repository.kargo apply -f kargo/stages.yaml -
Verify that the
Stages were created with thekargo get stagescommand.kargo get stages --project kargo-simple
NAME SHARD CURRENT FREIGHT HEALTH PHASE AGE
dev NotApplicable 20s
staging NotApplicable 20s
prod NotApplicable 20stipThe
SHARDcolumn shows which agent is reconciling each Stage. Stages without a shard assignment use the default shard. To assign a Stage to a specific agent, setspec.shardin your Stage manifest. This is particularly important for Stages with verification that require in-cluster resources. See Shards and Agents for more information.
You should see all 3 stages created. When you look at the Kargo UI, you should see the following
3.3. Promoting with Kargo
In this section we will be promoting the image we created in the ghcr repo in the Create Image Repository section.
3.3.1. Image Promotion
In this section we will be using Kargo to promote the image you created earlier.
After you navigate to your Kago instance UI:
-
Click on your
kargo-simpleProject. -
Click on the
icon on the devStageto initiate promotion. -
Click on the available freight (there should only be one).
-
Click on
YESto confirm promotion -
The promotion will be progressing as indicated by the
icon. -
When checking your Git repository, you will notice that Kargo committed back to the repository using
kustomize. -
In the Kargo UI, repeat the steps to promote the freight into the
stagingStage. -
Note that the freight will be color-coded to show which stage the artifacts are in.
3.3.2. Promoting Image Update
Now we will simulate a release and use Kargo to promote that update using the same CD Pipeline.
-
To simulate a release, simply retag an image with a newer semantic version using the
docker buildx imagetoolscommand.docker buildx imagetools create ghcr.io/akuity/guestbook:latest -t ghcr.io/${GITHUB_USER}/guestbook:v0.0.2 -
On the Kargo UI, click on the
Refreshbutton on theWarehouseto tell Kargo to fetch moreFreight.
Kargo will produce Freight even if you don't refresh since Kargo runs a loop to check for new Freight!
-
Click on the
icon on the devStageto initiate promotion. -
Click on the newly available
Freight(tagged withv0.0.2that you just created) -
Click on
YESto confirm promotion -
The promotion will be progressing as indicated by the
icon. -
Note that the new
Freightwill be color-coded to show which stage the artifacts are in.
3.3.3. Pull Request Promotions
In the Kargo Stages section, you had an overview of what a Stage is and how it is used for promotions. Specifically, how Kargo commits changes back to the specified Git repository. You can also configure the Stage to have Kargo submit a PR instead of a direct commit.
Taking another look at the Stages file kargo/stages.yaml. You will see the following in the prod Stage.
spec:
  promotionMechanisms:
    gitRepoUpdates:
    - repoURL: https://github.com/<repo>
      # snipped for brevity
      pullRequest: {}
Part of the configuration has the pullRequest option, which instructs Kargo to perform a pull request instead of directly commiting. In this seciton, you will see how this works.
-
Click on the
icon on the prodStageto initiate promotion. -
Note that only freight that has been verified in the
stagingStageis available forprod. -
Click on the available freight.
-
Click on
YESto confirm promotion -
The promotion will be progressing as indicated by the
icon. -
Navigate to your Git repository and click on Pull requests
-
Note that a new pull request was created - merge it.
-
Navigate back to the Kargo UI and see that the
Freightis now in theprodStage.
4. Integrating Argo CD
So far, you have been working on Kargo on its own. The real power comes from using Kargo with a GitOps controller (which does the deployment). In this section, Kargo will be integrated with Argo CD to demonstrate an end-to-end GitOps Continuous Promotion pipeline.
4.1. Making the Image Public
When you created the ghcr.io/${GITHUB_USER}/guestbook image in the Create Image Repository section, that image (by default) has its visibility set to "private". This is not an issue when you are using Kargo, as you saw in the Adding Repository Secret section.
Setting up Kubernetes to deploy workloads from a private image is a little more complex and setting up Kuberentes to pull from a registry with private images is beyond the scope of this tutorial. Therefore, you will have to make this image public for the rest of this quickstart.
-
Navigate to your package setting for the image by going to
https://github.com/users/${GITHUB_USER}/packages/container/package/guestbook -
Scroll down and click on
Change visiblility. -
Click on
Public. -
Type the name of the image,
guestbook, to confirm. -
Click on
I understand the consequences, change package visibility. -
Your image is now public.
4.2. Creating an Argo CD Instance
Creating and configuring an Argo CD instance on the Akuity Platform is beyond the scope of this tutorial. So a script has been provided to expedite the process. You will need to create an Akuity Platform token before you run the script.
If you are interested in learning more about managing Argo CD with the Akuity Platform, we recommend going through the Introduction to Argo CD and Advanced GitOps Workshop tutorials.
-
On the Akuity Platform, navigate to
Organization →API Keys →+ New Key -
Enter a description for your key.
-
Set the expiration to
7dfor 7 days. -
Click on
🔑Owner -
Click on
Create -
Make a note of the
AKUITY_API_KEY_IDandAKUITY_API_KEY_SECRETand clickDone -
Navigate to your codespace and run
export AKUITY_API_KEY_ID=<your key id>andexport AKUITY_API_KEY_SECRET=<your key secret> -
Run
bash scripts/setup-argocd-instance.sh. The script can take up to two minutes to run. -
Once the script is done, go back to the Akuity Platform, and navigate to
Argo CD →on the newly created Argo CD instance. -
Enter
adminas theusername andakuity-argocdas thepassword and then clickSIGN IN . -
Note that Applications were created as part of the script.
4.3. Kargo Integration
Integrating Kargo and Argo CD together is easy with the Akuity Platform. The integration is a two-step process first consisting of a change on the Akuity platform and the other a change being a manifest update.
4.3.1. Kargo Agent Setup
In a previous section, you set up a Kargo Agent. In order to connect an Argo CD instance, an agent needs to be created for it.
-
On the Akuity Platform, click on
Kargo -
Select your Kargo instance.
-
Click on
Agents -
Click on
+ Register an agent -
Name your agent (for example: my-argocd-agent).
-
Click on the
Akuity Managed Argo CD dropdown. -
Select the Argo CD instance that was created.
-
Enable
Set as Default Shard -
Click on
Connect . The agents will go from "Progressing" to "Healthy". -
(Optionally) You can safely delete the other agent if you like.
4.3.2. Update Kargo Stages
The next step is to update all the Stages to their corresponding Argo CD Applications. To do this you will have to add appName: <yourappname> under spec.promotionMechanisms.argoCDAppUpdates. In this scenario, we will be setting up a 1:1 configuration between Kargo Stages and Argo CD Applications. However, you can have a Kargo Stage manage multiple Argo CD Applications.
spec:
  promotionMechanisms:
    argoCDAppUpdates:
      - appName: myappname
For more information on Kargo Stage/Argo CD App configuration, see the offical CRD docs.
To update the Kargo Stages, we will be using a script to expedite the process. Feel free to look at the script, it is a simple patch of the manifests.
-
Navigate to the Codespace.
-
Run
bash scripts/kargo-argocd-manifestupdate.shto update the manifests. -
Navigate back to the Kargo UI
-
Select a stage, for example the
dev -
In the overview page, note that the Argo CD Application has been linked.
-
(Optionally) Check the other stages and their linked Argo CD Applications.
4.3. Promoting with Kargo
Now that Kargo and Argo CD are integrated, Kargo can promote a change by not only writing back to Git; but also trigger and Argo CD Application Sync.
-
Navigate to your Codespace and simulate a release by creating a new build.
docker buildx imagetools create ghcr.io/akuity/guestbook:latest -t ghcr.io/${GITHUB_USER}/guestbook:v0.0.3 -
Back on the Kargo UI, click on the
Refreshbutton on theWarehouseto tell kargo to fetch more freight. -
Click on the
icon on to initiate promotion. -
Select the new
Freightto promote. -
Click on "YES" to confirm the promotion.
-
Navigate to the Argo CD UI and note that Kargo has triggered a sync once it promoted the
Freight. -
Back in the Kargo UI, the Kargo
Stagenow reflects the status of the artifacts of theFreightand where they are running.
Feel free to explore promoting all the way down the pipeline, rollback, create new Freight, and add more Argo CD Applications for Kargo to manage their promotion.
5. Summary
You have reached the end of the quickstart. You now have a Kargo instance managaing image promotions with integration with an Argo CD instance managing the deployment of those promotions.
This is just the beginning and by now you might be able to see more complex deployment processes being managed easily with Kargo.