Microsoft Entra ID (Azure AD)
Configure Microsoft Entra ID, formerly known as Azure AD, as the Single Sign-On provider for your organization on the Akuity Platform.
There are three ways to connect Entra ID. Pick one:
| Method | Connector type | Azure object | Credential | Groups sourced from | Admin consent |
|---|---|---|---|---|---|
| Native OIDC | OIDC | App registration | Client ID and secret | ID-token claim, 200-group limit | Not required |
| Native SAML | SAML | Enterprise application (non-gallery) | Signing certificate, via metadata XML | SAML assertion, 150-group limit | Not required |
| Microsoft Connector | Azure Ad | App registration | Client ID and secret | Microsoft Graph API, no token limit | Required — Directory.Read.All |
Native OIDC is the right default for most organizations: it supports group claims and needs no tenant admin consent. Choose Native SAML if your organization standardizes on SAML 2.0. The Microsoft Connector is the simplest to configure — no discovery URL, metadata XML, or token-claim setup — but it is the only option that requires tenant admin consent.
An organization can have only a single SSO connection. If your organization already has one configured, you must delete it before adding another.
Because only one SSO connection is allowed, changing methods means deleting your existing configuration. While you make the change, keep a separate browser session logged in through your current non-SSO login. If the new configuration is wrong and you have no other way in, you will need to contact support.
Akuity Platform SSO is available on Enterprise plans only. Please contact our Sales Team to access the feature.
The owner role on the Organization is required to configure SSO.
Native OIDC
Connect Entra ID through the generic OpenID Connect connector, which talks directly to Entra ID's OIDC endpoints. This method supports group claims and needs no admin consent.
Before you start, you also need:
- Azure Entra ID access with permission to create App registrations
- A user account whose Email (
mail) attribute is populated in Entra ID — see Step 6, the most common cause of failure
Step 1: Verify your domain
SSO matches users by email domain, so the domain must be verified first.
-
In the Akuity Portal, go to Organization → Settings → Domain.
-
Add your domain (for example,
yourcompany.com) under New Domain Aliases. -
Submit it for verification.
See Domain Verification for the full process.
For security purposes, your domain and domain aliases will be submitted to Akuity for manual review and approval.
Wait until the status shows Verified before configuring SSO.
Step 2: Note the callback URL
-
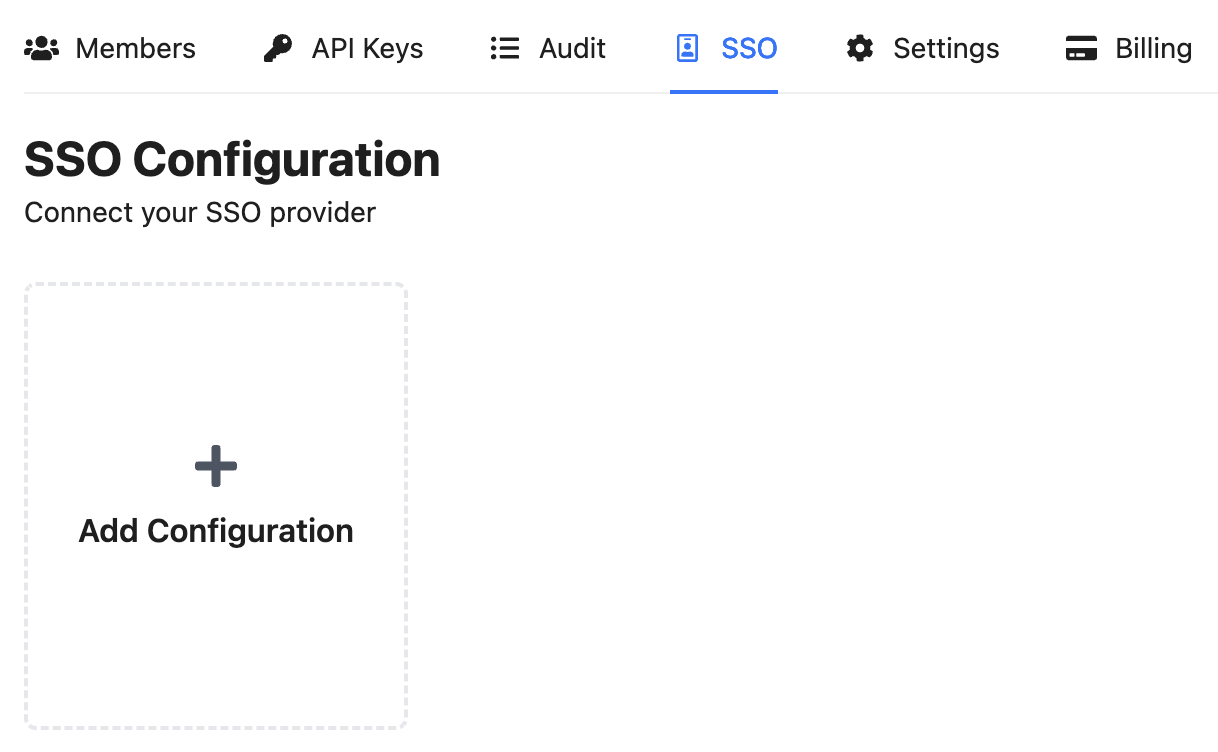
Go to Organization > SSO.
-
Click Add Configuration.
-
Set Type to OIDC.
-
Find the Callback URL field. This is the redirect URI you must register in Azure:
https://auth.akuity.io/login/callback
The field is read-only — it tells you what to register in your IdP. Copy it and leave the form open; you will return to it in Step 7.
Step 3: Register an application in Azure Entra ID
-
Log in to the Azure Portal.
-
Navigate to Microsoft Entra ID → App registrations.
-
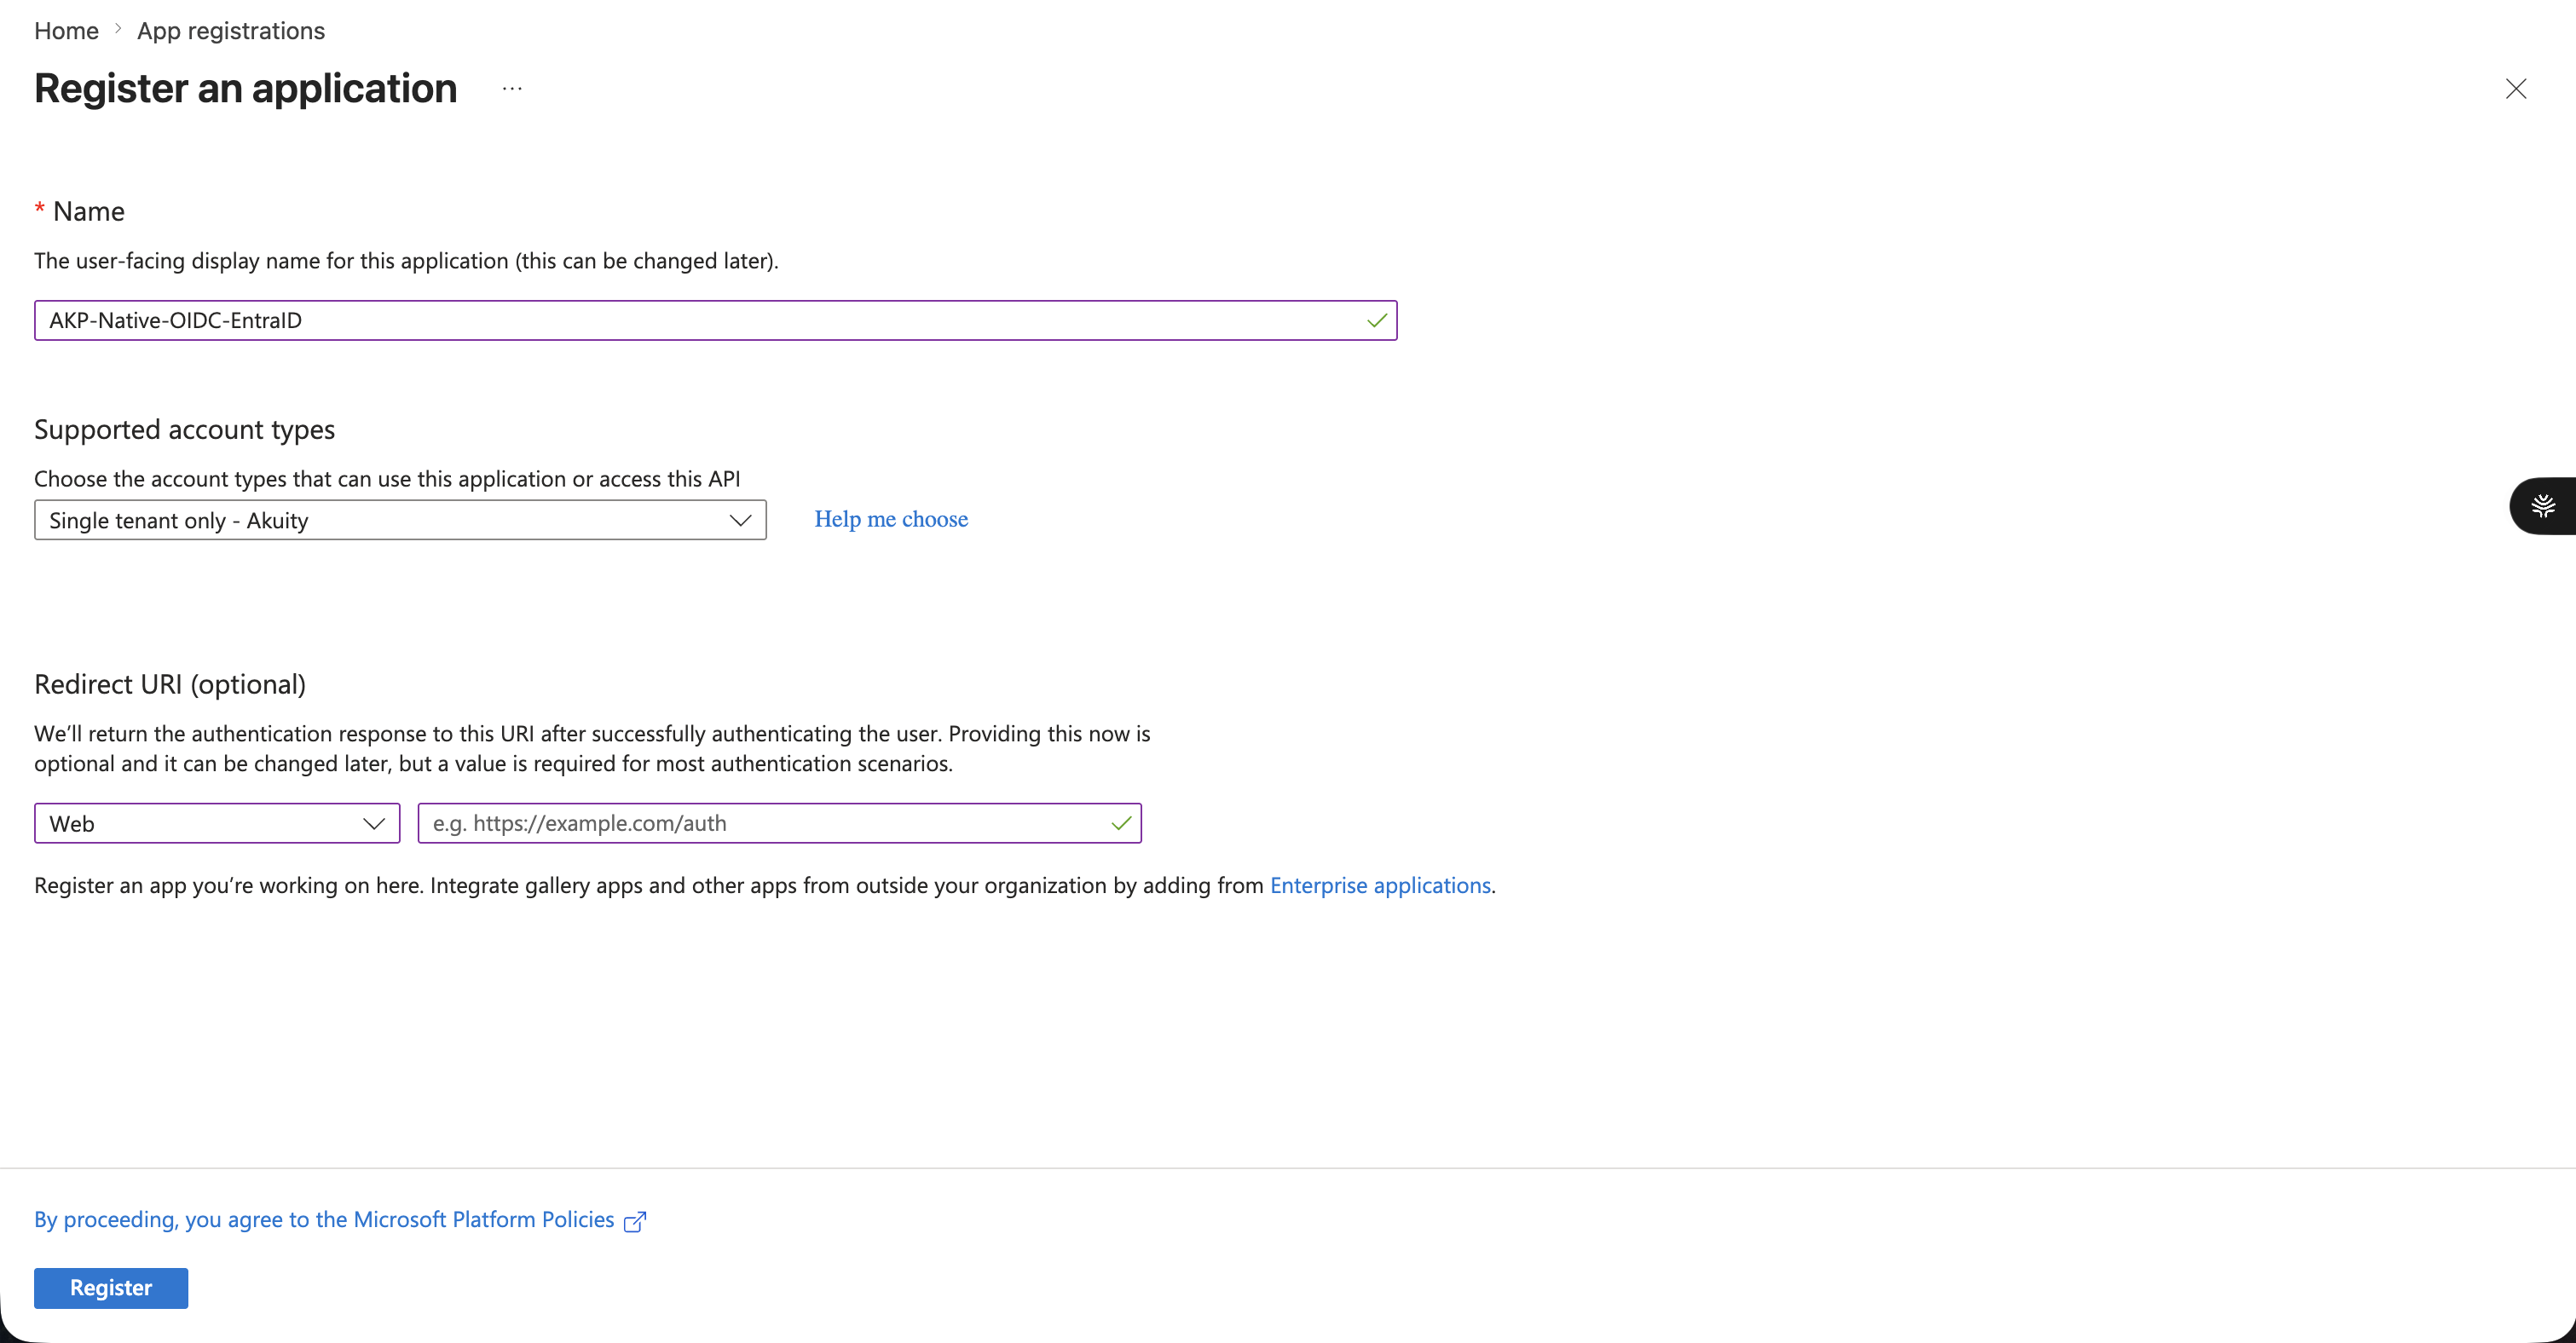
Click + New registration.
-
Fill in the form:
- Name: a descriptive name, for example
AKP-Native-OIDC-EntraID - Supported account types: Accounts in this organizational directory only (Single tenant)
- Redirect URI: platform Web, set to
https://auth.akuity.io/login/callback
- Name: a descriptive name, for example
-
Click Register.
Step 4: Note application details and create a client secret
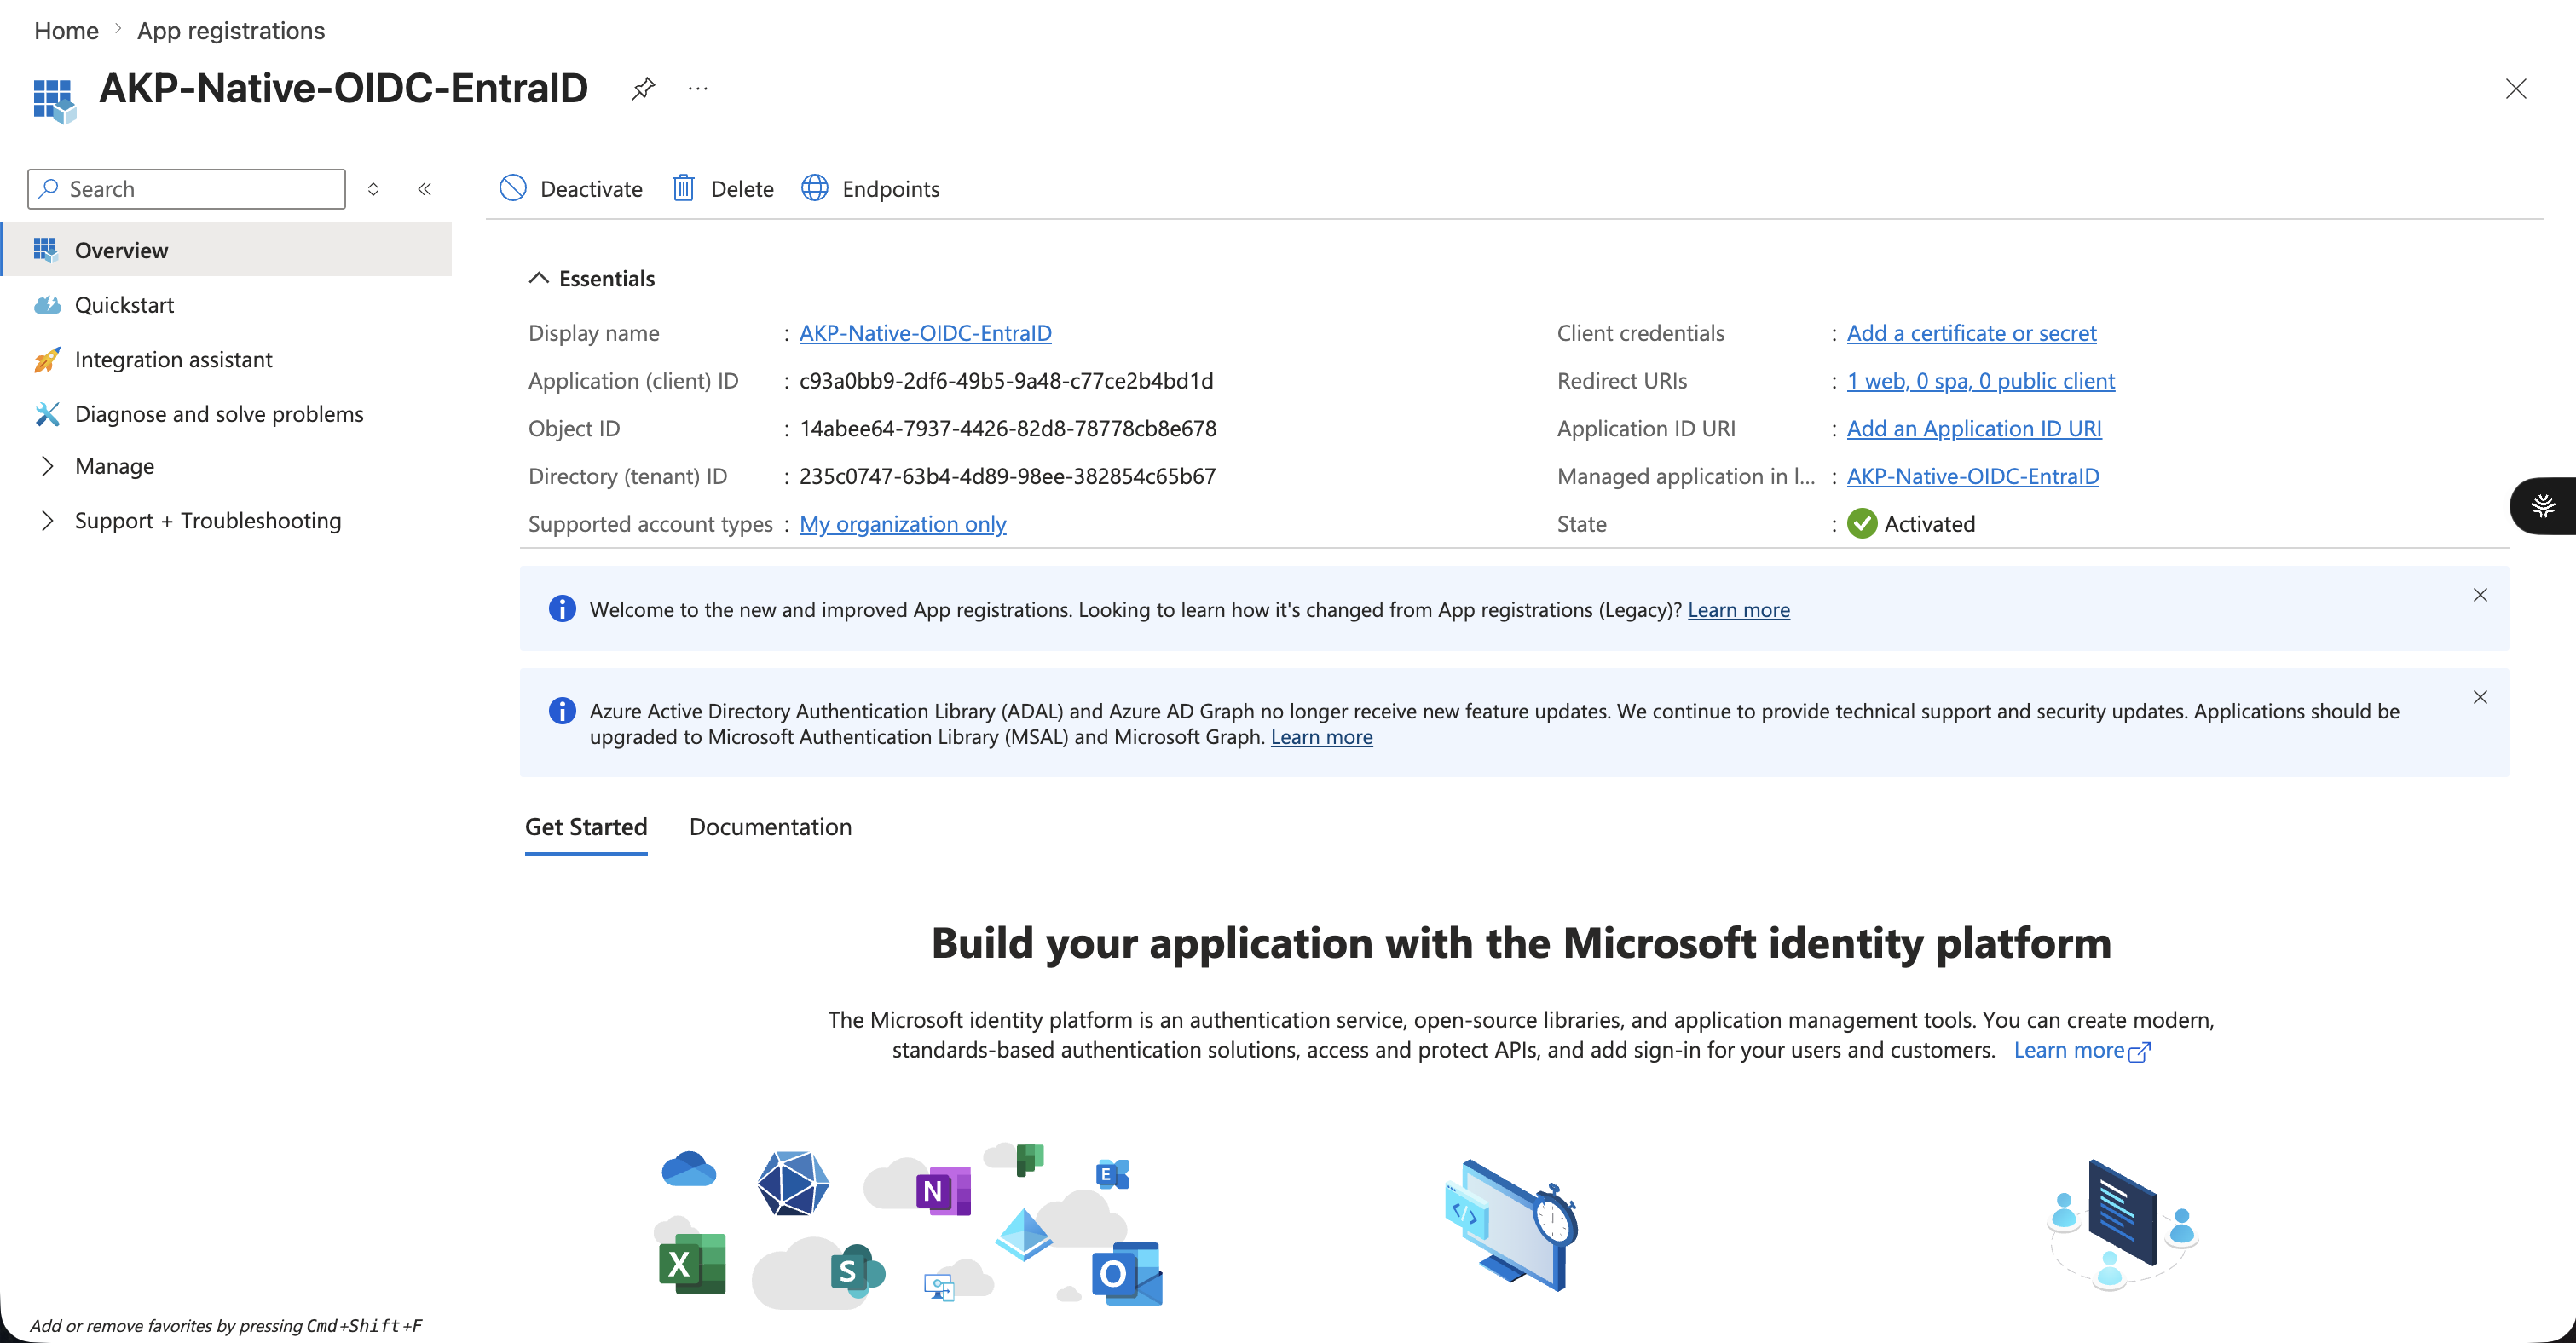
On the application's Overview page, note the Application (client) ID and the Directory (tenant) ID.
Then create the secret:
-
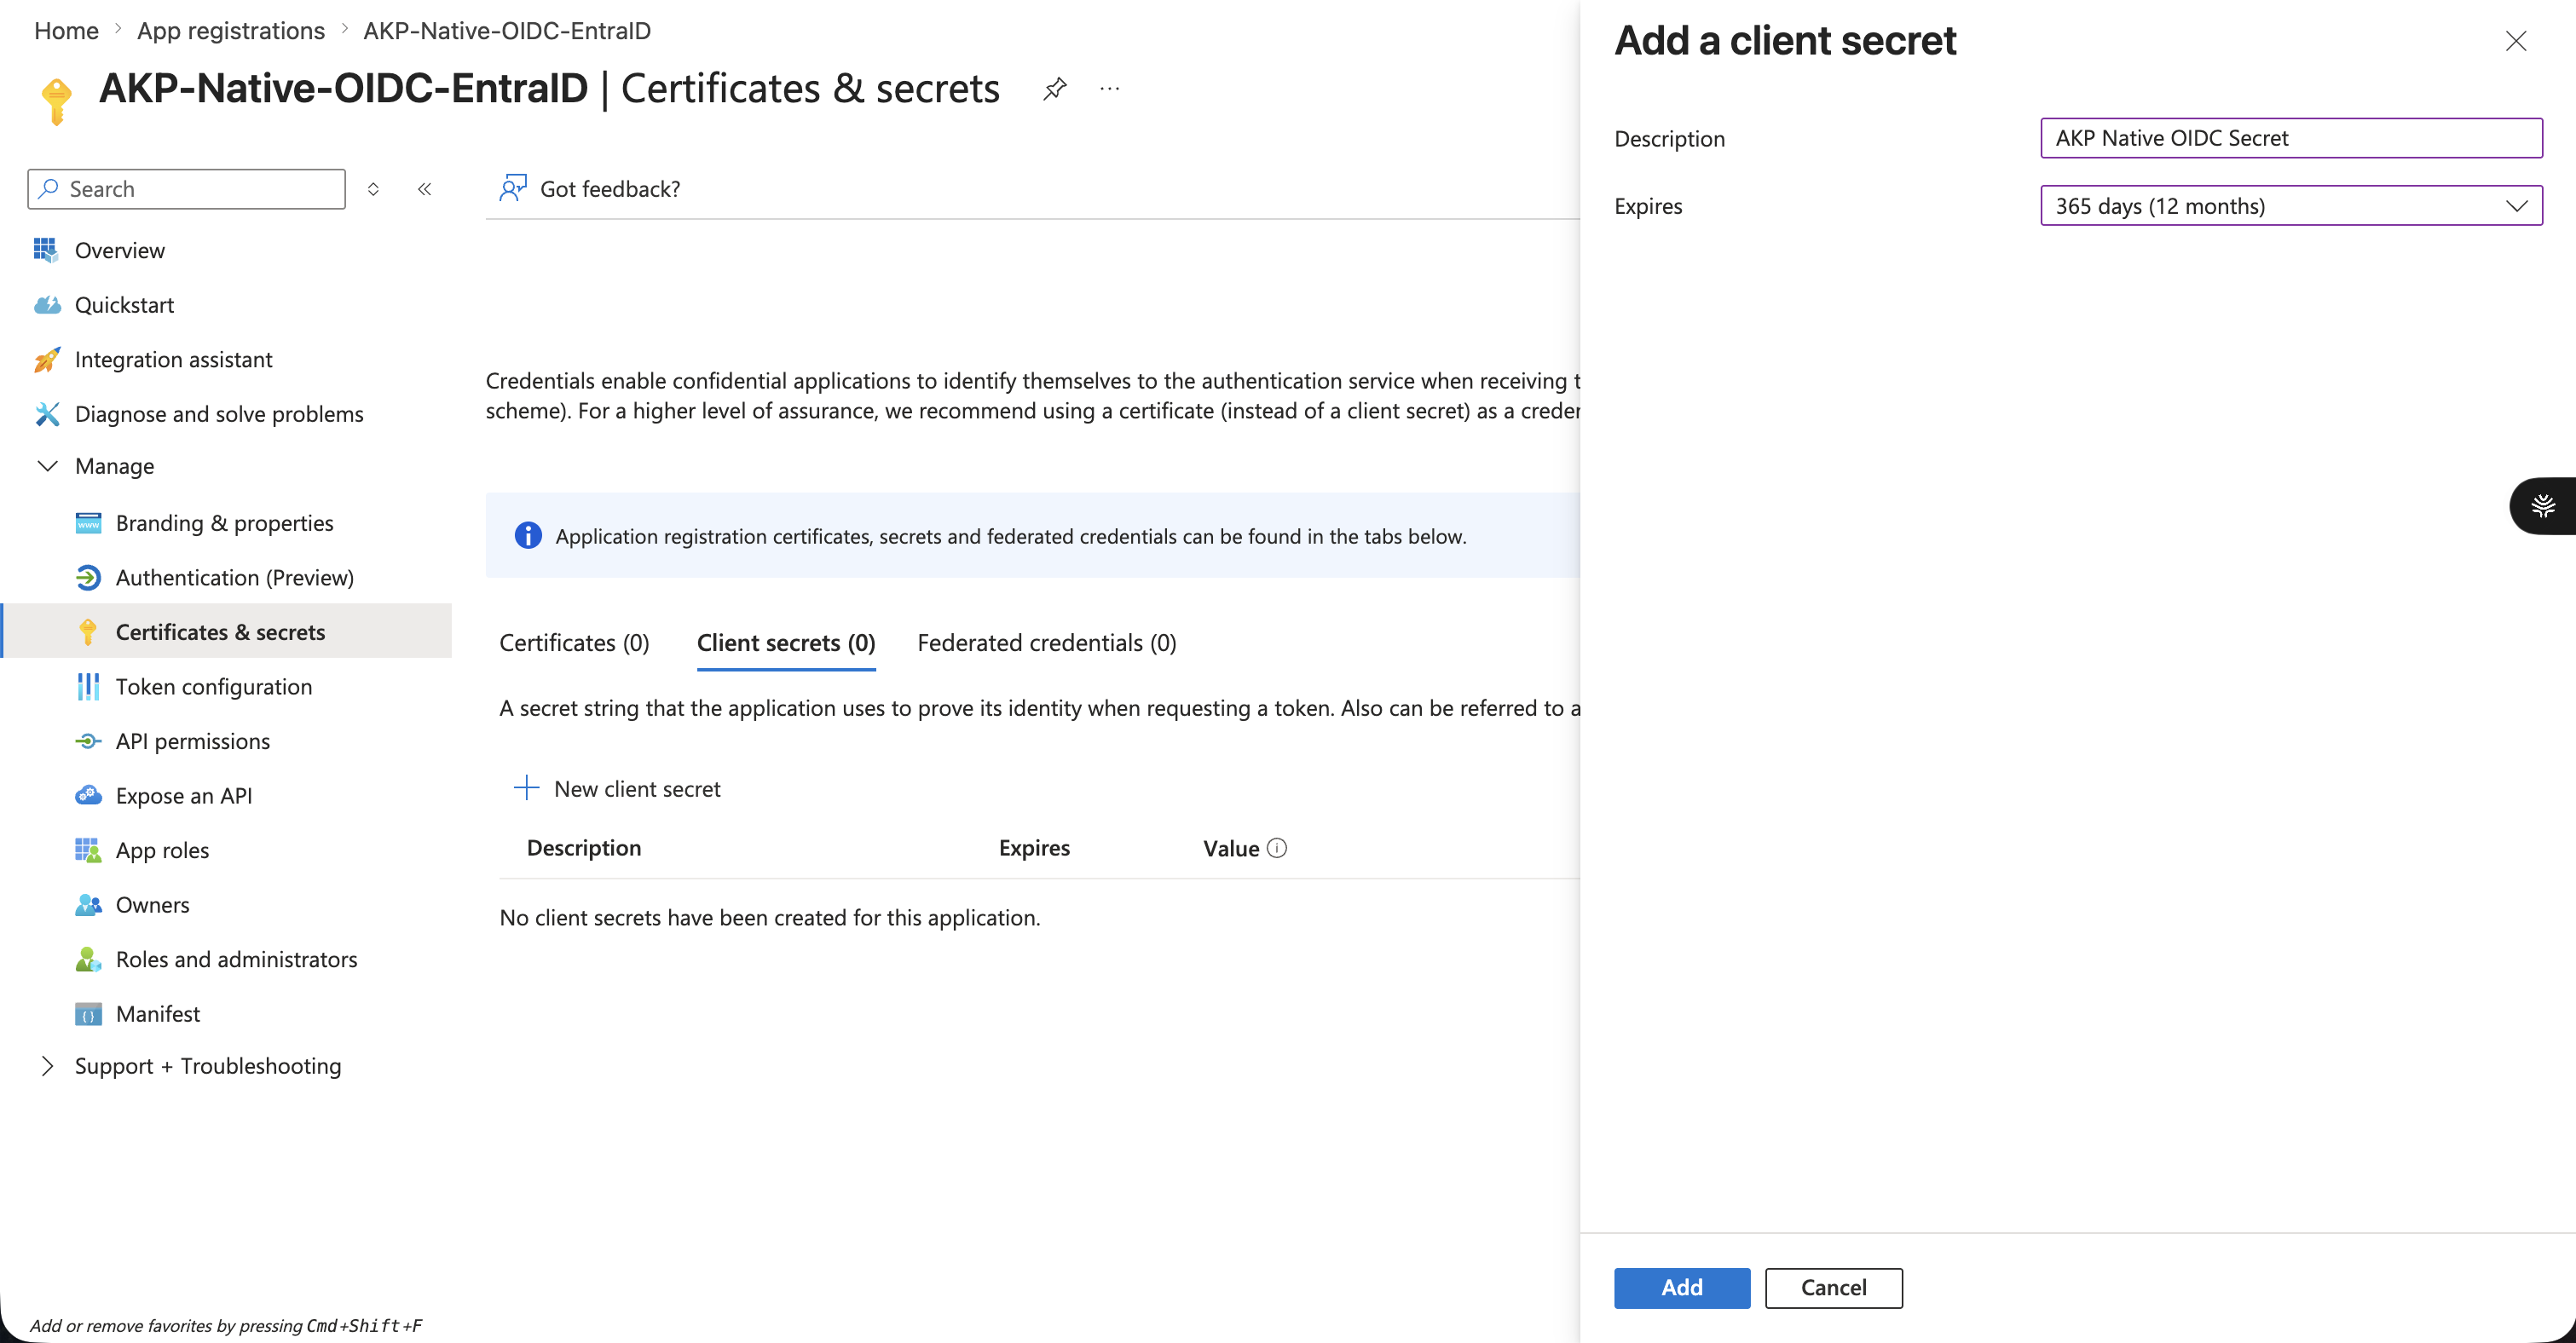
Go to Certificates & secrets → + New client secret.
-
Enter a description, for example
AKP SSO Secret, and an expiry such as 12 months. -
Click Add.
-
Copy the secret Value immediately. It is shown only once.
Copy the Value column, not the Secret ID.
Step 5: Configure token claims
Azure Entra ID does not emit an email claim by default. The Akuity Platform requires it, so you must add it explicitly.
Add the email claim
-
In the application, click Token configuration.
-
Click + Add optional claim.
-
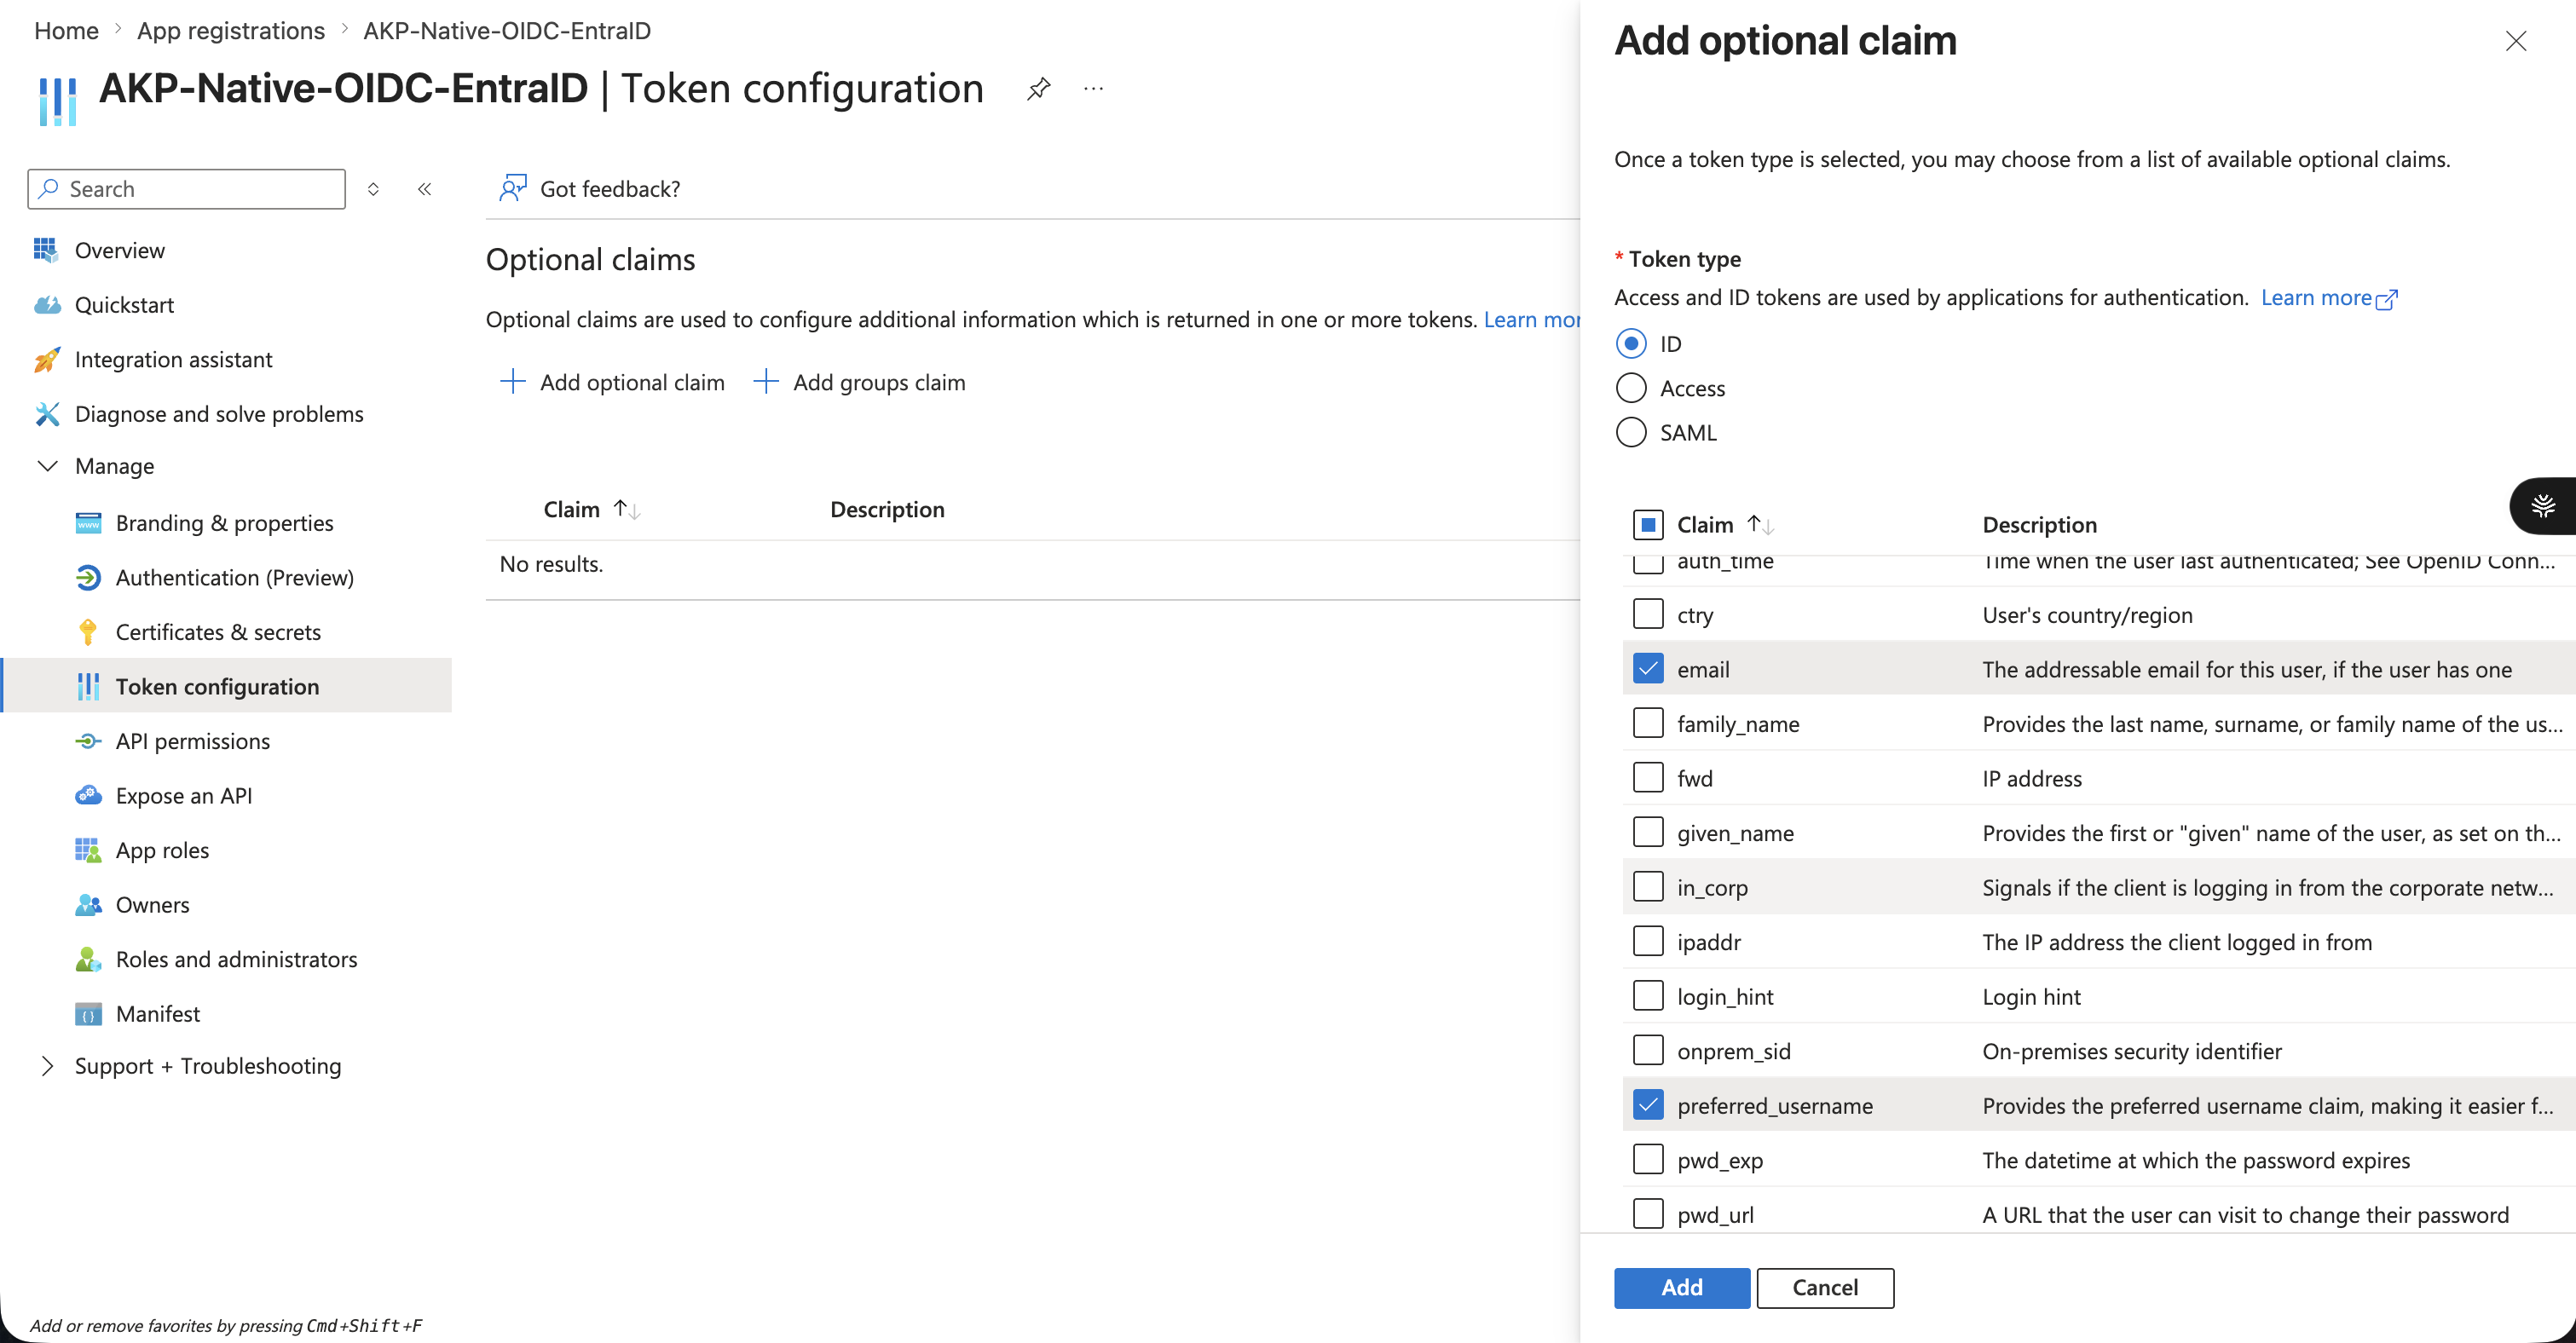
For Token type, select ID.
-
Check
email. Optionally also checkpreferred_usernameandupn. -
Click Add.
-
A banner appears reading "Some of these claims (email) require OpenId Connect scopes…". Tick the checkbox to turn on the Microsoft Graph
emailpermission, then click Add.
Without that checkbox the claim is configured but never appears in the token. The email scope is a basic OpenID Connect scope and does not require admin consent.
Add the groups claim
Add this if you plan to map Entra ID groups to Akuity roles or teams.
-
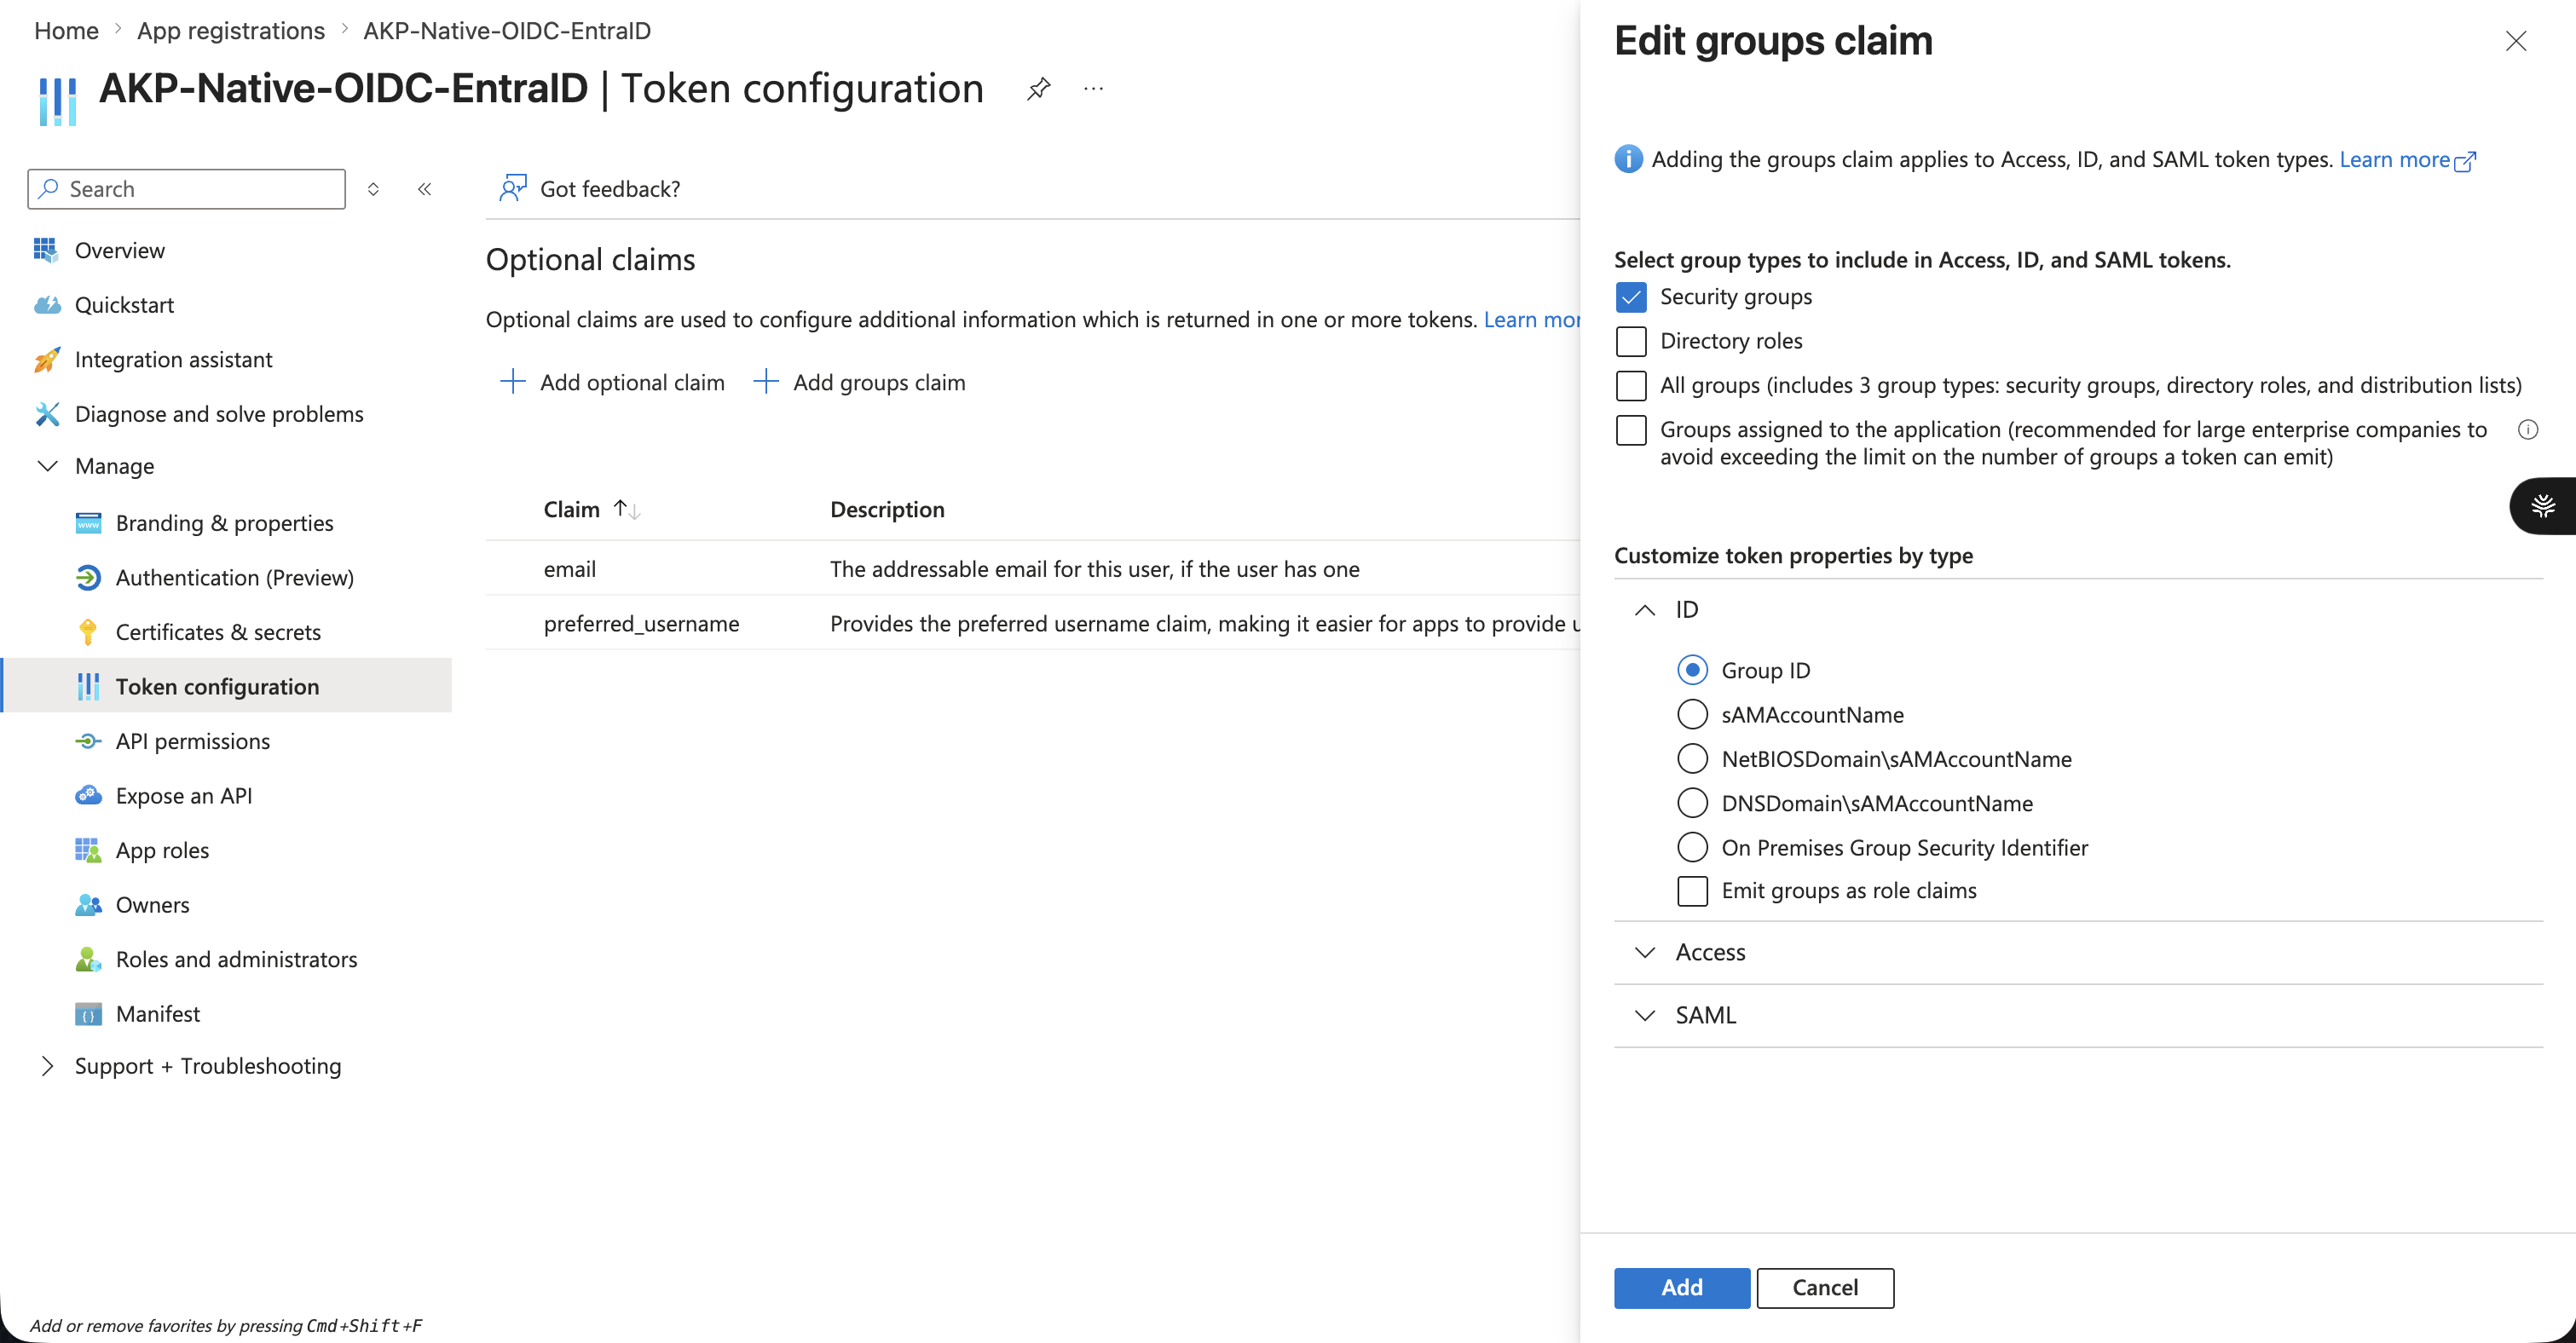
On the Token configuration page, click + Add groups claim.
-
Select Security groups, or Groups assigned to the application — see the limit below.
-
Under the ID token section, select Group ID.
-
Click Add.
If a user belongs to more than 200 groups, Entra ID silently drops the extras from the token. Group-based mapping then breaks in ways that are very hard to diagnose.
To avoid this, configure a groups claim filter: choose Groups assigned to the application instead of Security groups, so only groups explicitly assigned to the application are emitted. Assign those groups under Enterprise applications → your app → Users and groups.
Assigning groups to an application requires Entra ID P1 or P2. On lower tiers you can still emit security groups, but stay mindful of the 200-group ceiling.
No API permissions or admin consent are required for this method. The default User.Read plus the basic email scope is sufficient. This is a key advantage over the Microsoft Connector, which requires Directory.Read.All and tenant admin consent.
Step 6: Verify the user's email attribute
This is the single most common cause of a failed SSO login with Entra ID.
Entra ID only emits the email claim if the user account has its Email (mail) attribute populated. Many accounts — especially newly created, test, or service accounts — have this field blank, even though their UPN looks like an email address.
To check, either:
-
Go to Microsoft Entra ID → Users → your user → Edit properties → Contact Information → Email, or
-
Query Microsoft Graph:
GET https://graph.microsoft.com/v1.0/me?$select=mail,userPrincipalNameA response of
"mail": nullconfirms the problem.
To fix it you need the User Administrator role or higher. Either:
-
Go to Users → user → Edit properties → Contact Information → Email, enter the user's email address, and click Save, or
-
Send a Graph request:
PATCH /users/{id}with{ "mail": "user@yourcompany.com" }
The UPN (userPrincipalName) is not the same as the mail attribute. A user can have user@yourcompany.com as their UPN while mail is null. The Akuity Platform's OIDC form has no claim-mapping override, so the directory attribute must be set.
Step 7: Complete the AKP SSO configuration
Return to Organization → SSO → Add Configuration and fill in the form:
| Field | Value |
|---|---|
| Type | OIDC |
| Client ID | Your Application (client) ID from Step 4 |
| Groups Claim (toggle) | Off — see below |
| Scopes | openid, profile, email |
| Email Domain | Your verified domain, for example yourcompany.com |
| Domain Aliases | Any additional verified domains |
| Channel | Back Channel |
| Discovery URL | https://login.microsoftonline.com/<TENANT_ID>/v2.0/.well-known/openid-configuration |
| Client Secret | The secret Value from Step 4 |
| Callback URL | Read-only, informational |
| Auto Add Member | Enabled, so users join with the member role automatically |
| Group Claims | groups |
| Enforce SSO | Off until SSO is verified working |
Replace <TENANT_ID> with your Directory (tenant) ID from Step 4.
Leave the Groups Claim toggle off. It adds a groups scope to the authorization request. Microsoft Graph has no such scope, and login fails with:
AADSTS650053: The application asked for scope 'groups' that doesn't exist
on the resource '00000003-0000-0000-c000-000000000000'.
Entra ID delivers groups as an ID-token claim, configured in Step 5, not as an OAuth scope. Set only the separate Group Claims field to groups.
Leave Enforce SSO off until you have verified a successful login. Enforcing SSO requires all organization users to log in via SSO. If the configuration is broken you can be locked out of your account and will need to contact support. Enable it only after Step 8 succeeds.
Channel: Back Channel or Front Channel
| Channel | Behaviour |
|---|---|
| Back Channel (recommended) | Standard authorization-code flow using the client secret — the secure default for a confidential client |
| Front Channel | Uses response_mode=form_post and response_type=id_token, with no client secret |
The Discovery URL auto-fills the Issuer details section. If it does not populate, enter the values manually:
| Field | Value |
|---|---|
| Issuer | https://login.microsoftonline.com/<TENANT_ID>/v2.0 |
| Authorization Endpoint | https://login.microsoftonline.com/<TENANT_ID>/oauth2/v2.0/authorize |
| Token Endpoint | https://login.microsoftonline.com/<TENANT_ID>/oauth2/v2.0/token |
| Jwks URL | https://login.microsoftonline.com/<TENANT_ID>/discovery/v2.0/keys |
Click Add to save.
Step 8: Test the SSO login
-
Open a fresh incognito or private browser window.
-
Go to the Akuity Portal login page.
-
Enter your email address, for example
you@yourcompany.com, in the Email address field and click Continue. -
Auth0 matches your email domain and redirects you to the Microsoft sign-in page.
-
Sign in, and accept the consent prompt if one is shown. This is basic user consent and needs no admin approval.
-
You are redirected back and land in your organization.
Auth0 uses identifier-first login (Home Realm Discovery): typing your email is what routes you to your organization's enterprise connection.
The Continue with Microsoft Account button is the Microsoft personal account social connection — an entirely different connection that does not use your Entra ID SSO configuration.
Once login works, you can optionally enable Enforce SSO.
With group claims flowing, you can map Entra ID groups to Akuity roles and teams. See IDP Groups Mapping and IDP Team Mapping at the bottom of this page.
Use the group's Entra ID Object ID as the IdP group value, matching the Group ID format selected in Step 5.
Native OIDC troubleshooting
AADSTS650053: The application asked for scope 'groups' that doesn't exist
The Groups Claim toggle is enabled, which adds a nonexistent groups scope to the request. Turn the toggle off and ensure Scopes contains only openid, profile, and email. Groups come from the ID-token claim configured in Step 5.
'email' attribute is required for group claim resolution but is missing for user …
Entra ID returned no email claim. Check both:
-
The
emailoptional claim is added to the ID token, and the Microsoft Graphemailpermission checkbox was ticked (Step 5). -
The user's
mailattribute is populated in Entra ID (Step 6). Confirm withGET /me?$select=mail;nullmeans an administrator must set it.
This check is enforced in the Auth0 login pipeline, so no Akuity-side setting can bypass it.
API Error: domain_alias already exists
The domain you entered is already claimed by another SSO connection. Domain aliases must be unique. Check whether another organization already has an SSO connection using that domain, or use a different verified domain.
domain needs to be verified, please submit a verification request…
The domain or one of its aliases is not verified yet. Complete Step 1 and wait for Akuity's approval.
AADSTS54005: OAuth2 Authorization code was already redeemed
Not a configuration problem. An authorization code was used twice, usually from refreshing the callback page or pressing Back on a URL containing ?code=…. Start a fresh login from the login page.
Redirect URI mismatch
Verify that the redirect URI registered in Azure exactly matches the environment's callback URL. Check the redirect_uri parameter in the browser URL when you are redirected to Microsoft — that is the value Azure must have registered.
Groups not appearing, or group mapping not working
- Confirm a groups claim is configured in Azure Token configuration (Step 5)
- Use the group's Object ID in IDP mapping, not the display name
- Check whether the user exceeds the 200-group token limit (Step 5)
Locked out after enabling Enforce SSO
Contact Akuity support. This is why Enforce SSO should only be enabled after a verified successful login.
Native OIDC summary
| Component | Value |
|---|---|
| Azure app type | App registration (single tenant) |
| Redirect URI | https://auth.akuity.io/login/callback |
| Connector type | OIDC (generic) |
| Channel | Back Channel |
| Discovery URL | https://login.microsoftonline.com/<TENANT_ID>/v2.0/.well-known/openid-configuration |
| Required scopes | openid, profile, email |
| API permissions | Default User.Read plus Graph email — no admin consent required |
| Group token limit | 200 (OIDC/JWT) |
| Plan requirement | Enterprise plan, with the owner role on the organization |
| Key gotchas | email optional claim and populated mail attribute required; Groups Claim toggle must be off; keep Enforce SSO off until verified |
Native SAML
Connect Entra ID over SAML 2.0. Unlike Native OIDC, this method uses an Enterprise Application and a signing certificate rather than an app registration and a client secret.
SAML SSO can only be configured on a non-gallery Enterprise Application. If you create the app via App registrations → New registration, or via the "Register an application…" option in the Create-your-own dialog, you get an OIDC app whose Single sign-on page offers no SAML option — and it cannot be converted. You must delete it and start over.
Step 1: Verify your domain for SAML
-
In the Akuity Portal, go to Organization → Settings → Domain.
-
Add your domain (for example,
yourcompany.com) under New Domain Aliases. -
Submit it for verification and wait until the status shows Verified.
See Domain Verification for the full process.
For security purposes, your domain and domain aliases will be submitted to Akuity for manual review and approval.
Step 2: Note your organization ID
The SAML Entity ID and Reply URL both embed your organization ID.
-
Open your organization in the Akuity Portal.
-
Read the Org ID, shown on the organization page and present in the URL as
…/organizations/<ORG_ID>/….
Your Azure SAML values will be:
| Azure field | Value |
|---|---|
| Identifier (Entity ID) | urn:auth0:akuity:<ORG_ID> |
| Reply URL (ACS URL) | https://auth.akuity.io/login/callback?connection=<ORG_ID> |
| Sign on URL | https://akuity.cloud/login |
Replace <ORG_ID> with your organization ID.
Step 3: Create a non-gallery Enterprise Application
-
In the Azure Portal, go to Microsoft Entra ID → Enterprise applications.
-
Click + New application → + Create your own application.
-
Enter a name, for example
AKP-SAML-EntraID. -
Select Integrate any other application you don't find in the gallery (Non-gallery) — the bottom option.
-
Click Create.
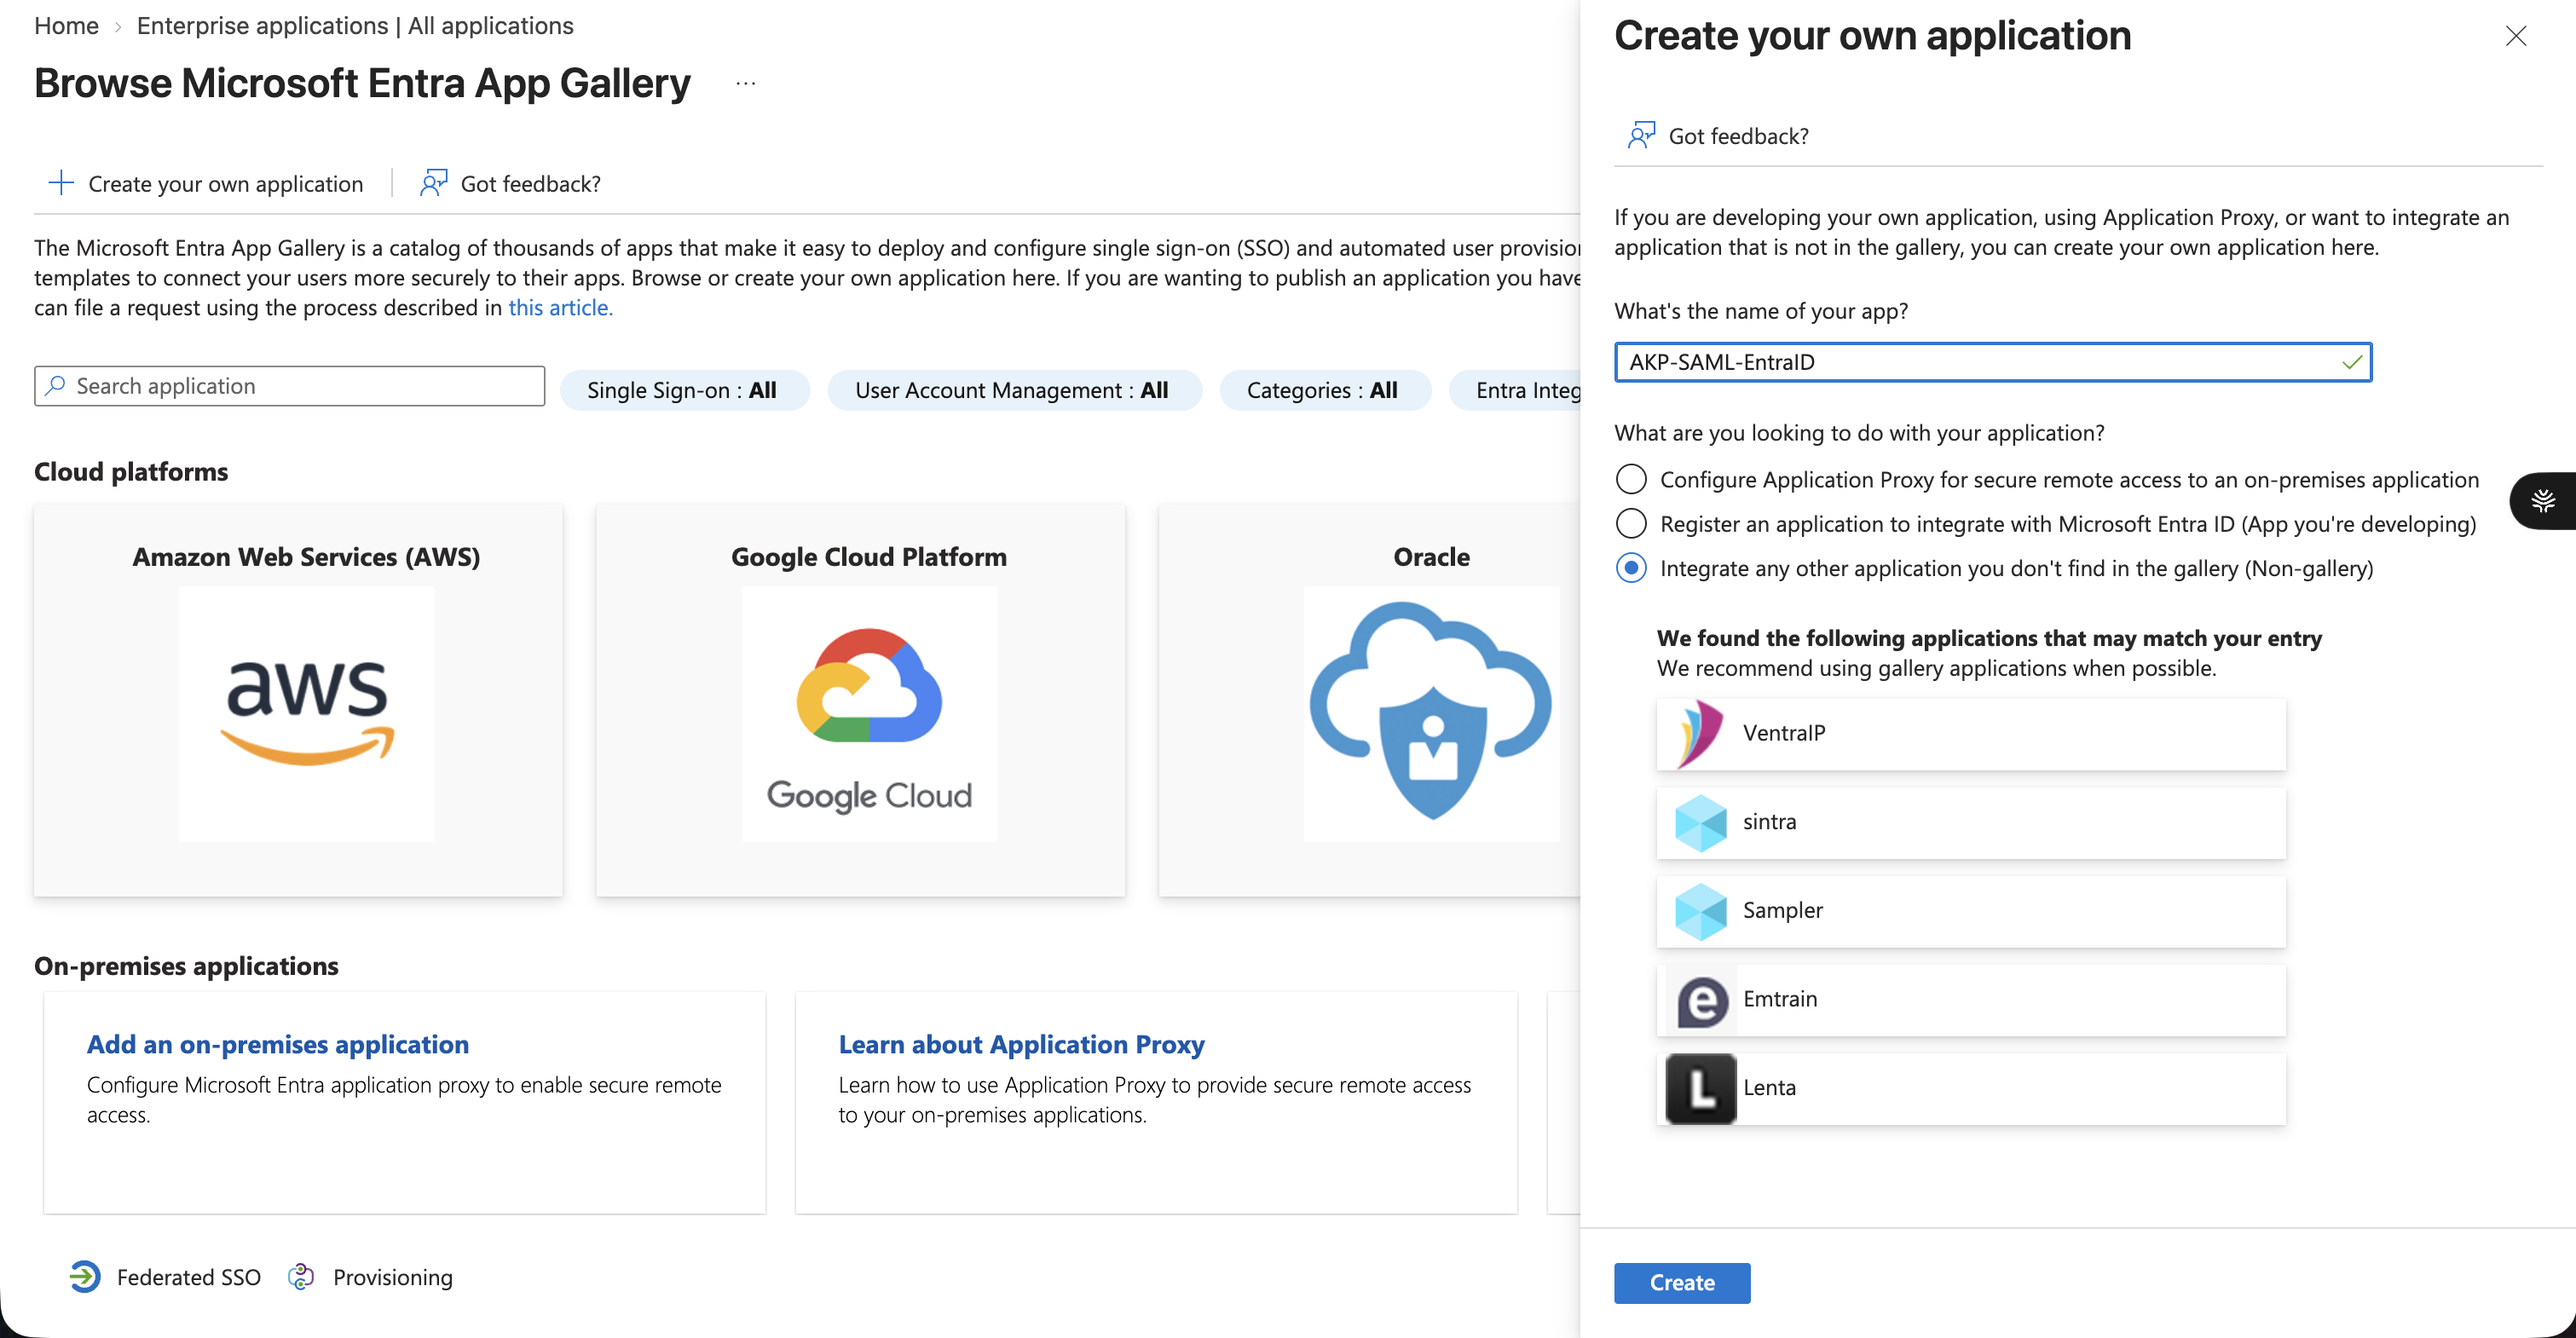
The three options in that panel are Application Proxy (on-premises), "Register an application to integrate with Microsoft Entra ID" (creates an OIDC app — wrong for SAML), and "Integrate any other application… (Non-gallery)" (correct).
Step 4: Configure basic SAML configuration
-
Open the new application and click Single sign-on in the left sidebar.
-
Select the SAML card. The other options, Password-based and Linked, are not applicable.
-
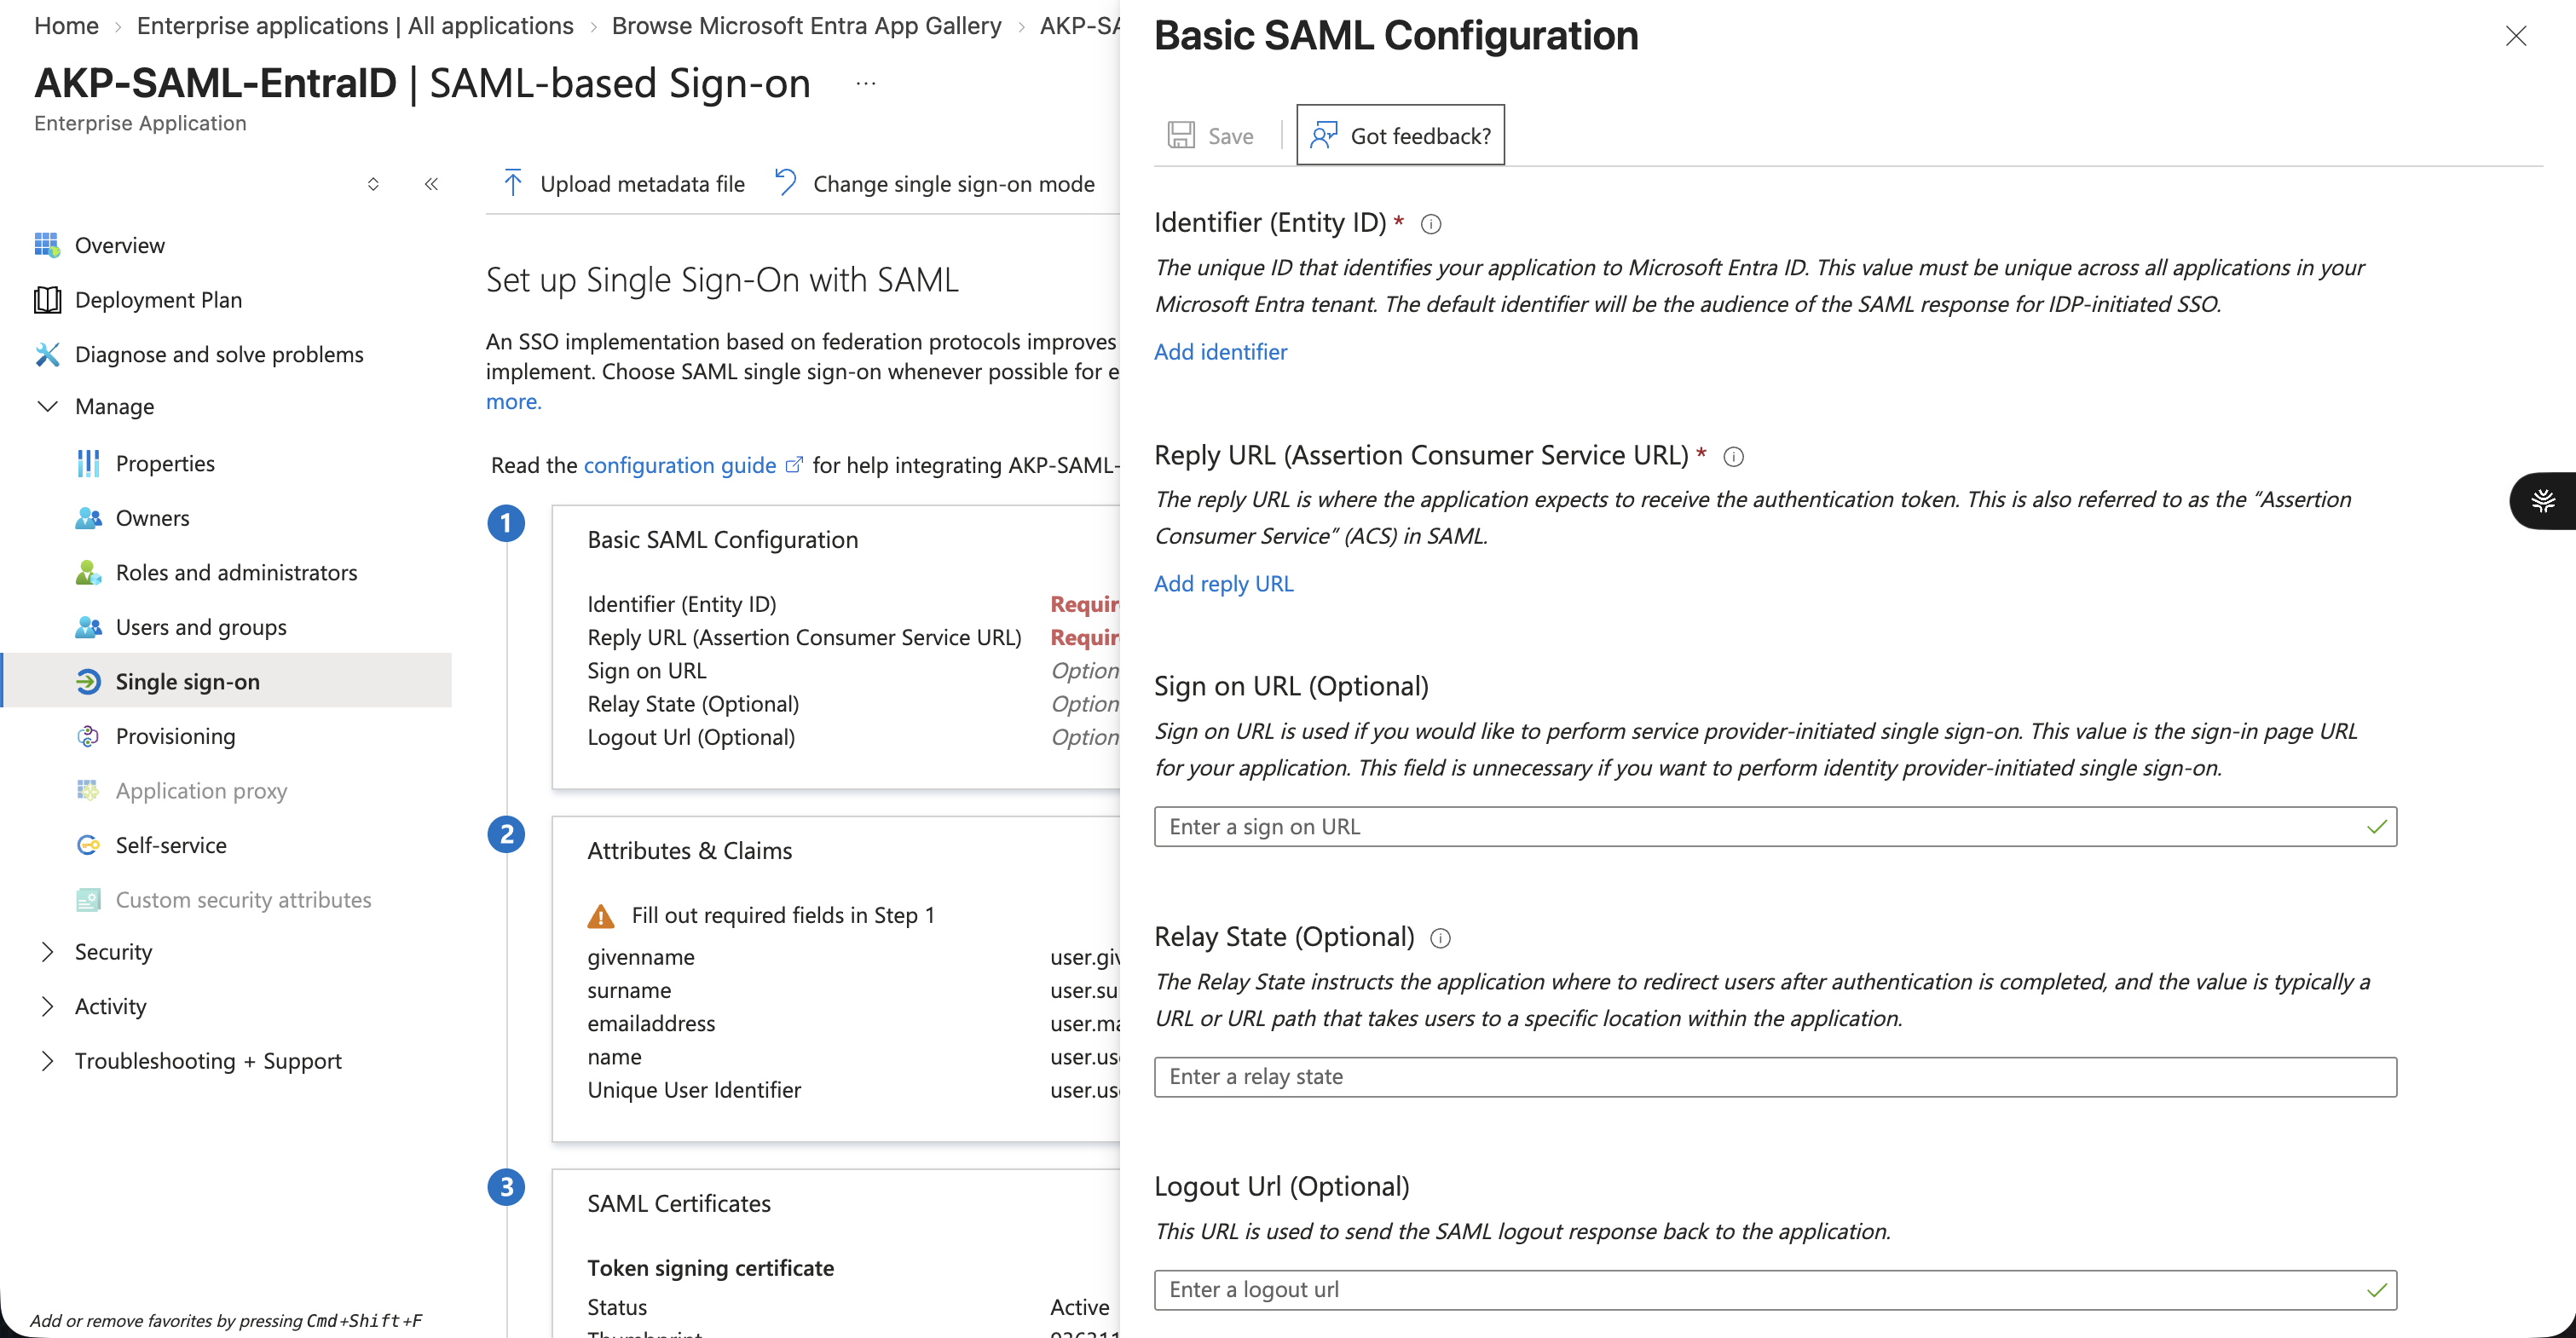
In section 1, Basic SAML Configuration, click the pencil icon and enter:
Field Value Identifier (Entity ID) urn:auth0:akuity:<ORG_ID>Reply URL (ACS URL) https://auth.akuity.io/login/callback?connection=<ORG_ID>Sign on URL https://akuity.cloud/loginRelay State / Logout URL Leave empty -
Click Save.
Step 5: Configure attributes and claims
Open section 2, Attributes & Claims. Azure's default claim set is already correct for email, so no edit is needed:
| Claim | Source |
|---|---|
| Unique User Identifier (Name ID) | user.userprincipalname |
http://schemas.xmlsoap.org/ws/2005/05/identity/claims/emailaddress | user.mail |
.../claims/givenname | user.givenname |
.../claims/name | user.userprincipalname |
.../claims/surname | user.surname |
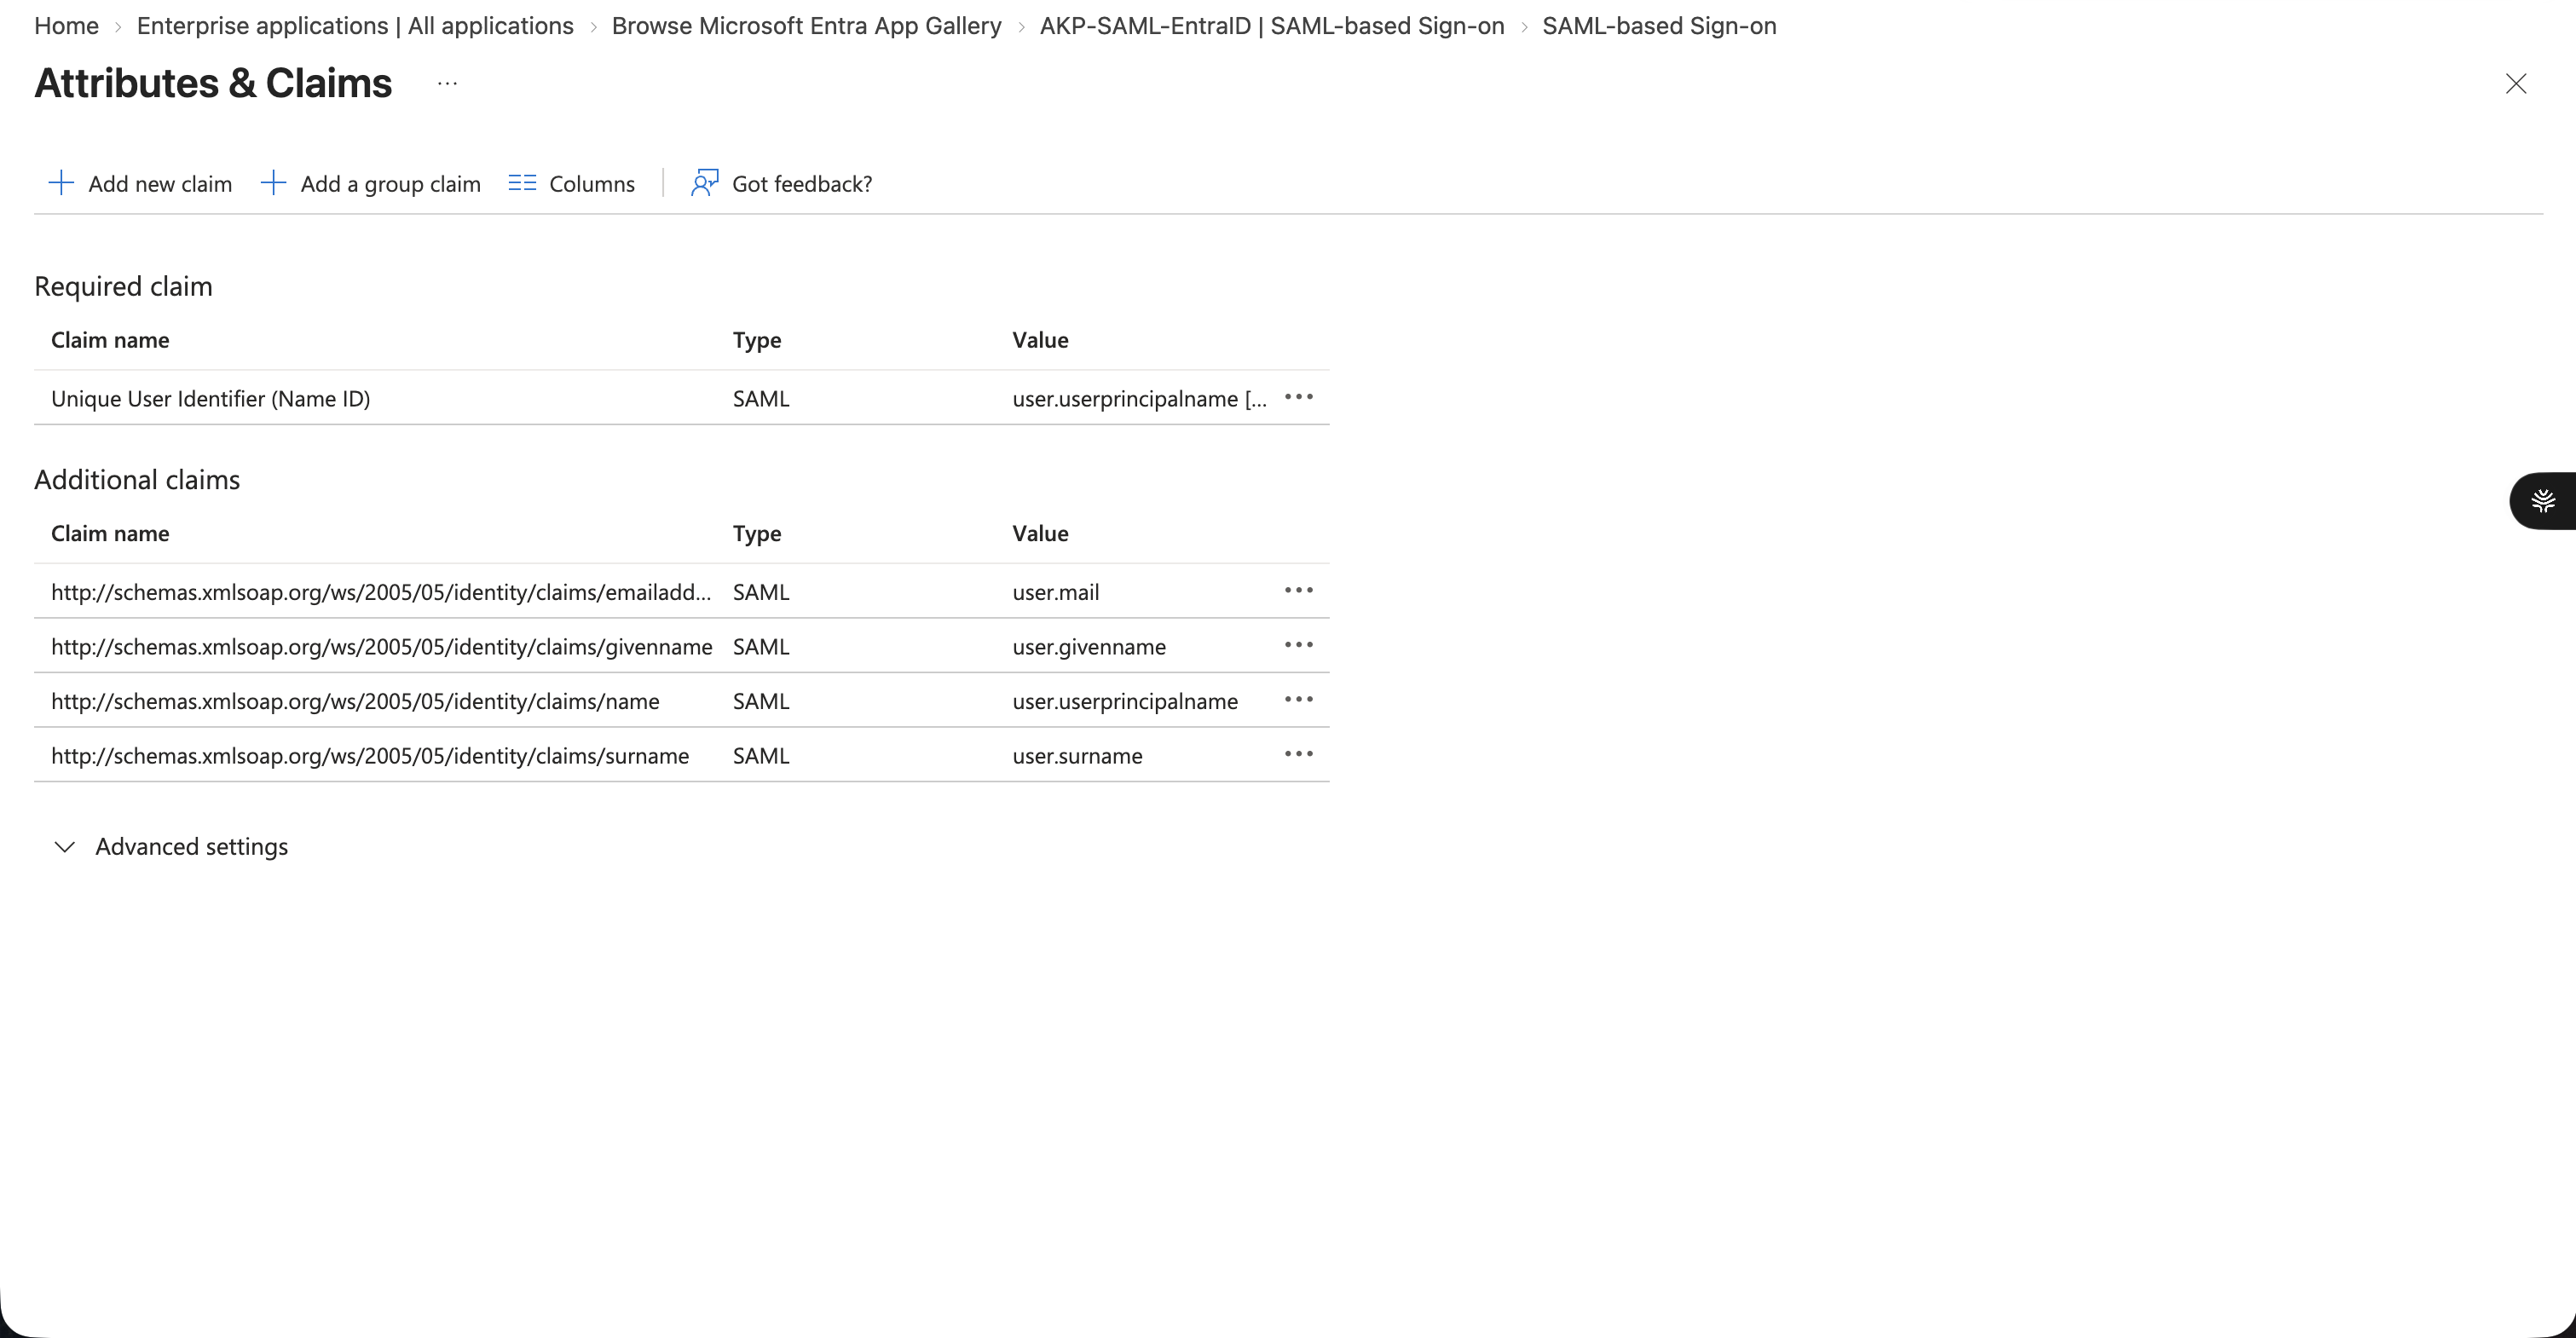
emailaddress claim is only useful if the user's mail attribute is populatedEntra ID sources this claim from the directory mail attribute, which is often blank on newly created, test, or service accounts even when their UPN looks like an email address. The Akuity login pipeline requires an email and will fail with "'email' attribute is required…" if it is empty.
To check, go to Users → user → Edit properties → Contact Information → Email, or query Graph:
GET https://graph.microsoft.com/v1.0/me?$select=mail,userPrincipalName
A response of "mail": null confirms the problem.
To fix it you need the User Administrator role or higher: set Contact Information → Email on the user, or send PATCH /users/{id} with { "mail": "user@yourcompany.com" }.
Alternatively, change the emailaddress claim's source attribute to user.userprincipalname. This is useful when the mail attribute cannot be set, though populating mail is the cleaner fix.
Add the groups claim
-
Click + Add a group claim.
-
For Which groups returned in the claim, select Security groups, or Groups assigned to the application — see the limit below.
-
For Source attribute, select Group ID.
-
Expand Advanced options and tick Customize the name of the group claim.
-
Set Name to
groups. -
Leave Emit groups as role claims unchecked.
-
Click Save.
The Akuity Platform expects the claim name groups, in lowercase. This differs from Dex-based products such as Argo CD and Kargo, where the convention in the upstream docs is Group.
If a user belongs to more than 150 groups, Entra ID silently drops the extras from the SAML assertion. Group-based mapping then breaks in ways that are very hard to diagnose. The equivalent limit for OIDC/JWT tokens is 200.
To avoid this, configure a groups claim filter: choose Groups assigned to the application instead of Security groups, so only groups explicitly assigned to the application are emitted. Assign them under Enterprise applications → your app → Users and groups.
Assigning groups to an application requires Entra ID P1 or P2. On lower tiers you can still emit security groups, but stay mindful of the 150-group ceiling.
Step 6: Download the federation metadata XML
In section 3, SAML Certificates, download the Federation Metadata XML.
This single file contains the sign-in endpoint, signing certificate, and algorithms. The Akuity Platform parses all of it automatically, so you do not need to fill any of those in by hand.
As an optional sanity check, the file should contain your tenant's entityID, a SingleSignOnService Location ending in /saml2, and at least one X509Certificate.
Step 7: Assign users to the application
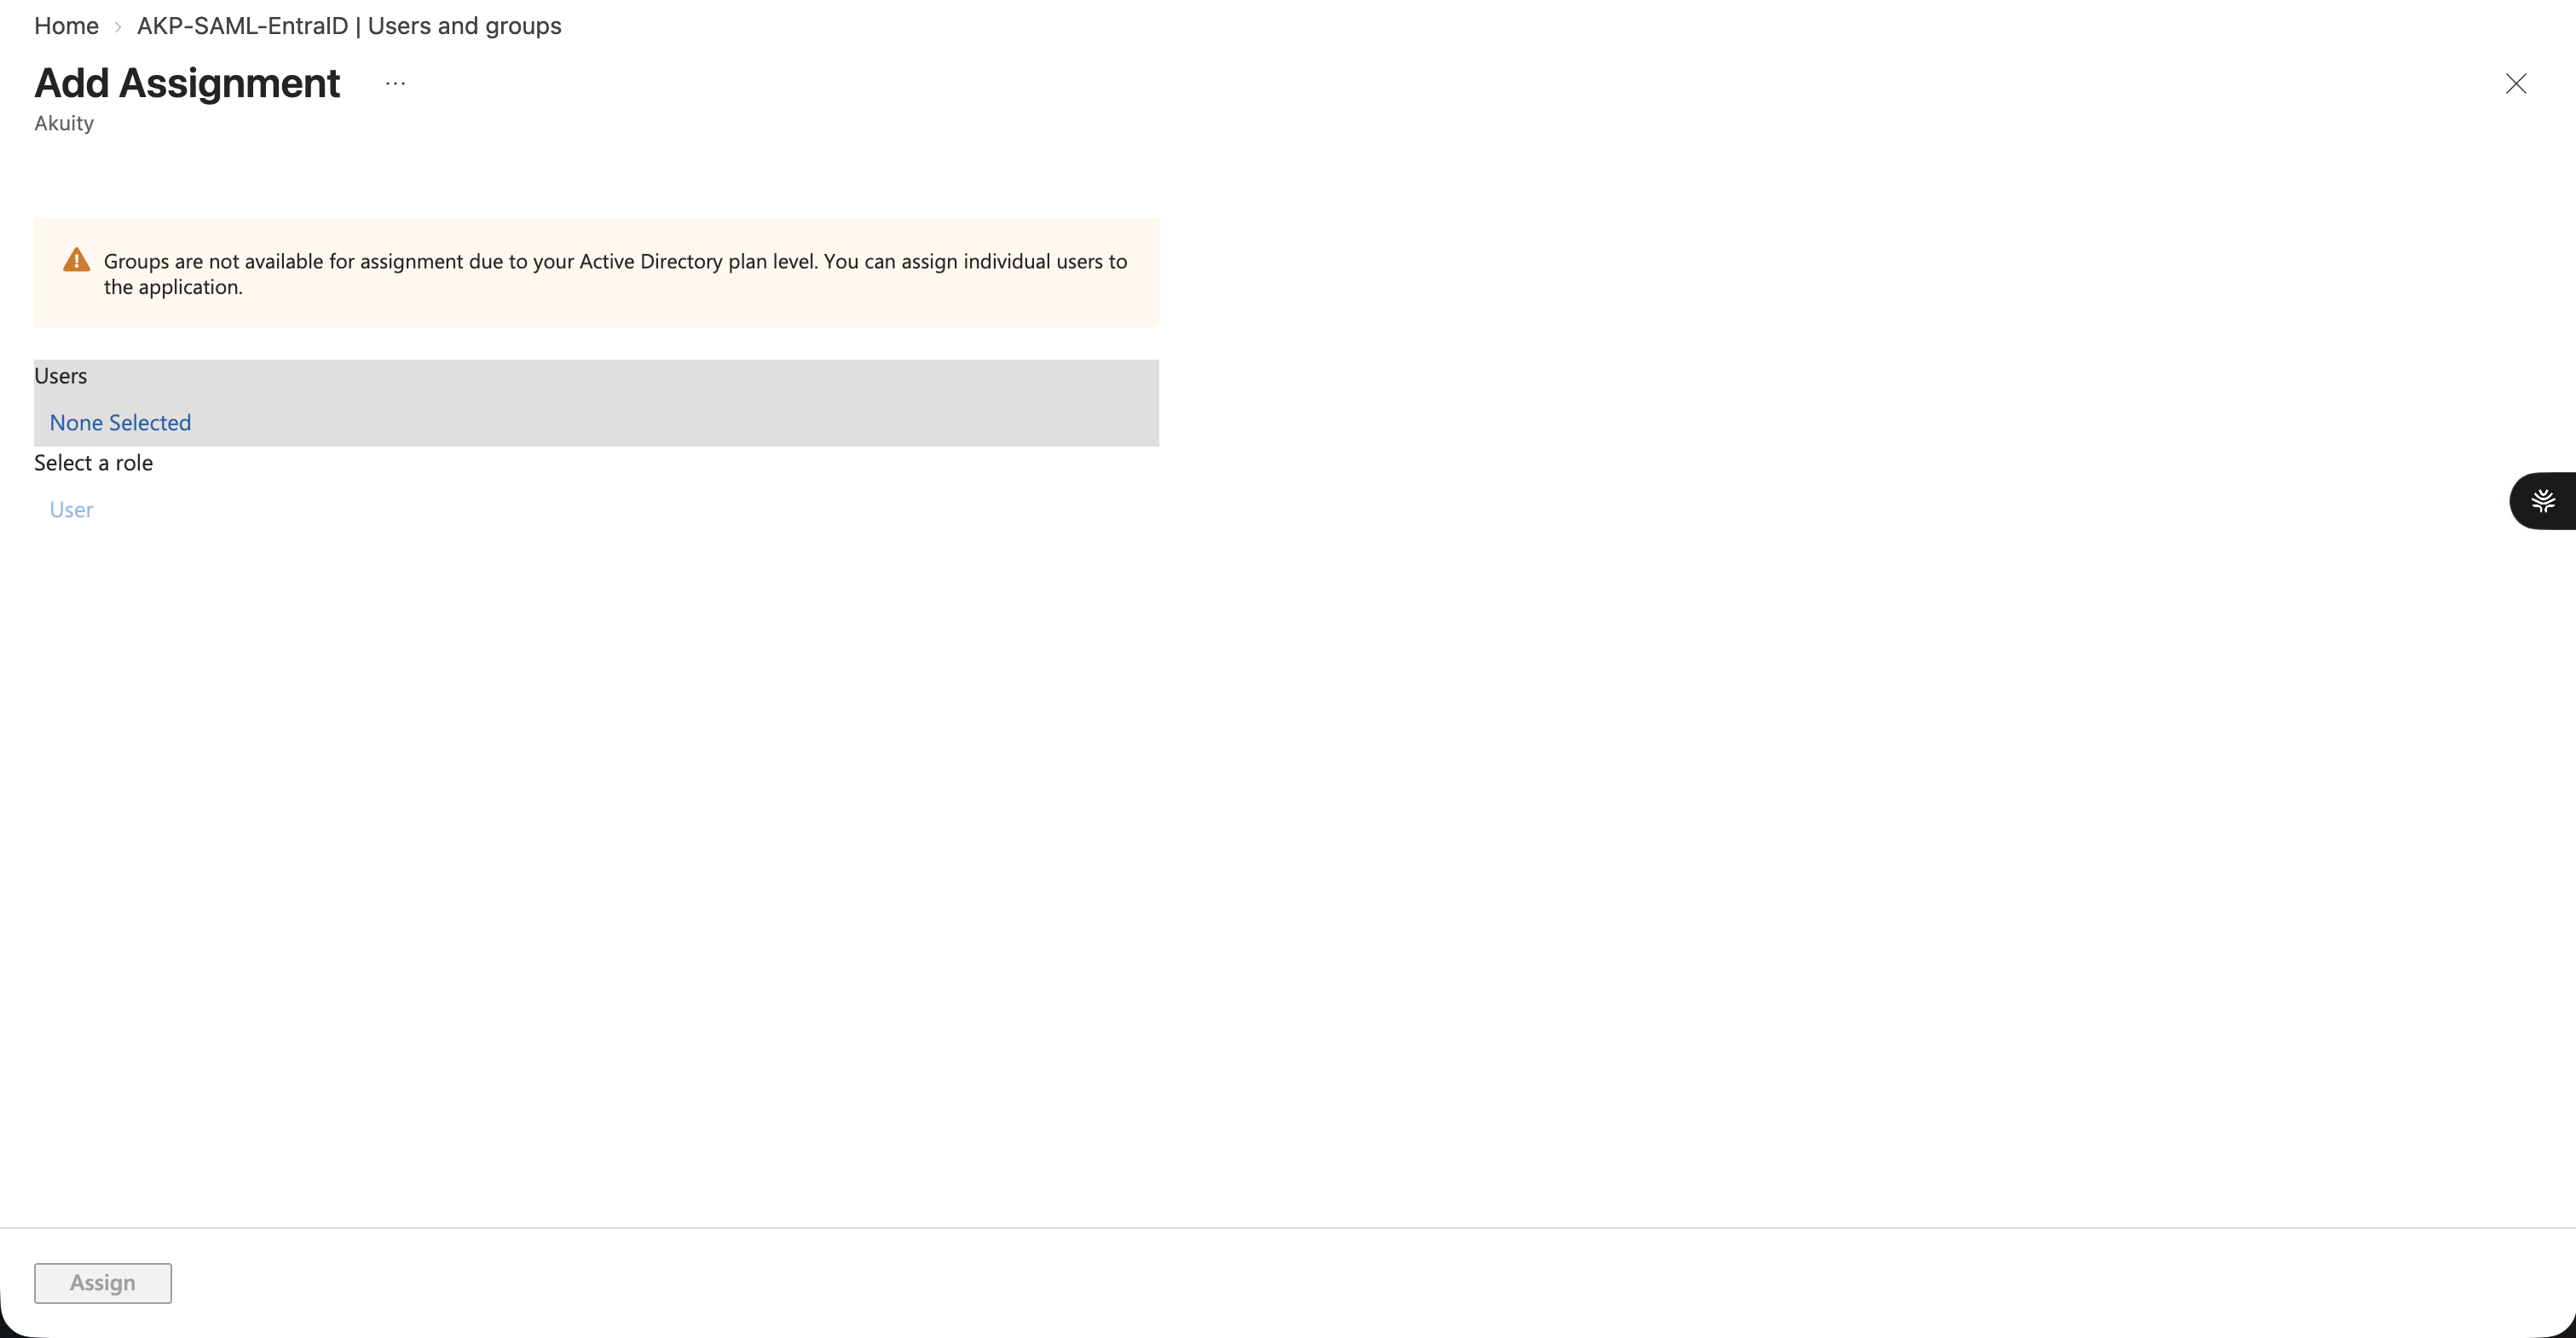
SAML only issues assertions for assigned users.
-
In the application, go to Users and groups → + Add user/group.
-
Add your user, and any groups, then click Assign.
Step 8: Configure SSO in the Akuity Portal
-
Go to Organization → SSO.
-
Click Add Configuration and set Type to SAML.
-
Fill in the form:
Field Value Type SAMLConfiguration Metadata XML Metadata XML Paste the entire contents of the federation metadata XML file from Step 6 Domain Your verified domain, for example yourcompany.comDomain Aliases Any additional verified domains IdP-Initiated SSO Off Auto Add Member Enabled Group Claims groupsEnforce SSO Off until verified working -
Click Add.
Configuration: metadata XML or connection details
| Option | What it needs |
|---|---|
| Metadata XML (recommended) | One field — paste the XML; endpoint, certificate, and algorithms are parsed automatically |
| Connection Details | Eight fields entered by hand: Sign-In Endpoint, Sign-Out Endpoint, Disable Sign-out, Sign Request, Signature Algorithm, Digest Algorithm, Base64 Encoded Signing Cert, Protocol Binding |
Two settings to leave off
Auth0, the identity provider powering Akuity Platform authentication, does not recommend enabling IdP-Initiated SSO.
In an IdP-Initiated flow, Auth0 receives an unsolicited response from the IdP and the application receives an unsolicited response from Auth0. Neither entity can verify that the user actually started the flow. This opens the possibility of a Login CSRF attack, where an attacker can trick a legitimate user into unknowingly logging into the application with the identity of the attacker.
Whenever possible, keep this disabled and let authentication be initiated from the Akuity Platform (the default). Only enable this if your IdP requires initiating the login flow and you understand the risks involved.
Enforce SSO requires all organization users to log in via SSO. If the configuration is broken you can be locked out and will need to contact support. Enable it only after Step 9 succeeds.
Step 9: Test the SAML login
-
Open a fresh incognito or private window, keeping your non-SSO session open elsewhere.
-
Go to the Akuity Portal login page.
-
Enter your email address in the Email address field and click Continue.
-
You are redirected to Microsoft. Sign in.
-
You land back in your organization.
Auth0 uses identifier-first login (Home Realm Discovery): entering your email is what routes you to your organization's enterprise connection.
The Continue with Microsoft Account button is the Microsoft personal account social connection — a different connection that does not use your Entra ID SSO configuration.
The redirect URL should be https://login.microsoftonline.com/<tenant-id>/saml2?SAMLRequest=….
If you instead see /oauth2/v2.0/authorize?…client_id=…, an OIDC connection is still in play. Confirm the SAML configuration saved, then start from a fresh window.
Once login works, you can optionally enable Enforce SSO.
With the groups claim flowing, you can map Entra ID groups to Akuity roles and teams. See IDP Groups Mapping and IDP Team Mapping at the bottom of this page.
Use the group's Entra ID Object ID as the IdP group value, matching the Group ID format chosen in Step 5.
Native SAML troubleshooting
The Single sign-on page shows no SAML option
The application was created as an app registration (OIDC), not a non-gallery Enterprise Application. The page will say "This application uses OpenID Connect and OAuth" and point you at App registrations. These apps cannot be converted — delete it and recreate via Enterprise applications → Create your own application → Integrate any other application… (Non-gallery).
Login redirects to /oauth2/v2.0/authorize instead of /saml2
An OIDC connection is still active. Confirm the SAML configuration was saved, and that any previous OIDC configuration was deleted, then retry from a brand-new window. A stale tab can replay an old OIDC authorization URL.
'email' attribute is required…
The SAML assertion carried no email. Check that the emailaddress claim exists and that its source attribute points at a populated field — user.mail preferred, which requires the directory attribute to be set, or user.userprincipalname as a fallback. See Step 5.
API Error: domain_alias already exists
The domain is already claimed by another SSO connection. Domain aliases must be unique. Check whether another organization has an SSO connection using that domain, or use a different verified domain.
domain needs to be verified…
The domain or one of its aliases is not verified. Complete Step 1 and wait for Akuity's approval.
Certificate or signature errors
Re-download the federation metadata XML and paste it again. This also resolves cases where Azure rotated the signing certificate. Ensure you pasted the entire file contents.
Groups not appearing, or group mapping not working
- Confirm the group claim exists and is named
groups - Confirm Group Claims in the Akuity form is set to
groups - Use the group's Object ID in IDP mapping, not the display name
- Check whether the user exceeds the 150-group SAML limit (Step 5)
Native SAML summary
| Component | Value |
|---|---|
| Azure app type | Enterprise Application (non-gallery) |
| Identifier (Entity ID) | urn:auth0:akuity:<ORG_ID> |
| Reply URL (ACS) | https://auth.akuity.io/login/callback?connection=<ORG_ID> |
| Sign on URL | https://akuity.cloud/login |
| Connector type | SAML |
| Configuration method | Metadata XML (recommended) |
| Credential | SAML signing certificate, inside the metadata XML |
| Admin consent | Not required |
| Group claim name | groups |
| Group limit | 150 (SAML assertion) |
| Plan requirement | Enterprise plan, with the owner role on the organization |
| Key gotchas | Non-gallery Enterprise App required and cannot be converted from an app registration; one SSO config per organization; keep a non-SSO login path before changing SSO; mail attribute must be populated; keep Enforce SSO and IdP-Initiated SSO off until verified |
Microsoft Connector
Use Auth0's dedicated Microsoft connector — the Azure Ad type in the SSO form. It authenticates against Entra ID and reads group membership through the Microsoft Graph API.
This is the simplest of the three methods to configure: no discovery URL, no metadata XML, and no token-claim setup in Azure. It is also the only one that requires tenant admin consent.
Step 1: Verify both domains
This connector uses two domain values, and the Azure AD Domain must itself be a verified domain on the organization.
-
In the Akuity Portal, go to Organization → Settings → Domain.
-
Add and verify both:
- Your Entra tenant domain, for example
yourtenant.onmicrosoft.com. Find it in the Azure Portal header, shown next to your organization name. - Your email domain, for example
yourcompany.com.
- Your Entra tenant domain, for example
-
Wait until both show Verified.
See Domain Verification for the full process.
For security purposes, your domain and domain aliases will be submitted to Akuity for manual review and approval.
Why two domains are needed:
| Field | Value | Purpose |
|---|---|---|
| Azure AD Domain | yourtenant.onmicrosoft.com | Identifies your Entra tenant to Auth0. Must be verified. |
| Domain Aliases | yourcompany.com | The email domain users actually sign in with. This is what routes them to your connection at login. |
Step 2: Register an application in Azure Entra ID
-
Log in to the Azure Portal.
-
Navigate to Microsoft Entra ID → App registrations.
-
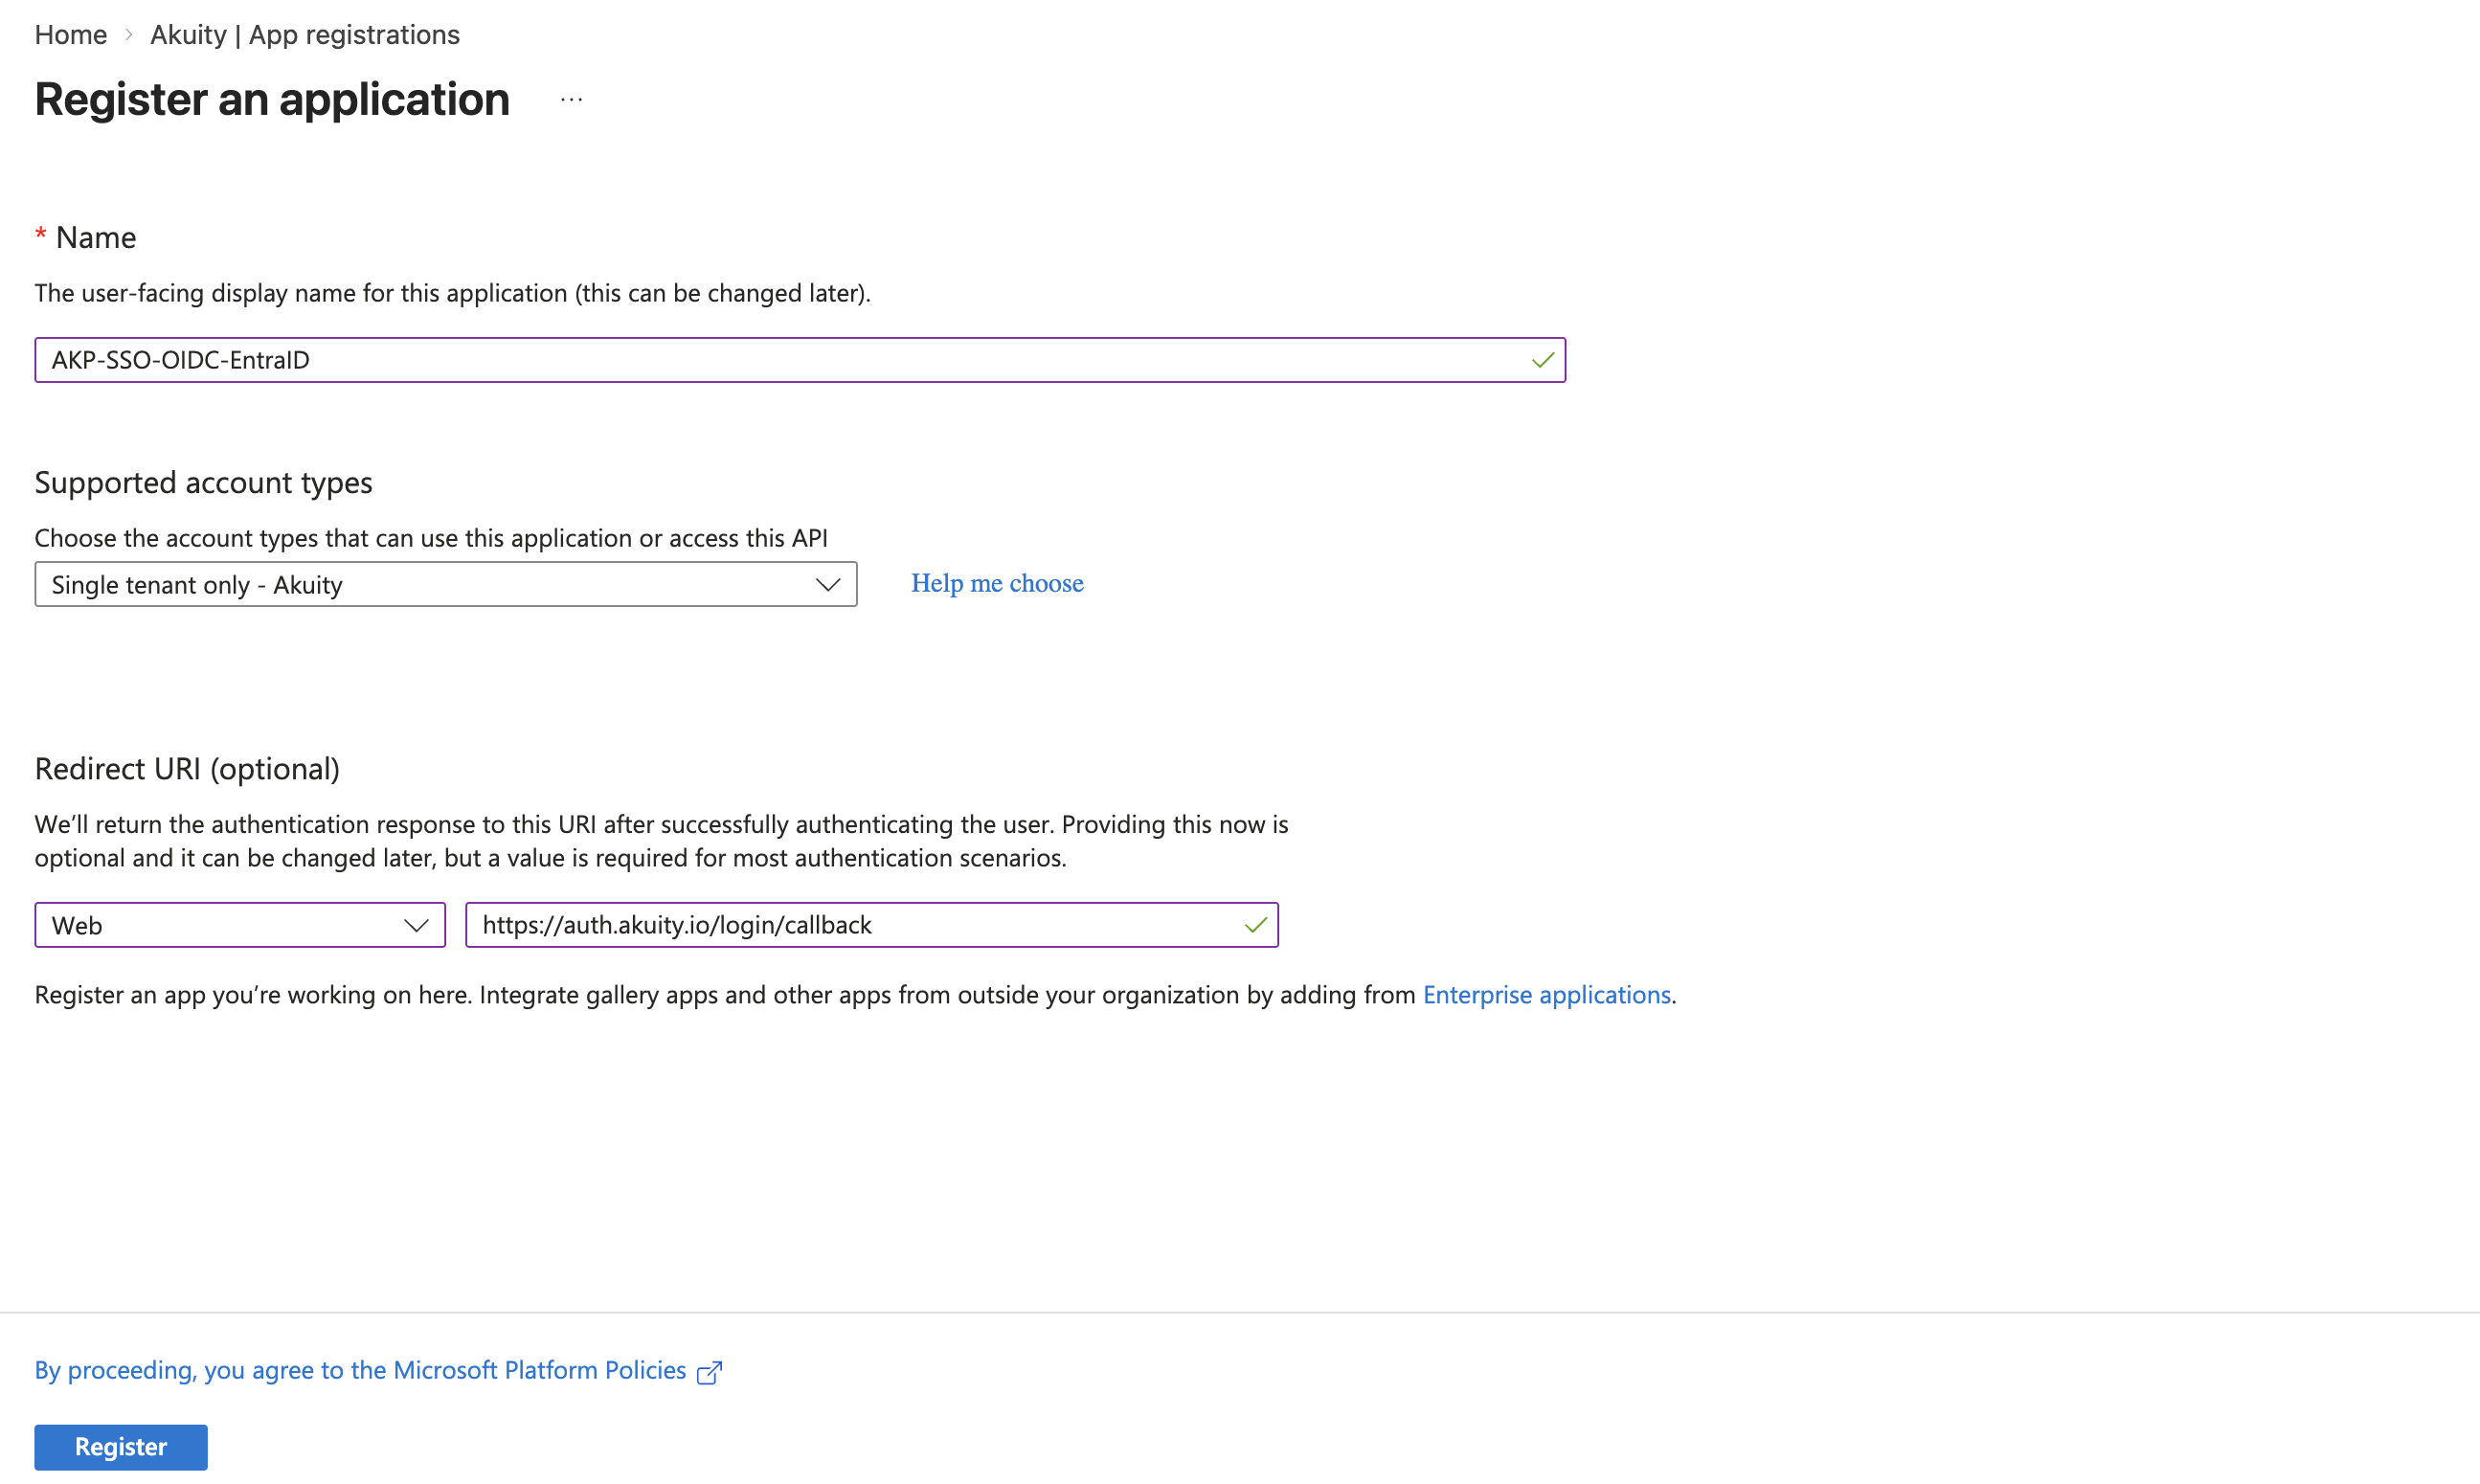
Click + New registration.
-
Fill in the form:
- Name: a descriptive name, for example
AKP-Microsoft-Connector-EntraID - Supported account types: Accounts in this organizational directory only (Single tenant)
- Redirect URI: platform Web, set to
https://auth.akuity.io/login/callback
- Name: a descriptive name, for example
-
Click Register.
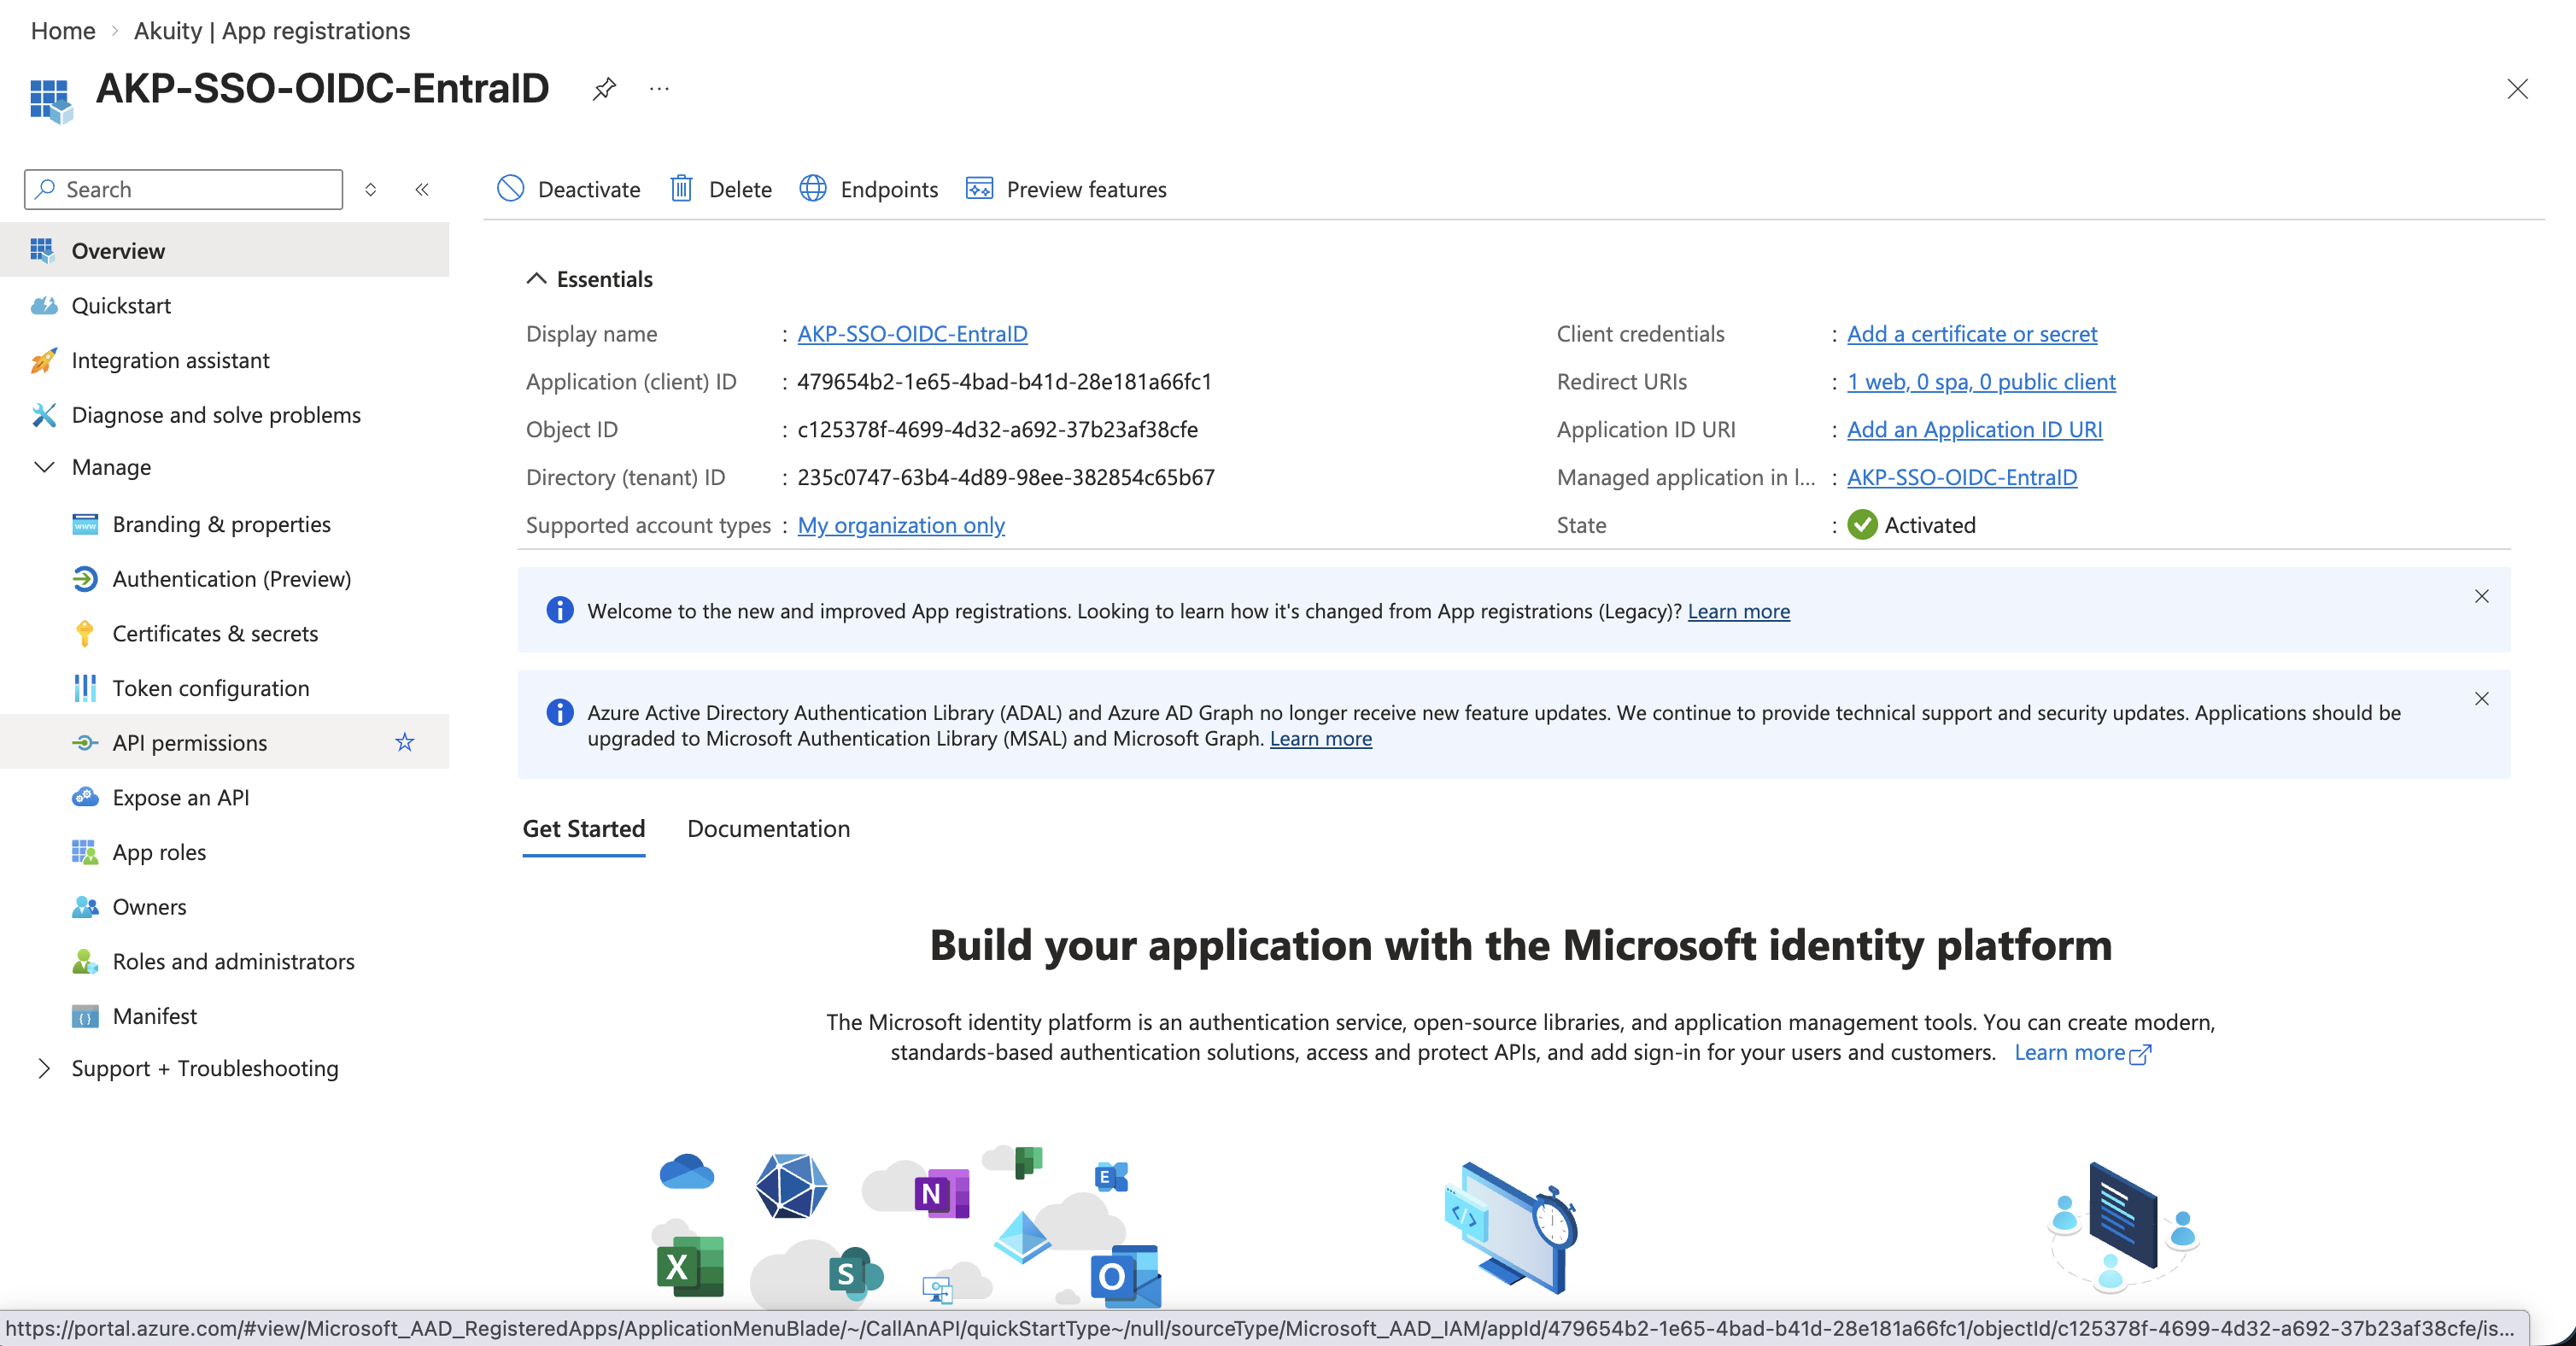
On the Overview page, note the Application (client) ID.
Step 3: Create a client secret
-
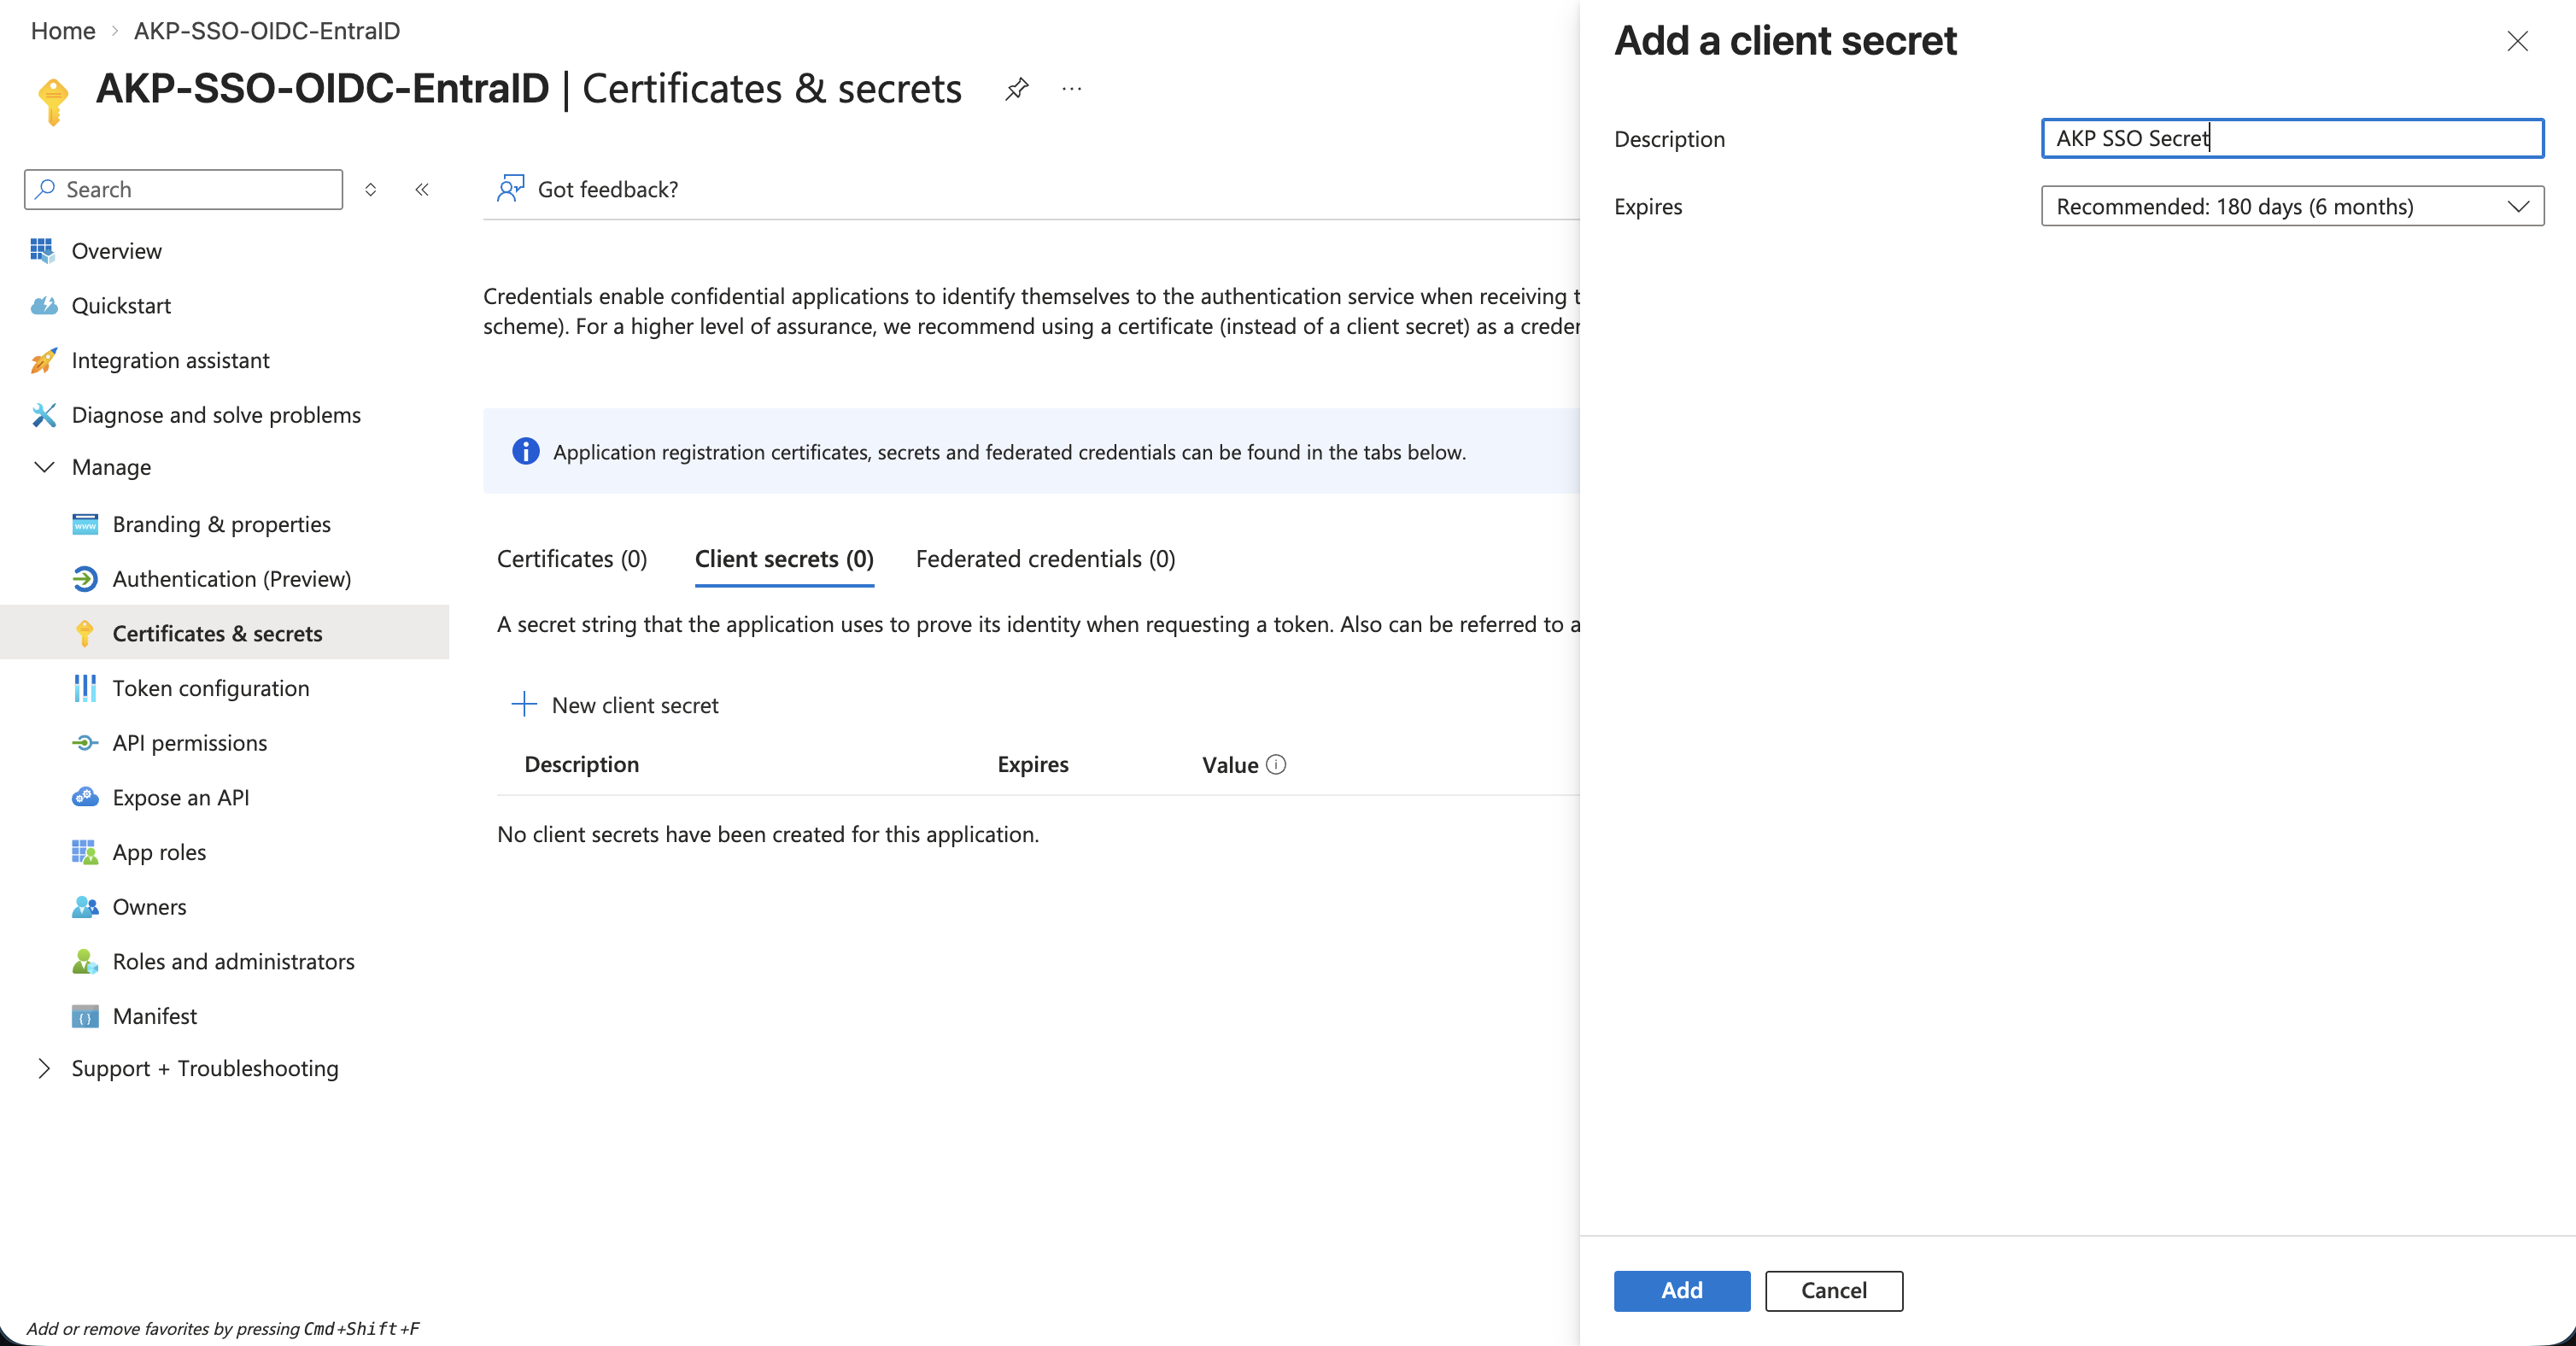
Go to Certificates & secrets → + New client secret.
-
Enter a description, for example
AKP Microsoft Connector Secret, and an expiry such as 12 months. -
Click Add.
-
Copy the secret Value immediately.
Azure shows the Value only once. As soon as you navigate away it is masked permanently. If you lose it, delete the old secret, create a new one, and update the value in the SSO configuration.
Copy the Value column, not the Secret ID.
Step 4: Add API permissions and grant admin consent
The connector reads user and group data through the Microsoft Graph API.
-
In the application, click API permissions.
-
Confirm these two delegated Microsoft Graph permissions are present. Add any that are missing via + Add a permission → Microsoft Graph → Delegated permissions.
Permission Type Admin consent required User.ReadDelegated No Directory.Read.AllDelegated Yes -
Click Grant admin consent for your organization in the toolbar.
-
Confirm with Yes.
-
Both rows must show Granted in the Status column.
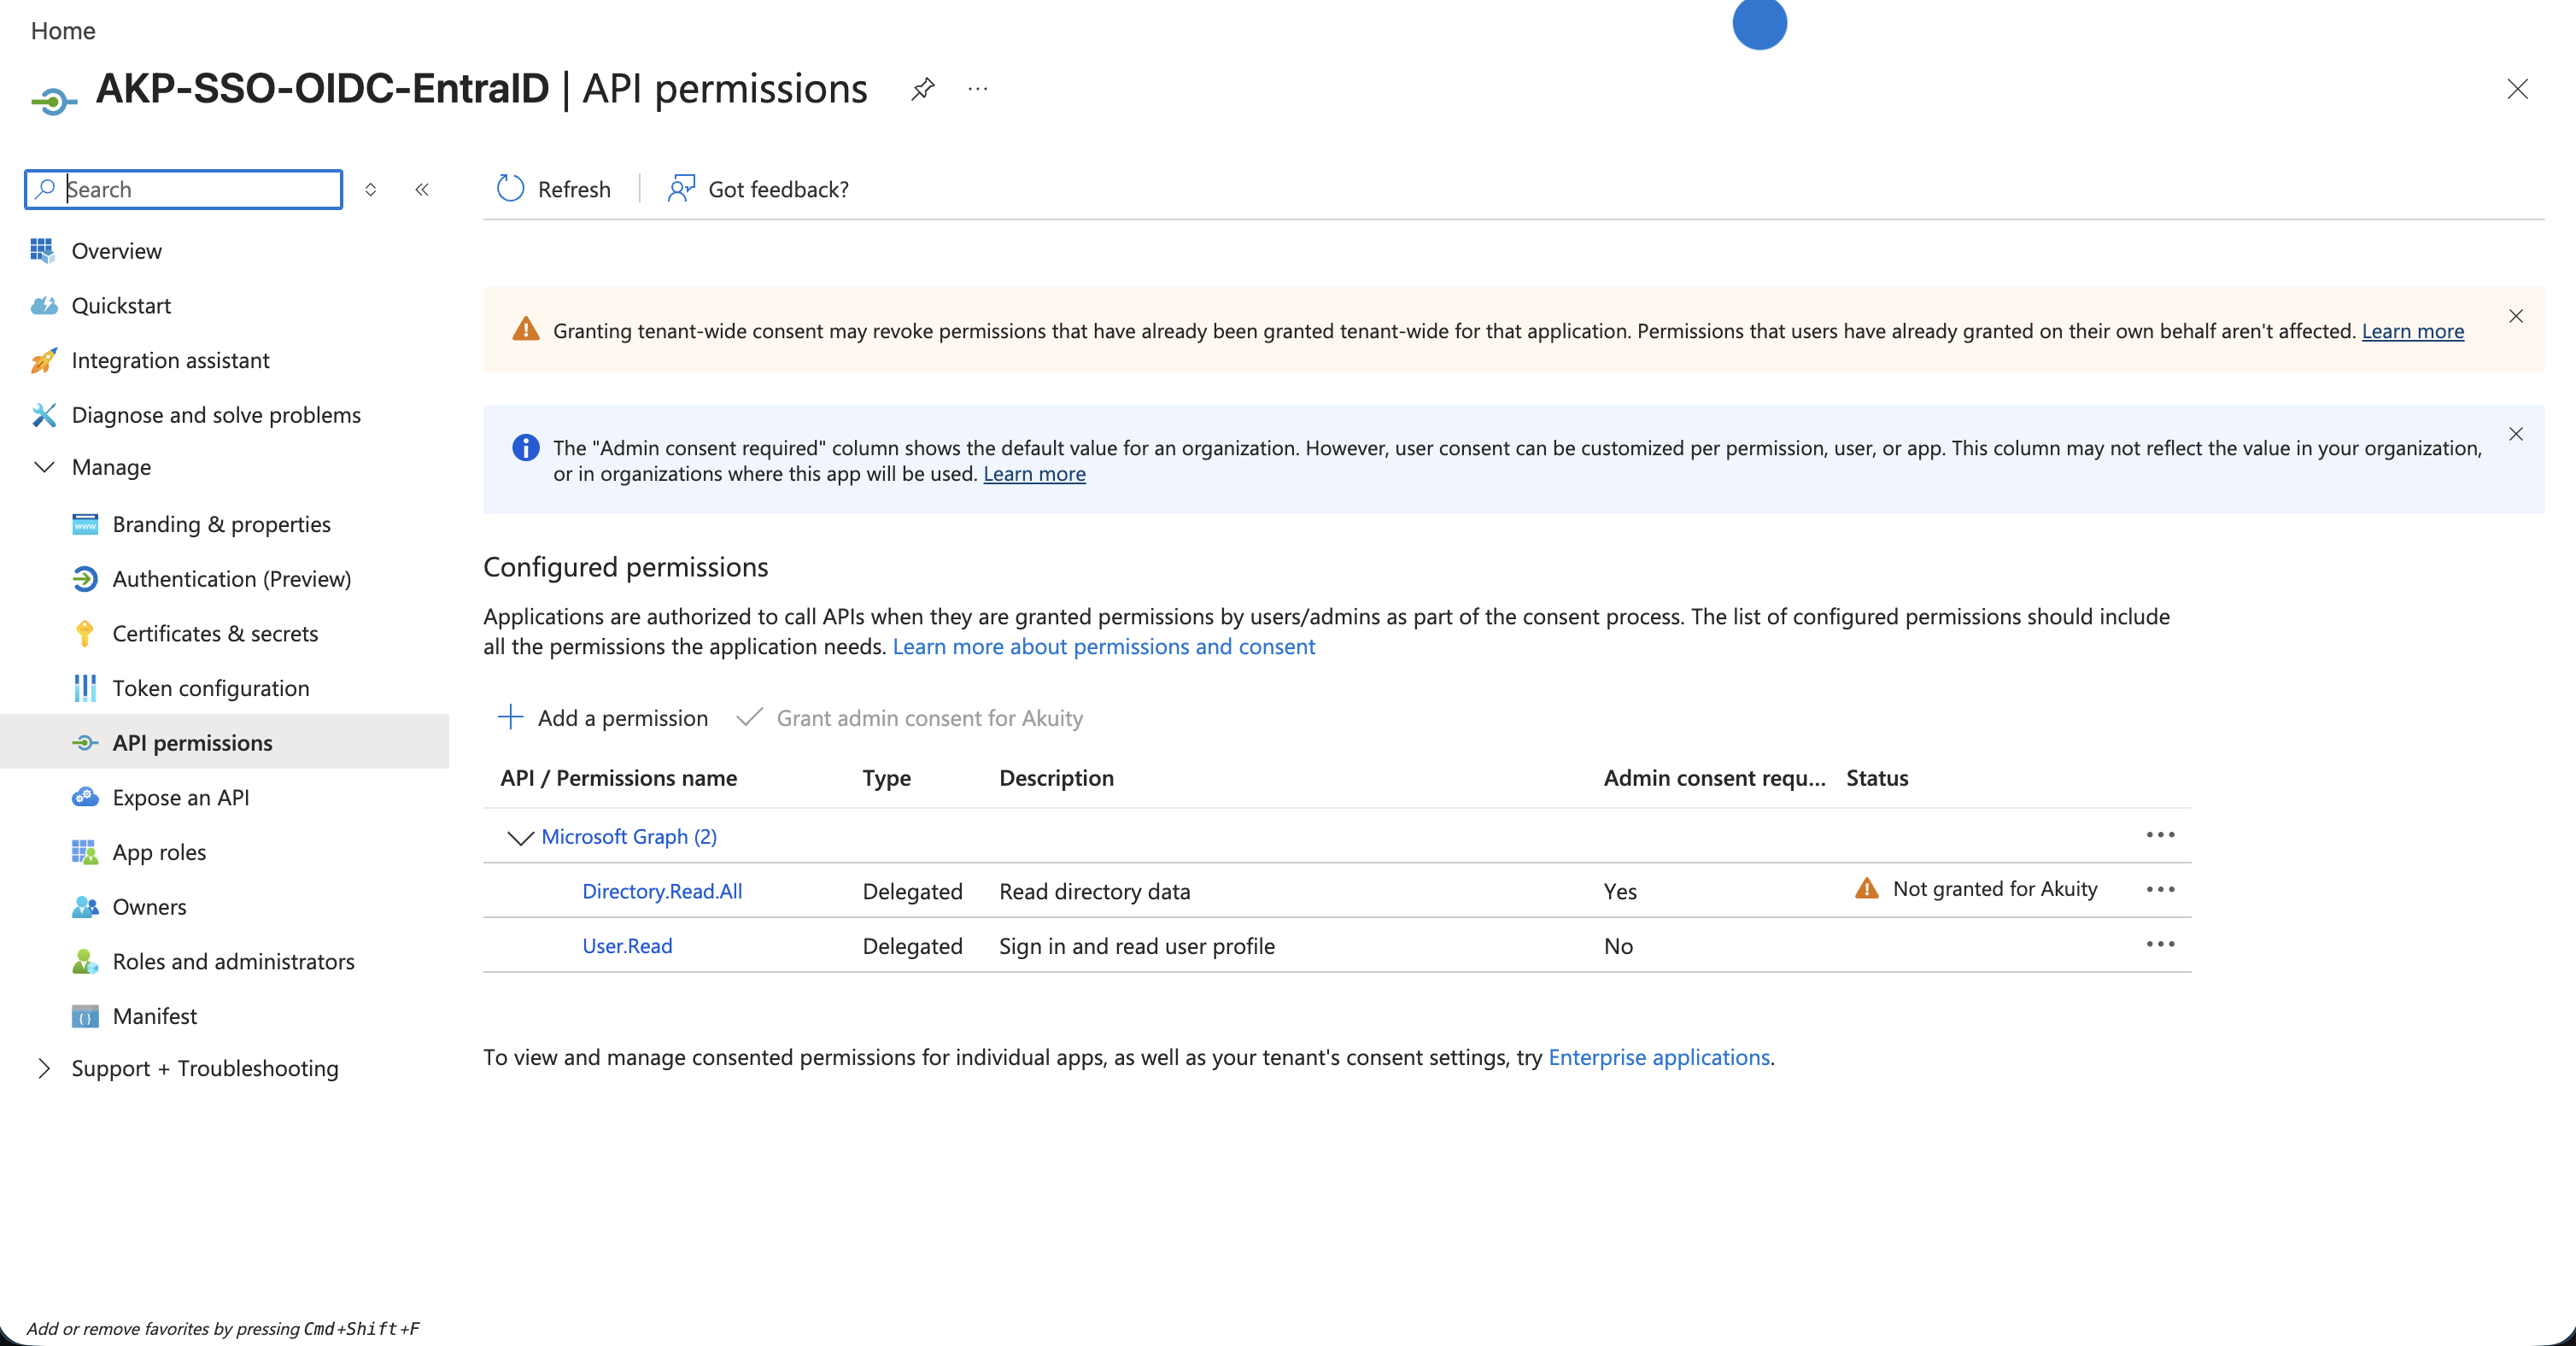
Directory.Read.All requires tenant-wide admin consent. Until it is granted, the Grant admin consent button is greyed out for non-admins, and users attempting to log in are shown an "Approval required" screen and cannot authenticate.
If you are not a tenant admin, ask an administrator to grant consent for this application. Note that the permission is Delegated, not an Application permission.
The yellow banner reading "Granting tenant-wide consent may revoke permissions that have already been granted tenant-wide…" is a generic notice, not an error. It is safe to proceed for a newly created application.
Groups and the Entra ID group limits
Because this connector reads group membership through the Microsoft Graph API rather than from token claims, the Entra ID token group limits — 150 for SAML assertions, 200 for JWT/OIDC tokens — do not constrain it in the same way. This is a genuine advantage over Native OIDC and Native SAML.
If you rely on token-embedded groups elsewhere in your setup, apply a groups claim filter to stay under the limit:
-
In the application, go to Token configuration → + Add groups claim.
-
Select Groups assigned to the application rather than Security groups, so only groups explicitly assigned to the application are emitted.
-
Assign those groups under Enterprise applications → your app → Users and groups.
Assigning groups to an application requires Entra ID P1 or P2. On lower tiers you can still emit security groups, but stay mindful of the 150 and 200 ceilings.
Step 5: Configure SSO in the Akuity Portal
-
Go to Organization → SSO.
-
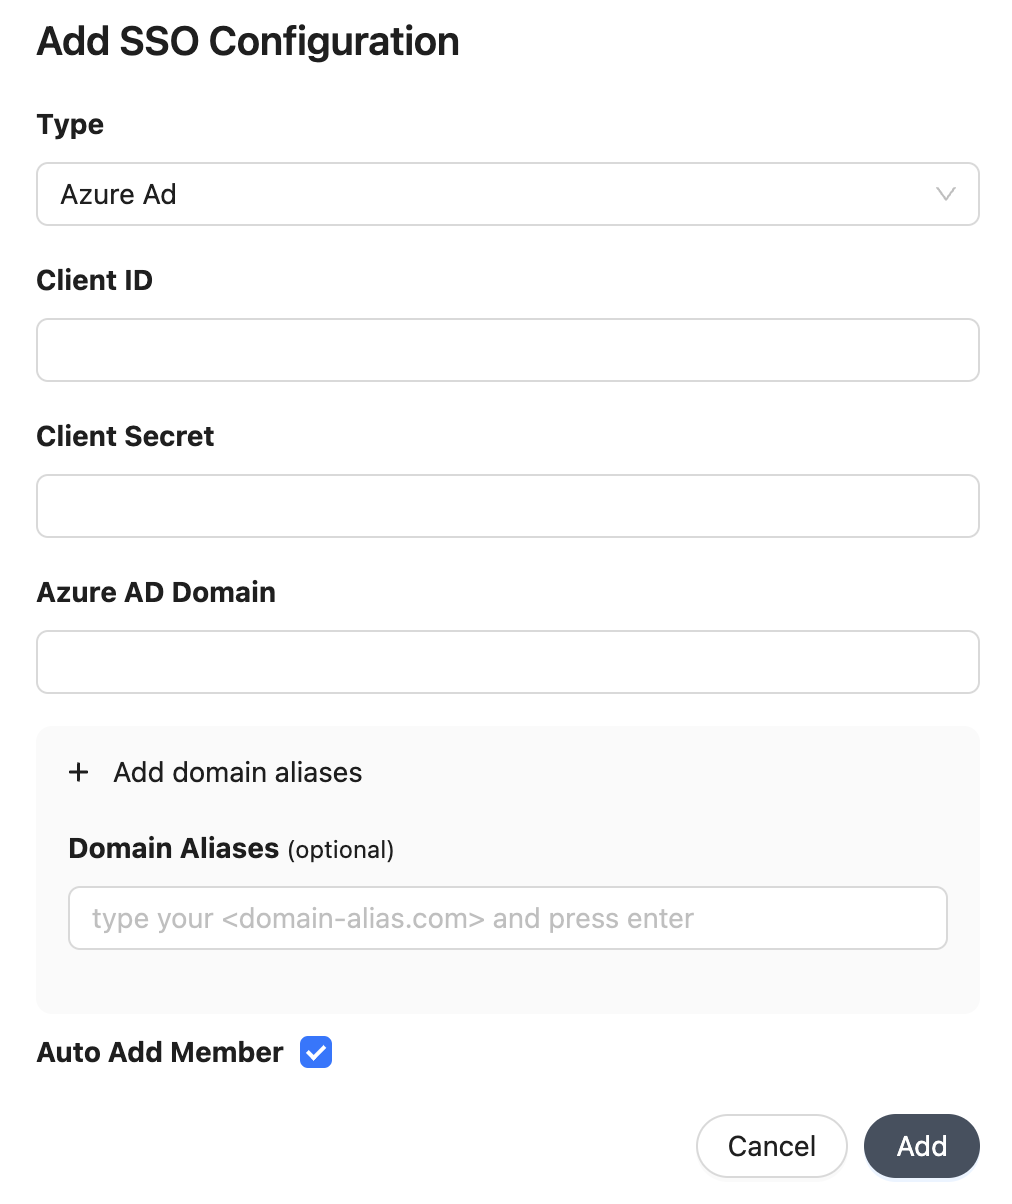
Click Add Configuration and set Type to Azure Ad.
-
Fill in the form:
Field Value Type Azure AdClient ID Your Application (client) ID from Step 2 Client Secret The secret Value from Step 3 Azure AD Domain Your Entra tenant domain, for example yourtenant.onmicrosoft.com— must be verifiedDomain Aliases Your email domain, for example yourcompany.com— must be verifiedAuto Add Member Enabled Group Claims groupsEnforce SSO Off until verified working -
Click Add.
There is considerably less to configure here than with the other two methods: no discovery URL, no issuer endpoints, no metadata XML, no channel selection, and no token-claim setup in Azure.
Enforce SSO requires all organization users to log in via SSO. If the configuration is broken you can be locked out and will need to contact support. Enable it only after Step 6 succeeds.
Step 6: Test the connector login
-
Open a fresh incognito or private window, keeping your non-SSO session open elsewhere.
-
Go to the Akuity Portal login page.
-
Enter your email address, for example
you@yourcompany.com, in the Email address field and click Continue. -
You are redirected to Microsoft. Sign in.
-
You land back in your organization.
Once login works, you can optionally enable Enforce SSO.
You can map Entra ID groups to Akuity roles and teams. See IDP Groups Mapping and IDP Team Mapping at the bottom of this page.
Use the group's Entra ID Object ID as the IdP group value. Group membership is read through the Microsoft Graph API, so the Entra ID token group limits do not apply.
Microsoft Connector troubleshooting
AADSTS50011: The redirect URI … does not match the redirect URIs configured for the application
The callback URL in use is not registered on the application. Read the redirect_uri value out of the error message, or the browser URL, then add it: App registrations → your app → Authentication → Add URI, paste it, and click Save.
"Approval required" screen during login
Admin consent has not been granted for Directory.Read.All. Complete Step 4 — an administrator must click Grant admin consent. Without it, this connector cannot function.
The "Grant admin consent" button is greyed out
Your account lacks the required role. Either have an administrator grant consent, or obtain Cloud Application Administrator or Global Administrator. If a role was just assigned to you, sign out of the Azure Portal and back in — role assignments only apply to a new token. If the role is PIM-eligible, activate it first under Privileged Identity Management → My roles.
API Error: domain_alias already exists
The domain is already claimed by another SSO connection. Domain aliases must be unique. Check whether another organization has a connection using that domain, or use a different verified domain.
domain needs to be verified…
Either the Azure AD Domain or a domain alias is not verified. Both must be verified (Step 1), including the .onmicrosoft.com tenant domain, which is easy to overlook.
Lost the client secret
It cannot be recovered. Create a new secret (Step 3) and update the Client Secret field in the SSO configuration.
Groups not appearing, or group mapping not working
- Confirm
Directory.Read.Allis granted with admin consent. Group lookup goes through Microsoft Graph and silently returns nothing without it. - Confirm Group Claims is set to
groupsin the Akuity form - Use the group's Object ID in IDP mapping, not the display name
Microsoft Connector summary
| Component | Value |
|---|---|
| Azure app type | App registration (single tenant) |
| Redirect URI | https://auth.akuity.io/login/callback |
| Connector type | Azure Ad |
| Azure AD Domain | Entra tenant domain, for example yourtenant.onmicrosoft.com — must be verified |
| Domain Aliases | Email domain, for example yourcompany.com — must be verified |
| Required API permissions | User.Read (delegated), Directory.Read.All (delegated) |
| Admin consent | Required |
| Groups sourced from | Microsoft Graph API — token group limits do not apply |
| Plan requirement | Enterprise plan, with the owner role on the organization |
| Key gotchas | Admin consent is mandatory; two domains must be verified including .onmicrosoft.com; secret values cannot be retrieved; register the correct callback or hit AADSTS50011; keep a non-SSO login path; keep Enforce SSO off until verified |
IDP Groups Mapping
IDP Groups does not work for Okta native integration as Okta does not support groups claim. Please use generic SAML/OIDC option instead to connect with Okta if you want to use this feature.
To configure IDP Groups for an Organization in the Akuity Platform:
-
Go to Organization > SSO.
-
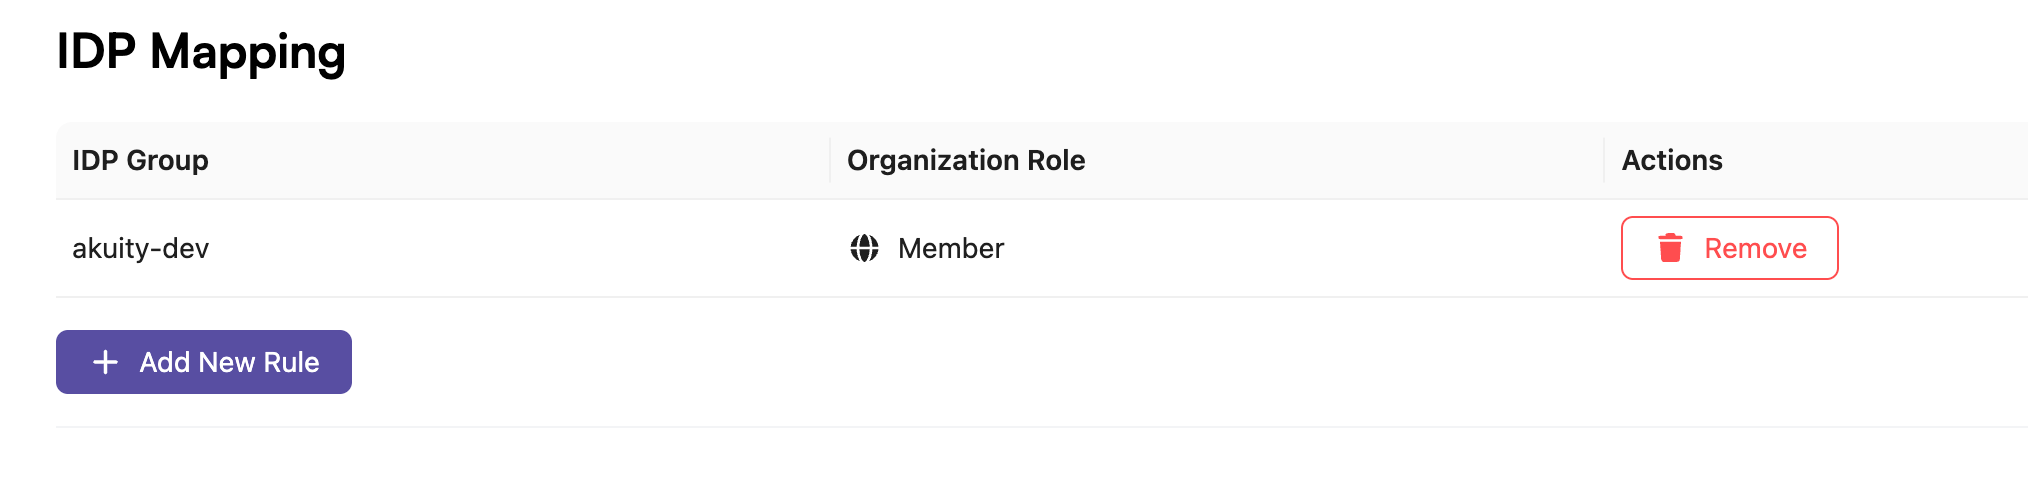
Click Add New Rule in the IDP Mapping.
-
In the Add IDP Group Mapping select the role and specify the corresponding IDP Group for your provider.
-
Click the Add button.
In the SSO settings, if the Auto Add Member is checked the new user will join your organization with the member role automatically.
IDP Team Mapping
IDP Team Mapping does not work for Okta native integration as Okta does not support groups claim. Please use generic SAML/OIDC option instead to connect with Okta if you want to use this feature.
This feature allows you to map users with a specific OIDC group to a team in your organization.
Your organization must have at least one Team.
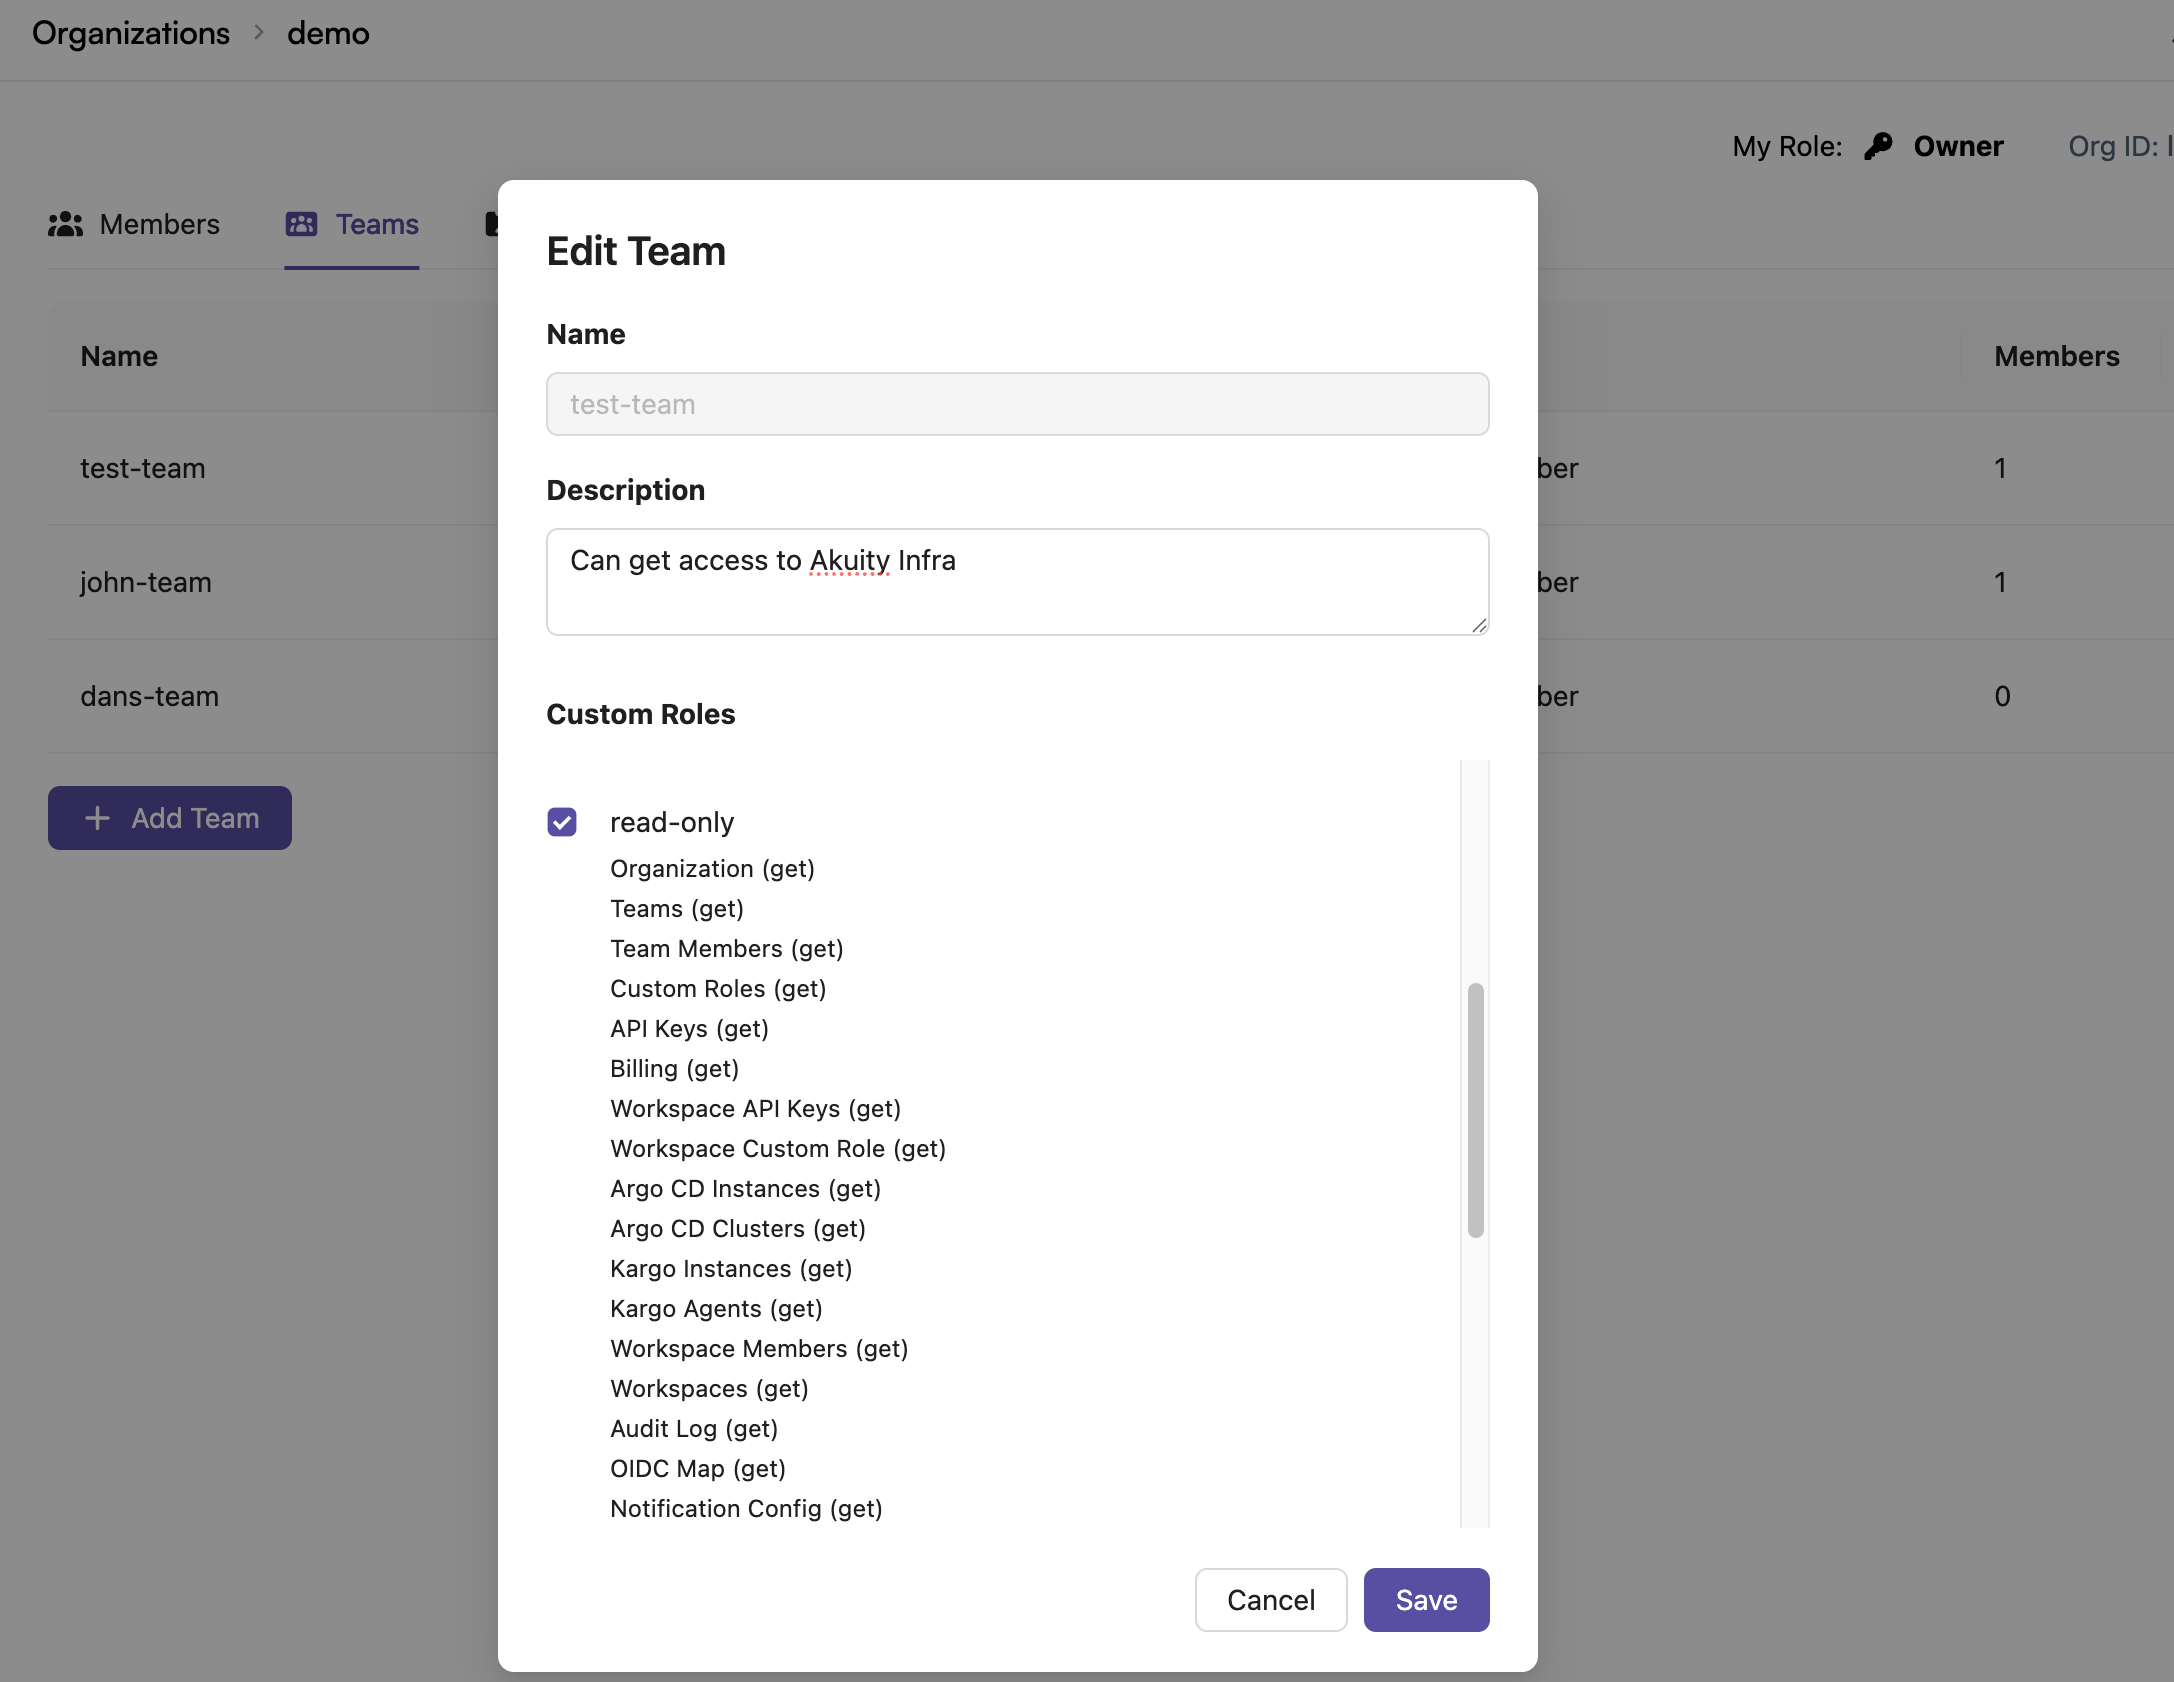
To configure this feature for an Organization in the Akuity Platform:
-
Go to Organization > SSO.
-
Scroll down to the "IDP Team Mapping" section and click Add New Mapping.
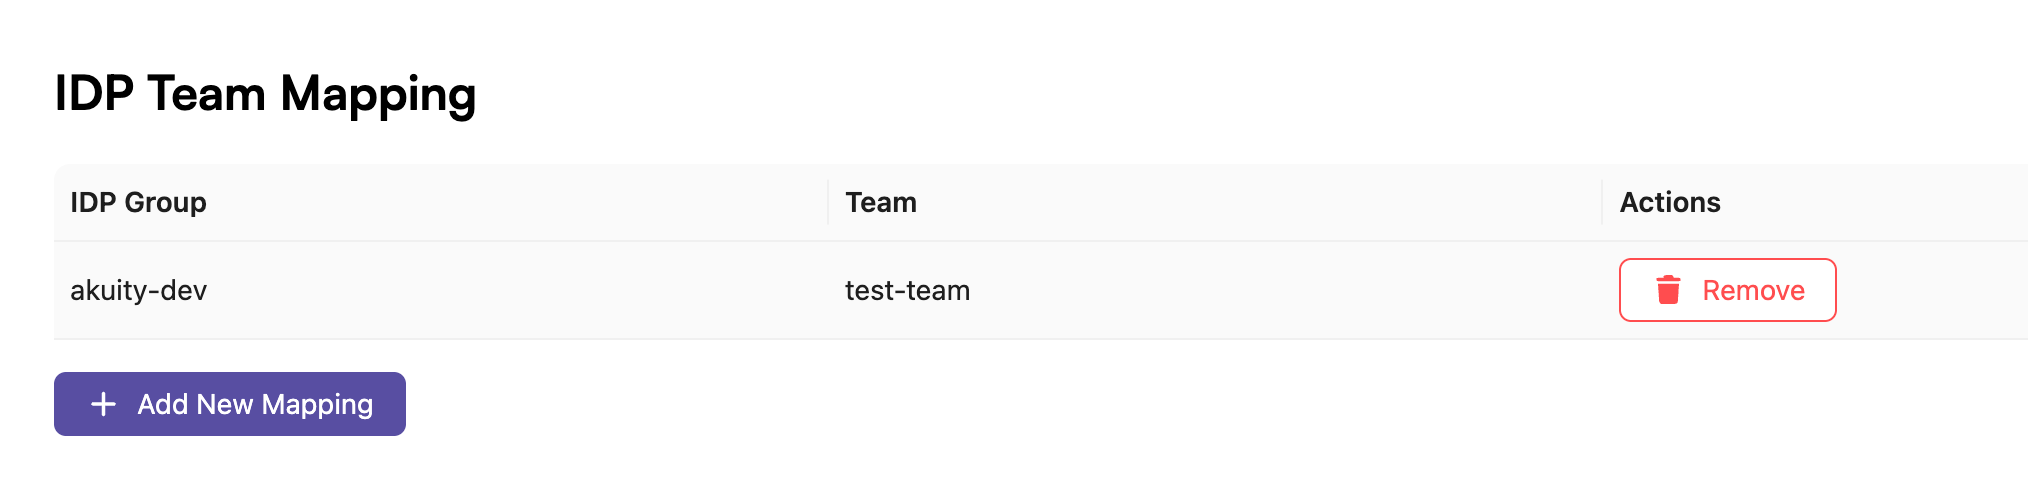
-
In the modal that appears, specify an IDP group and select an existing team from the dropdown.
-
Click the Add button.
Now, when a user logs in with the specified IDP group, they will be added to the selected team in your organization.