Okta
Configure Okta as the Single Sign-On provider for your organization on the Akuity Platform.
There are three ways to connect Okta. Pick one:
| Method | Connector type | Credential | Group mapping |
|---|---|---|---|
| Okta with OIDC | OIDC | Client ID and secret | Supported |
| Okta with SAML | SAML | Metadata XML | Supported |
| Okta (native connector) | Okta | Client ID and secret | Not supported |
The native Okta connector is the quickest to set up but does not deliver the groups claim, so if you need to map Okta groups to Akuity roles or teams, use the OIDC or the SAML method.
Akuity Platform SSO is available on Enterprise plans only. Please contact our Sales Team to access the feature.
The owner role on the Organization is required to configure SSO.
Okta with OIDC
Connect Okta through the generic OIDC connector. Use this method if you need group mapping: it is the only way to get Okta's groups claim to the Akuity Platform.
Okta's native connector does not deliver the groups claim, so IDP Groups Mapping and IDP Team Mapping do not work with it. If you have already created an Okta-type configuration and need groups, delete it and create an OIDC-type configuration as described here.
An organization can have only a single SSO connection. If your organization already has one configured, you must delete it before adding another.
Because only one SSO connection is allowed, changing methods means deleting your existing configuration. While you make the change, keep a separate browser session logged in through your current non-SSO login. If the new configuration is wrong and you have no other way in, you will need to contact support.
For this method you also need:
- Okta Super Admin, or App Admin plus Org Admin, enough to create an app integration and edit its token claims.
- Your Okta domain, for example
dev-12345.okta.comoracme.okta.com. - Your Akuity Organization ID, needed only for the optional IdP-initiated login step in Step 6. Find it on the Organization page in the Akuity Platform.
Step 1: Verify your domain
SSO matches users by email domain, so the domain must be verified first.
-
In the Akuity Portal, go to Organization → Settings → Domain.
-
Add your domain (for example,
acme.com) under New Domain Aliases. -
Submit it for verification.
See Domain Verification for the full process.
For security purposes, your domain and domain aliases will be submitted to Akuity for manual review and approval.
Wait until the status shows Verified before configuring SSO. Allow for this review when planning a cutover — the configuration is not live the moment you save it.
Step 2: Note the callback URL
-
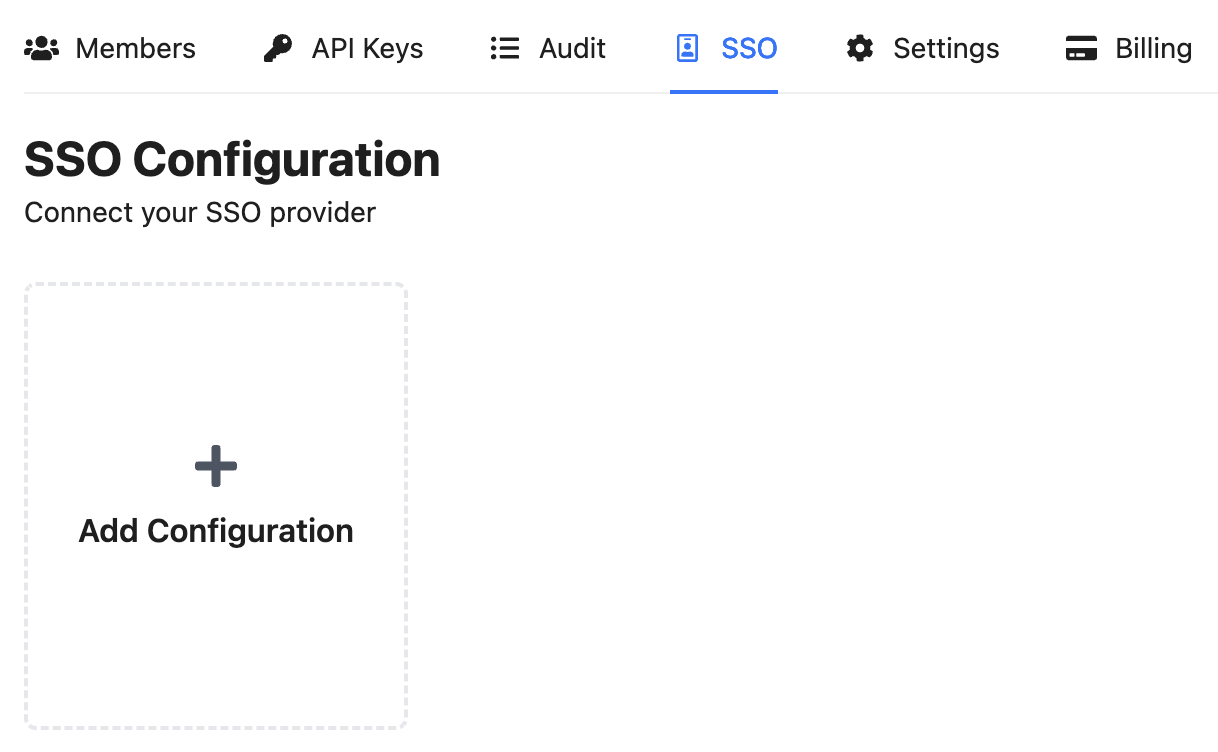
Go to Organization > SSO.
-
Click Add Configuration.
-
Set Type to OIDC.
-
Find the Callback URL field. This is the redirect URI you must register in Okta:
https://auth.akuity.io/login/callback
The field is read-only, it tells you what to register in Okta. Copy it and leave the form open; you will return to it in Step 7.
https://auth.akuity.io/login/callback is a fixed value. A trailing slash, http:// instead of https://, or a typo produces a 400 Bad Request at sign-in time — in Okta, "The 'redirect_uri' parameter must be a Login redirect URI in the client app settings."
This URI belongs to Auth0, the identity provider that brokers Akuity Platform authentication. It is the same for every customer.
Step 3: Register an OIDC application in Okta
Create a confidential client — an application that can safely hold a client secret, which the Akuity Platform requires for the back-channel flow.
-
Sign in to your Okta Admin Console at
https://<your-okta-domain>/admin. -
In the left navigation, expand Applications and click Applications.
-
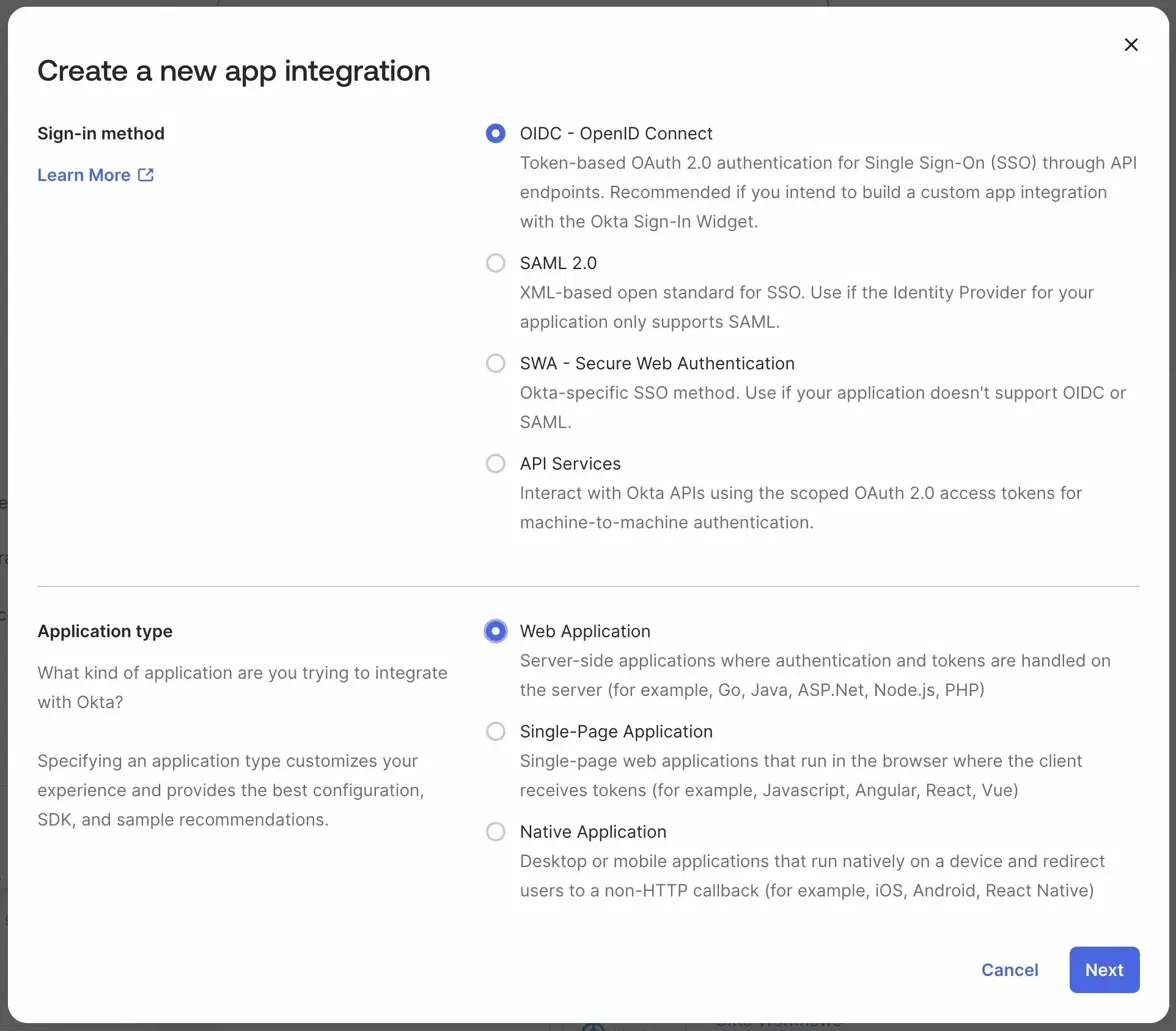
Click Create App Integration.
-
For Sign-in method, select OIDC - OpenID Connect.
-
For Application type, select Web Application, then click Next.
-
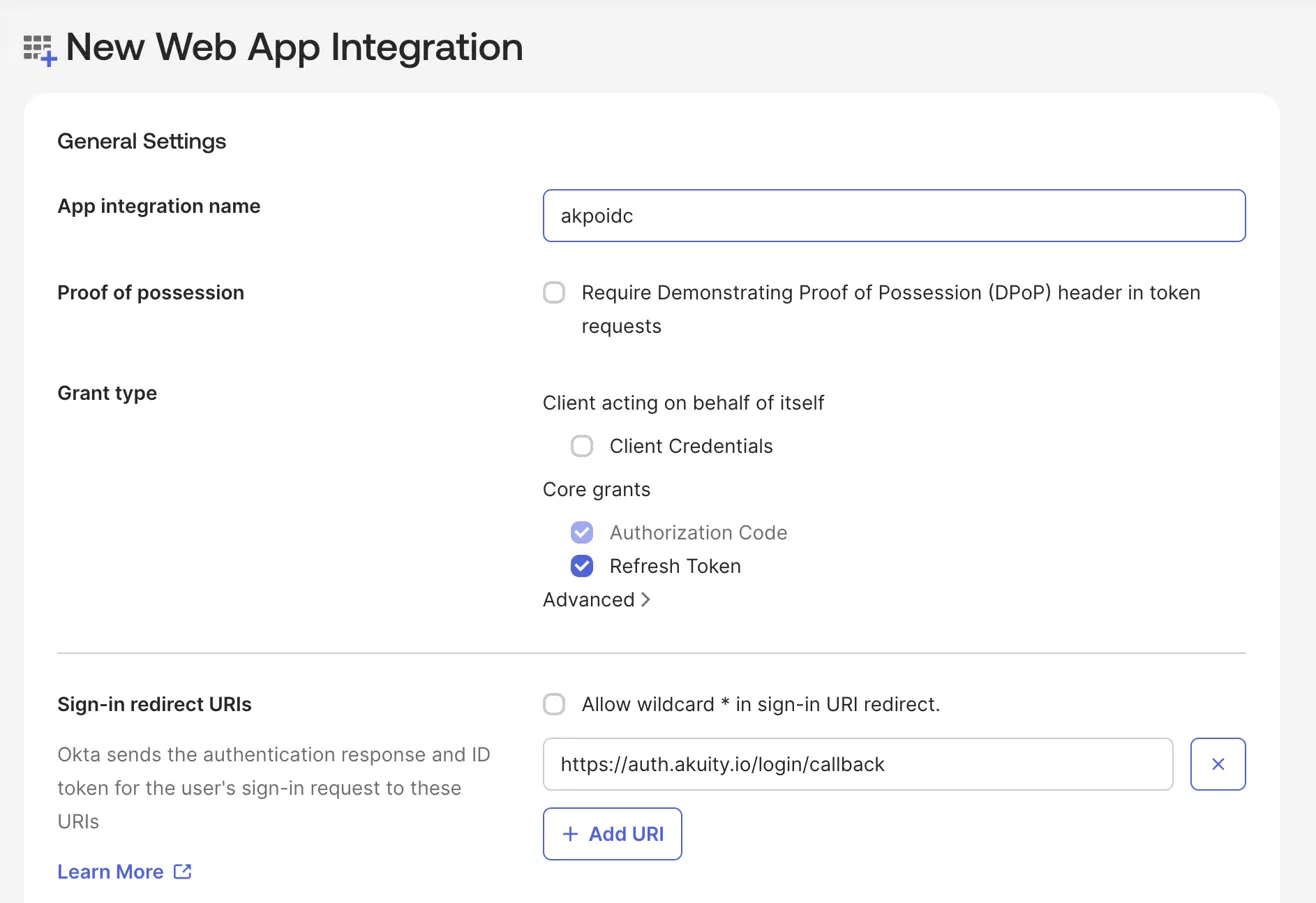
In App integration name, enter a name your administrators will recognize, such as
akuity-platform-sso. -
Leave Proof of possession unchecked. Do not enable Require Demonstrating Proof of Possession (DPoP) header in token requests.
-
Under Grant type, confirm the following:
Grant type Setting Authorization Code Checked — required, and enabled by default Refresh Token Optional; safe to leave checked Client Credentials Unchecked -
Under Sign-in redirect URIs, remove any pre-filled values and enter exactly
https://auth.akuity.io/login/callback. -
Leave Allow wildcard * in sign-in URI redirect unchecked.
Single-Page Application creates a public client with no client secret, so it cannot complete the back-channel code exchange. API Services creates a client-credentials-only app with no user login flow.
Either option will fail at sign-in, and Okta does not let you change the application type after creation — you would have to delete the app and start over.
Step 4: Assign users and copy the credentials
First, assign users. Okta will not issue a token for a user who is not assigned to the application.
-
Scroll to the Assignments section.
-
Under Controlled access, choose who can use this application. Allow everyone in your organization to access is the simplest starting point; alternatively select Limit access to selected groups and add the groups that should be able to sign in.
-
Click Save.
If a user is not assigned to this app — directly or through a group — Okta rejects the authorization request with "User is not assigned to the client application."
This is the most common cause of a failed first login test.
Then collect the credentials. After saving, Okta opens the application's detail page on the General tab.
-
Find the Client Credentials section.
-
Copy the Client ID. In Okta it looks like
0oa11e9he9bqfglYq698. -
Confirm Client authentication is set to Client secret.
-
Confirm Proof Key for Code Exchange (PKCE) is not checked.
-
Scroll to CLIENT SECRETS, click the eye icon to reveal the secret, and copy it.
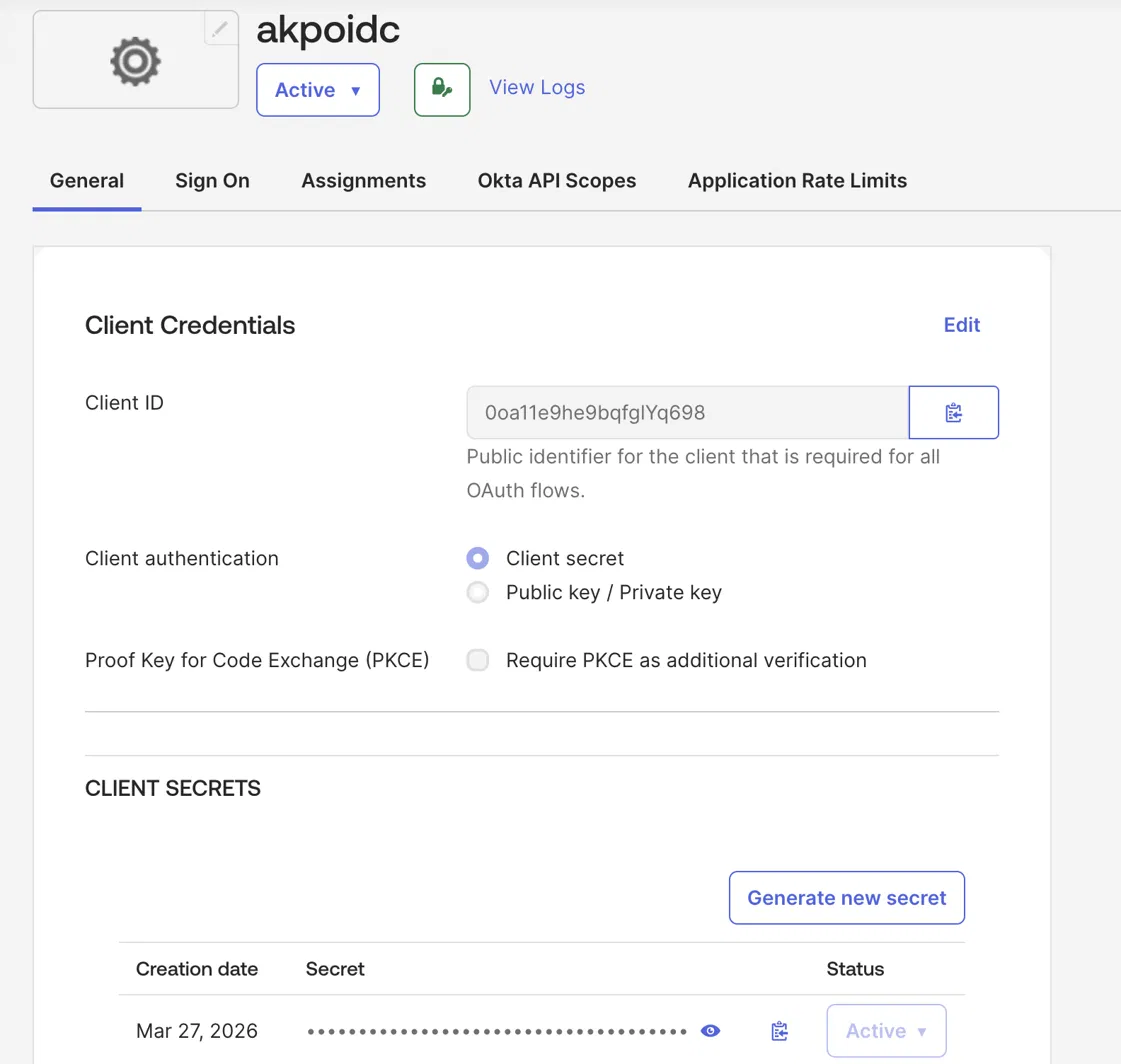
The Akuity Platform performs a confidential-client code exchange authenticated with the client secret, and does not send a PKCE code verifier.
Enabling Require PKCE as additional verification causes the token request to fail with invalid_grant / "PKCE verification failed" after the user has already authenticated — a confusing failure mode, because the login screen succeeds and the error only appears on the redirect back.
Okta shows the secret value on demand rather than only once, but it should still be handled as a credential: paste it directly into the Akuity Platform form, and do not commit it to Git, paste it into a ticket, or store it in a shared document.
If you later rotate the secret with your provider, you must update it in the Akuity SSO configuration at the same time, or all SSO logins will break immediately.
Step 5: Issue the groups claim
This step is what makes IDP Groups Mapping and IDP Team Mapping possible. Okta does not place group memberships in the ID token unless you explicitly configure a claim.
Do this with a dedicated custom authorization server. It gives you a self-contained place to define the scope, the claim, its filter, the access policy, and token lifetimes for this integration alone — without touching anything else in your Okta org.
Custom authorization servers are part of Okta's API Access Management feature. If Security → API → Authorization Servers offers no Add Authorization Server button, your Okta org does not have it enabled — use the alternative at the end of this step instead.
Step 5a: Add the authorization server
-
In the Okta Admin Console left navigation, expand Security and click API.
-
Make sure you are on the Authorization Servers tab.
-
Click Add Authorization Server.
-
Fill in the dialog:
Field Value Name A short identifier, for example akpAudience https://akuity.cloud/Description Something meaningful, for example auth server -
Click Save.
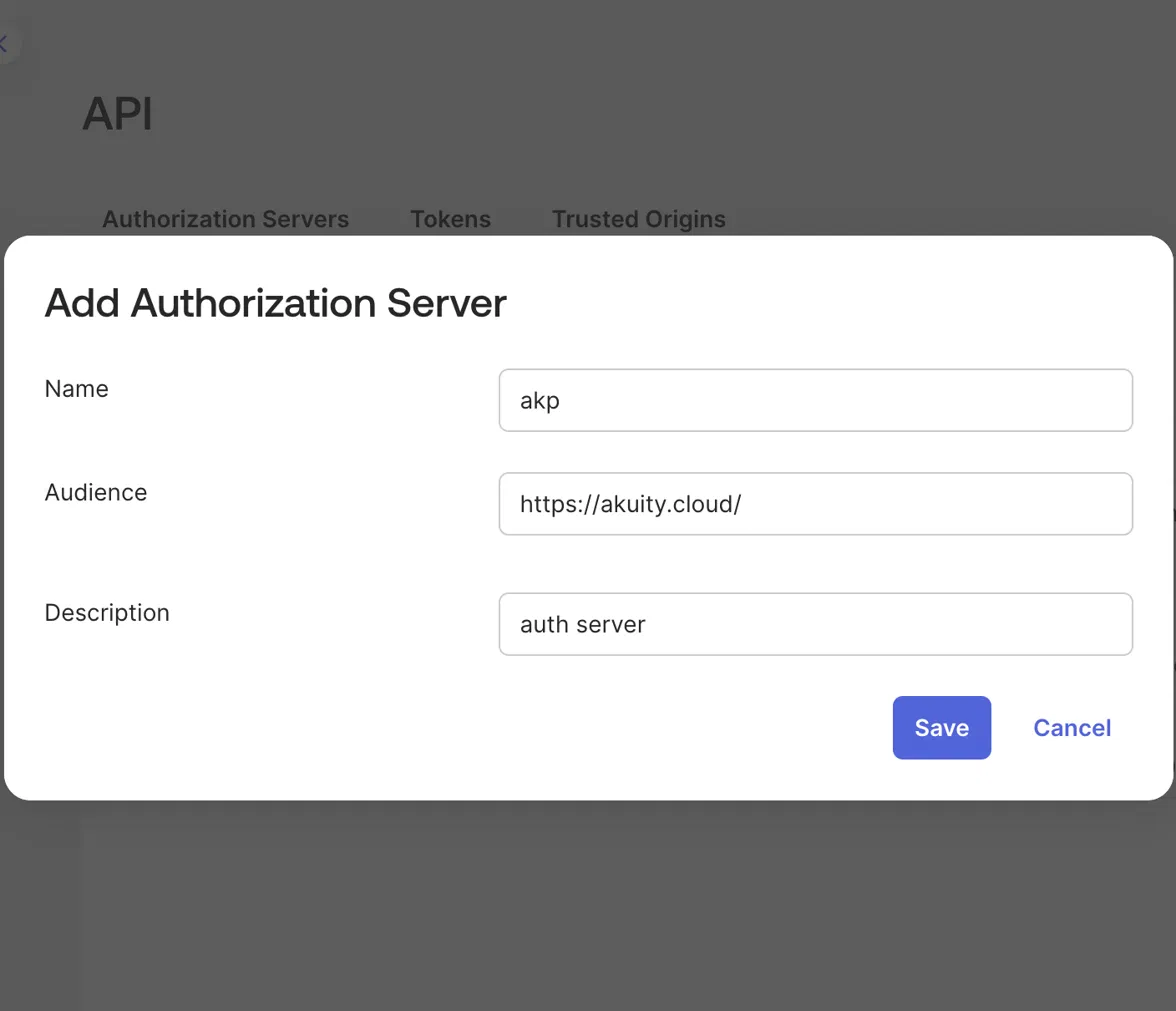
Okta then opens the new authorization server. Note its Issuer URI on the Settings tab — it looks like https://<your-okta-domain>/oauth2/aus1a2b3c4d5e6f7g8h9. This is the Discovery URL you will enter in Step 7.
The audience becomes the aud claim on access tokens minted by this authorization server. The Akuity Platform's login flow relies on the ID token, whose audience is always the client ID, so this value is not used for validation — but setting it to https://akuity.cloud/ keeps the server's purpose obvious to the next administrator who reads it.
Once set, avoid changing it: anything already validating that audience would break.
Step 5b: Add the groups scope
The openid, profile, and email scopes already exist on a new authorization server. groups does not, so add it.
-
On the authorization server page, open the Scopes tab.
-
Click Add Scope.
-
Fill in the dialog:
Field Value Name groups— must match exactly; this is the value the Akuity Platform requestsDisplay phrase A short human-readable label, for example grp membershipDescription For example Allows to see what grps you belong toUser consent See the caution below before choosing Block services Check Block services from requesting this scope Default scope Leave Set as a default scope unchecked Metadata Leave Include in public metadata unchecked -
Click Create.
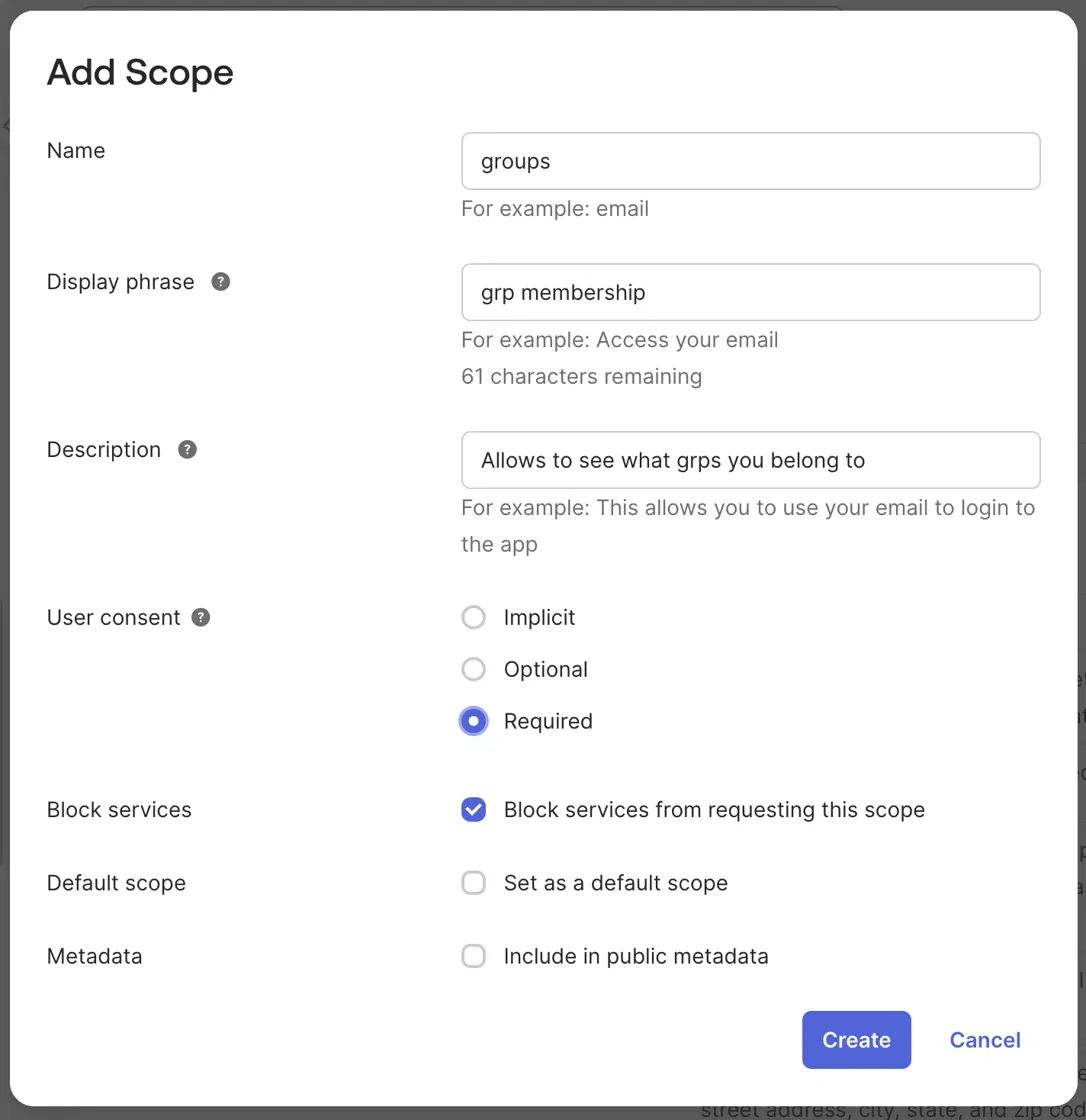
Setting User consent to Required means Okta will ask the user to grant this scope — but only if consent is also enabled on the application itself, under the app's General Settings → User consent. If it is, your users see an extra "grant access" prompt on first login, which is often unexpected in an internal SSO flow.
If you do not want any prompt, set User consent to Implicit instead. Implicit grants the scope silently and is the more common choice for a first-party integration like this one.
Block services from requesting this scope prevents machine-to-machine clients using the client credentials flow from asking for groups. Since this scope only makes sense for an interactive user login, checking it narrows the blast radius at no cost.
Leaving Set as a default scope unchecked means groups is only included when it is explicitly requested — which the Akuity Platform does, because you list it in Scopes in Step 7. Marking it default would hand group data to every client on this authorization server.
Step 5c: Add the groups claim
The scope grants permission to ask for group data. The claim is what actually puts it in the token.
-
Open the Claims tab.
-
Click Add Claim.
-
Fill in the dialog:
Field Value Name groupsInclude in token type ID Token, with the adjacent dropdown set to Always Value type Groups Filter Matches regex with a pattern that matches only the groups relevant to the Akuity Platform, for example akuity-.*Disable claim Leave unchecked Include in The following scopes: — add groups -
Click Create.
groupsThe Akuity Platform's Groups Claim toggle reads the claim named groups. A differently named claim, such as okta_groups or roles, will not be read, and group mappings will silently match nothing.
Logins will still succeed — users will simply arrive with no mapped role, which makes this a hard failure to diagnose.
The Akuity Platform reads group membership from the ID token. A claim configured only for the access token will never be seen, producing the same silent no-mapping outcome.
Setting the second dropdown to Always ensures the claim is present on every ID token this server issues, rather than only when a matching scope combination is requested.
A .* filter matches every group the user belongs to, including Okta's built-in Everyone. That adds noise to your mappings and inflates the ID token.
This is not merely cosmetic. Okta caps how many groups it will place in a token, and users belonging to very large numbers of groups can have their group list silently truncated. If group mappings work for some users but not others, an over-broad filter is the first thing to check.
A prefix convention such as akuity-.* keeps the token small and the intent explicit.
Step 5d: Add an access policy
A custom authorization server issues no tokens at all until an access policy permits it. This is the step most often missed.
-
Open the Access Policies tab.
-
Click Add New Access Policy.
-
Fill in the dialog:
Field Value Name For example akuityDescription For example access to akpAssign to The following clients: — add the application you created in Step 3, for example akpoidc -
Click Create Policy.
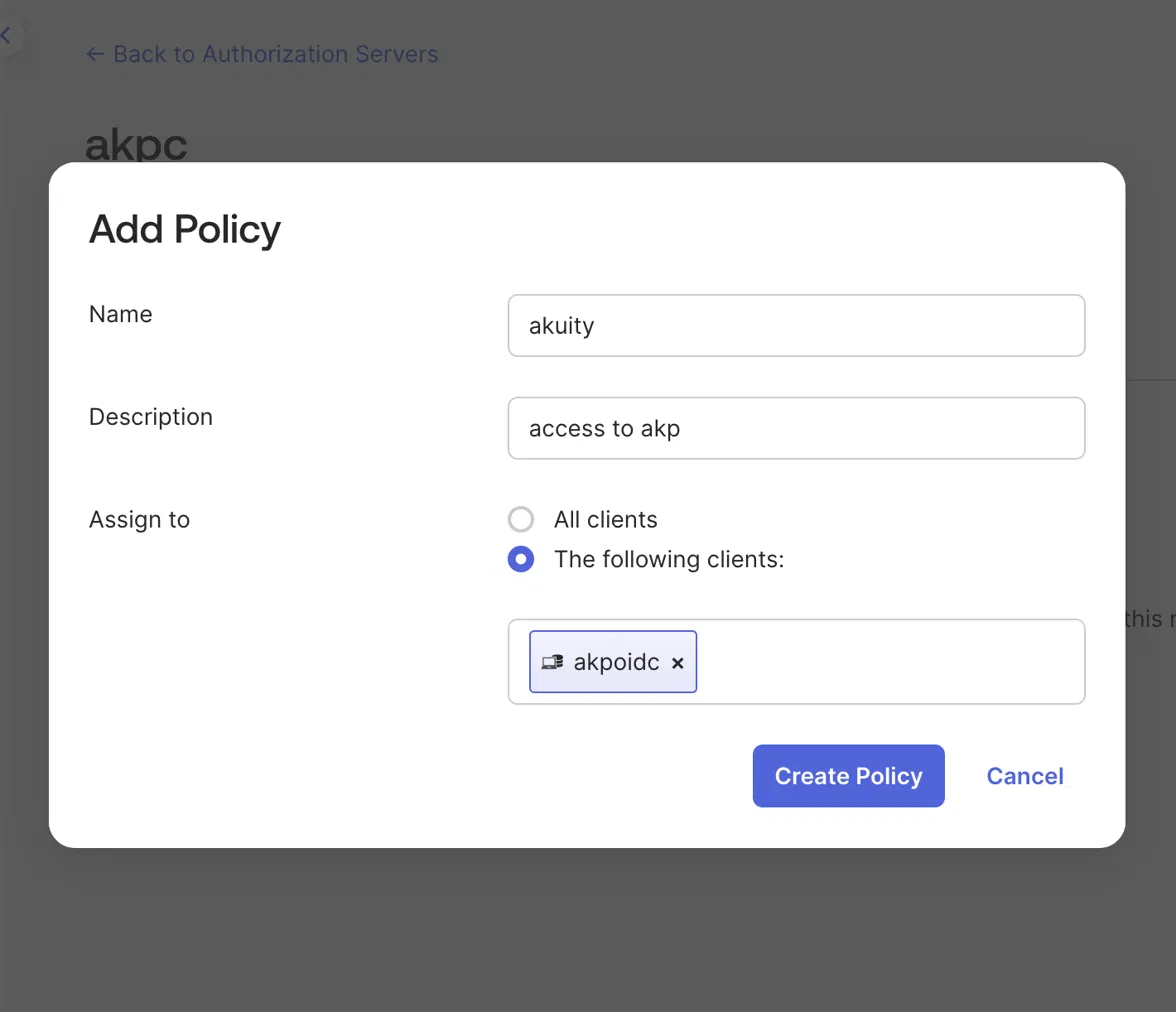
All clients lets every application in your Okta org request tokens from this authorization server, including the groups scope. Naming the specific client keeps this authorization server dedicated to the Akuity Platform integration, which is the whole reason for creating a separate one.
Step 5e: Add a rule to the policy
A policy with no rules still denies everything, so the policy is not finished until it has at least one rule.
-
With the
akuitypolicy selected, click Add rule.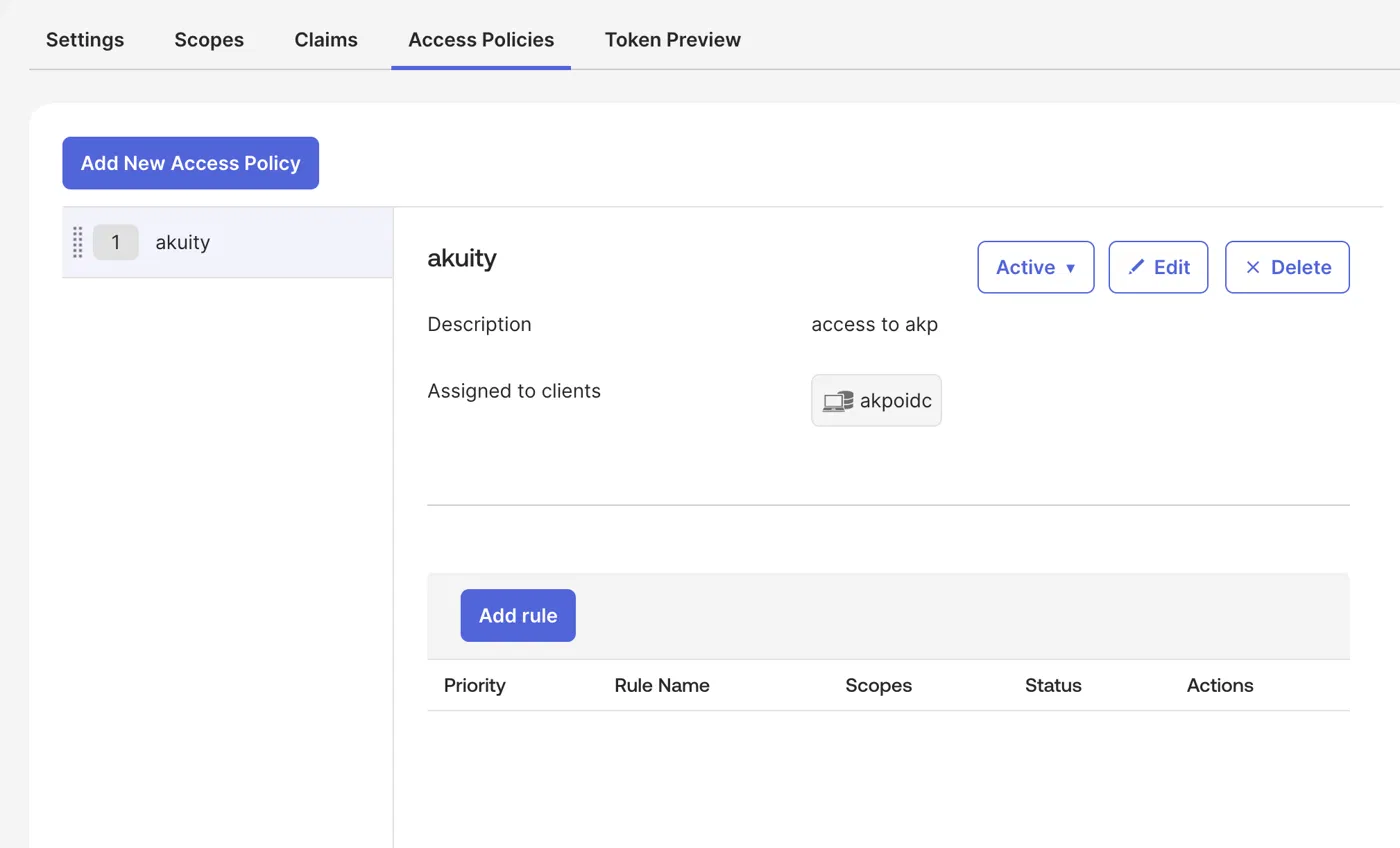
-
Fill in the rule:
Field Value Rule Name For example defIF Grant type is Check Authorization Code under Core grants. Leave Client Credentials and Device Authorization unchecked AND User is Any user assigned the app. Choose Assigned the app and a member of one of the following only for a second layer of restriction beyond the app assignment from Step 4 AND Scopes requested Any scopes is fine. Restricting to specific scopes means remembering to update the rule if the Akuity Platform's scope list ever changes THEN Use this inline hook None (disabled) AND Access token lifetime is For example 8 HoursAND Refresh token lifetime is For example 5 Days, expiring if not used every1 Days -
Click Create Rule.
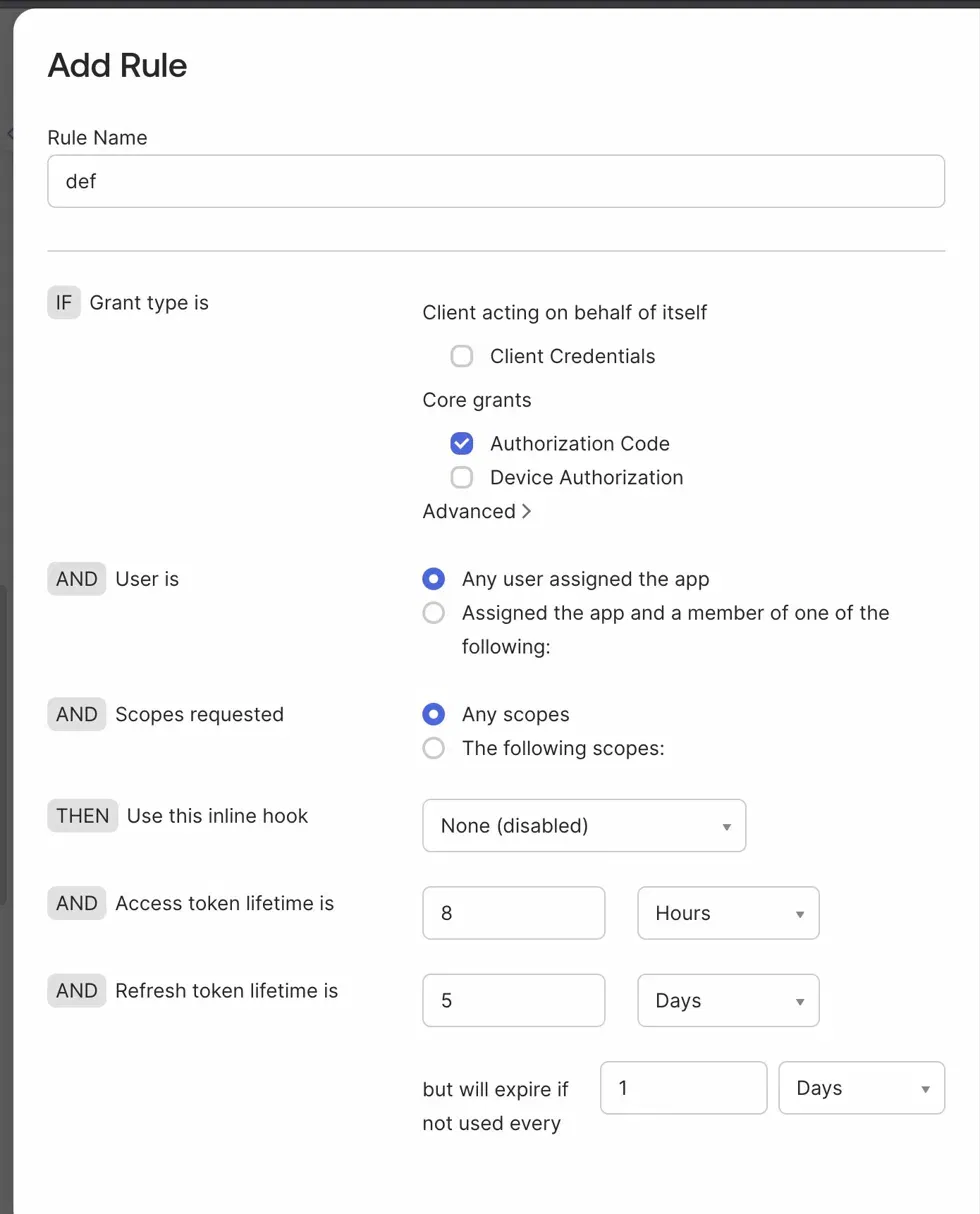
The rule above permits Authorization Code, which is what the Back Channel setting in Step 7 uses.
If you plan to use Front Channel instead, the flow is an implicit grant and you must enable it here under Advanced as well as on the application itself — otherwise the request is rejected by policy even though the app allows it.
The authorization server's Token Preview tab renders a token for a chosen user and client without needing a real login. Select your client, the Authorization Code grant, a test user, and the openid email profile groups scopes, then click Preview Token and confirm a groups array appears in the ID token with the expected values.
This catches a missing scope, a misconfigured claim, or a policy that denies the request in seconds, rather than after a failed browser login.
If your Okta org lacks API Access Management
Without custom authorization servers you must fall back to Okta's org authorization server, where the groups claim is configured on the application rather than on a separate server:
-
On the application page, open the Sign On tab.
-
In the OpenID Connect ID Token section, click Edit. On some Okta versions this lives under Token Claims → Show legacy configuration.
-
Set Groups claim type to Filter.
-
Set the Groups claim filter name to
groups, choose Matches regex, and enter your pattern, for exampleakuity-.*. -
Click Save.
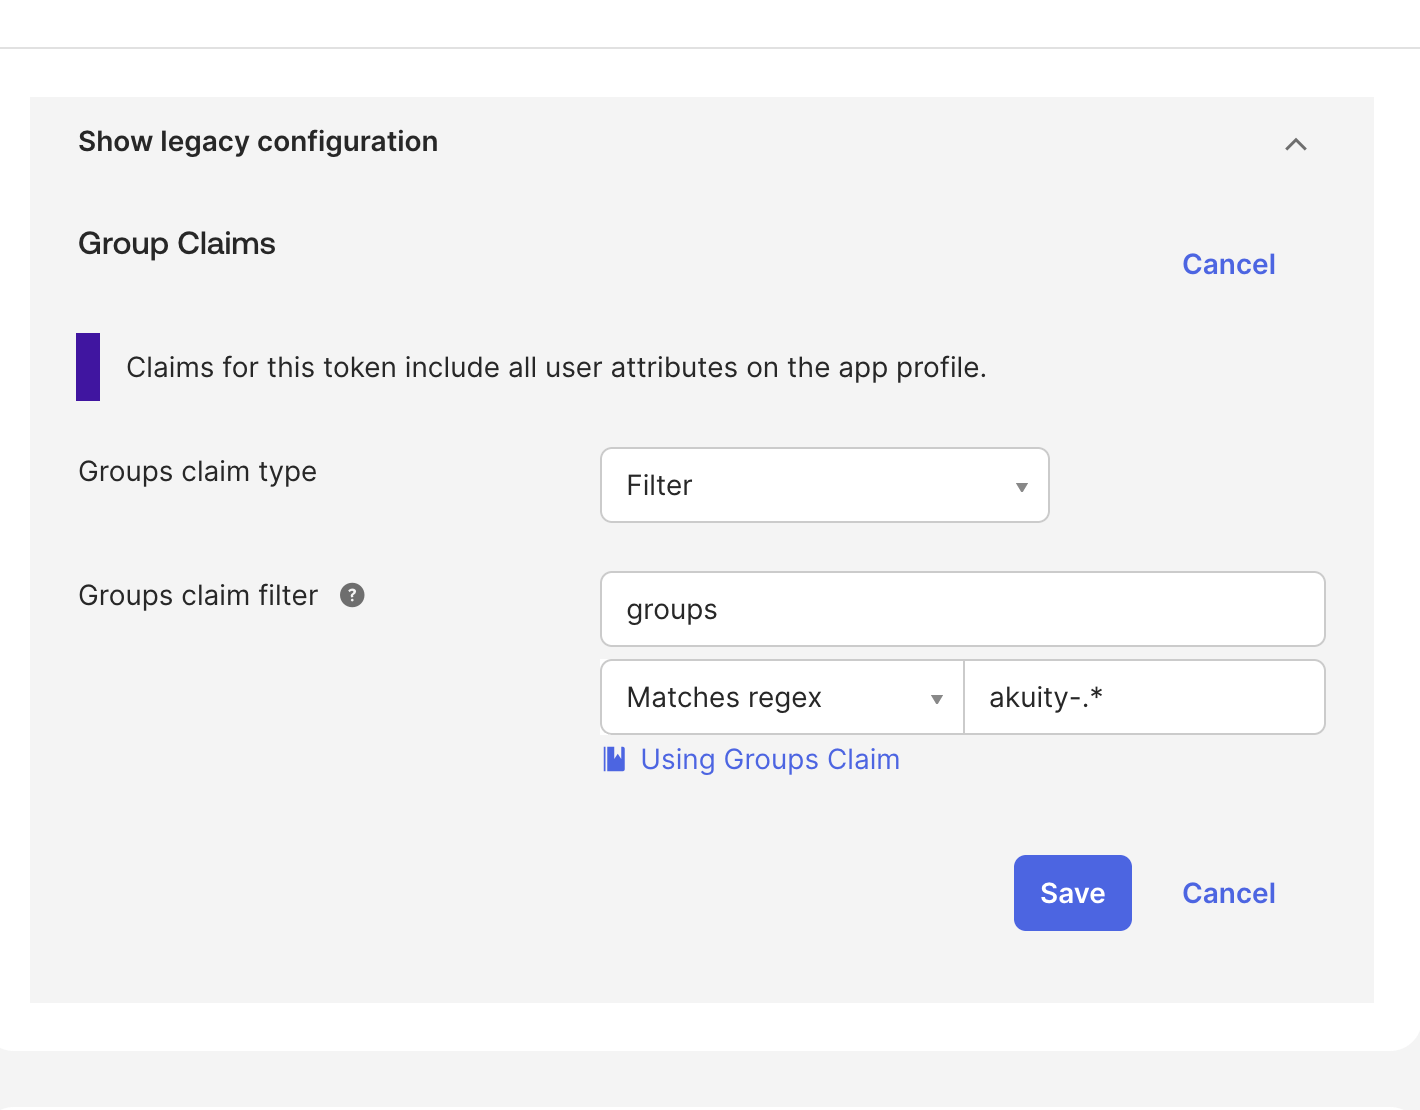
In that case skip Steps 5a–5e entirely, and in Step 7 use your bare Okta domain as the Discovery URL rather than a custom authorization server's issuer URI.
Step 6: (Optional) Configure IdP-initiated login
Complete this step only if you want users to be able to start the login flow from their Okta dashboard instead of from akuity.cloud. Read the security warning below first.
In Okta:
-
On the application's General tab, scroll to the LOGIN section and click Edit.
-
Set Login initiated by to Either Okta or App.
-
Under Application visibility, check Display application icon to users so the tile appears on the Okta dashboard.
-
For Login flow, select Redirect to app to initiate login (OIDC Compliant).
-
In Initiate login URI, enter the following, replacing the placeholder with your Akuity Organization ID:
https://akuity.cloud/api/auth/login/sso/<your-organization-id> -
Click Save.
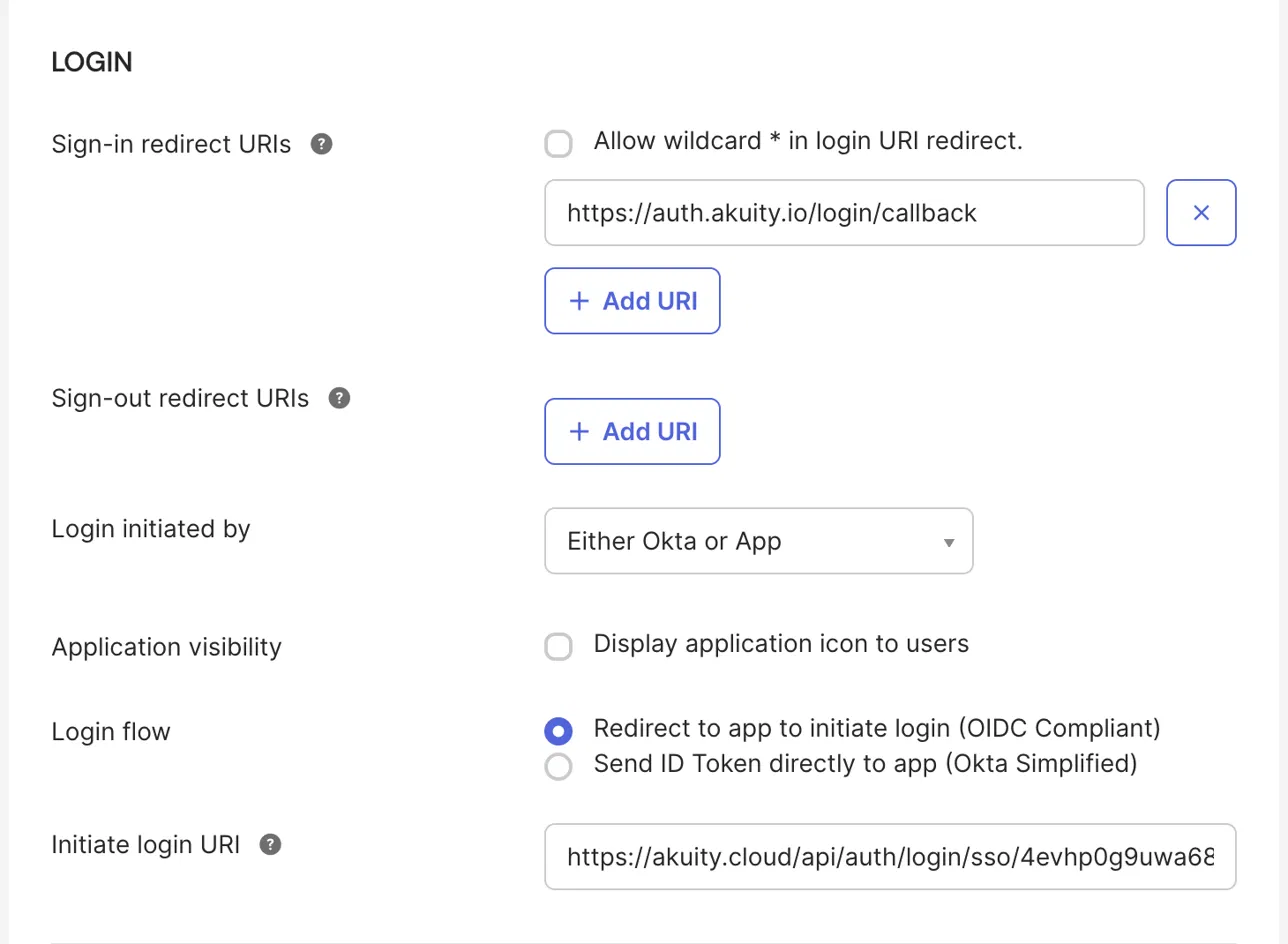
Auth0, the identity provider powering Akuity Platform authentication, does not recommend enabling IdP-Initiated SSO.
In an IdP-Initiated flow, Auth0 receives an unsolicited response from the IdP and the application receives an unsolicited response from Auth0. Neither entity can verify that the user actually started the flow. This opens the possibility of a Login CSRF attack, where an attacker can trick a legitimate user into unknowingly logging into the application with the identity of the attacker.
Whenever possible, keep this disabled and let authentication be initiated from the Akuity Platform (the default). Only enable this if your IdP requires initiating the login flow and you understand the risks involved.
Send ID Token directly to app (Okta Simplified) posts an unsolicited ID token straight to the application. The Akuity Platform expects the standards-compliant redirect, so the Okta-simplified flow will not complete.
Step 7: Complete the AKP SSO configuration
Return to Organization → SSO → Add Configuration and fill in the form using the values collected above:
| Field | Value |
|---|---|
| Type | OIDC |
| Client ID | Your OIDC application Client ID from Step 4 |
| Groups Claim (toggle) | On — required for group and team mapping |
| Scopes | openid, email, profile, groups |
| Email Domain | Your verified domain, for example acme.com |
| Domain Aliases | Any additional verified domains, for example some-org.com |
| Channel | Back Channel |
| Discovery URL | The custom authorization server's Issuer URI from Step 5a, for example https://acme.okta.com/oauth2/aus1a2b3c4d5e6f7g8h9 |
| Client Secret | The client secret from Step 4 — required for the Back Channel |
| Callback URL | Read-only, informational |
| Auto Add Member | Enabled, so users join with the member role automatically |
| Enforce SSO | Off until SSO is verified working |
Notes on individual fields:
- Scopes.
openidis mandatory for any OIDC flow.emailandprofilepopulate the user's identity in the Akuity Platform.groupsis required for group mapping — omit it if you left the Groups Claim toggle off. - Email Domain. Users whose primary Okta email address ends in this domain are routed to this SSO configuration.
- Domain Aliases. Click Add domain aliases to add further domains that should also match organization members. Useful after acquisitions, or for multi-brand organizations.
- Discovery URL. Use the custom authorization server's Issuer URI from Step 5a, not your bare Okta domain — the
groupsscope and claim you defined in Steps 5b–5c exist only on that server. A green checkmark confirms the Akuity Platform reached the provider's discovery document and populated the Issuer details below automatically. - Auto Add Member. Leave it off if you want every new user's access granted explicitly, whether by group mapping or by invitation.
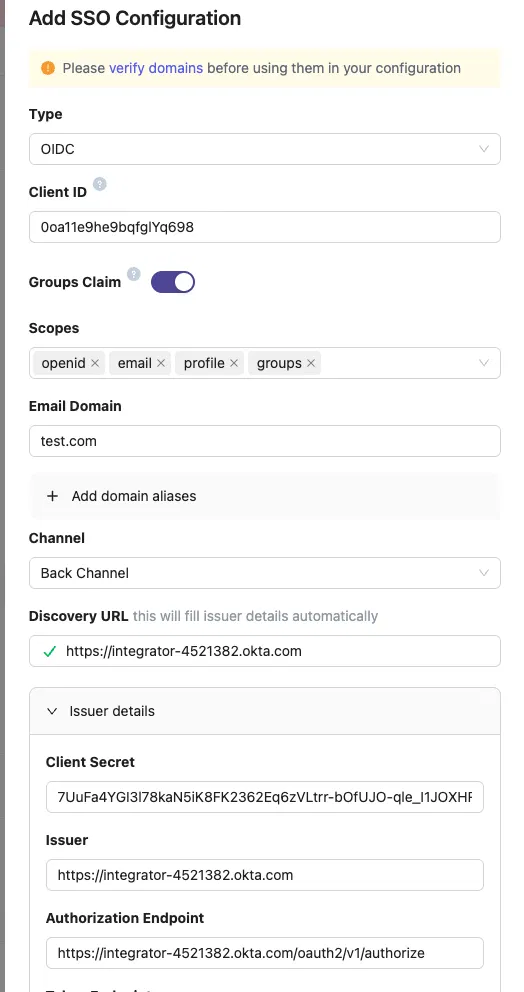
Click Add to save.
Issuer details
The Discovery URL auto-fills the Issuer details section. Expand it and verify the values, filling in anything left blank:
| Field | Description | Okta example |
|---|---|---|
| Issuer | URL of the issuer identifier | https://acme.okta.com/oauth2/aus1a2b3c4d5e6f7g8h9 |
| Authorization Endpoint | OAuth 2.0 authorization endpoint | https://acme.okta.com/oauth2/aus1a2b3c4d5e6f7g8h9/v1/authorize |
| Token Endpoint | OAuth 2.0 token endpoint — required for the Back Channel | https://acme.okta.com/oauth2/aus1a2b3c4d5e6f7g8h9/v1/token |
| Jwks URL | JSON Web Key Set document URL | https://acme.okta.com/oauth2/aus1a2b3c4d5e6f7g8h9/v1/keys |
On the org authorization server the paths drop the /oauth2/<authServerId> segment — https://acme.okta.com/oauth2/v1/authorize, and so on.
Channel: Back Channel or Front Channel
| Channel | Behaviour |
|---|---|
| Back Channel (recommended) | Uses response_type=code. The authorization code is exchanged for tokens server to server, authenticated with the client secret. |
| Front Channel | Uses response_mode=form_post with response_type=id_token. The ID token is delivered through the browser and no client secret is used. |
Front Channel uses response_type=id_token, which providers treat as an implicit grant. The application created in Step 3 only has the Authorization Code grant enabled, so the request is rejected with unsupported_response_type.
To use Front Channel with Okta you must return to the app, open General → Grant type → Advanced, and enable the implicit (hybrid) grant with ID token issuance.
Back Channel avoids this entirely and is the recommended configuration.
The examples above use the custom authorization server built in Step 5. Its issuer is https://<your-okta-domain>/oauth2/<authServerId>, and its discovery document lives at https://<your-okta-domain>/oauth2/<authServerId>/.well-known/openid-configuration. This is the right choice for this integration, because the groups scope, claim, and access policy configured in Step 5 apply to it.
If you fell back to Okta's org authorization server because your org lacks API Access Management, then:
- The Discovery URL is your bare Okta domain, for example
https://acme.okta.com, and its discovery document lives athttps://<your-okta-domain>/.well-known/openid-configuration. - Groups come from the application's own claim filter, configured in If your Okta org lacks API Access Management.
- The
groupsscope behaves differently there. If the authorization endpoint returnsinvalid_scope, removegroupsfrom Scopes — the claim still arrives in the ID token.
Pointing the Discovery URL at one server while configuring groups on the other is the most common cause of logins that succeed with no group mappings applied.
Step 8: Test before enforcing
-
Open a fresh incognito or private browser window — this keeps your existing, working session intact.
-
Go to the Akuity Portal login page and start a login with an email address on the domain you configured.
-
Confirm you are redirected to Okta, authenticate, and confirm you land back in the Akuity Platform.
-
Check the user's role and team membership in Organization → Members to verify your mappings applied.
-
Repeat with a user in each mapped group before rolling out broadly.
Enforce SSO requires all organization users to log in through SSO. If your SSO configuration is broken at that moment, you may be locked out of your account entirely and will need to contact support to recover.
Test thoroughly with several real users, across at least one group mapping, before enabling enforcement.
Once login works, you can optionally enable Enforce SSO.
With group claims flowing, you can map your provider's groups to Akuity roles and teams. See IDP Groups Mapping and IDP Team Mapping below.
Group names are matched against the values in the groups claim, so use each group's name exactly as Okta sends it.
Okta with SAML
Connect Okta over SAML 2.0. Use this method if you need IDP groups mapping.
-
Go to Organization > SSO.
-
Click Add Configuration.
-
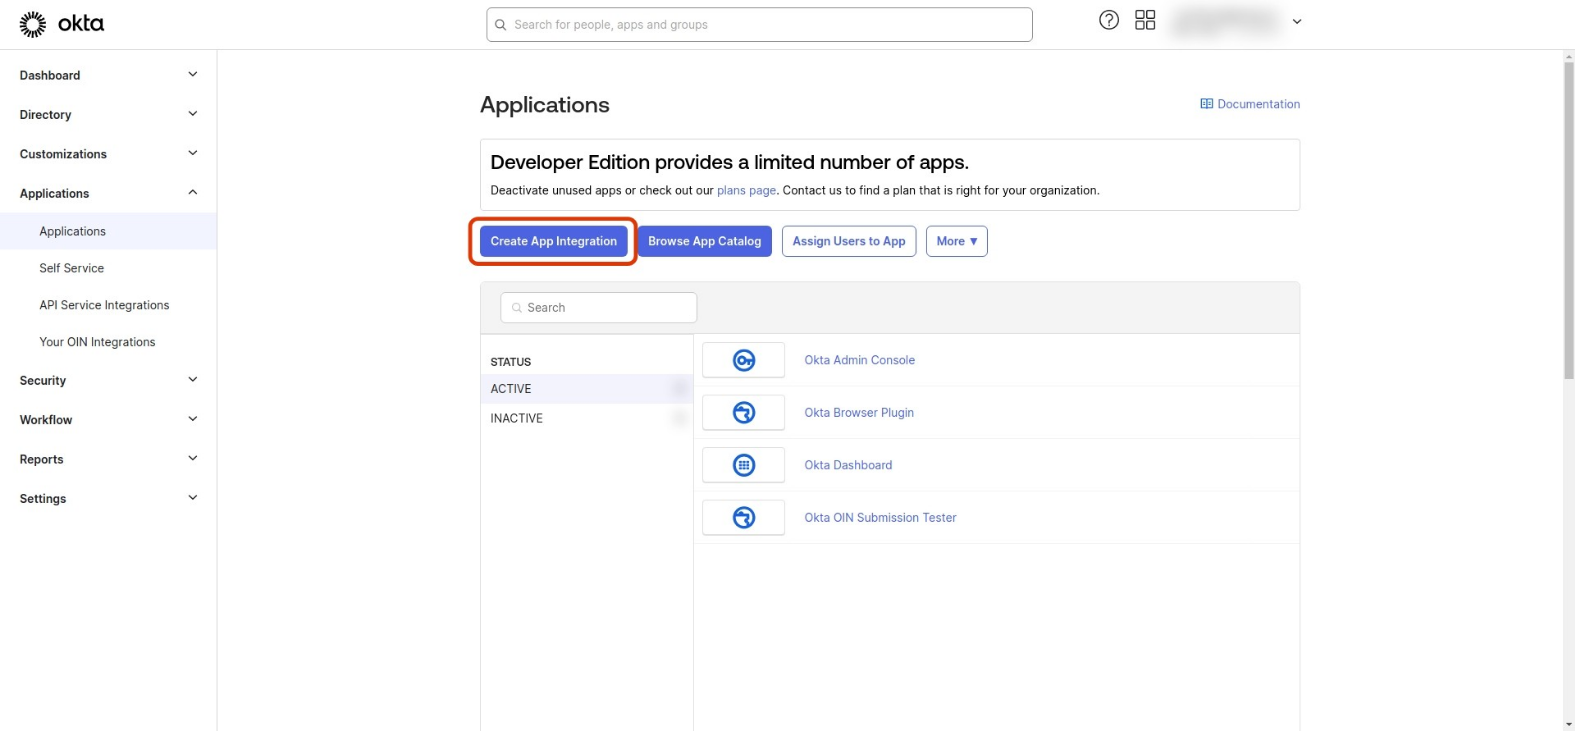
In your Okta Admin Dashboard, go to Applications → Applications → Create App Integration.
-
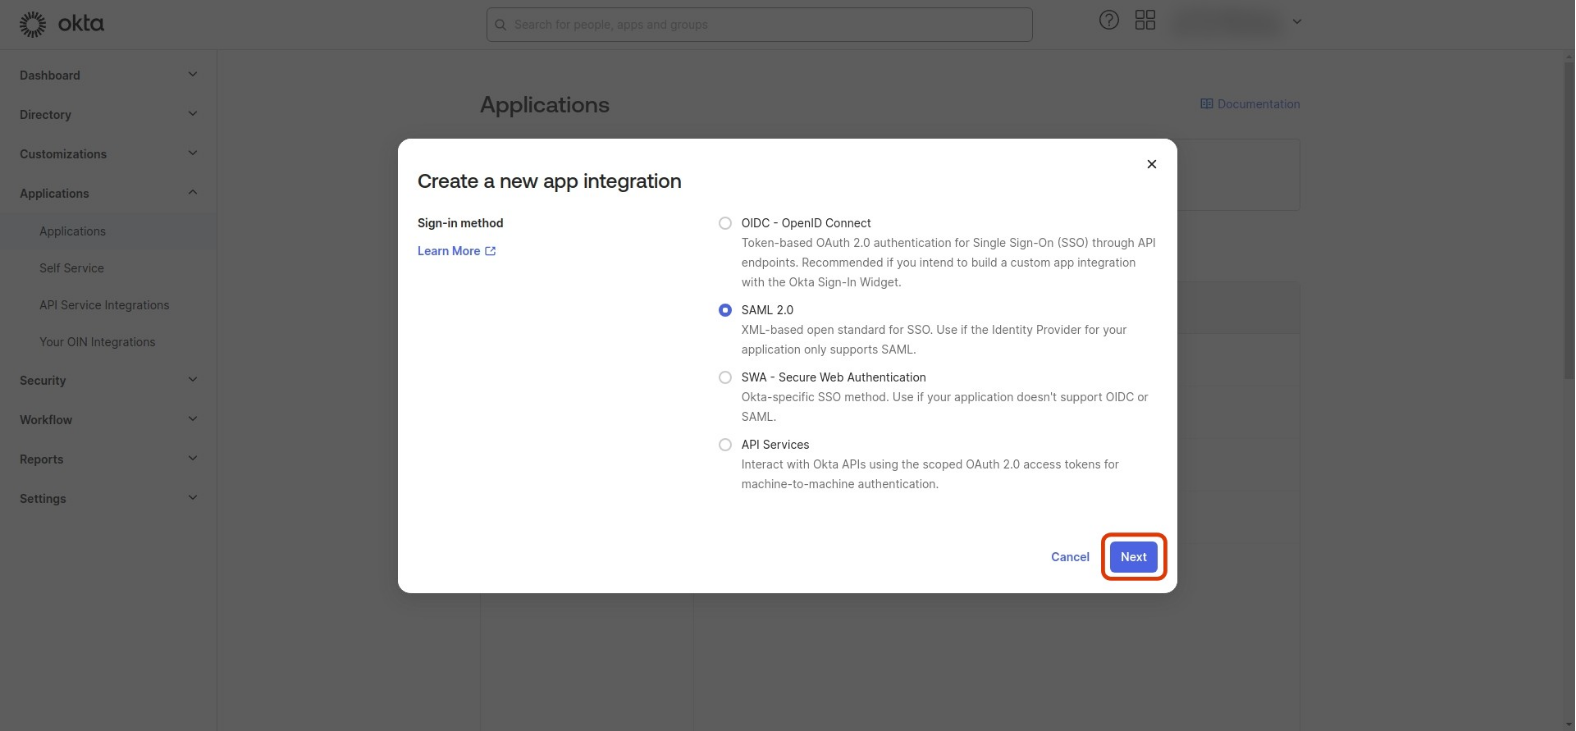
Select SAML 2.0 as the sign-in method, and click Next.
-
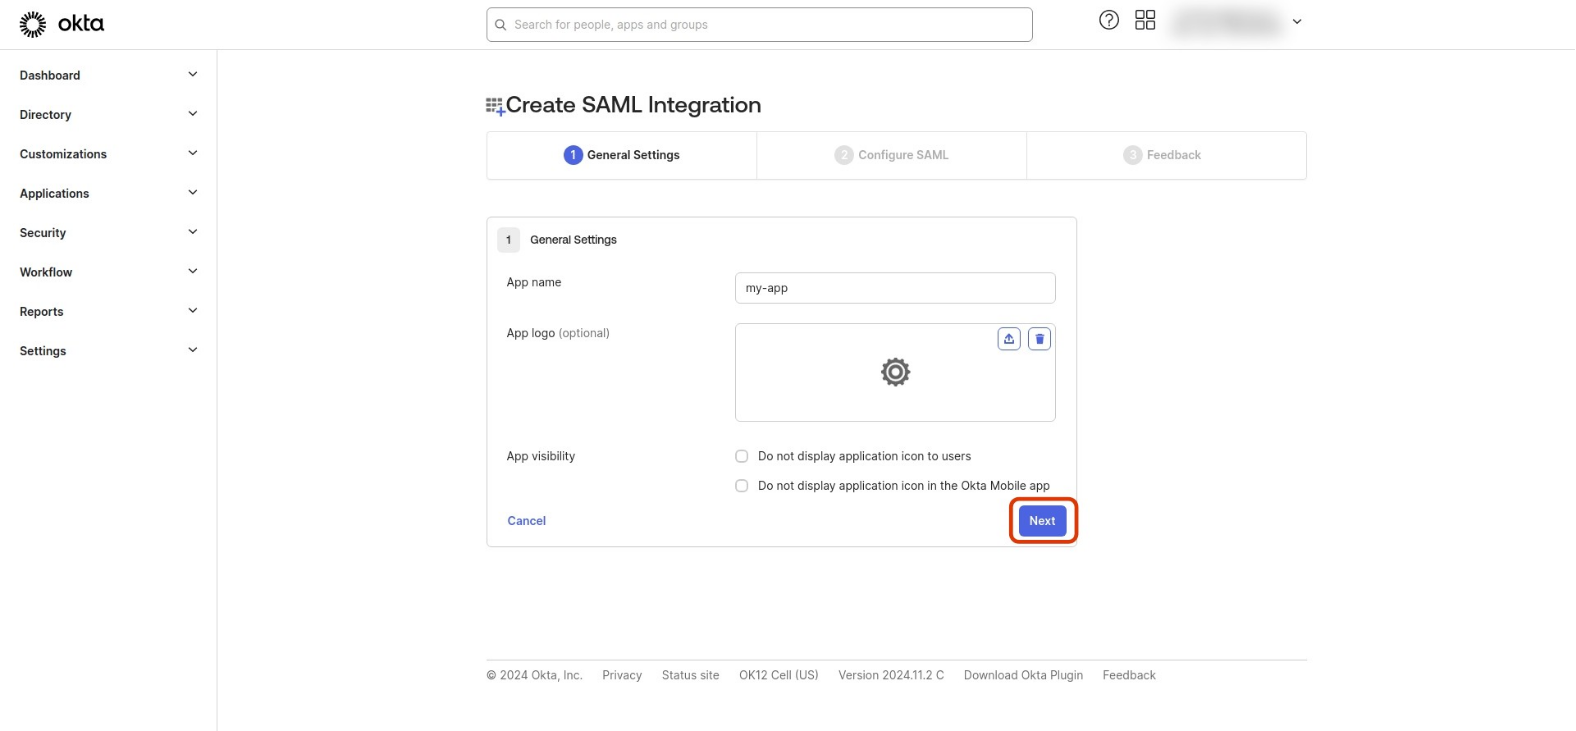
Provide the app name and logo, then click Next.
-
In the Configure SAML section, set the following:
-
Single Sign-On URL:
https://auth.akuity.io/login/callback?connection=<your_organization_id> -
Audience URI (SP Entity ID):
urn:auth0:akuity:<your_organization_id>
In the Attributes Statements section, add:
Name Name format Value email Unspecified user.email given_name Unspecified user.firstName family_name Unspecified user.lastName In the Group Attribute Statements section, add the following. You can modify the group regex according to your needs.
Name Name format Filter groups Unspecified Matches regex : .*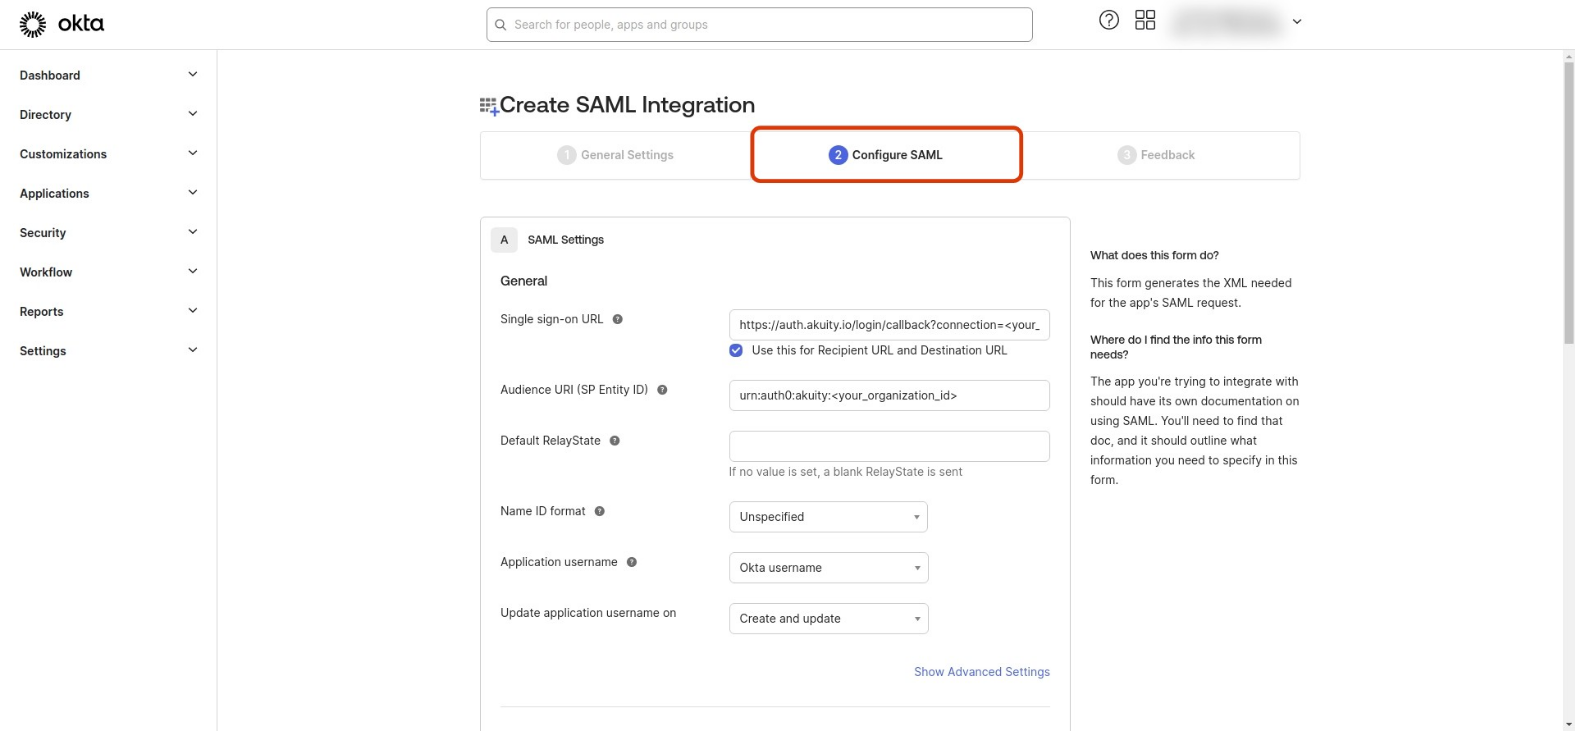
-
-
Click Next, then Finish.
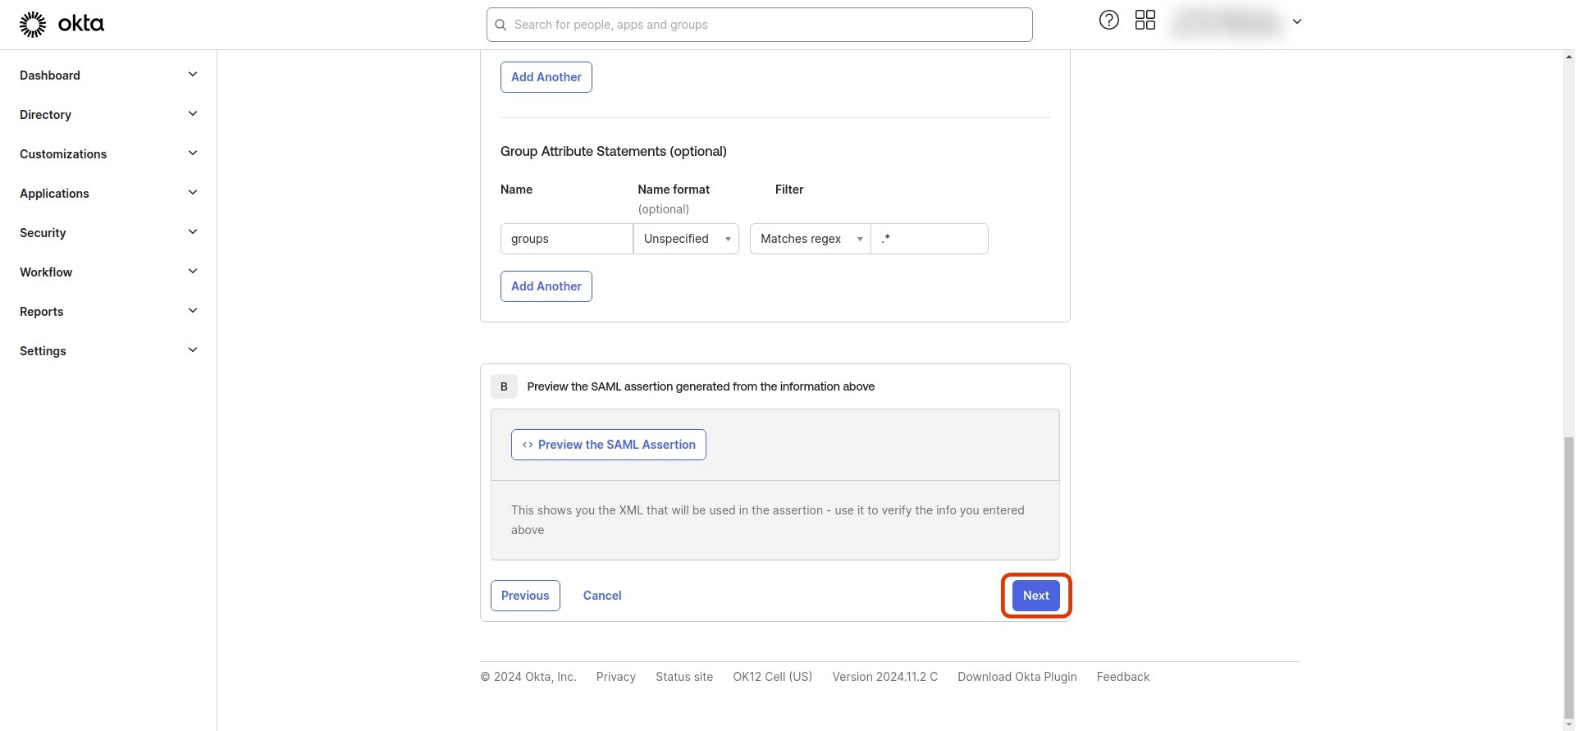
-
Go to the application details page, select the Sign On tab, then find and click View SAML setup instructions on the right side.
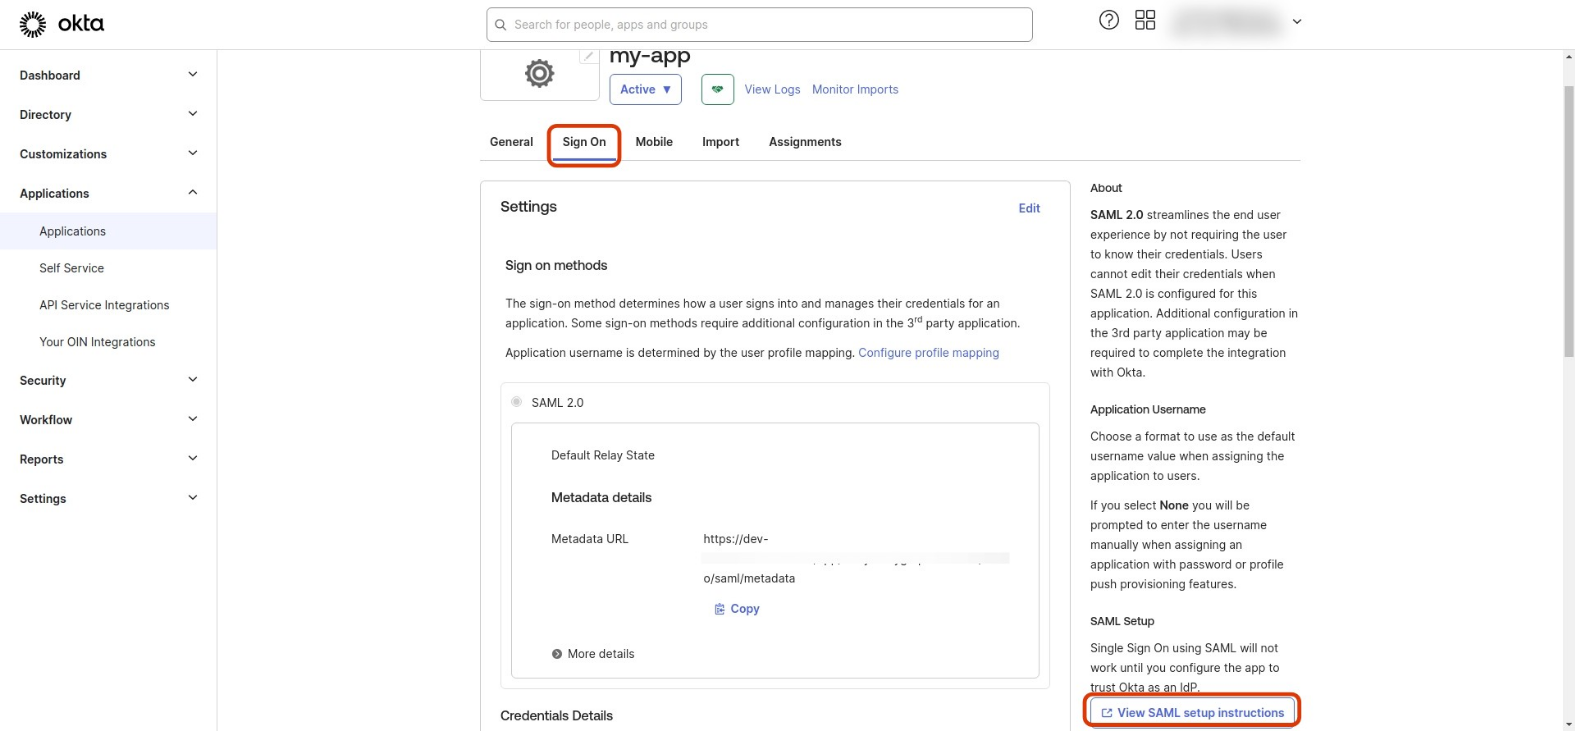
-
This opens a
How to Configure SAML 2.0 for <app-name> Applicationpage, where you can find the XML IdP metadata. Copy the XML.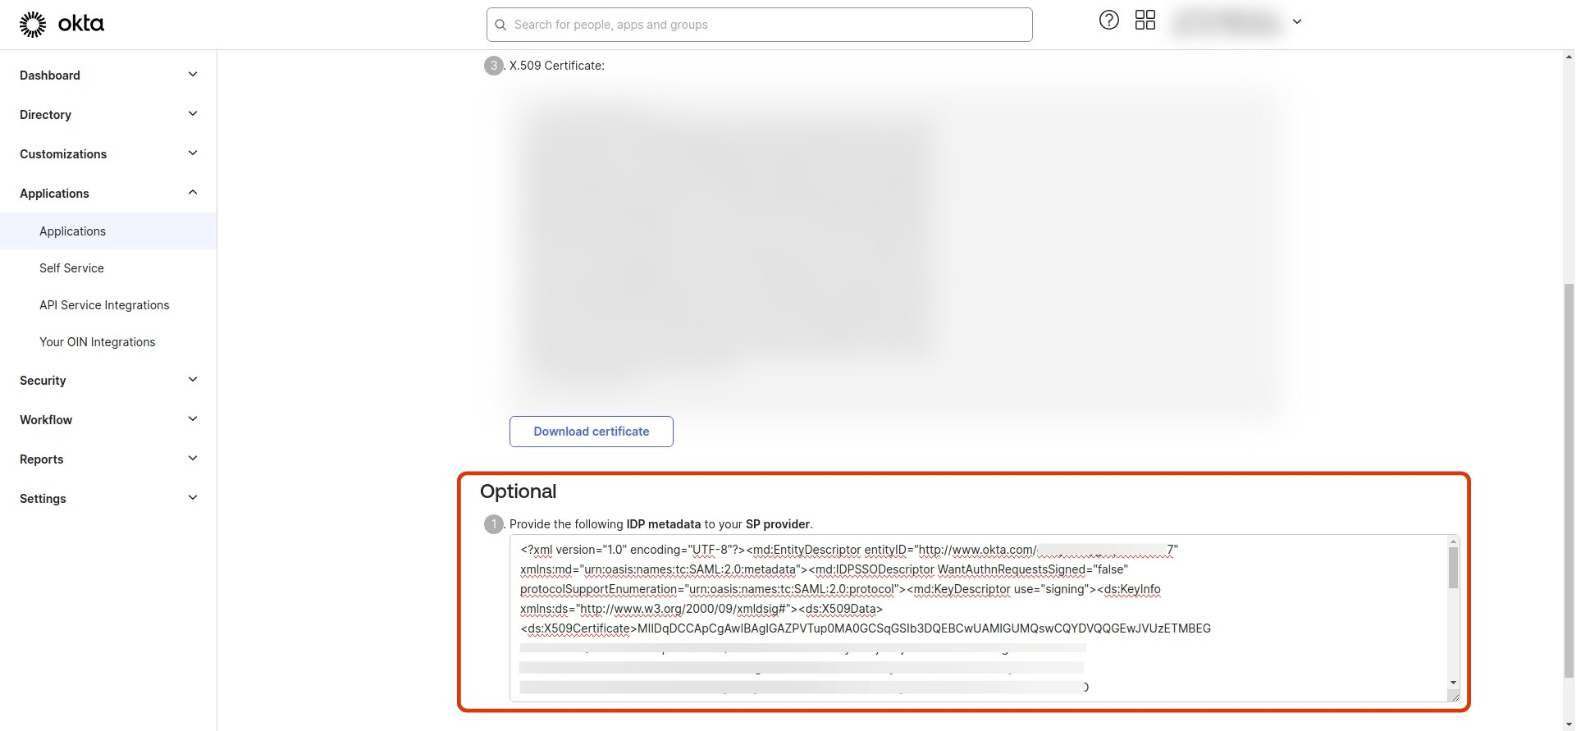
-
Return to the Akuity Platform and select SAML from the Type dropdown.
-
Choose XML as the configuration type and paste the metadata you copied into the Metadata XML input.
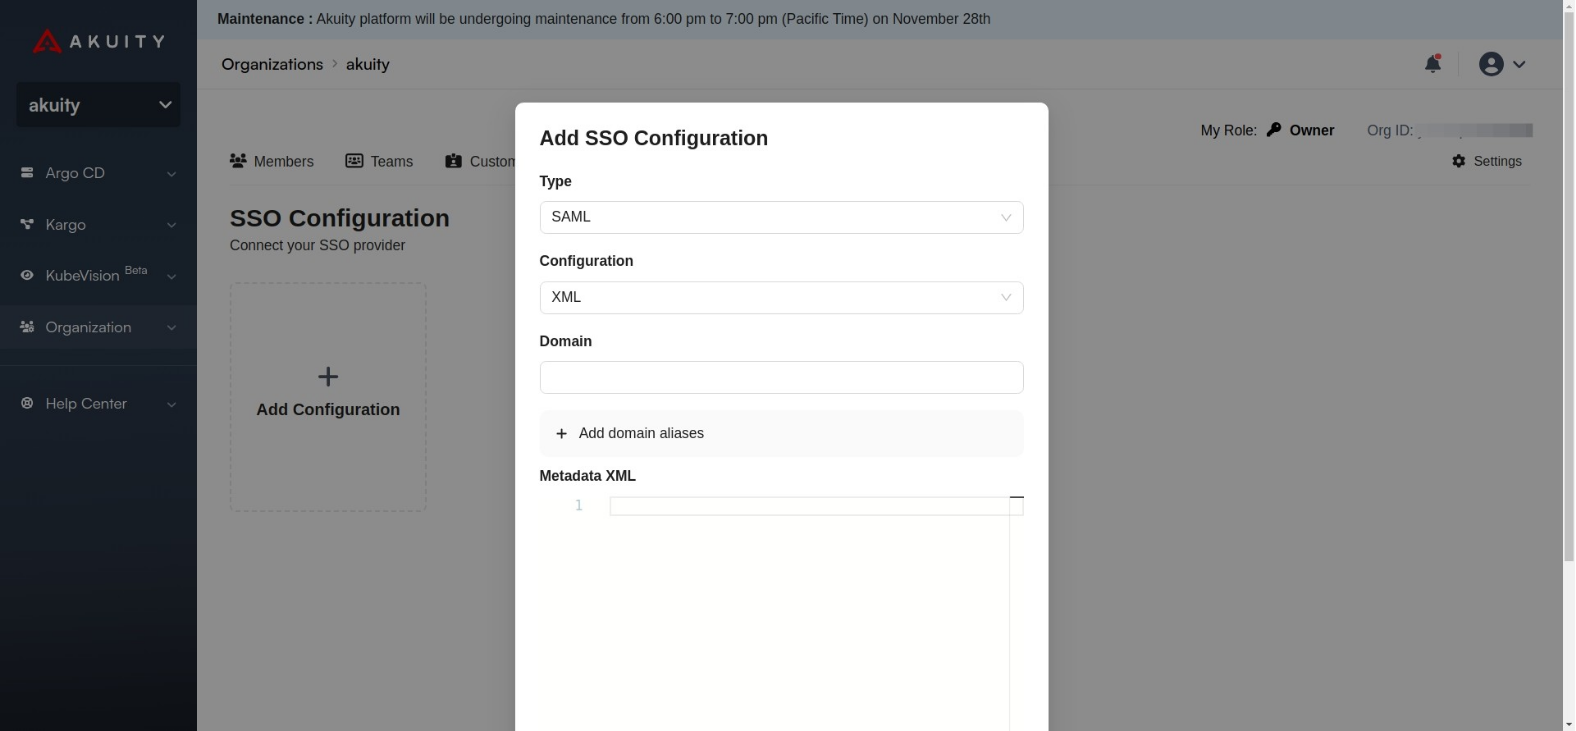
-
Add your SSO email domain in the Domain input field.
-
Click the Enforce SSO toggle if you want to enforce SSO login for your organization members. If this is disabled, users will have the option to log in with SSO or with social login like Google.
Enforcing SSO will require all organization users to use SSO for login. If your SSO configuration is broken, you may be locked out from your account and require contact with support.
Make sure to thoroughly test your SSO configuration before enforcing it for all users.
- Optionally, enable the IdP Initiated SSO toggle if you want users to be able to log in directly from Okta without first visiting the Akuity Platform.
Auth0, the identity provider powering Akuity Platform authentication, does not recommend enabling IdP-Initiated SSO.
In an IdP-Initiated flow, Auth0 receives an unsolicited response from the IdP and the application receives an unsolicited response from Auth0. Neither entity can verify that the user actually started the flow. This opens the possibility of a Login CSRF attack, where an attacker can trick a legitimate user into unknowingly logging into the application with the identity of the attacker.
Whenever possible, keep this disabled and let authentication be initiated from the Akuity Platform (the default). Only enable this if your IdP requires initiating the login flow and you understand the risks involved.
-
Create the configuration by clicking Add.
-
Now, if you try to log in with an email associated with the domain you just configured, you will be redirected to Okta.
With the groups claim flowing, you can map Okta groups to Akuity roles and teams. See IDP Groups Mapping and IDP Team Mapping at the bottom of this page.
Okta Native Connector
Connect Okta through its native connector. This is the quicker setup, but it cannot map groups.
Okta native integration does not support groups claim, please use generic SAML/OIDC instead if you want to use IDP groups mapping features.
-
Go to Organization > SSO.
-
Click Add Configuration.
-
Create an Okta OIDC Application.
- In your Okta Admin Dashboard, Select Applications > Applications, and Create App Integration.
- Select Create New App.
- Choose OIDC as the Sign-in method and Web Application as Application Type.
- Set Sign-in redirect URIs with
https://auth.akuity.io/login/callbackand select Create. - Copy your
Client IDandClient Secret. - (Optional) You can configure Initiate login URI to skip Akuity login page.
- Set Login initiated by under General Settings as Either Okta or App
- Set Login flow as OIDC Compliant
- Set Initiate login URI as
https://akuity.cloud/api/auth/login/sso/<your-organization-id>(ID can be found in Organization tab in Akuity Dashboard)
-
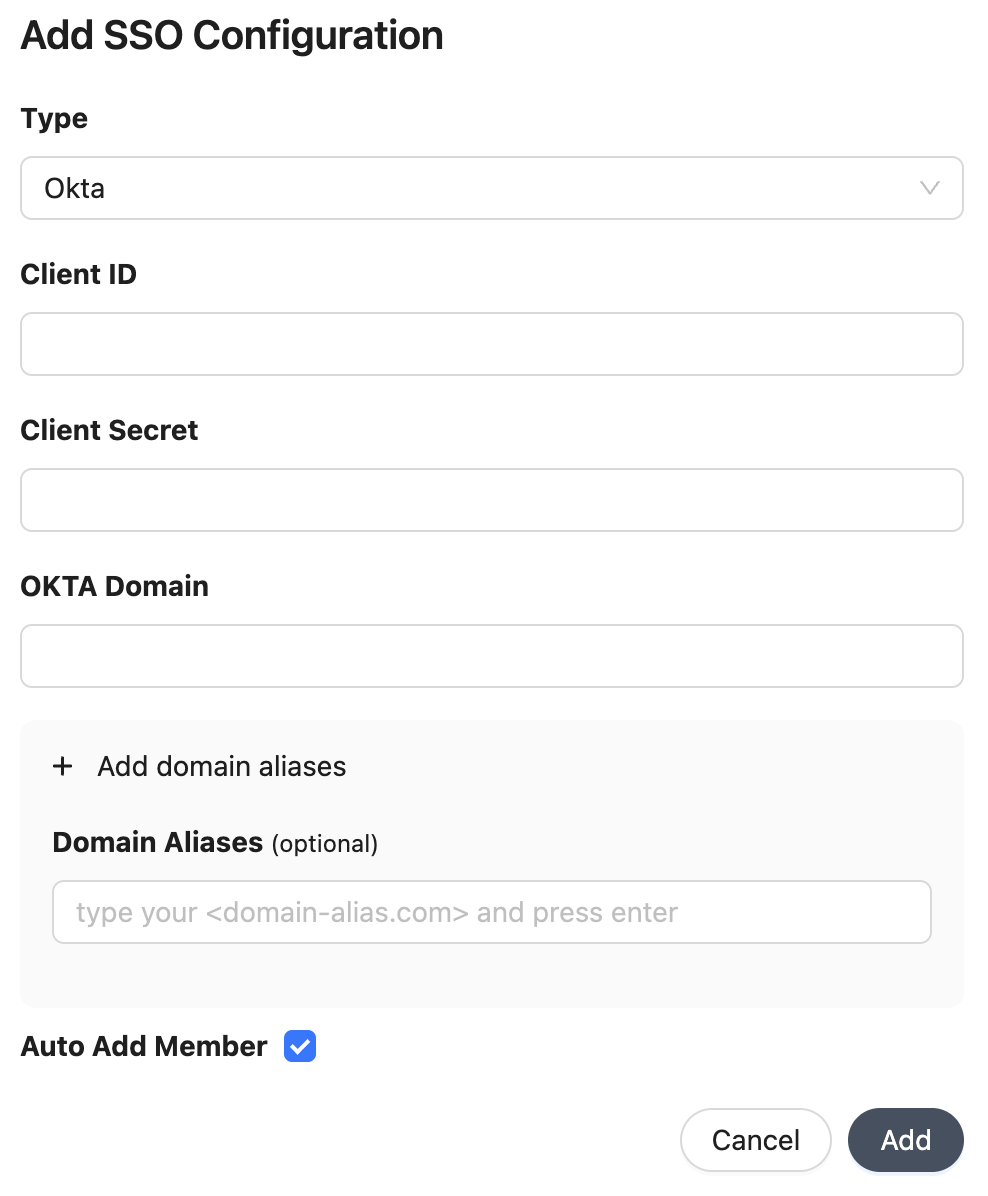
Populate the configuration details on the form.
- Client ID: Okta OIDC Application Client ID
- Client Secret: Okta OIDC Application Client Secret
- Okta Domain: Your Okta domain.
- Domain Aliases: Additional domains to match organization members (e.g.
some-org.com). - Auto Add Member: Allow your organization members to join your organization with the
memberrole automatically.
For security purposes, your domain and domain aliases will be submitted to Akuity for manual review and approval.
IDP Groups Mapping
IDP Groups does not work for Okta native integration as Okta does not support groups claim. Please use generic SAML/OIDC option instead to connect with Okta if you want to use this feature.
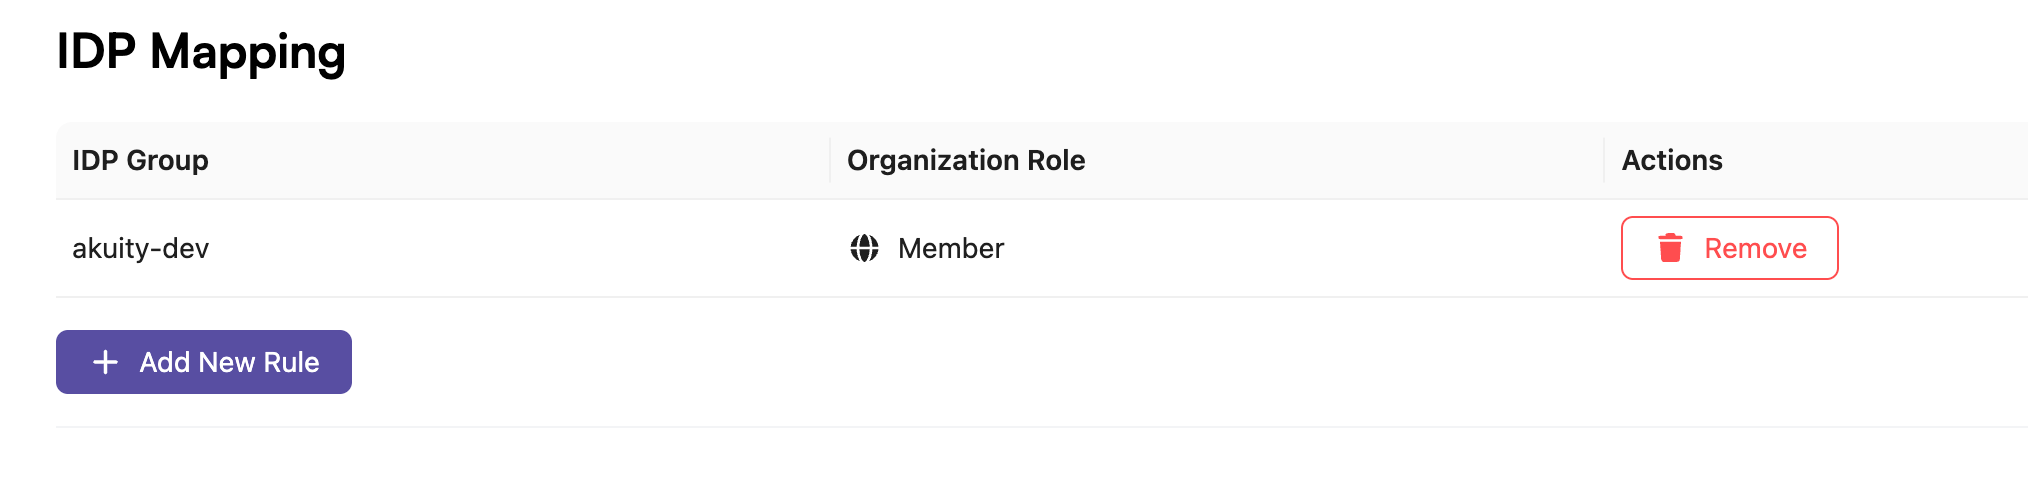
To configure IDP Groups for an Organization in the Akuity Platform:
-
Go to Organization > SSO.
-
Click Add New Rule in the IDP Mapping.
-
In the Add IDP Group Mapping select the role and specify the corresponding IDP Group for your provider.
-
Click the Add button.
In the SSO settings, if the Auto Add Member is checked the new user will join your organization with the member role automatically.
IDP Team Mapping
IDP Team Mapping does not work for Okta native integration as Okta does not support groups claim. Please use generic SAML/OIDC option instead to connect with Okta if you want to use this feature.
This feature allows you to map users with a specific OIDC group to a team in your organization.
Your organization must have at least one Team.
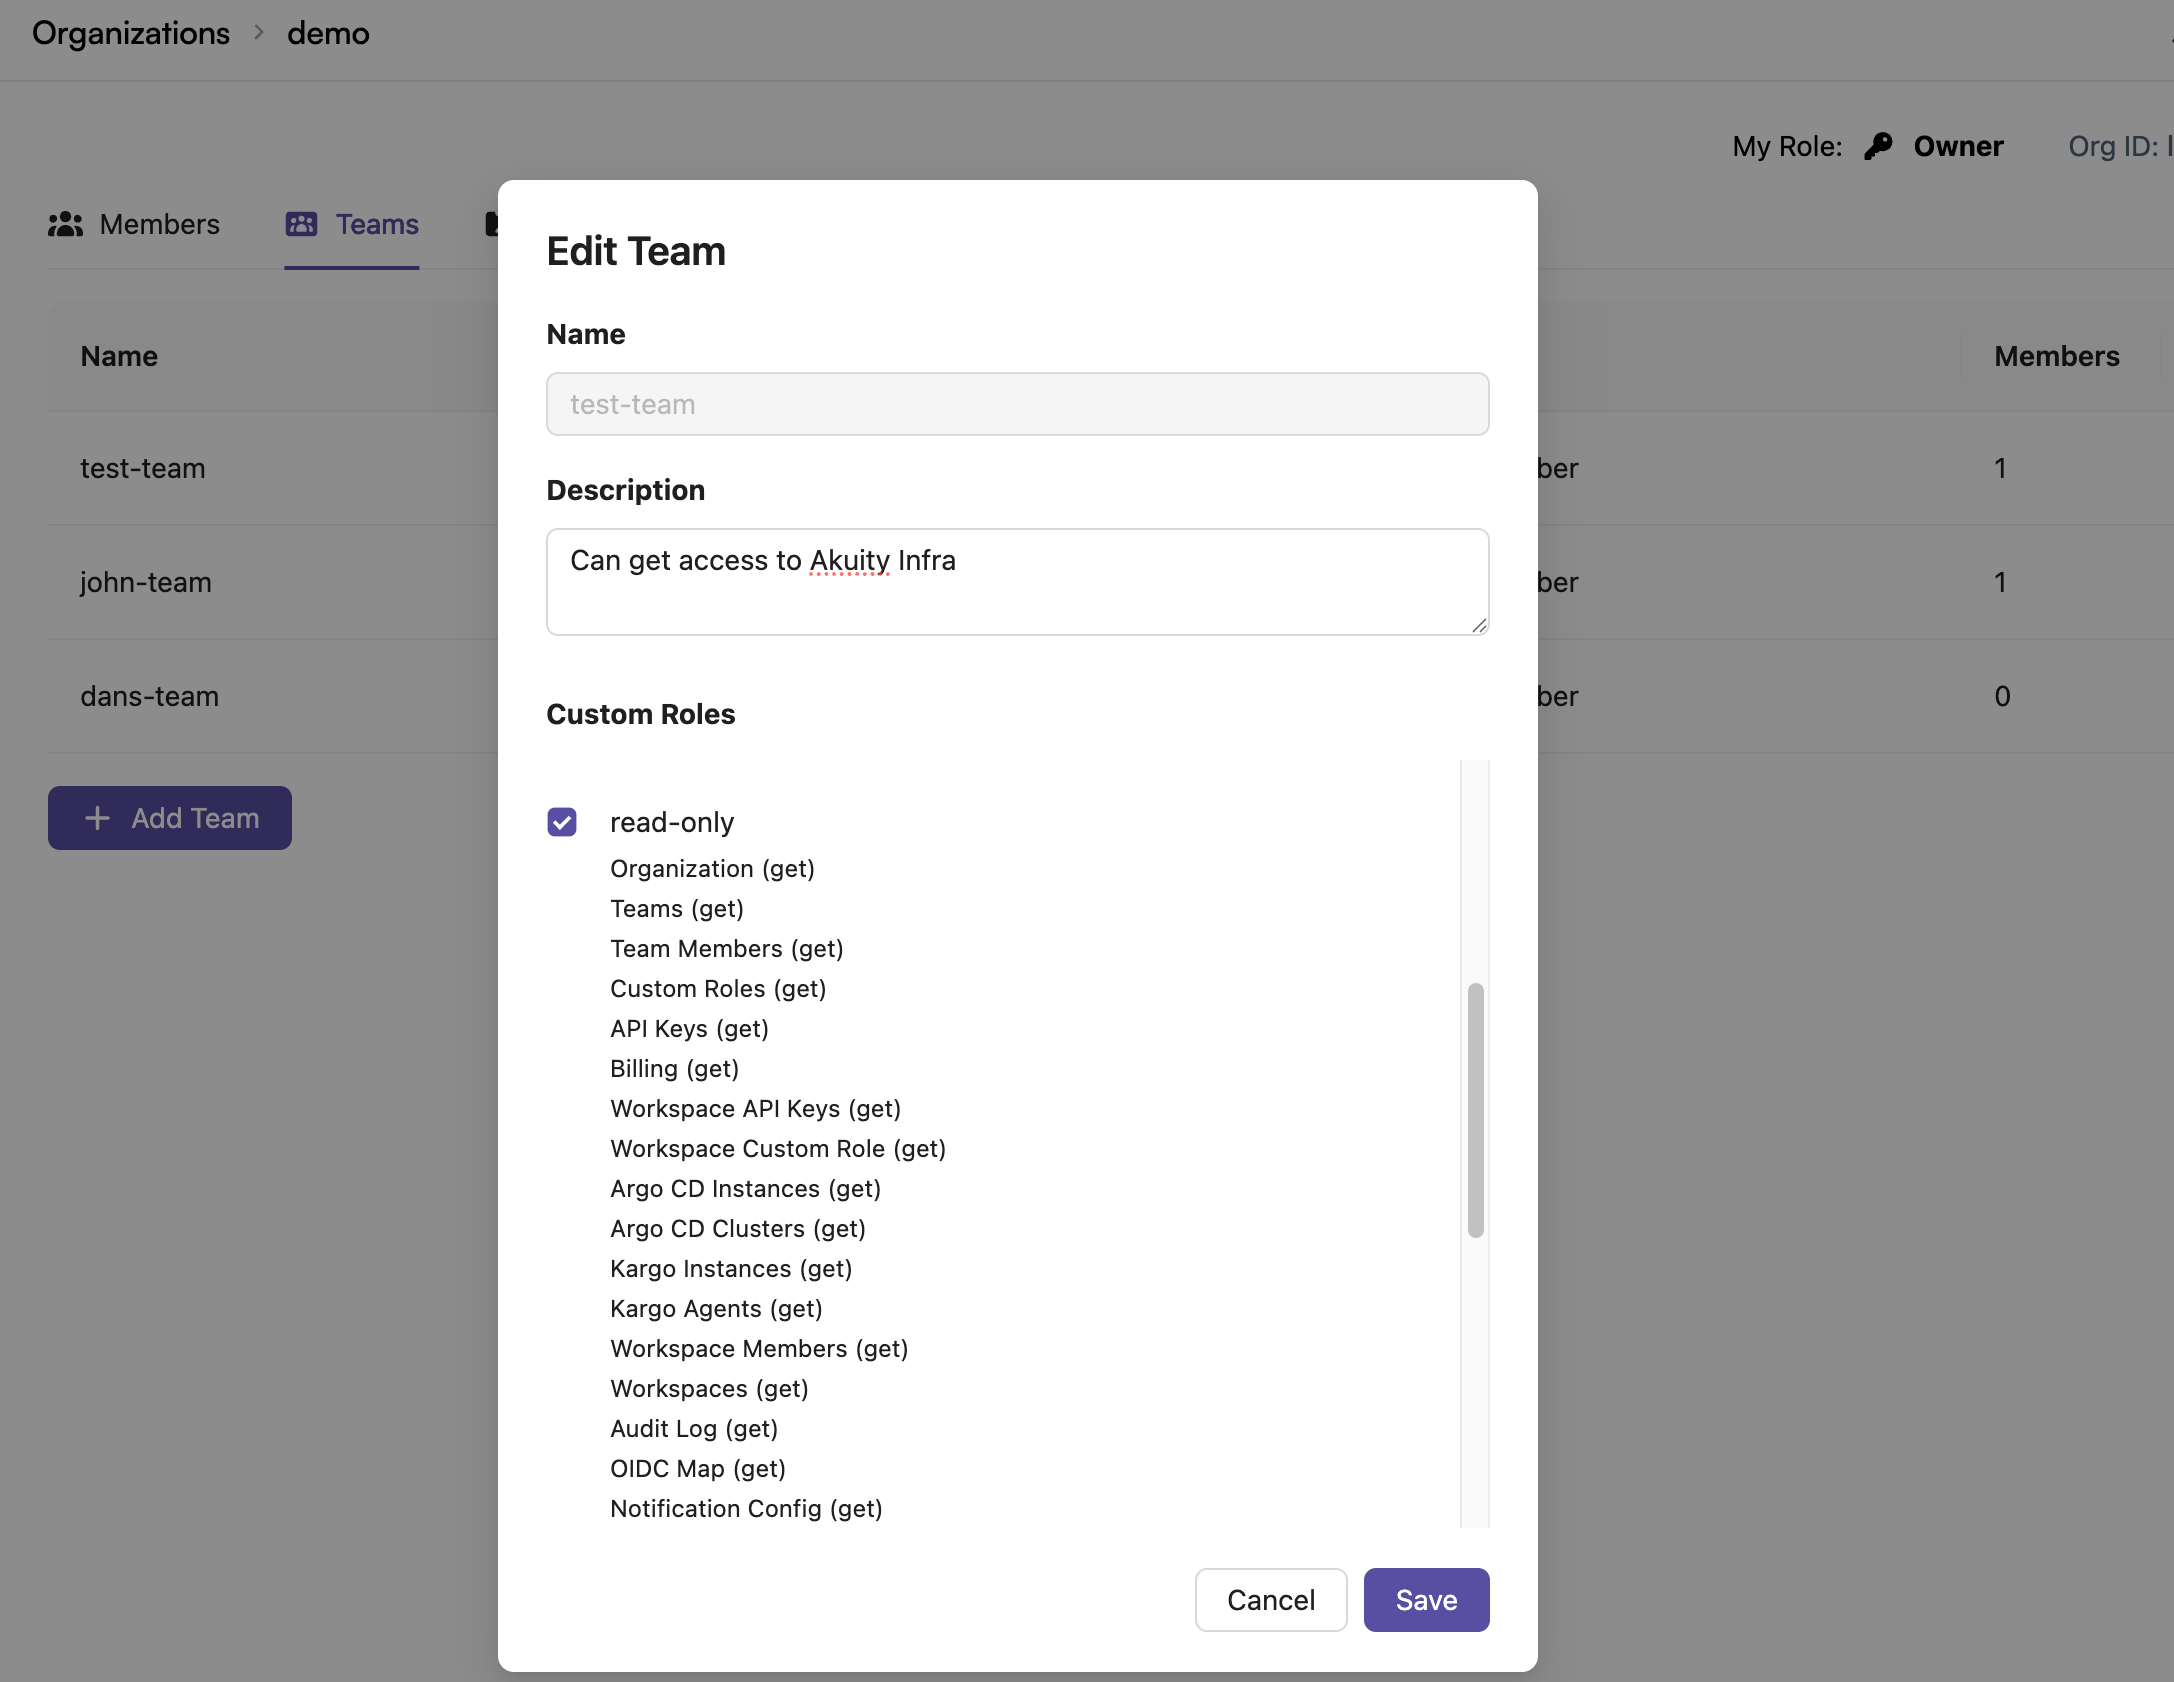
To configure this feature for an Organization in the Akuity Platform:
-
Go to Organization > SSO.
-
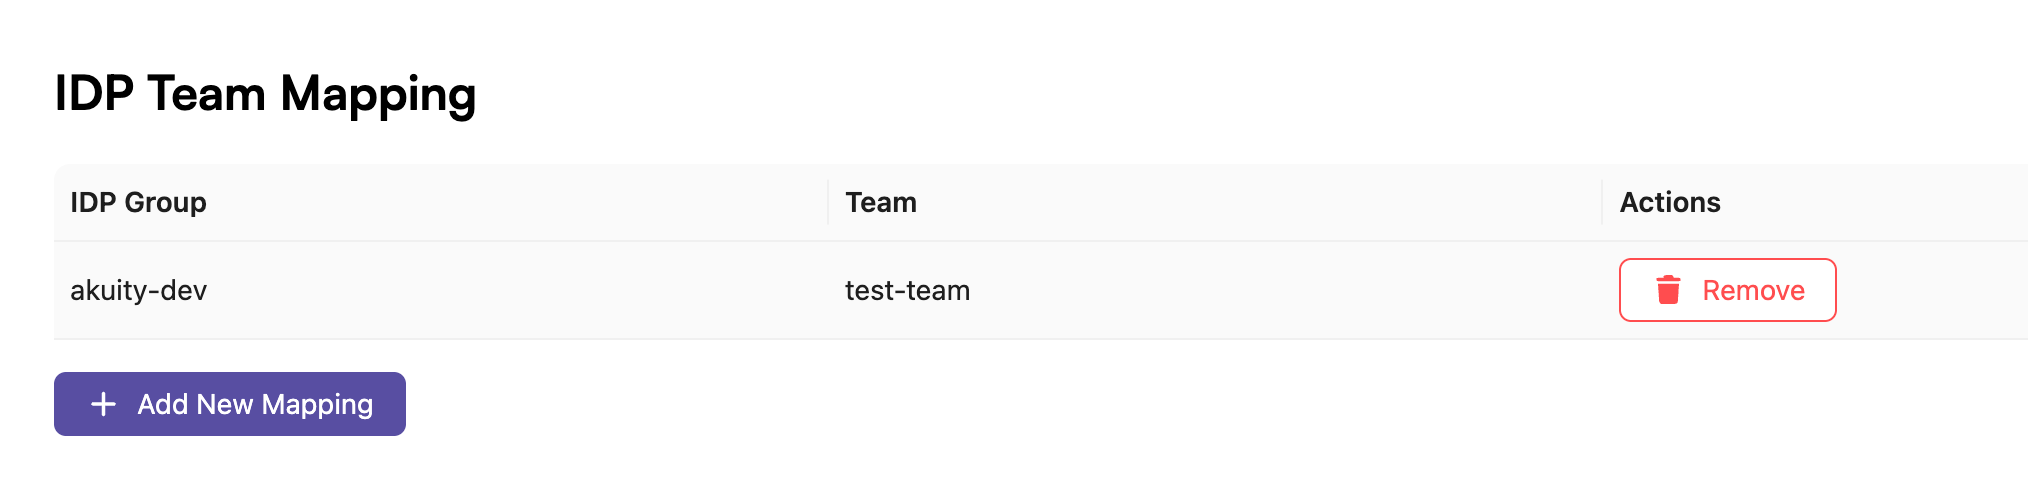
Scroll down to the "IDP Team Mapping" section and click Add New Mapping.
-
In the modal that appears, specify an IDP group and select an existing team from the dropdown.
-
Click the Add button.
Now, when a user logs in with the specified IDP group, they will be added to the selected team in your organization.
Troubleshooting
"User is not assigned to the client application"
The user is not assigned to the application, directly or through a group. Assign them (Step 4). This is the most common cause of a failed first login test.
invalid_grant / "PKCE verification failed" after authenticating
Require PKCE as additional verification is enabled on the application. The Akuity Platform authenticates the code exchange with the client secret and sends no PKCE verifier. Disable the setting (Step 4).
"The 'redirect_uri' parameter must be a Login redirect URI in the client app settings"
The registered redirect URI does not exactly match https://auth.akuity.io/login/callback. Check for a trailing slash, http:// instead of https://, or a typo (Step 2).
unsupported_response_type
The configuration uses Front Channel, but the application only has the Authorization Code grant enabled. Either switch to Back Channel, or enable the implicit (hybrid) grant with ID token issuance at your provider (Step 7).
invalid_scope immediately after clicking sign-in
Most often a custom authorization server with no groups scope defined, or a Discovery URL pointing at a different server than the one you configured. Add the groups scope and claim to the server you are pointing at (Steps 5b–5c), or correct the Discovery URL. With providers that deliver groups only as a token claim, remove groups from Scopes entirely.
The authorization request is denied, or no token is issued at all
A custom authorization server issues nothing until an access policy with at least one rule permits the client. Confirm the policy names your application and that its rule allows the Authorization Code grant (Steps 5d–5e).
Logins succeed but no role is assigned
The claim is not named groups, or the Groups Claim toggle is off. A differently named claim is silently ignored (Step 5). Also confirm the group name in the mapping matches exactly what Okta sends.
Group mappings work for some users but not others
The affected users likely exceed Okta's group-per-token limit and have had their group list silently truncated. Narrow the groups claim filter (Step 5).
"Please verify domains before using them in your configuration"
The email domain has not been verified yet. Complete Step 1 and wait for Akuity's approval.
Locked out after enabling Enforce SSO
Contact Akuity support. This is why Enforce SSO should only be enabled after a verified successful login.
Known limitations
- The native Okta connector does not support the groups claim. IDP Groups Mapping and IDP Team Mapping are unavailable with it; use the
OIDCconnector as described here. - Group membership changes are not pushed. There is no SCIM-style live sync in this flow. Changes at your provider apply at the user's next SSO login.
- Manual role edits are not durable for SSO users. Group mappings are reapplied on each login and take precedence, so a manually granted role can be overwritten on the user's next login. Manage SSO users' roles through group mappings rather than one-off manual edits, and treat a manual change as temporary.
- Okta limits the number of groups placed in a token. Users in very many groups may have their group list truncated; keep the claim filter narrow.
- One SSO provider per organization. A single SSO configuration applies to the whole Akuity Organization.
- IdP-initiated SSO is discouraged by Auth0 due to login CSRF exposure, and is off by default.
Summary
| Component | Value |
|---|---|
| Okta app type | Confidential client / Web Application |
| Redirect URI | https://auth.akuity.io/login/callback |
| Connector type | OIDC (generic) |
| Channel | Back Channel |
| Discovery URL | Custom authorization server issuer URI, for example https://acme.okta.com/oauth2/aus1a2b3c4d5e6f7g8h9 |
| Required scopes | openid, email, profile, groups |
| Credential | Client ID and client secret |
| Group claim name | groups |
| Groups Claim toggle | On |
| Plan requirement | Enterprise plan, with the owner role on the organization |
| Key gotchas | Redirect URI must match exactly; PKCE must be disabled; claim must be named groups; keep the groups filter narrow; one SSO config per organization; keep a non-SSO login path; keep Enforce SSO off until verified |