Microsoft Entra ID (Azure AD)
Configure Microsoft Entra ID, formerly known as Azure AD, as the Single Sign-On provider for your Kargo instance.
There are three ways to connect Entra ID. Pick one:
| Method | Kargo mode | Azure object | Credential | Groups from | Group limit |
|---|---|---|---|---|---|
| Native OIDC | OIDC | App registration, SPA platform | PKCE | ID-token claim | 200 |
| Dex OIDC | Dex, oidc connector | App registration | Client secret | ID-token claim | 200 |
| Dex SAML | Dex, saml connector | Enterprise application (non-gallery) | Signing certificate, inline | SAML assertion | 150 |
Native OIDC is the simplest of the three: Kargo talks to Entra ID directly, with no Dex hop and no client secret. It is also the only method documented here for CLI login. The two Dex methods route through Kargo's built-in Dex instance.
Before you start, you need:
- An Akuity Platform account with a Kargo instance
- Admin access to your Kargo instance settings
- Azure Entra ID access with permission to create App registrations, or Enterprise applications for Dex SAML
Native OIDC
Connect Entra ID directly over OIDC with PKCE. Kargo's UI runs the authorization-code flow as a public client, so there is no client secret and no Dex hop.
Kargo stores the Dex configuration and the direct-OIDC fields side by side and uses a flag to select between them, so you can switch between Dex and OIDC without losing either configuration.
For CLI login (Step 8) you also need the kargo CLI installed.
Step 1: Switch to OIDC mode and note the callback URL
-
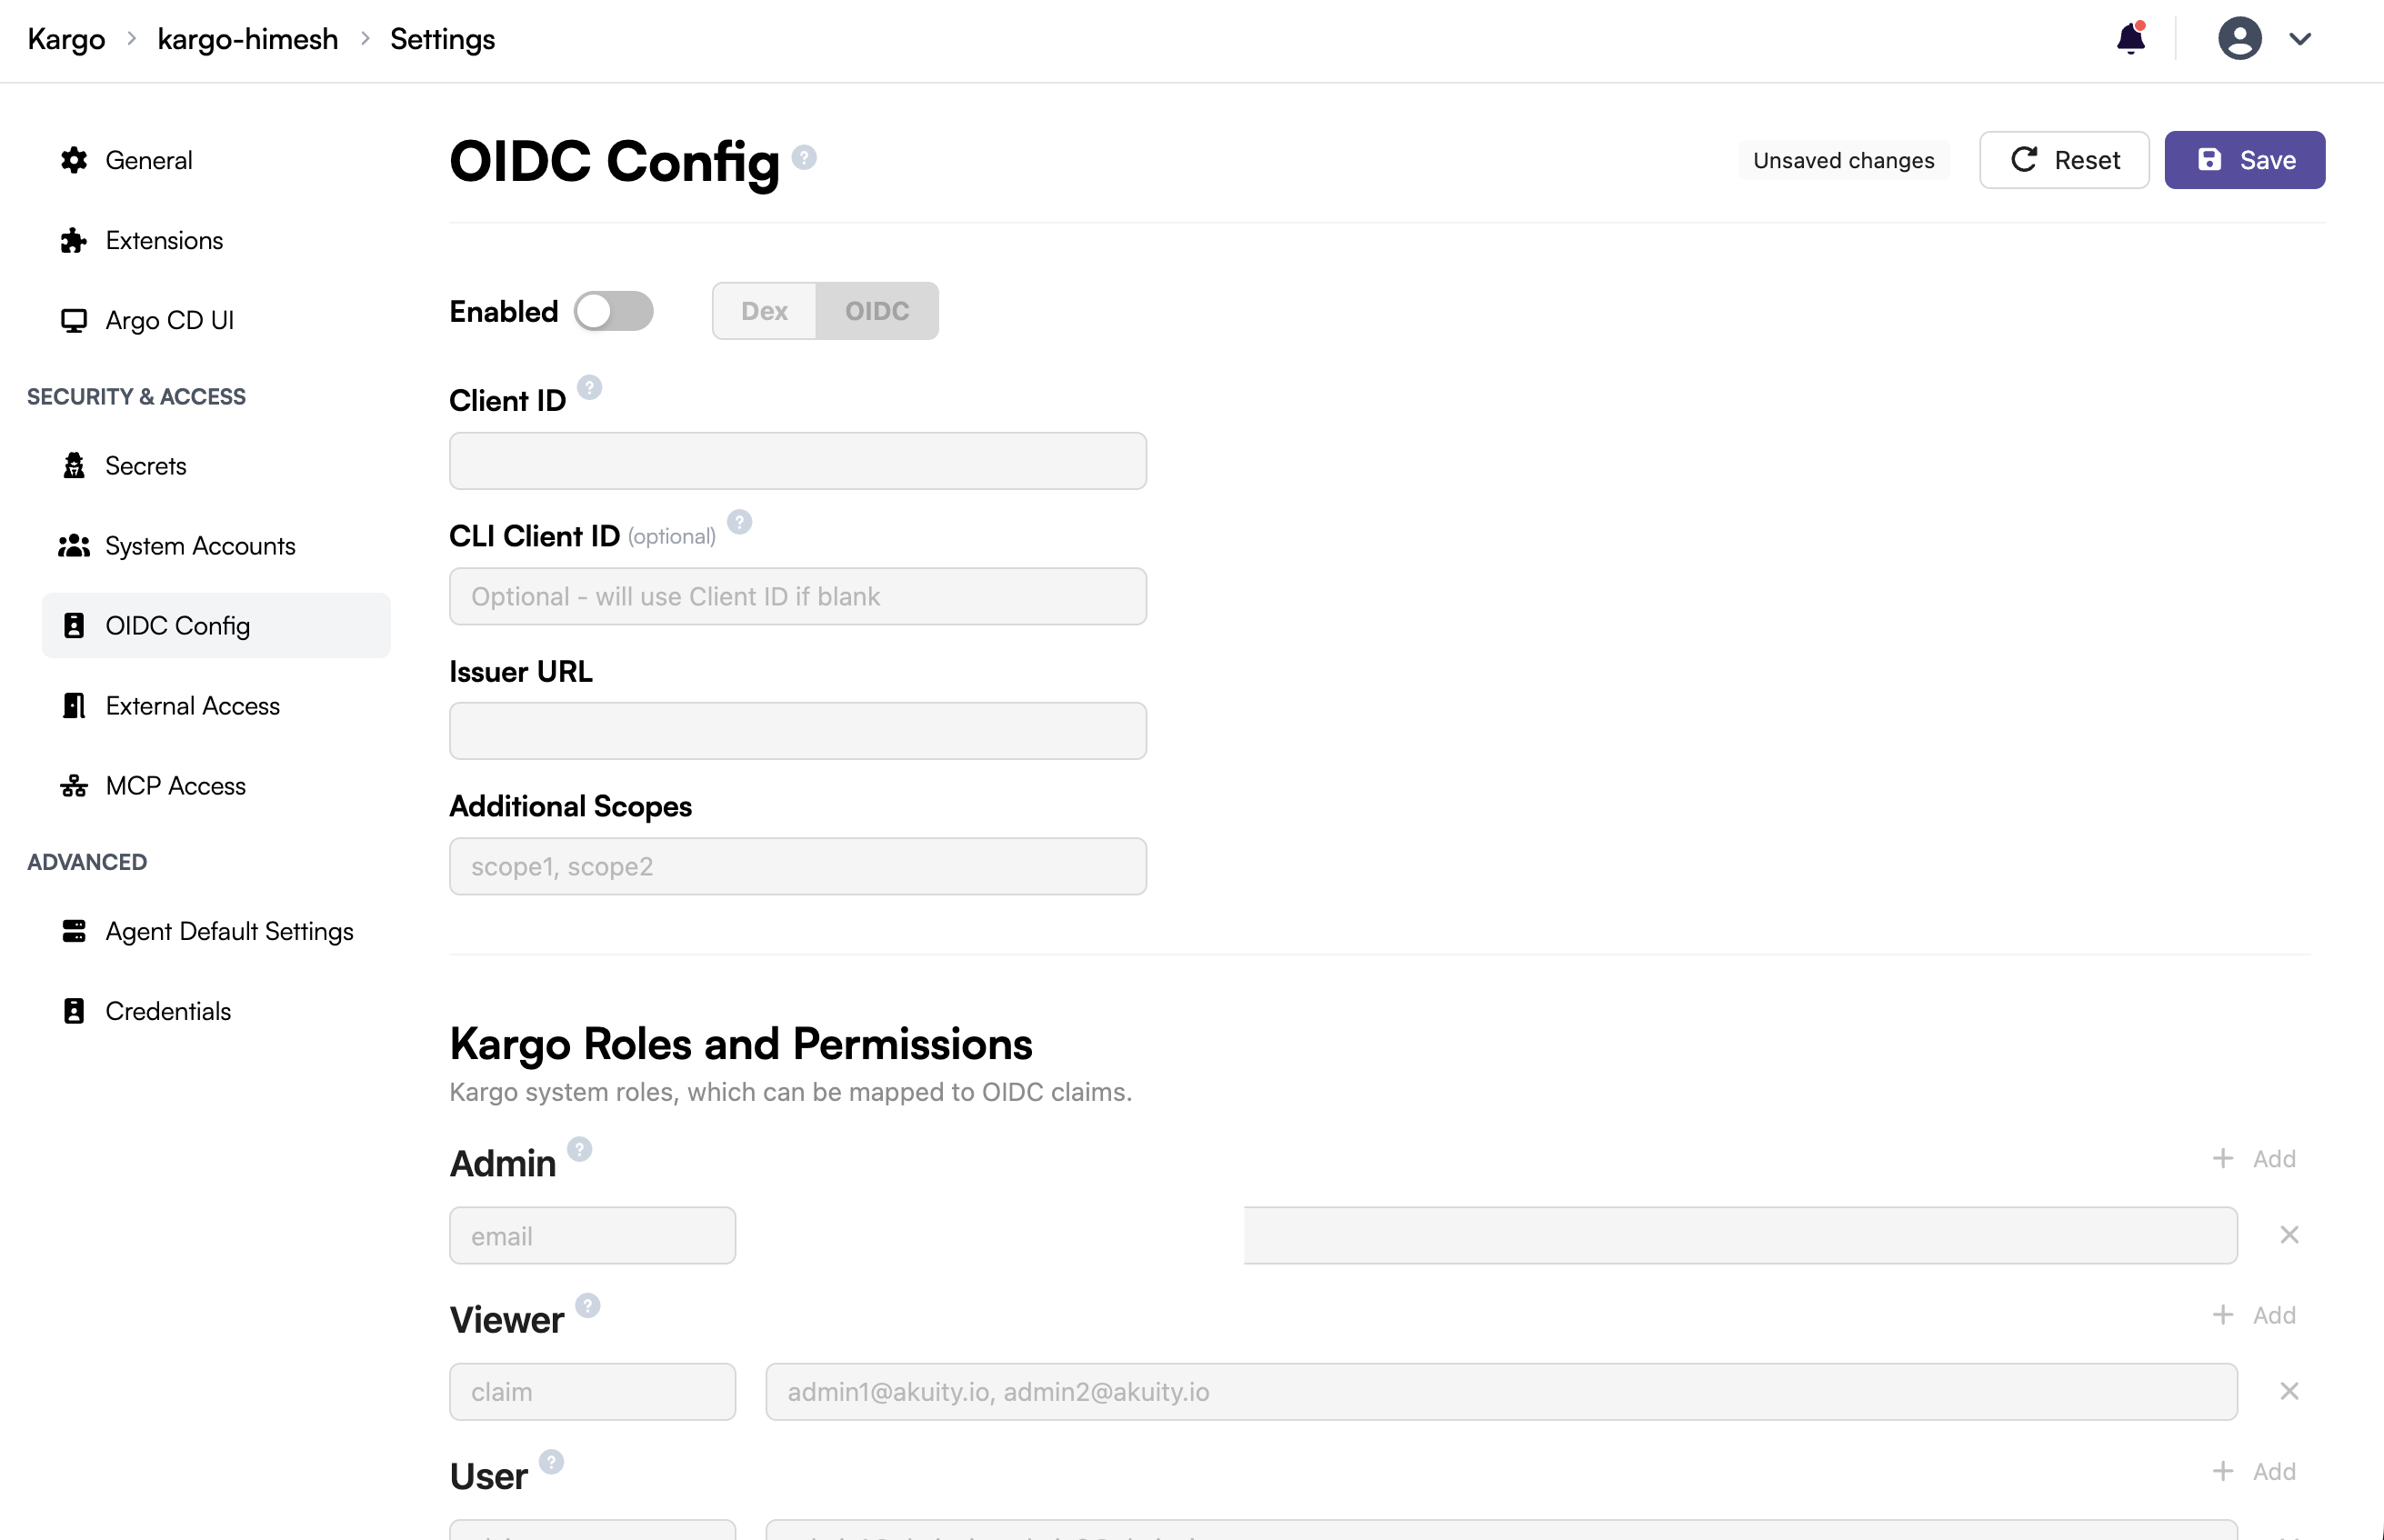
In your Kargo Instance, go to Settings.
-
In the left panel, search for Access and go to OIDC Config.
-
Toggle Enabled to on.
-
Select OIDC, not Dex.
-
The callback URL banner shows:
https://<your-kargo-hostname>/login
The form changes completely compared with Dex mode: you get Client ID, CLI Client ID, Issuer URL and Additional Scopes instead of a YAML editor and a Secrets tab.
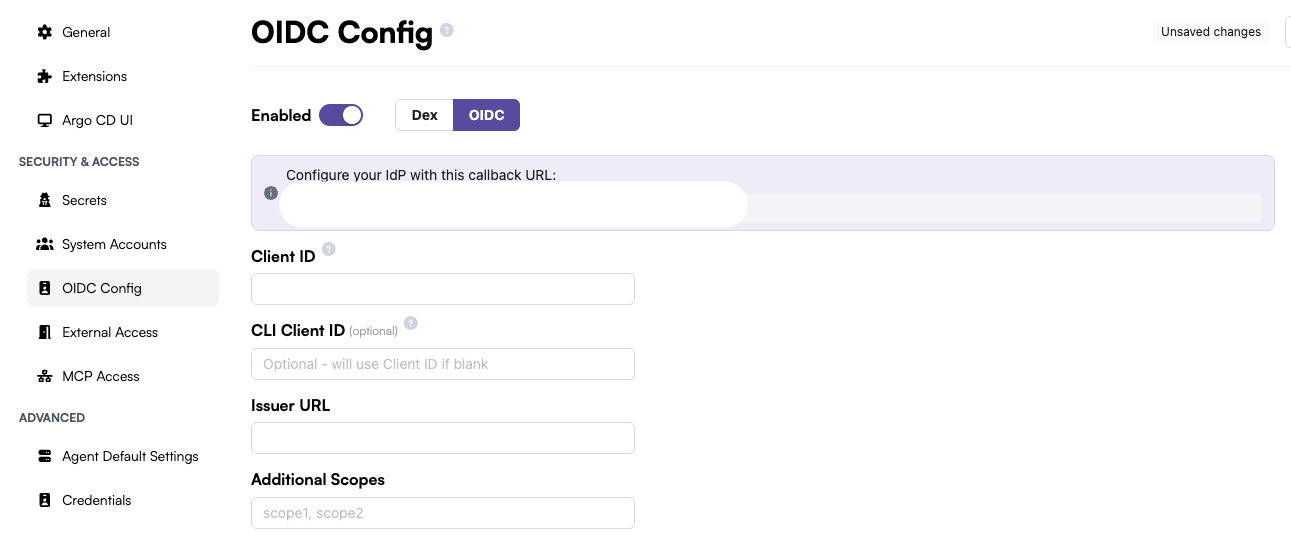
Leave this page open — you will return to it in Step 5.
Step 2: Register the application in Azure
-
In the Azure Portal, go to Microsoft Entra ID → App registrations → + New registration.
-
Name: a descriptive name, for example
Kargo-Native-OIDC-EntraID. -
Supported account types: Accounts in this organizational directory only (Single tenant).
-
Redirect URI: change the platform dropdown from Web to Single-page application (SPA), then enter:
https://<your-kargo-hostname>/login -
Click Register.
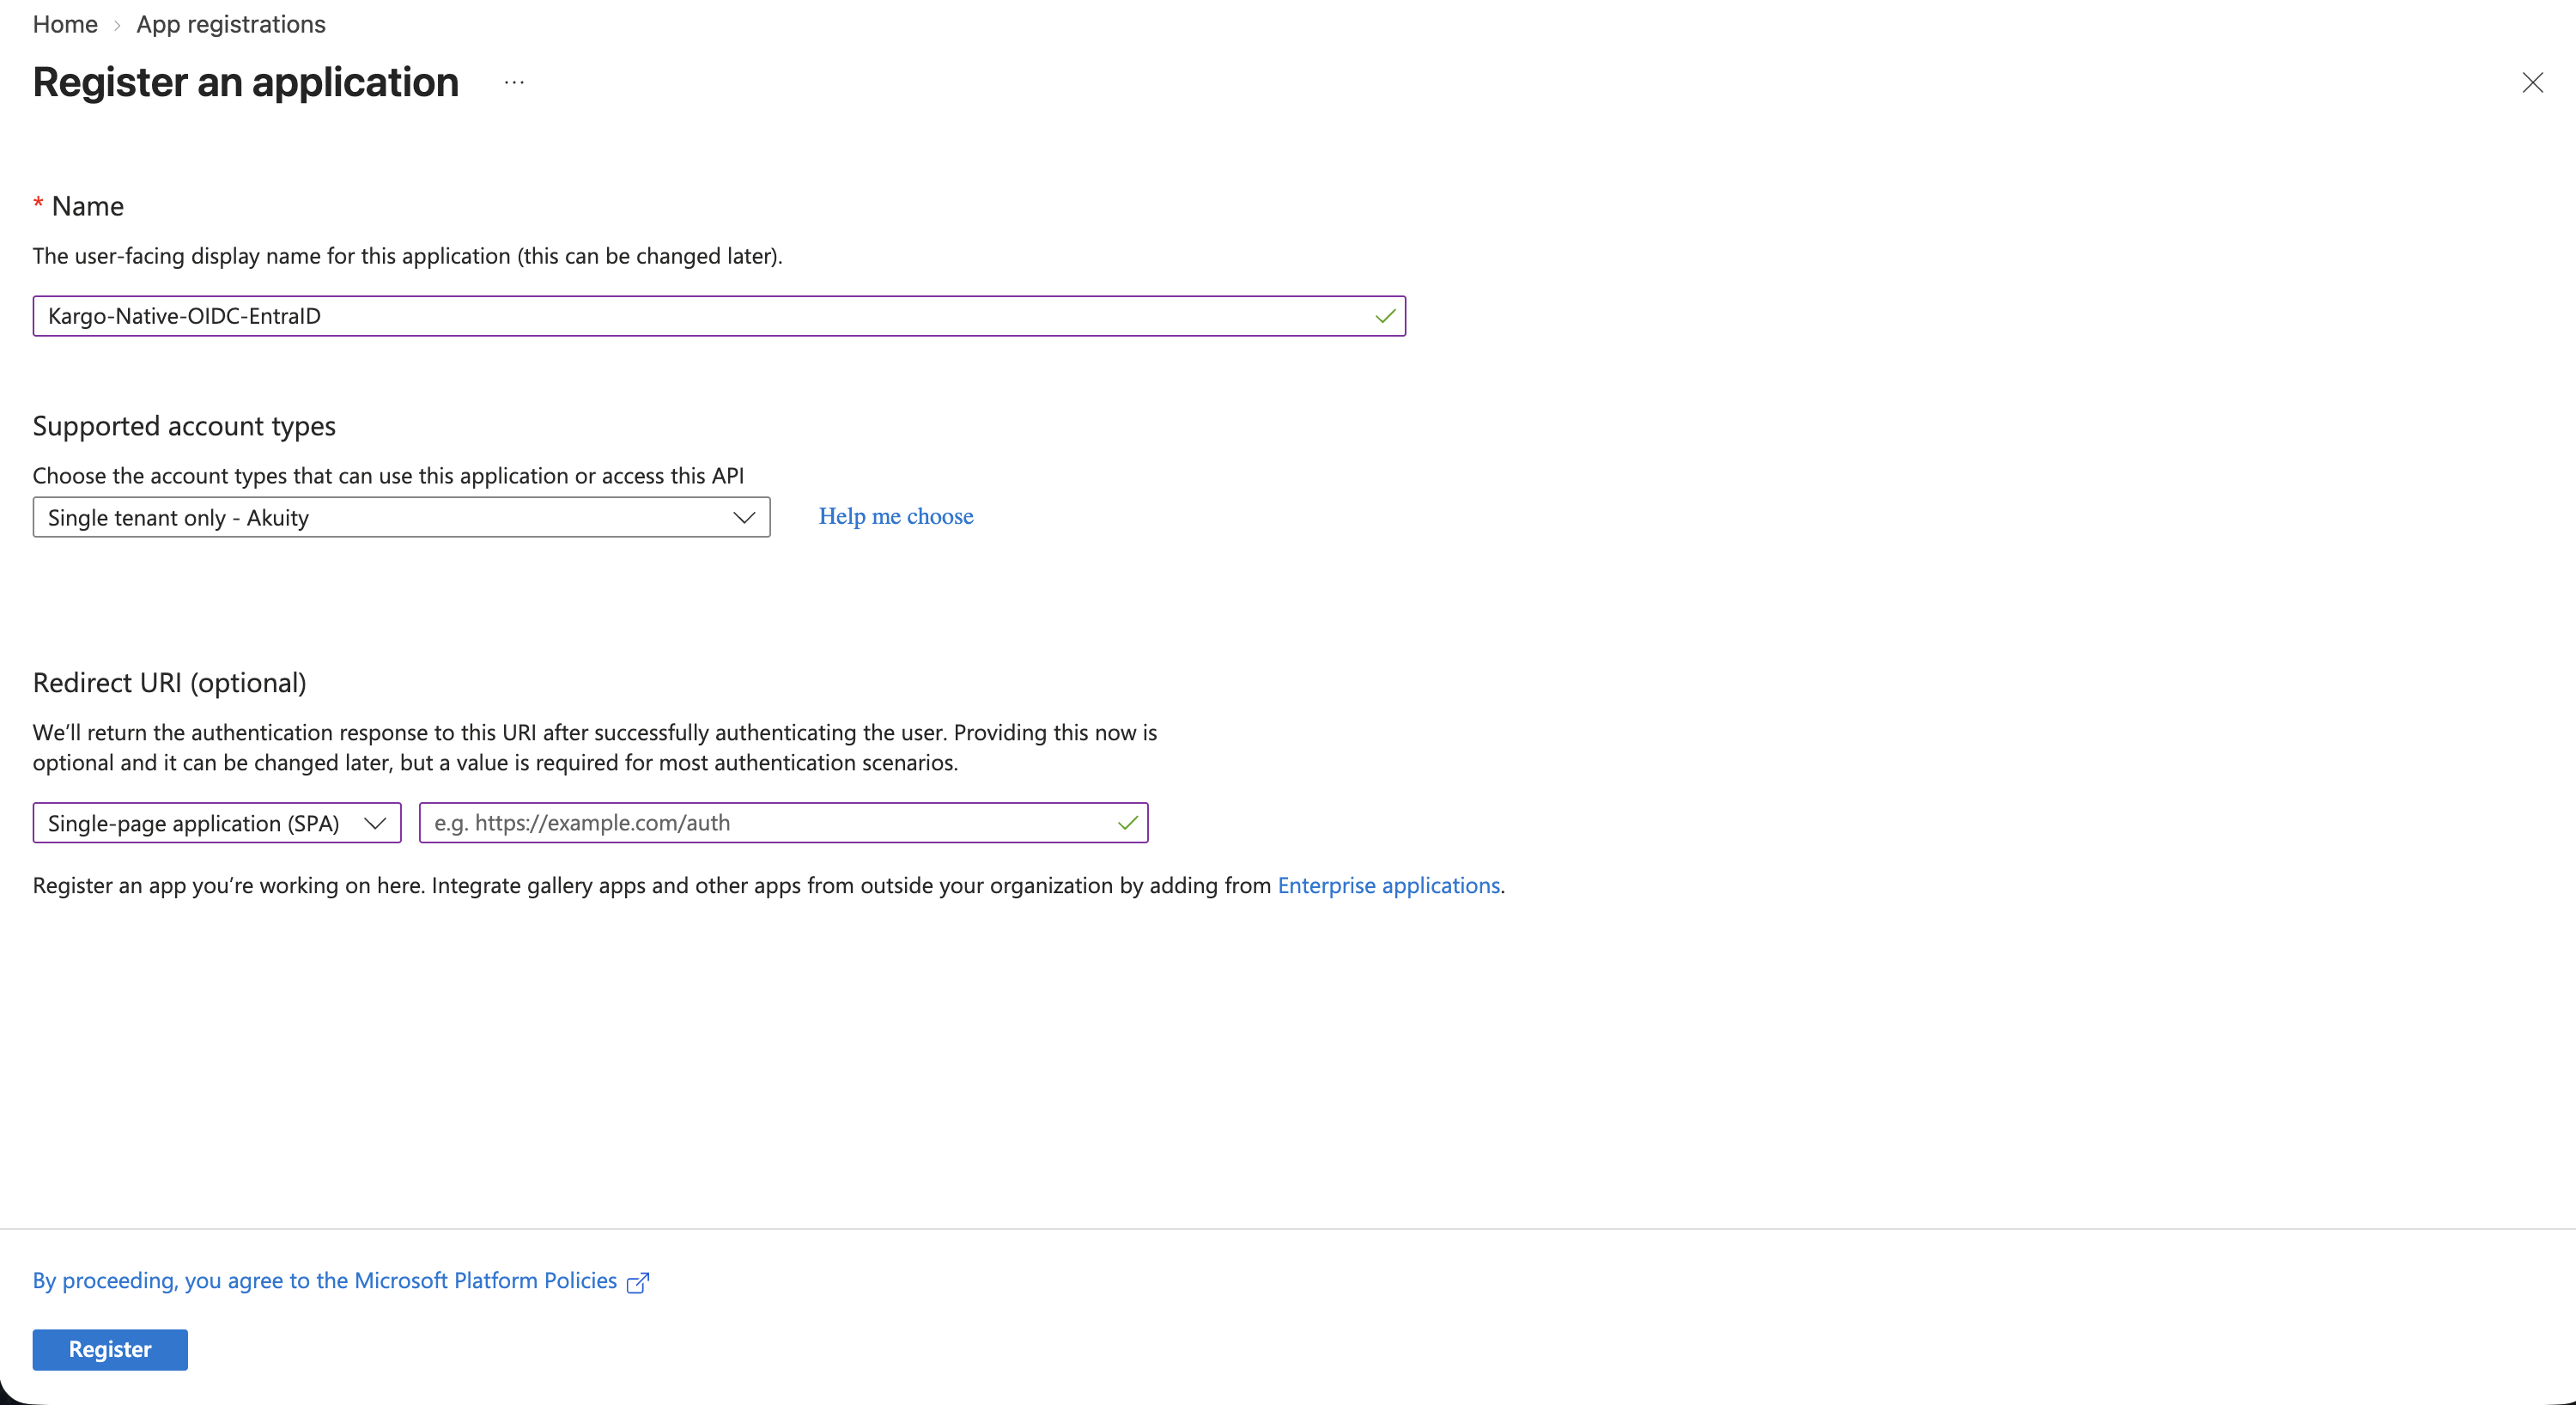
This is the most important choice in this guide.
Kargo's UI runs the authorization-code and PKCE exchange from the browser as a public client, with no client secret. Entra's Web platform expects a client secret and does not enable CORS on the token endpoint, so the token exchange fails.
Single-page application is the only platform that supports public-client PKCE with CORS.
On the Overview page, note the Application (client) ID and the Directory (tenant) ID.
No client secret is needed anywhere in this method. PKCE replaces it. If you find yourself creating one, you are on the wrong platform type.
Step 3: Add the CLI platform
The Kargo CLI authenticates with the same authorization-code and PKCE flow, receiving the callback on a local loopback port.
-
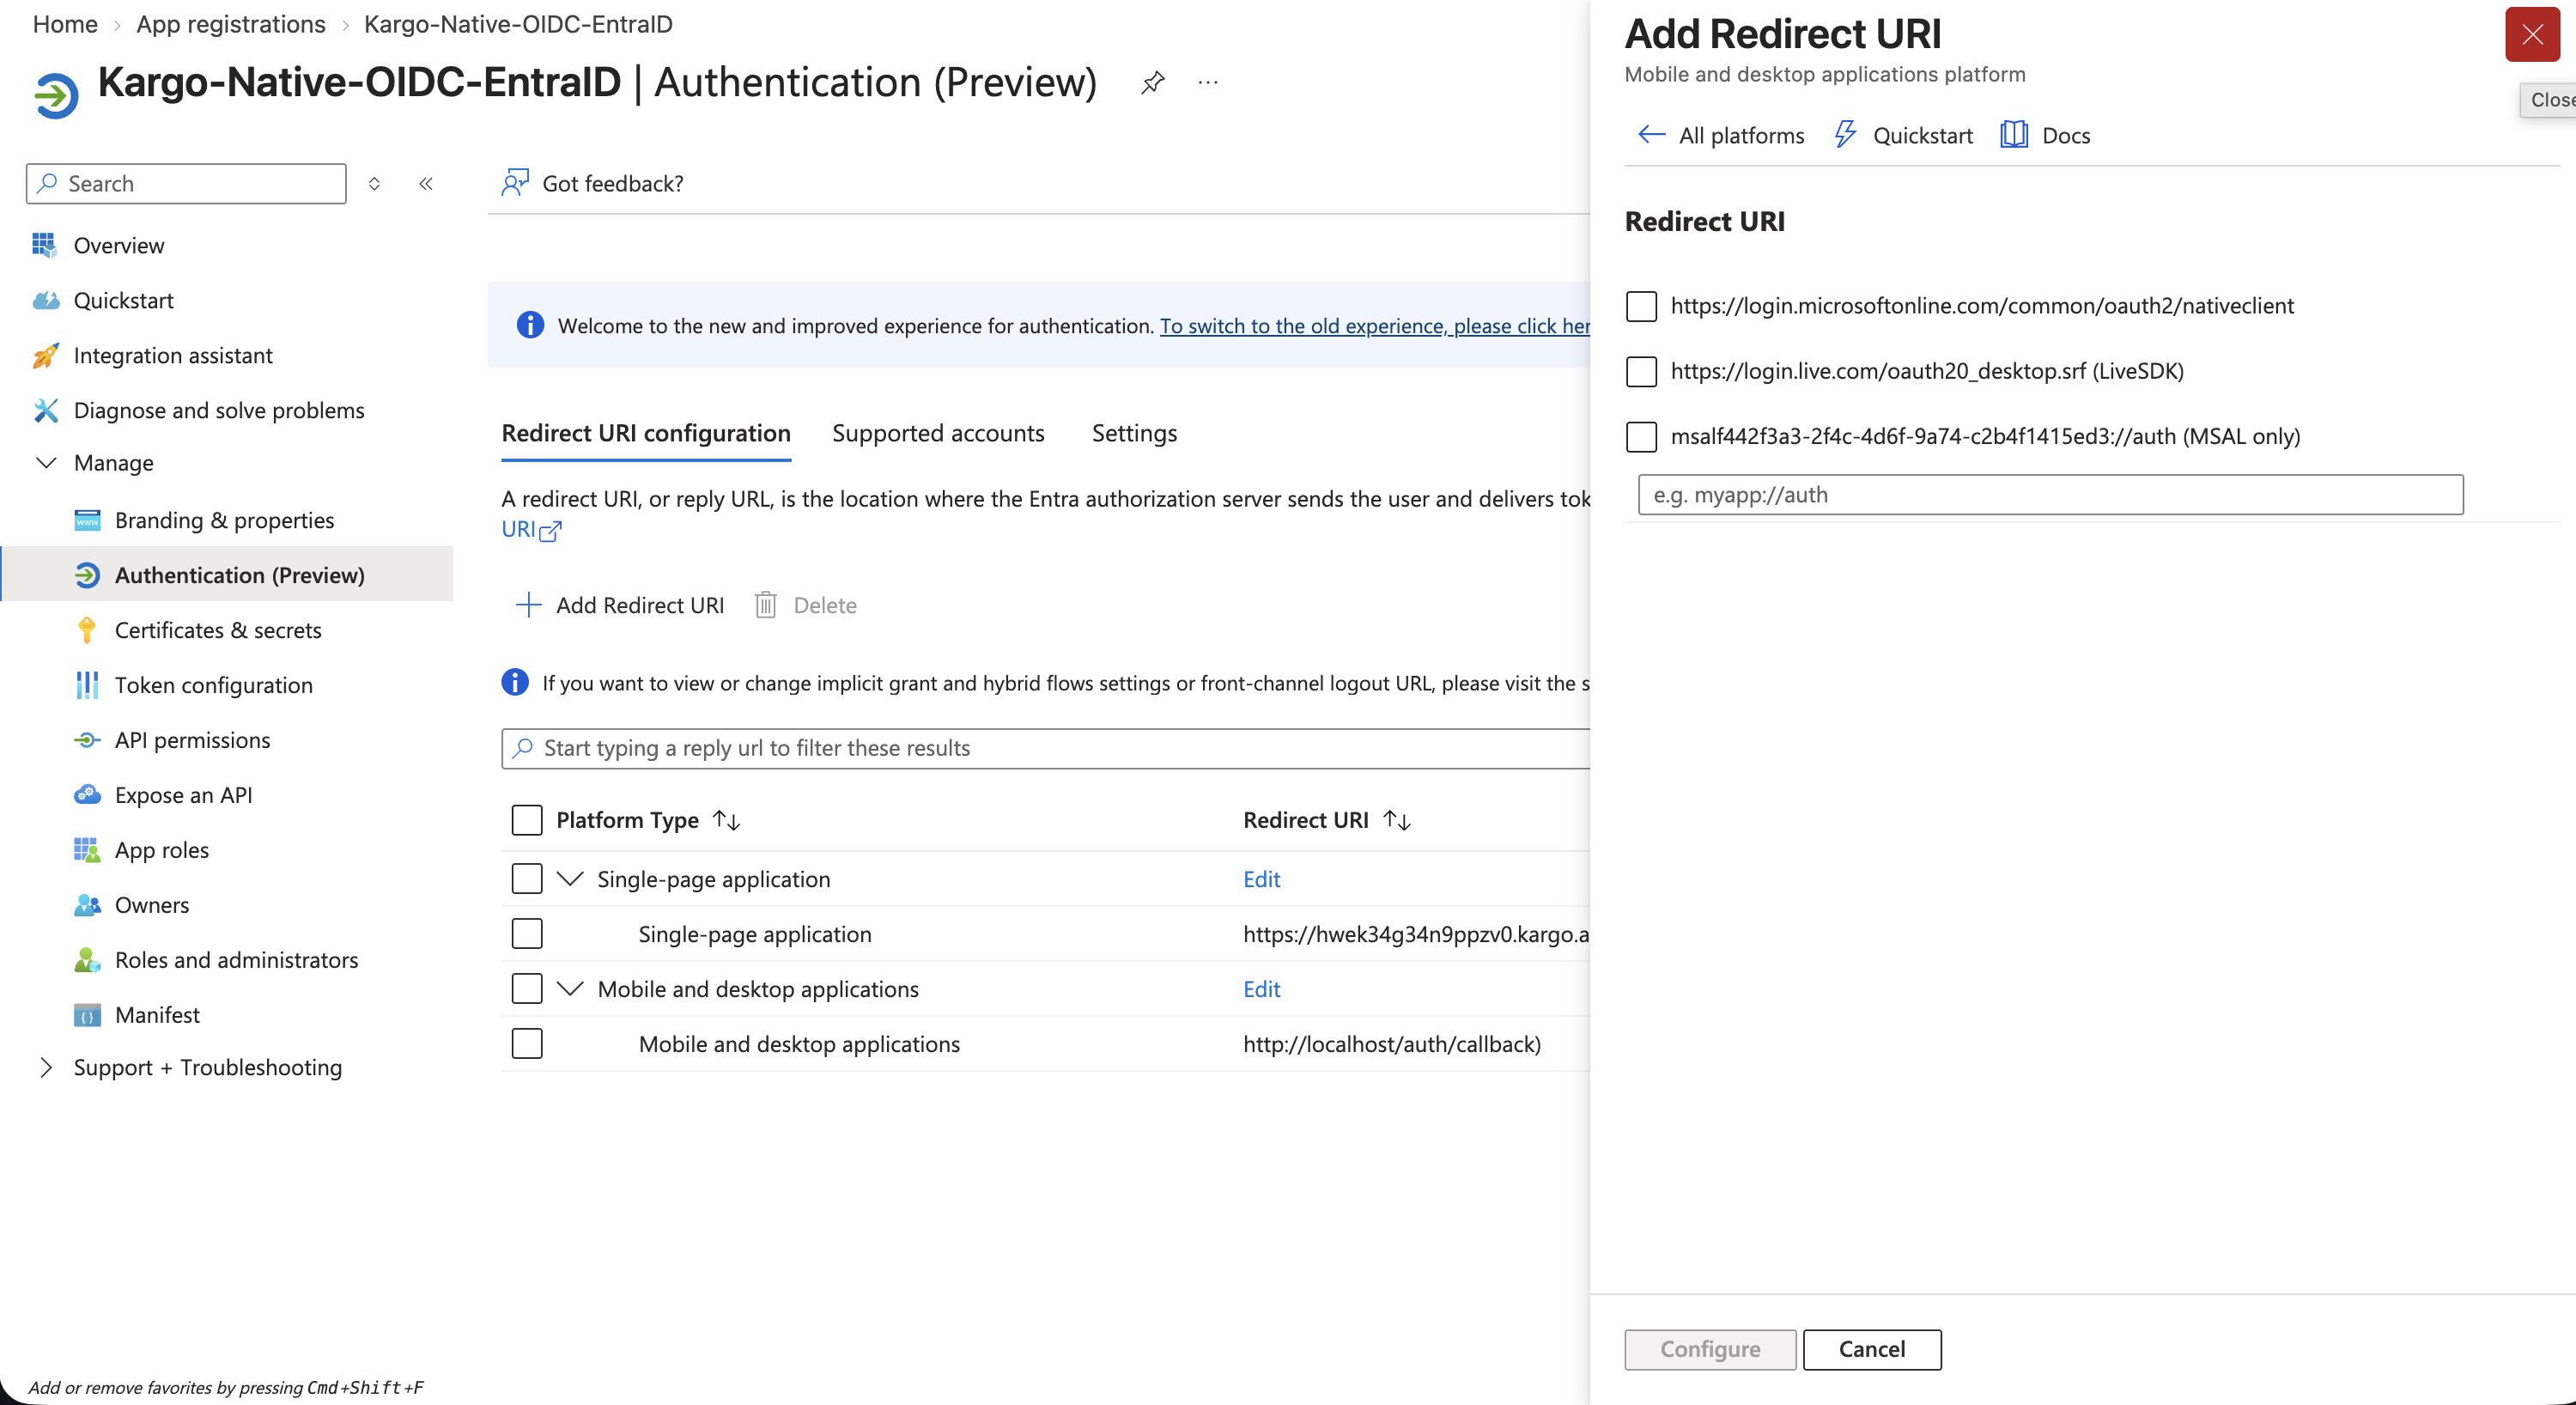
In the application, go to Authentication → + Add a platform.
-
Choose the Mobile and desktop applications tile.
-
Ignore the suggested URIs. Under Custom redirect URIs enter:
http://localhost/auth/callback -
Click Configure.
You should now have two platform configurations: SPA for /login, and Mobile and desktop applications for http://localhost/auth/callback. Adding this platform also marks the application as a public client, which the CLI flow requires.
Step 4: Configure token claims
Azure Entra ID does not emit an email claim by default, and groups must be explicitly requested as a claim.
Add the email claim
-
In the application, go to Token configuration → + Add optional claim.
-
For Token type, select ID.
-
Check
email. Optionally also checkpreferred_usernameandupn. -
Click Add.
-
A banner appears reading "Some of these claims (email) require OpenId Connect scopes…". Tick the checkbox to turn on the Microsoft Graph
emailpermission, then click Add.
Without that checkbox the claim is configured but never appears in the token. The email scope is a basic OpenID Connect scope and does not require admin consent.
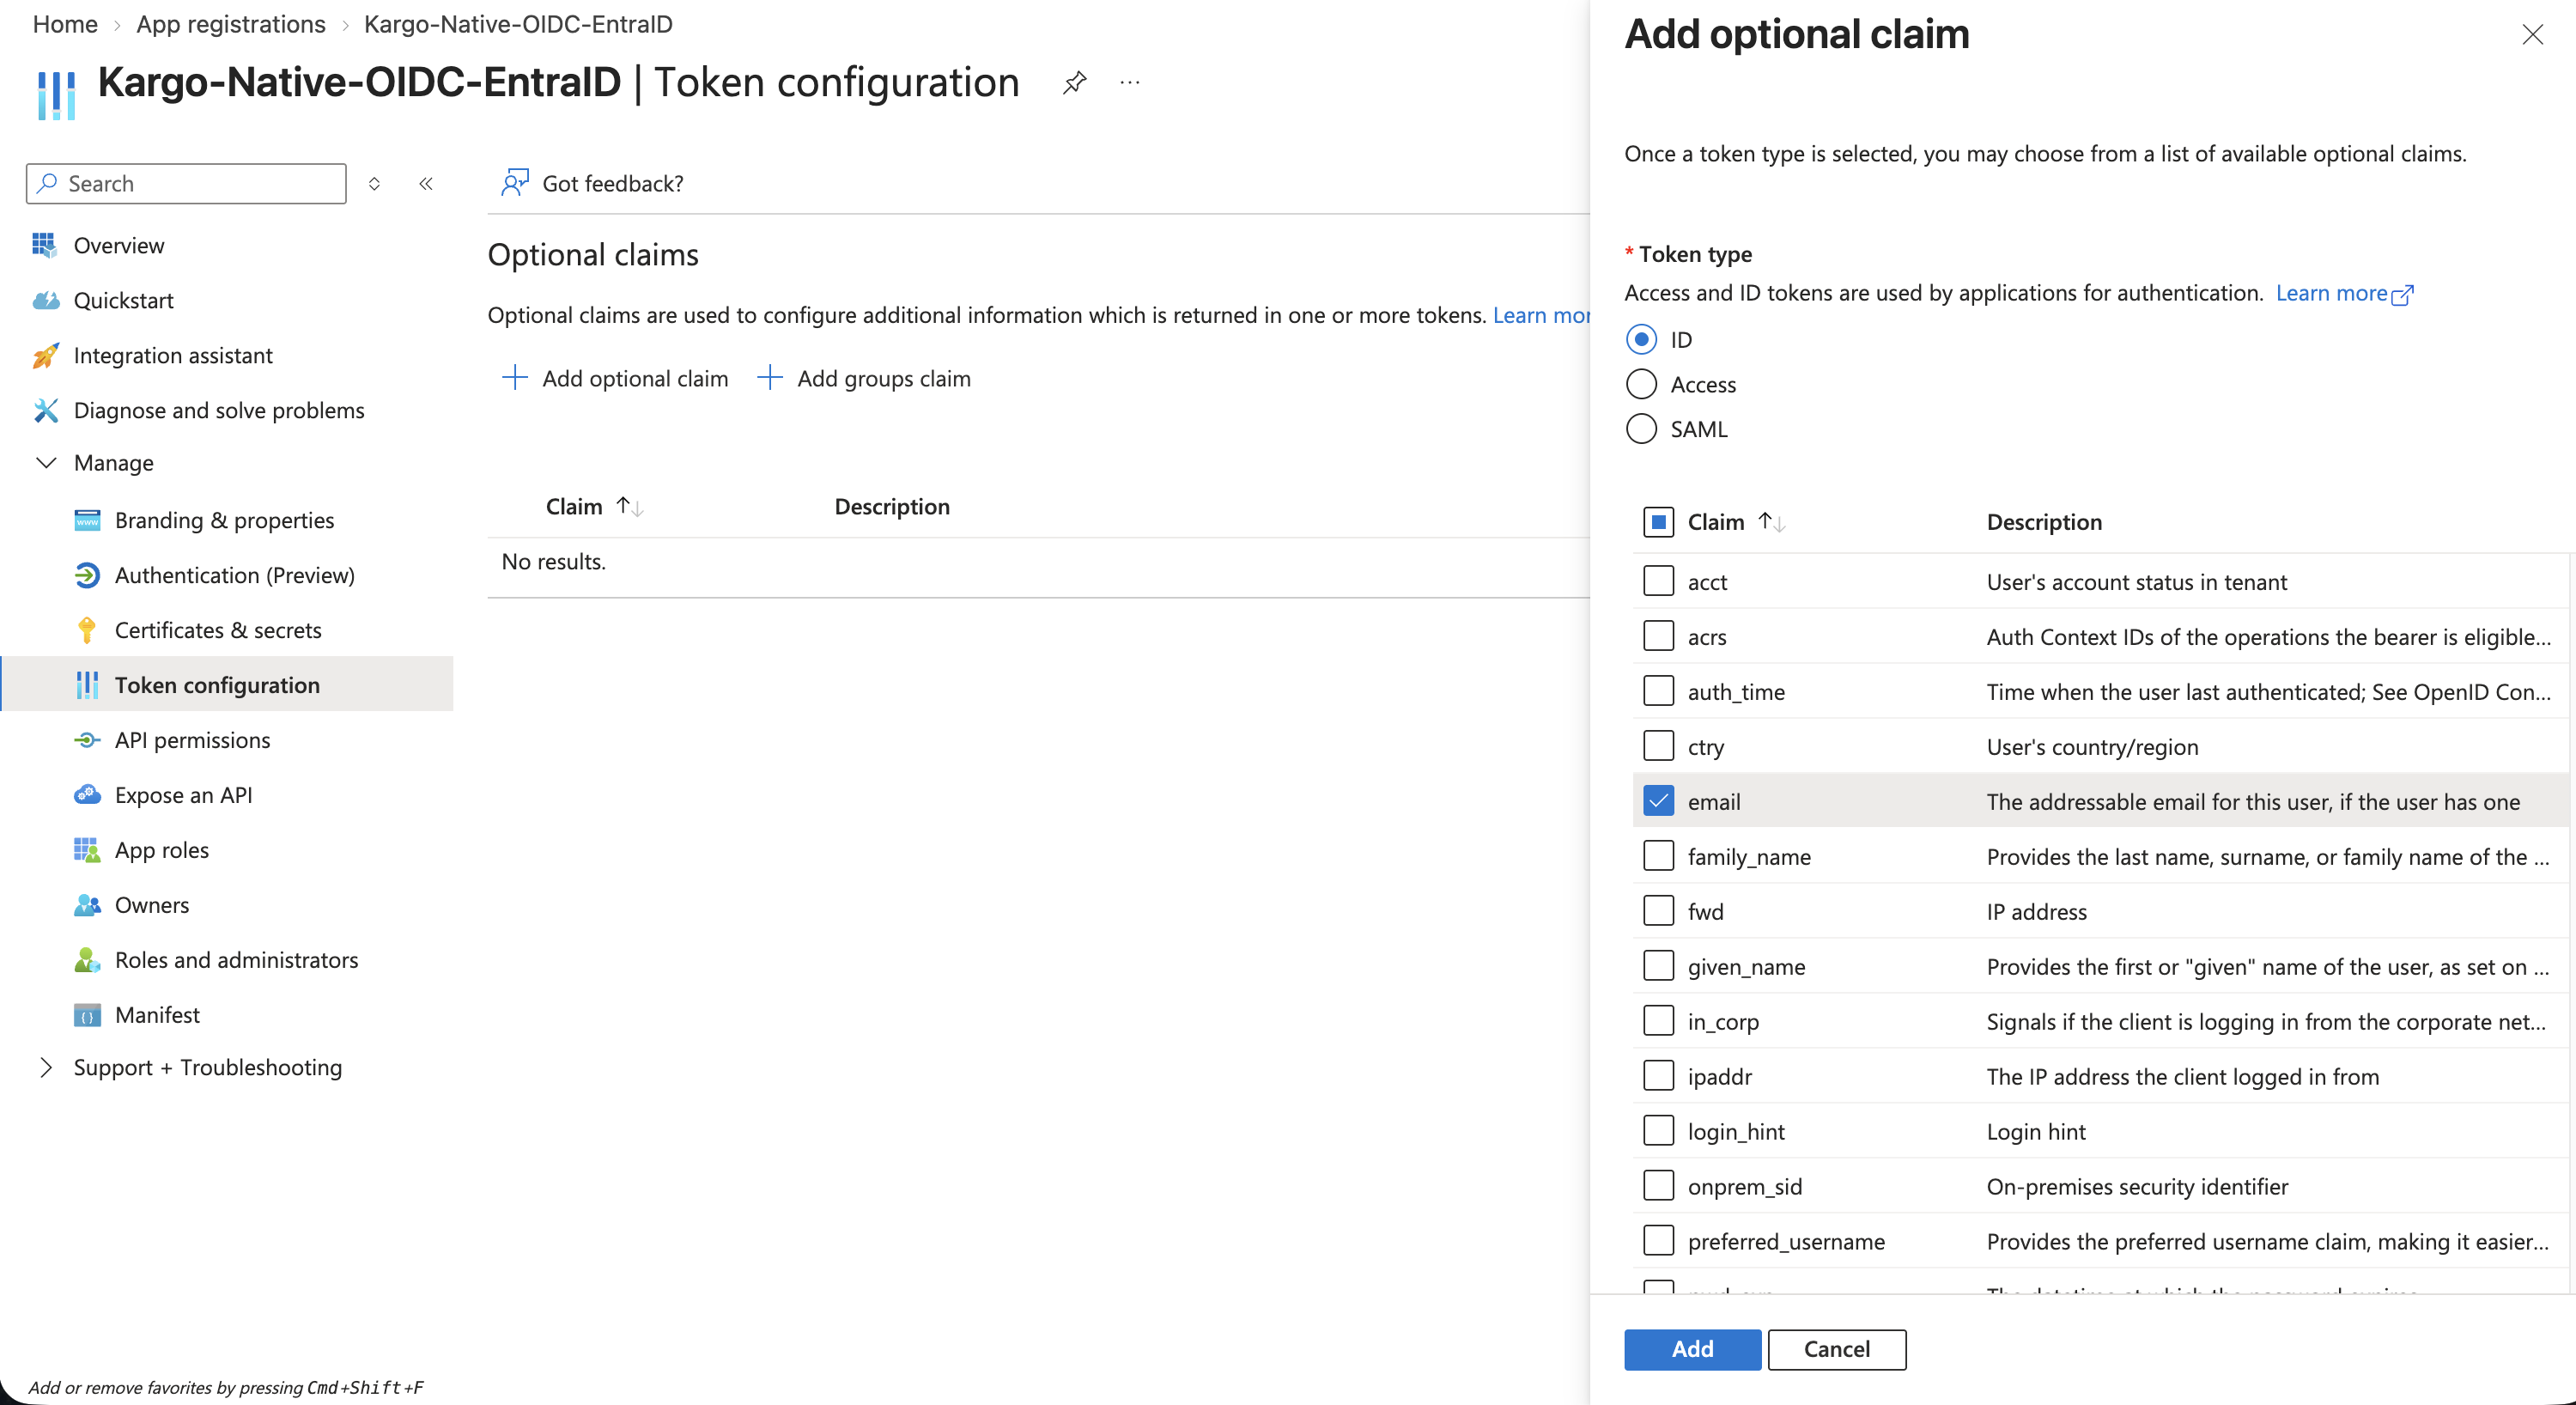
email claim only carries a value if the user's mail attribute is populatedEntra ID sources it from the directory mail attribute, which is frequently blank on newly created, test, or service accounts even when the UPN looks like an email address.
To check, query Microsoft Graph:
GET https://graph.microsoft.com/v1.0/me?$select=mail,userPrincipalName
A response of "mail": null confirms the problem. You can also look under Users → user → Contact Information → Email.
To fix it you need the User Administrator role: set Contact Information → Email on the user, or send PATCH /users/{id} with { "mail": "user@yourcompany.com" }.
Alternatively, map Kargo roles on a claim that is always present, such as preferred_username or sub. Kargo accepts any claim name.
Add the groups claim
Add this if you want group-based roles.
-
Go to Token configuration → + Add groups claim.
-
Select Security groups, or Groups assigned to the application — see the limit below.
-
Under the ID token section, select Group ID.
-
Click Add.
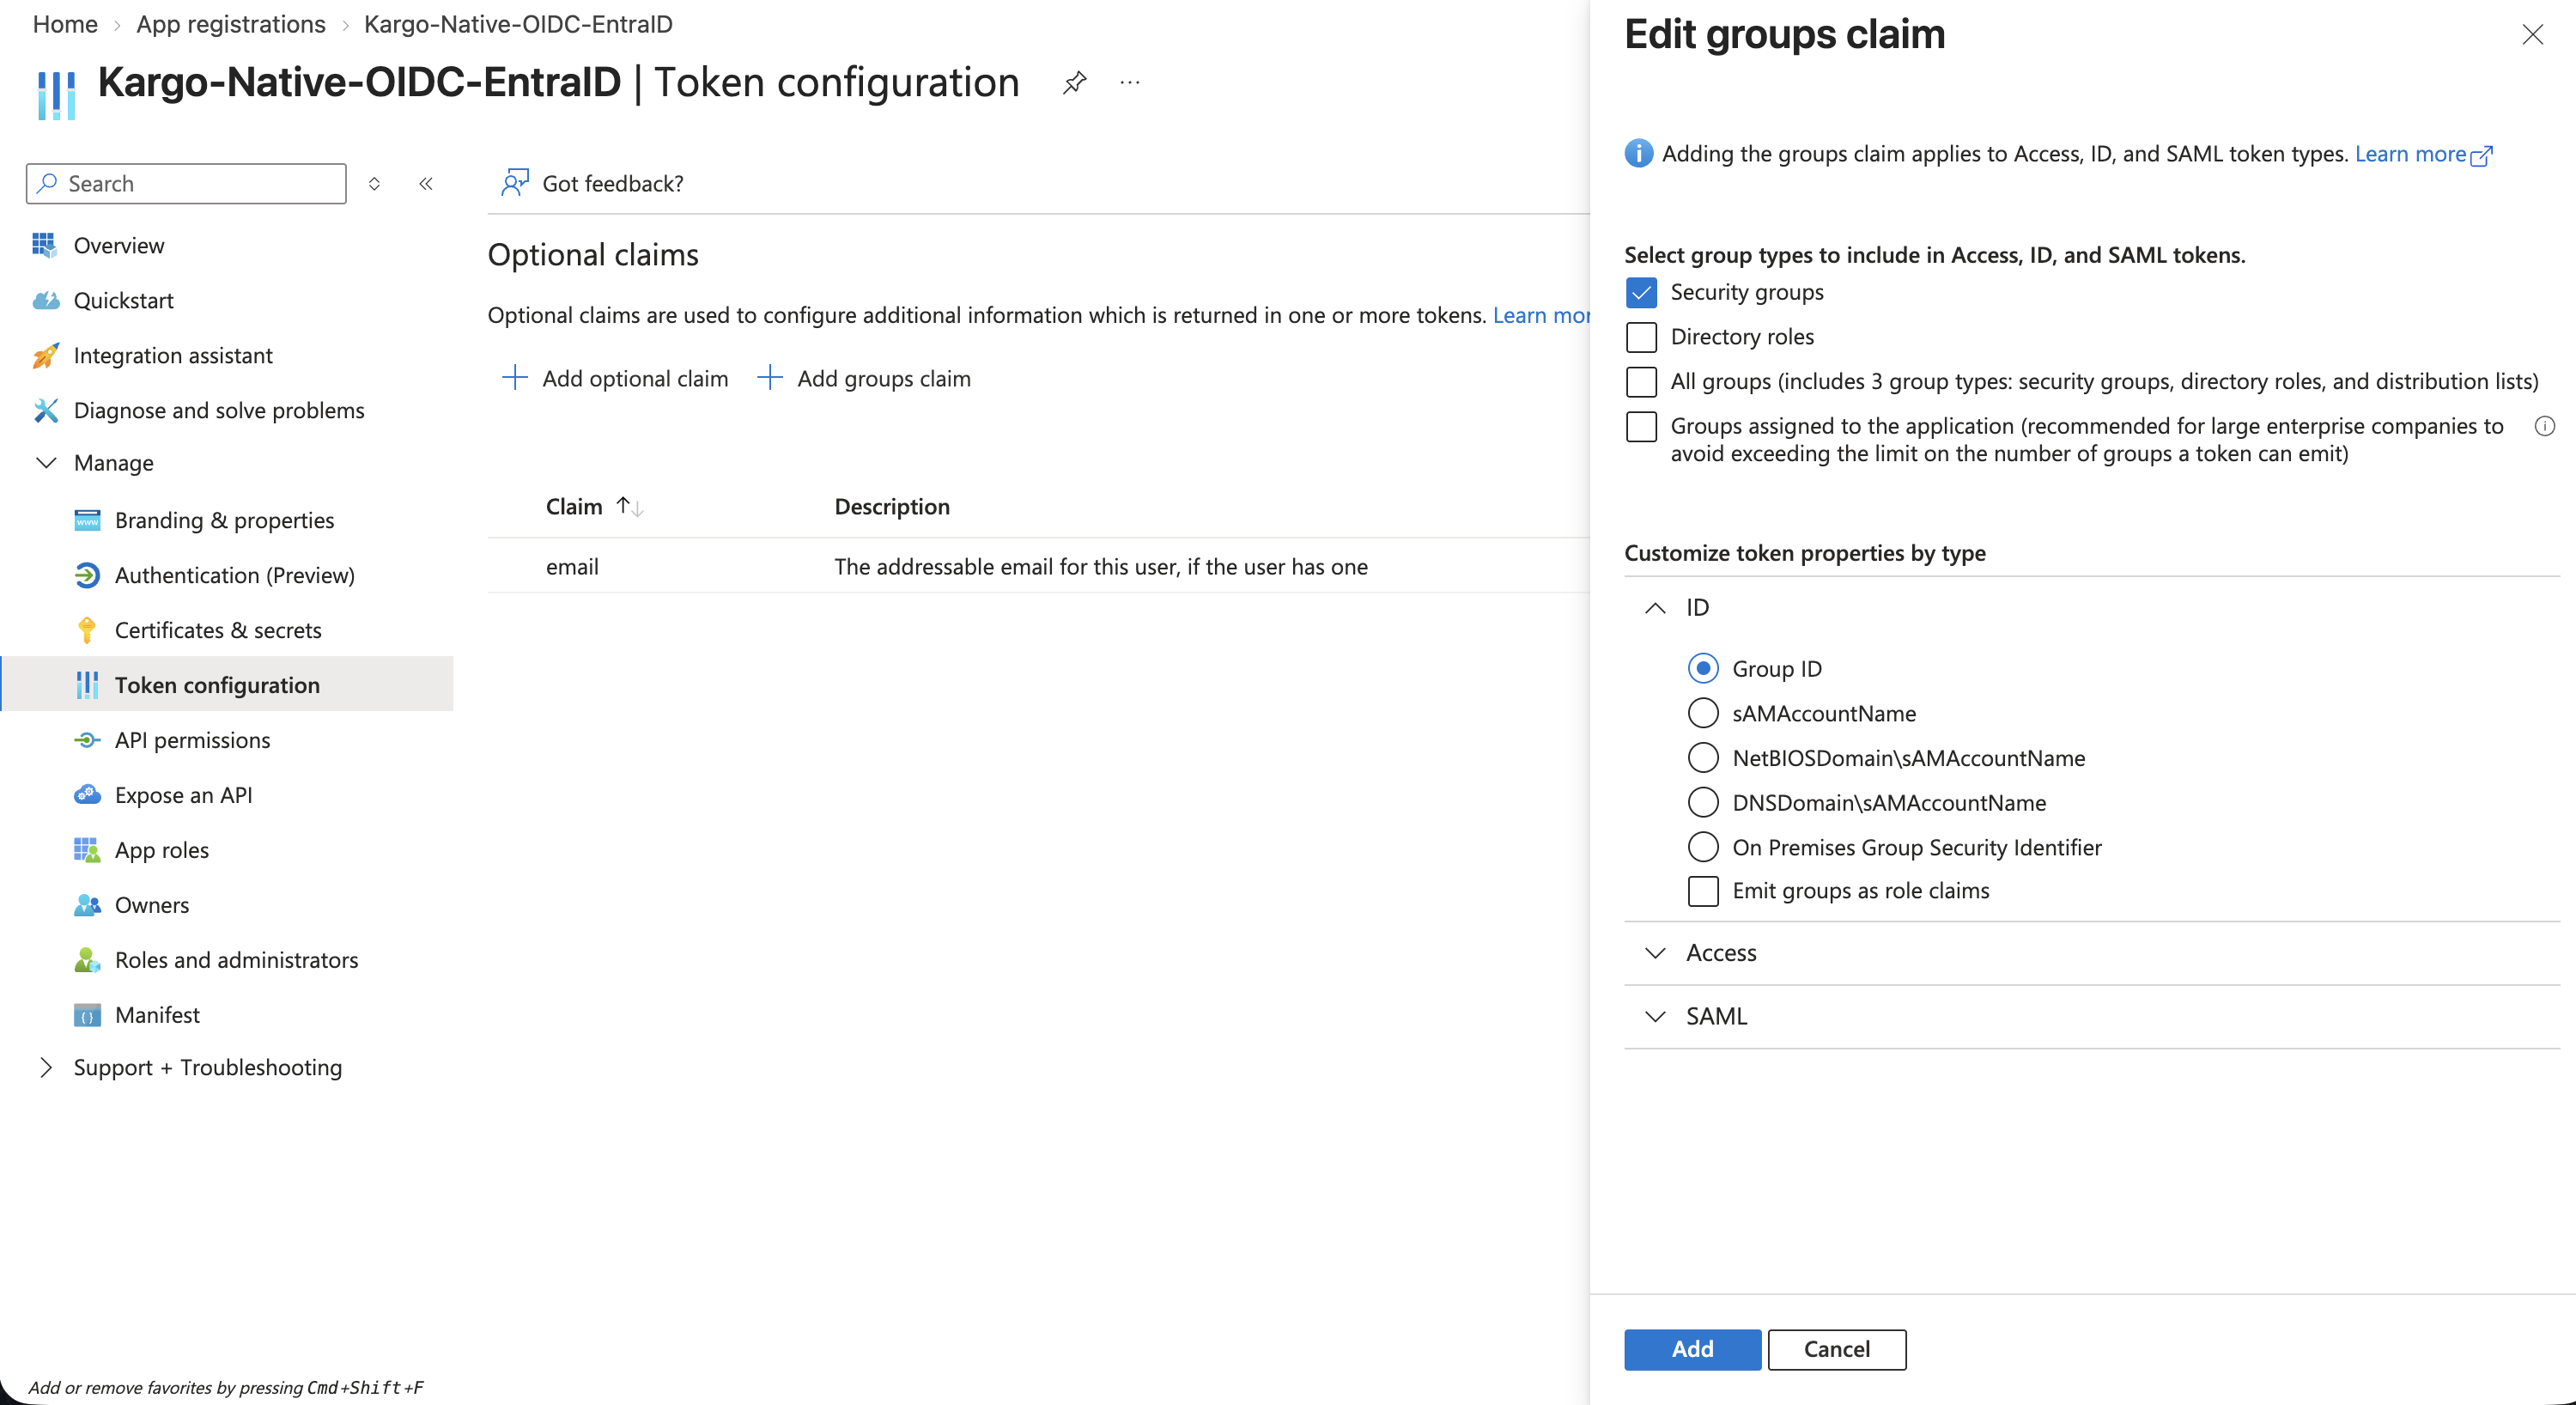
Past 200 groups Entra ID drops the groups claim entirely and emits overage indicators (_claim_names and _claim_sources) instead. Kargo has no overage-resolution feature, so affected users silently receive no groups at all, with no error, and group-based roles quietly stop applying.
To avoid this, configure a groups claim filter: select Groups assigned to the application instead of Security groups, so only groups explicitly assigned to the application are emitted. Assign them under Enterprise applications → your app → Users and groups.
Assigning groups to an application requires Entra ID P1 or P2.
No API permissions or admin consent are required for this method. The default User.Read plus the basic email scope is sufficient.
Step 5: Complete the Kargo OIDC configuration
Back on the Kargo OIDC Config page with OIDC mode selected, fill in:
| Field | Value |
|---|---|
| Client ID | Your Application (client) ID from Step 2 |
| CLI Client ID | The same Application (client) ID |
| Issuer URL | https://login.microsoftonline.com/<TENANT_ID>/v2.0 |
| Additional Scopes | Leave empty |
Replace <TENANT_ID> with your Directory (tenant) ID.
groups to Additional ScopesKargo already requests openid, profile and email by default, and appends offline_access when the identity provider advertises it. Adding a groups scope produces:
AADSTS650053: The application asked for scope 'groups' that doesn't exist on the
resource '00000003-0000-0000-c000-000000000000'.
Microsoft Graph has no groups scope. Groups arrive via the token claim configured in Step 4, never via a scope.
A single Entra ID registration serves both the UI and the CLI, because Entra allows multiple platform configurations on one application. Leaving CLI Client ID blank also works — the UI auto-fills it from Client ID.
Step 6: Map users to Kargo roles
Scroll to Kargo Roles and Permissions. For the Admin role:
- Claim key:
email - Claim value: your email address
- Click Add
Available roles are Admin, Viewer, User, and Project Creator.
For group-based mapping, use claim key groups with the group's Entra ID Object ID as the value, matching the Group ID format chosen in Step 4.
Claim matching is exact string equality — no wildcards, no substring matching, no case folding. If you later change the groups claim format, for example from Group ID to sAMAccountName, every existing mapping must be rewritten. Plan format changes as a coordinated migration.
Click Save.
Step 7: Test the UI login
-
Open a fresh incognito or private window and go to
https://<your-kargo-hostname>. -
Click SSO Login.
-
Sign in with your Entra ID account, and accept the consent prompt if shown. This is basic user consent and needs no admin approval.
-
You land in the Kargo UI with the role you mapped.
The redirect URL should contain:
login.microsoftonline.com/<tenant>/oauth2/v2.0/authorize?…&code_challenge=…&code_challenge_method=S256&redirect_uri=…%2Flogin
code_challenge_method=S256 confirms PKCE, and a redirect_uri ending in /login with no /dex/callback anywhere confirms Dex is bypassed.
Step 8: Test the CLI login
kargo login https://<your-kargo-hostname> --sso
The CLI starts a loopback listener on a free local port, opens your browser to Entra ID, completes the PKCE exchange, and stores the token.
Verify you are authenticated:
kargo get projects
You should see your projects listed.
Native OIDC troubleshooting
AADSTS50011 for the CLI callback
Check the registered URI for stray characters. A trailing bracket, space, or slash pasted in with the URL is easy to miss in the Azure form — the value must be exactly http://localhost/auth/callback.
AADSTS50011 for the UI callback
The redirect URI registered in Azure does not match the callback Kargo actually uses. Read the redirect_uri parameter out of the browser URL when you are redirected to Microsoft — that is the exact value Azure must have registered. For native OIDC it is https://<kargo-host>/login.
AADSTS650053: The application asked for scope 'groups' that doesn't exist
Remove groups from Additional Scopes. Entra ID has no groups scope — groups come from the token claim configured in Step 4.
CORS error, or "client_secret is required" at the token exchange
The application is registered on the Web platform instead of Single-page application (SPA). Kargo's UI is a public client using PKCE, and only the SPA platform supports that with CORS. Add a SPA platform configuration, or recreate the application, with the /login redirect URI.
Login succeeds but the user has no permissions
No role mapping matched. Check Kargo Roles and Permissions: the claim key and value must match the token exactly. Decode the ID token and compare the claim values character for character.
Groups missing, or group-based roles not applying
- Confirm a groups claim is configured in Azure Token configuration (Step 4)
- Use the group's Object ID as the mapping value, not the display name
- Check whether the user exceeds the 200-group ceiling. Kargo has no overage fallback, so affected users get no groups silently — switch to Groups assigned to the application
Only some of a user's groups appear
If the groups claim is set to Groups assigned to the application, only groups explicitly assigned to the application are emitted. Assign the remaining groups under Enterprise applications → your app → Users and groups.
If it is set to Security groups, verify the missing groups are actually security-enabled. Microsoft 365 groups and distribution lists are excluded.
email claim missing
You need both the email optional claim, with the Graph email permission enabled, and a populated mail attribute on the user. See Step 4. Alternatively map roles on preferred_username or sub.
Native OIDC summary
| Component | Value |
|---|---|
| Azure app type | App registration (single tenant) |
| UI platform | Single-page application (SPA) |
| UI redirect URI | https://<kargo-host>/login |
| CLI platform | Mobile and desktop applications |
| CLI redirect URI | http://localhost/auth/callback — no port needed |
| Kargo SSO mode | OIDC, not Dex |
| Issuer URL | https://login.microsoftonline.com/<TENANT_ID>/v2.0 |
| Client secret | PKCE |
| Additional scopes | Empty; defaults are openid, profile, email |
| Admin consent | Not required |
| Group token limit | 200, with no overage fallback in Kargo |
| CLI command | kargo login https://<kargo-host> --sso |
| Key gotchas | Register the UI as SPA, not Web; register the CLI loopback URI under Mobile and desktop applications; never add a groups scope; the mail attribute must be set for the email claim |
Dex OIDC
Connect Entra ID through Dex's oidc connector, using an app registration and a client secret.
Step 1: Get your Kargo callback URL
-
In your Kargo Instance, go to Settings.
-
In the left panel, search for Access and go to OIDC Config.
-
Toggle Enabled to on.
-
Select the Dex option, not OIDC.
-
A banner displays your callback URL. Copy it — you will register it in Azure:
https://<your-kargo-hostname>/dex/callback
The Kargo Dex callback path is /dex/callback.
When Dex is selected the page shows the /dex/callback URL; when OIDC (direct) is selected it shows a /login URL. Make sure you copy the /dex/callback one.
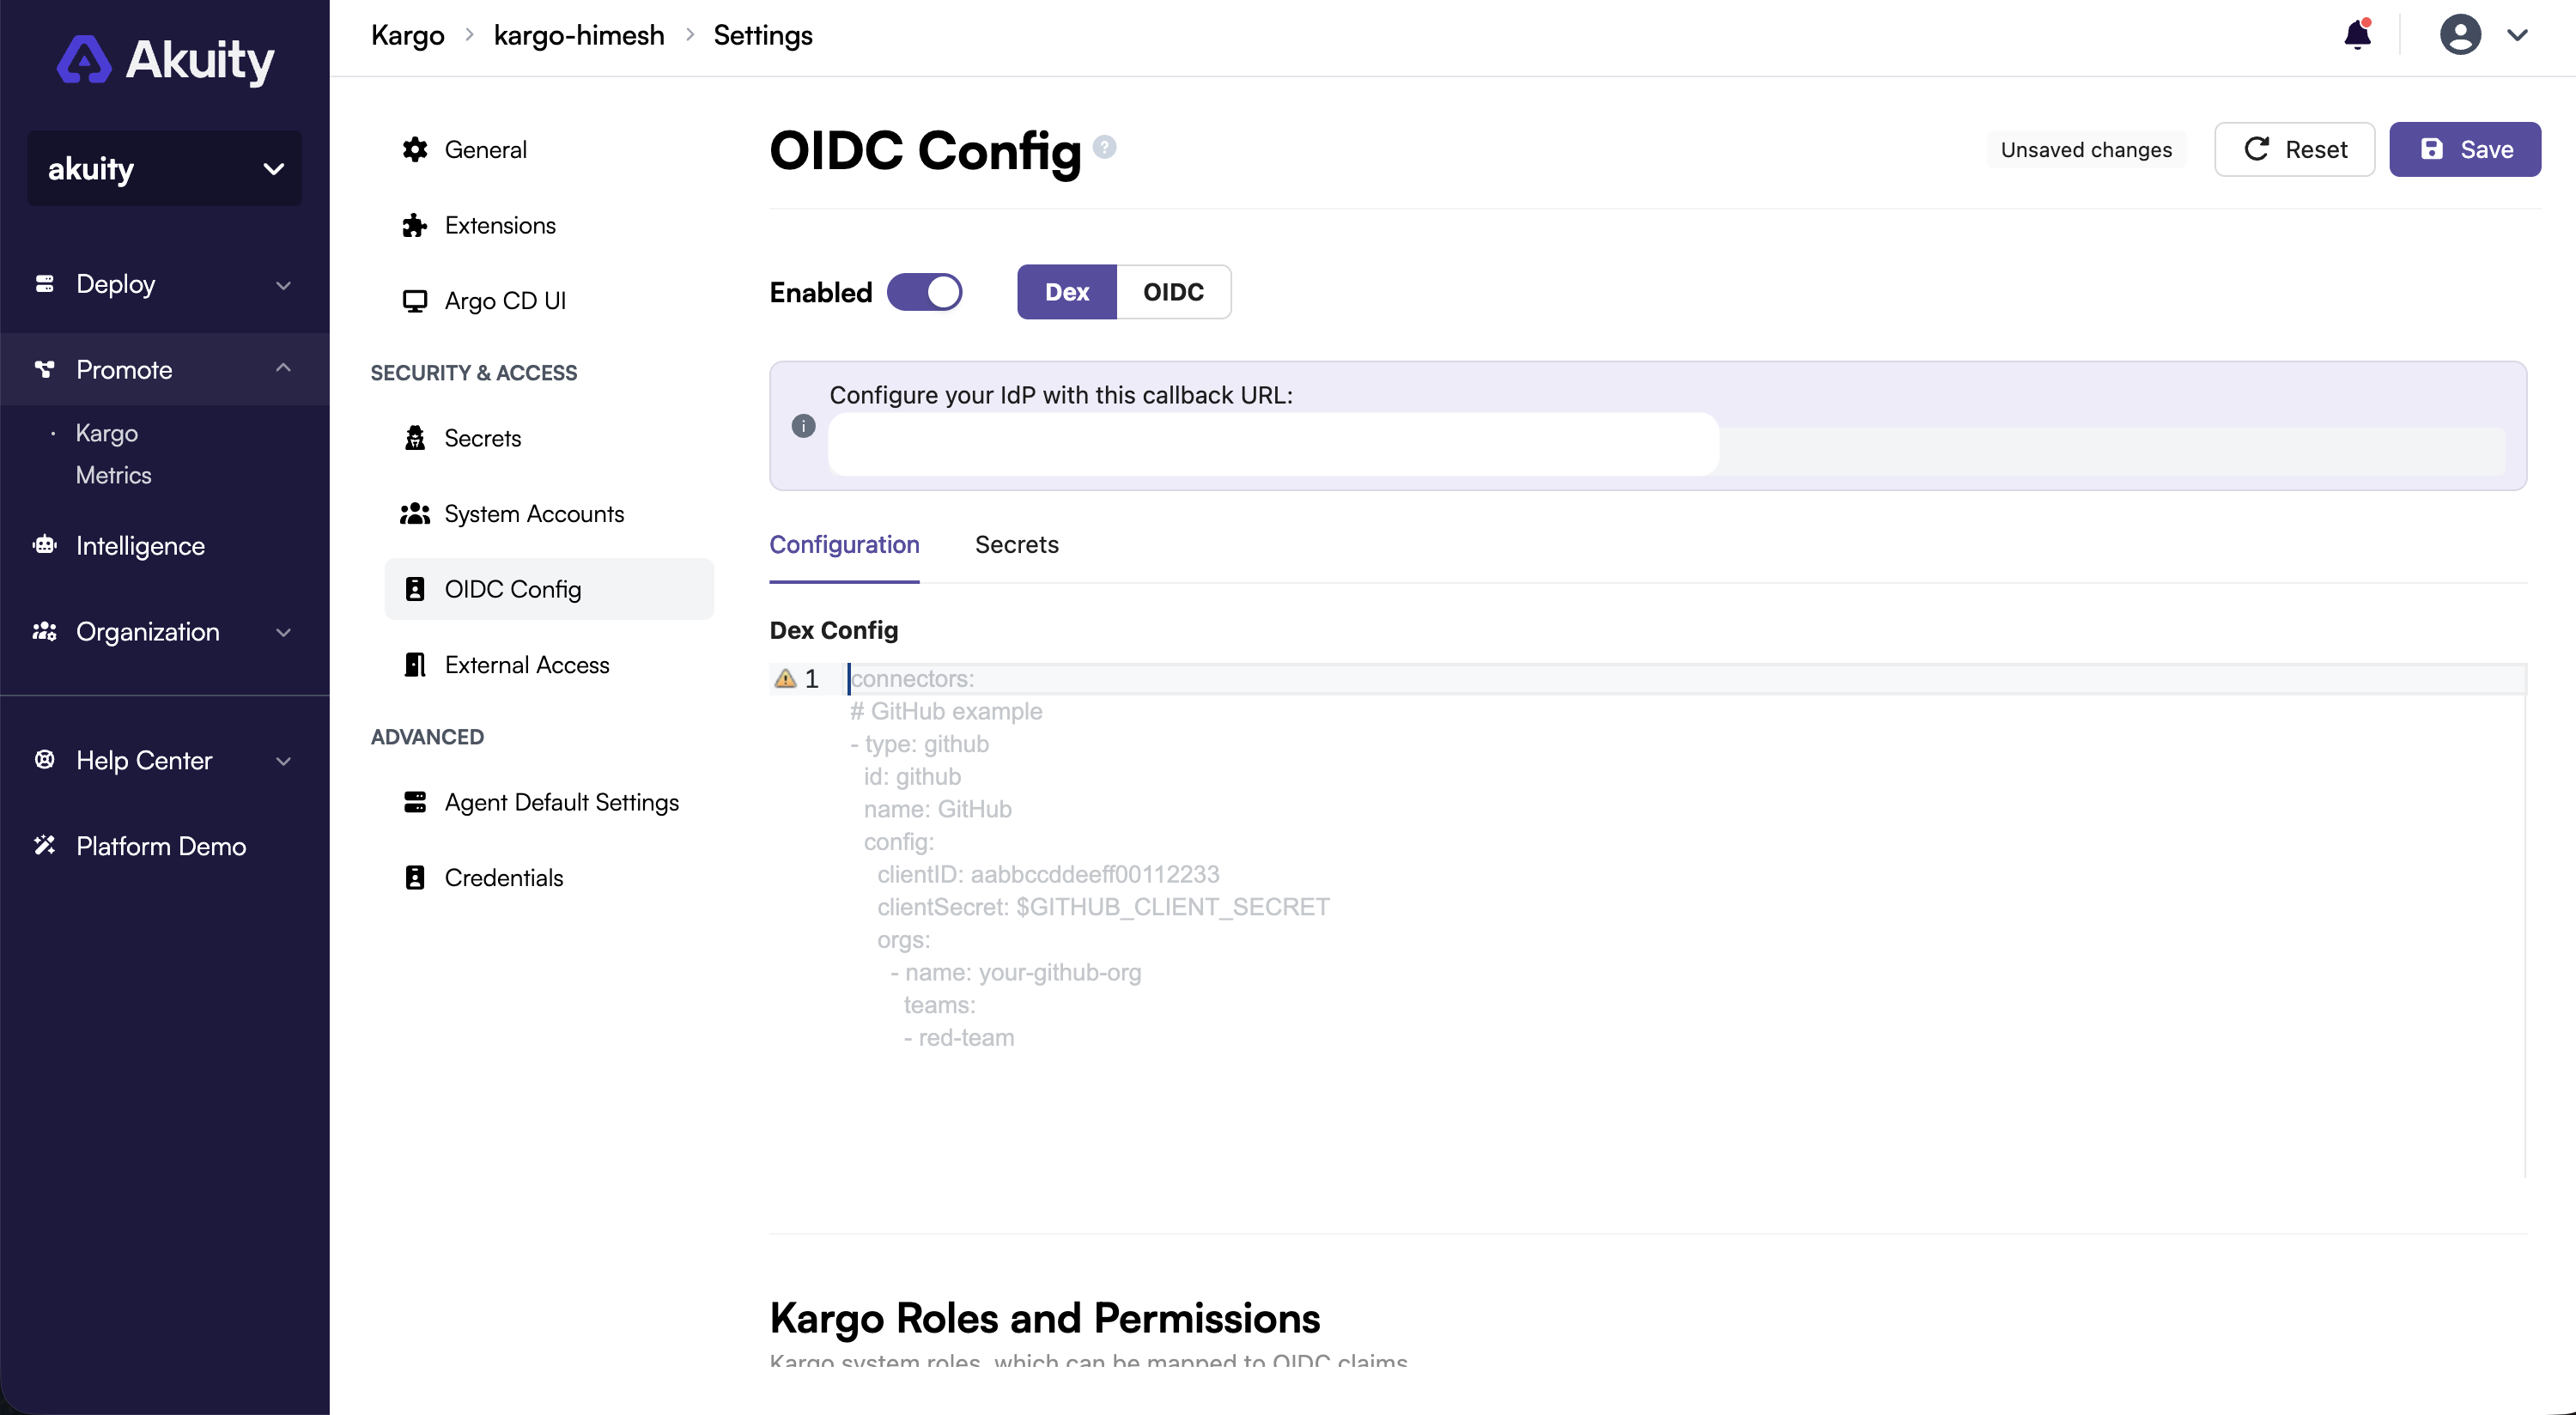
Leave this page open — you will come back to fill in the configuration.
Step 2: Register a new application in Azure Entra ID
-
Log in to the Azure Portal.
-
Navigate to Microsoft Entra ID → App registrations.
-
Click + New registration.
-
Fill in the registration form:
- Name: a descriptive name, for example
Kargo-Dex-OIDC-EntraID - Supported account types: Accounts in this organizational directory only (Single tenant)
- Redirect URI: platform Web, set to
https://<your-kargo-hostname>/dex/callbackfrom Step 1
- Name: a descriptive name, for example
-
Click Register.
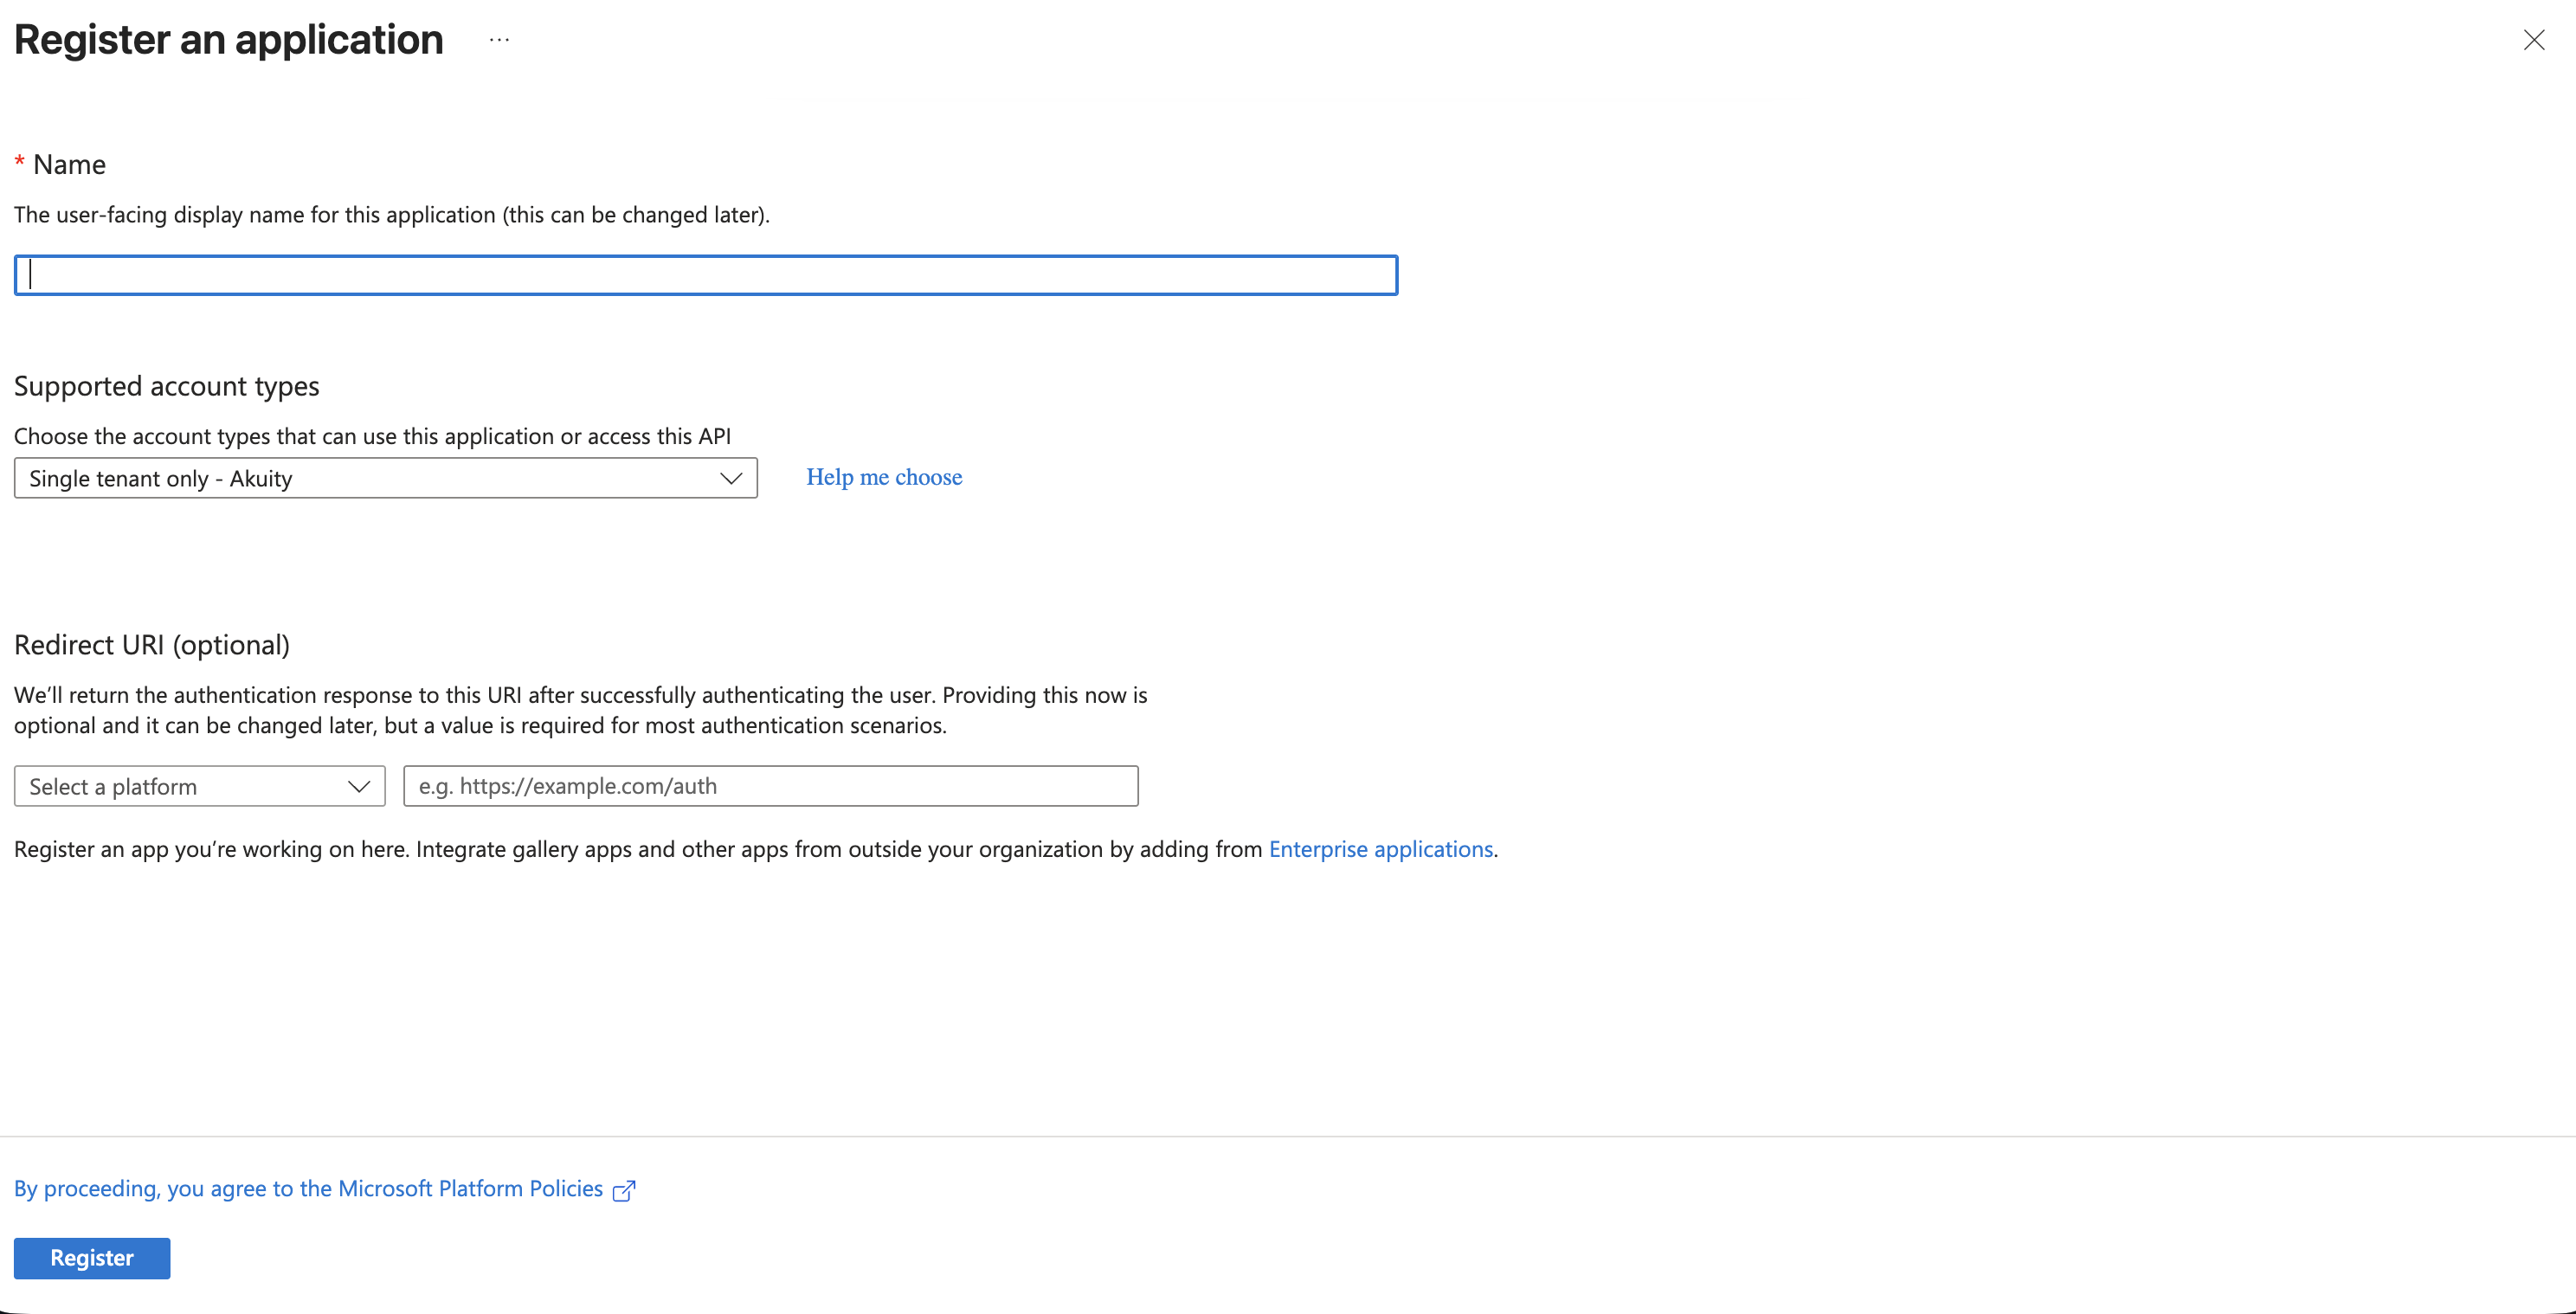
Step 3: Note down application details
On the application's Overview page, note down the Application (client) ID and the Directory (tenant) ID.
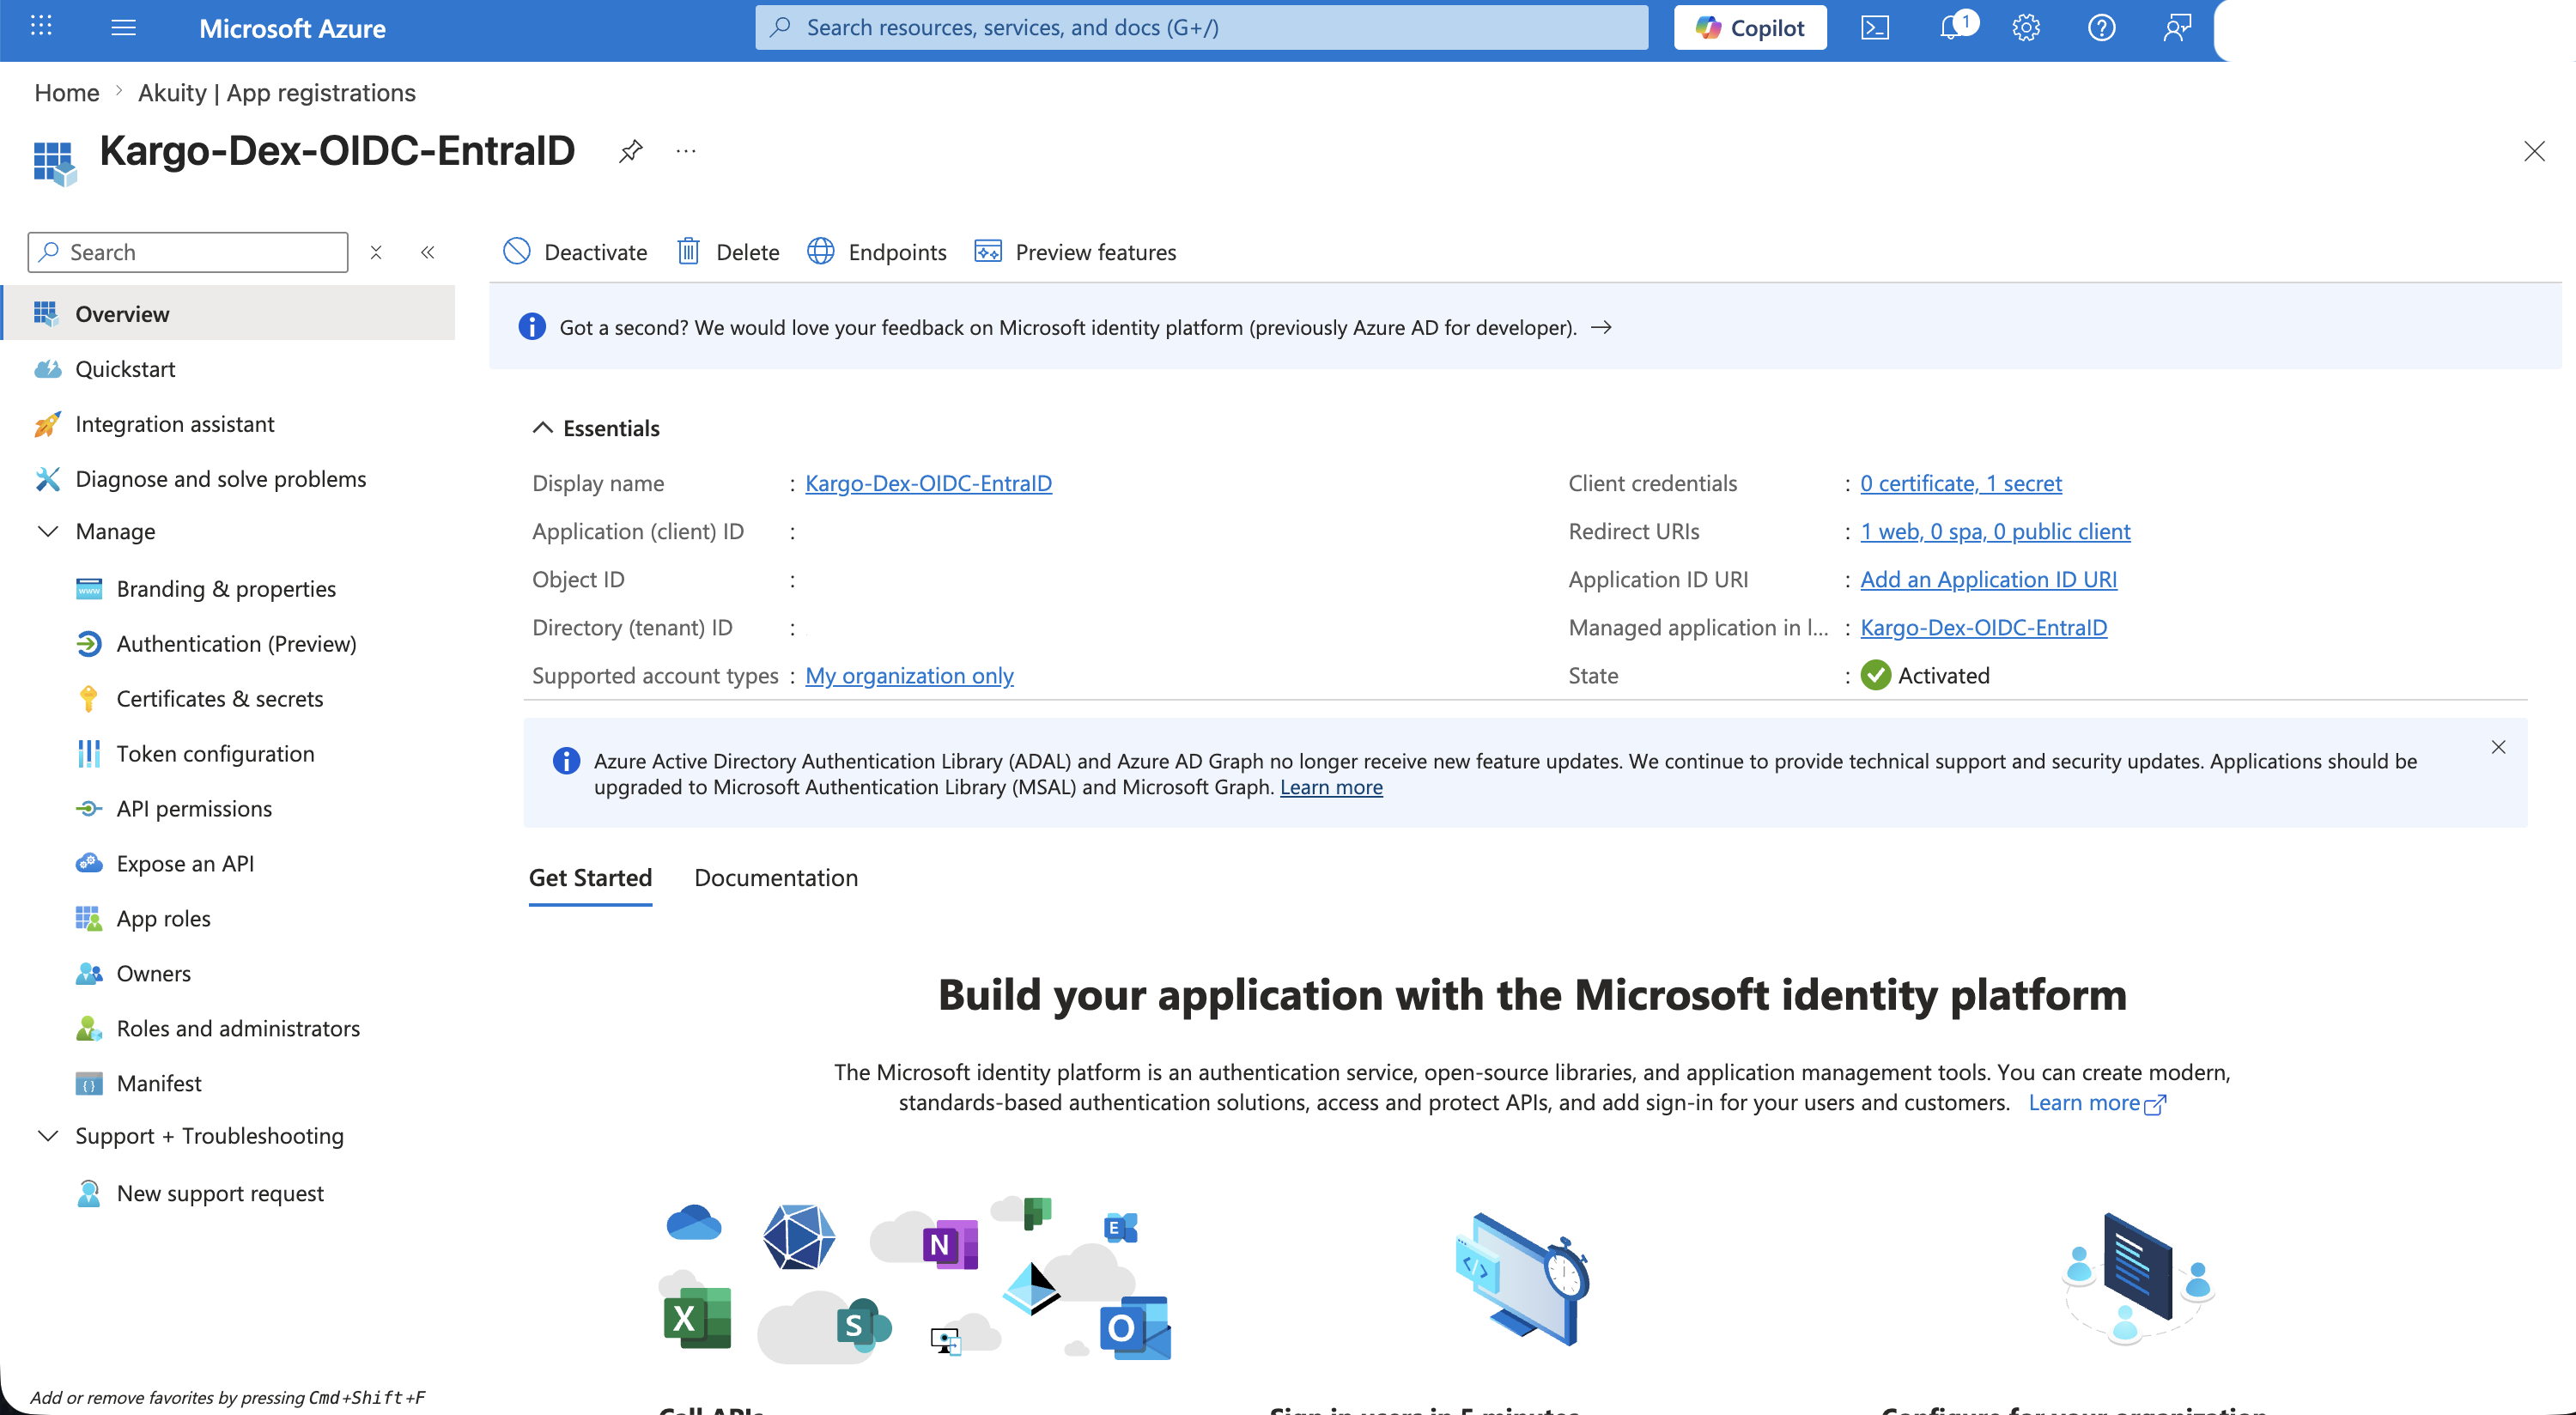
Step 4: Create a client secret
-
In the left sidebar, click Certificates & secrets.
-
Click + New client secret.
-
Enter a description, for example
Kargo Dex OIDC Secret, and select an expiry such as 12 months. -
Click Add.
-
Copy the secret Value immediately. It is shown only once.
Copy the Value column, not the Secret ID. If you lose it, you will need to create a new one.
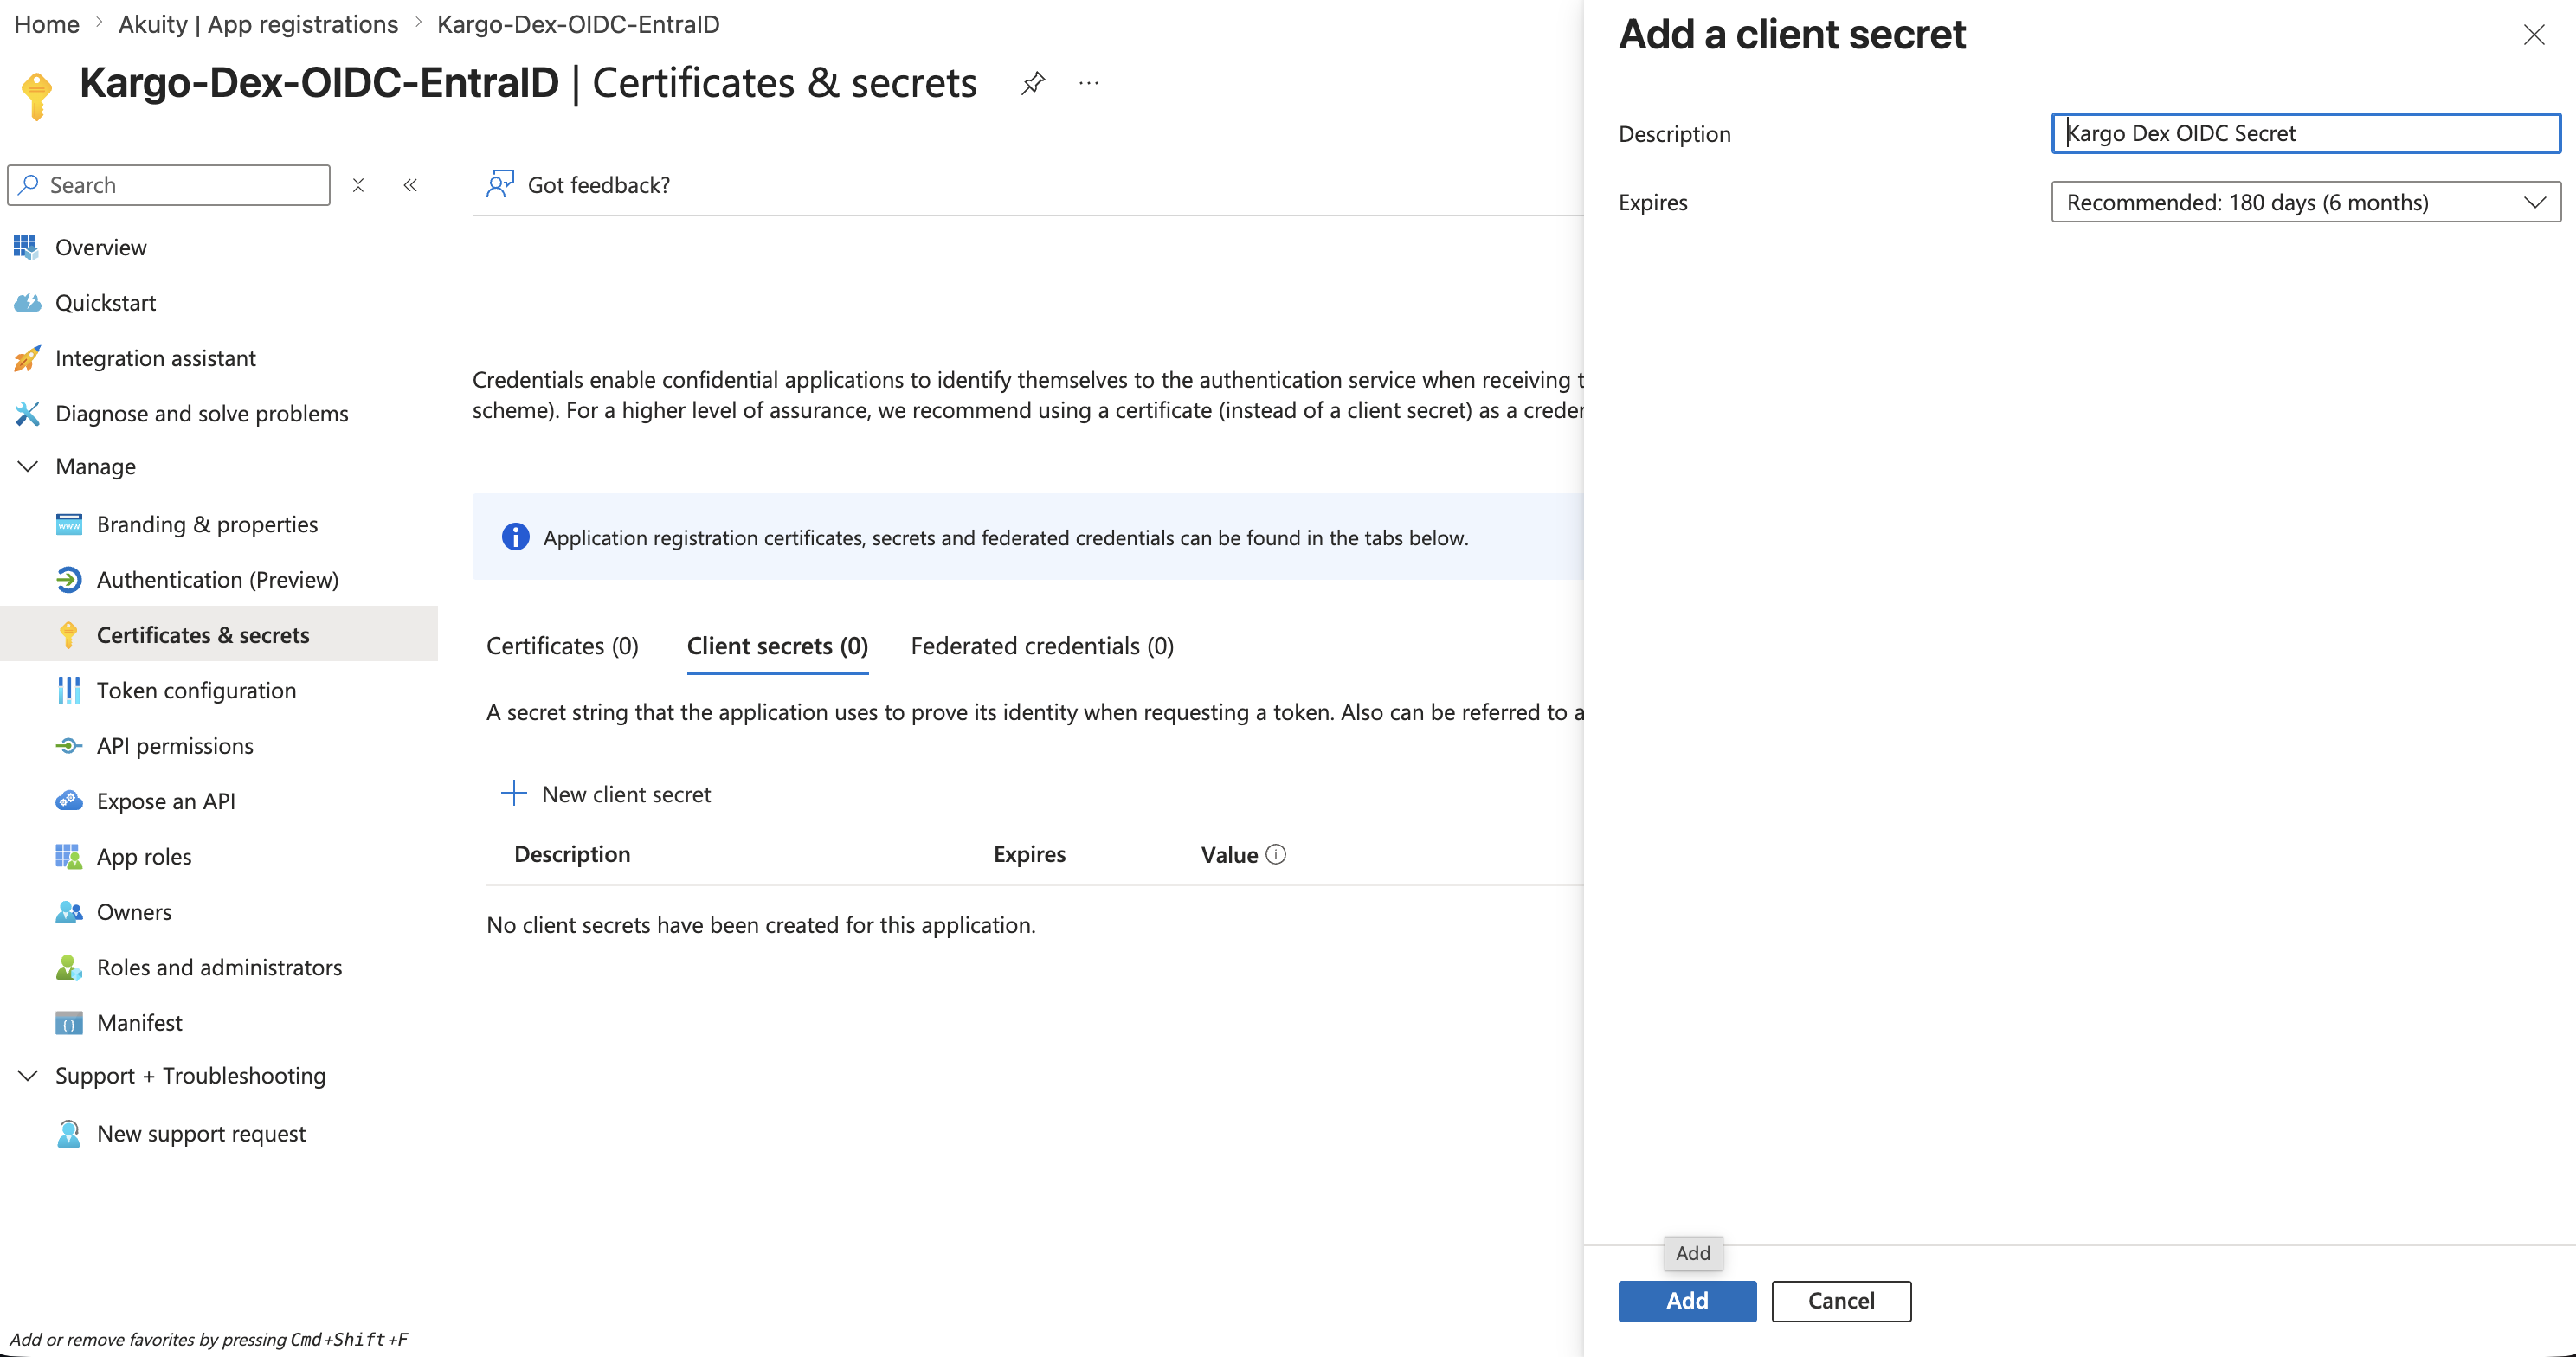
Step 5: Add the email optional claim
Azure Entra ID does not include an email claim in tokens by default. Kargo requires an email claim to identify users, so you must add it.
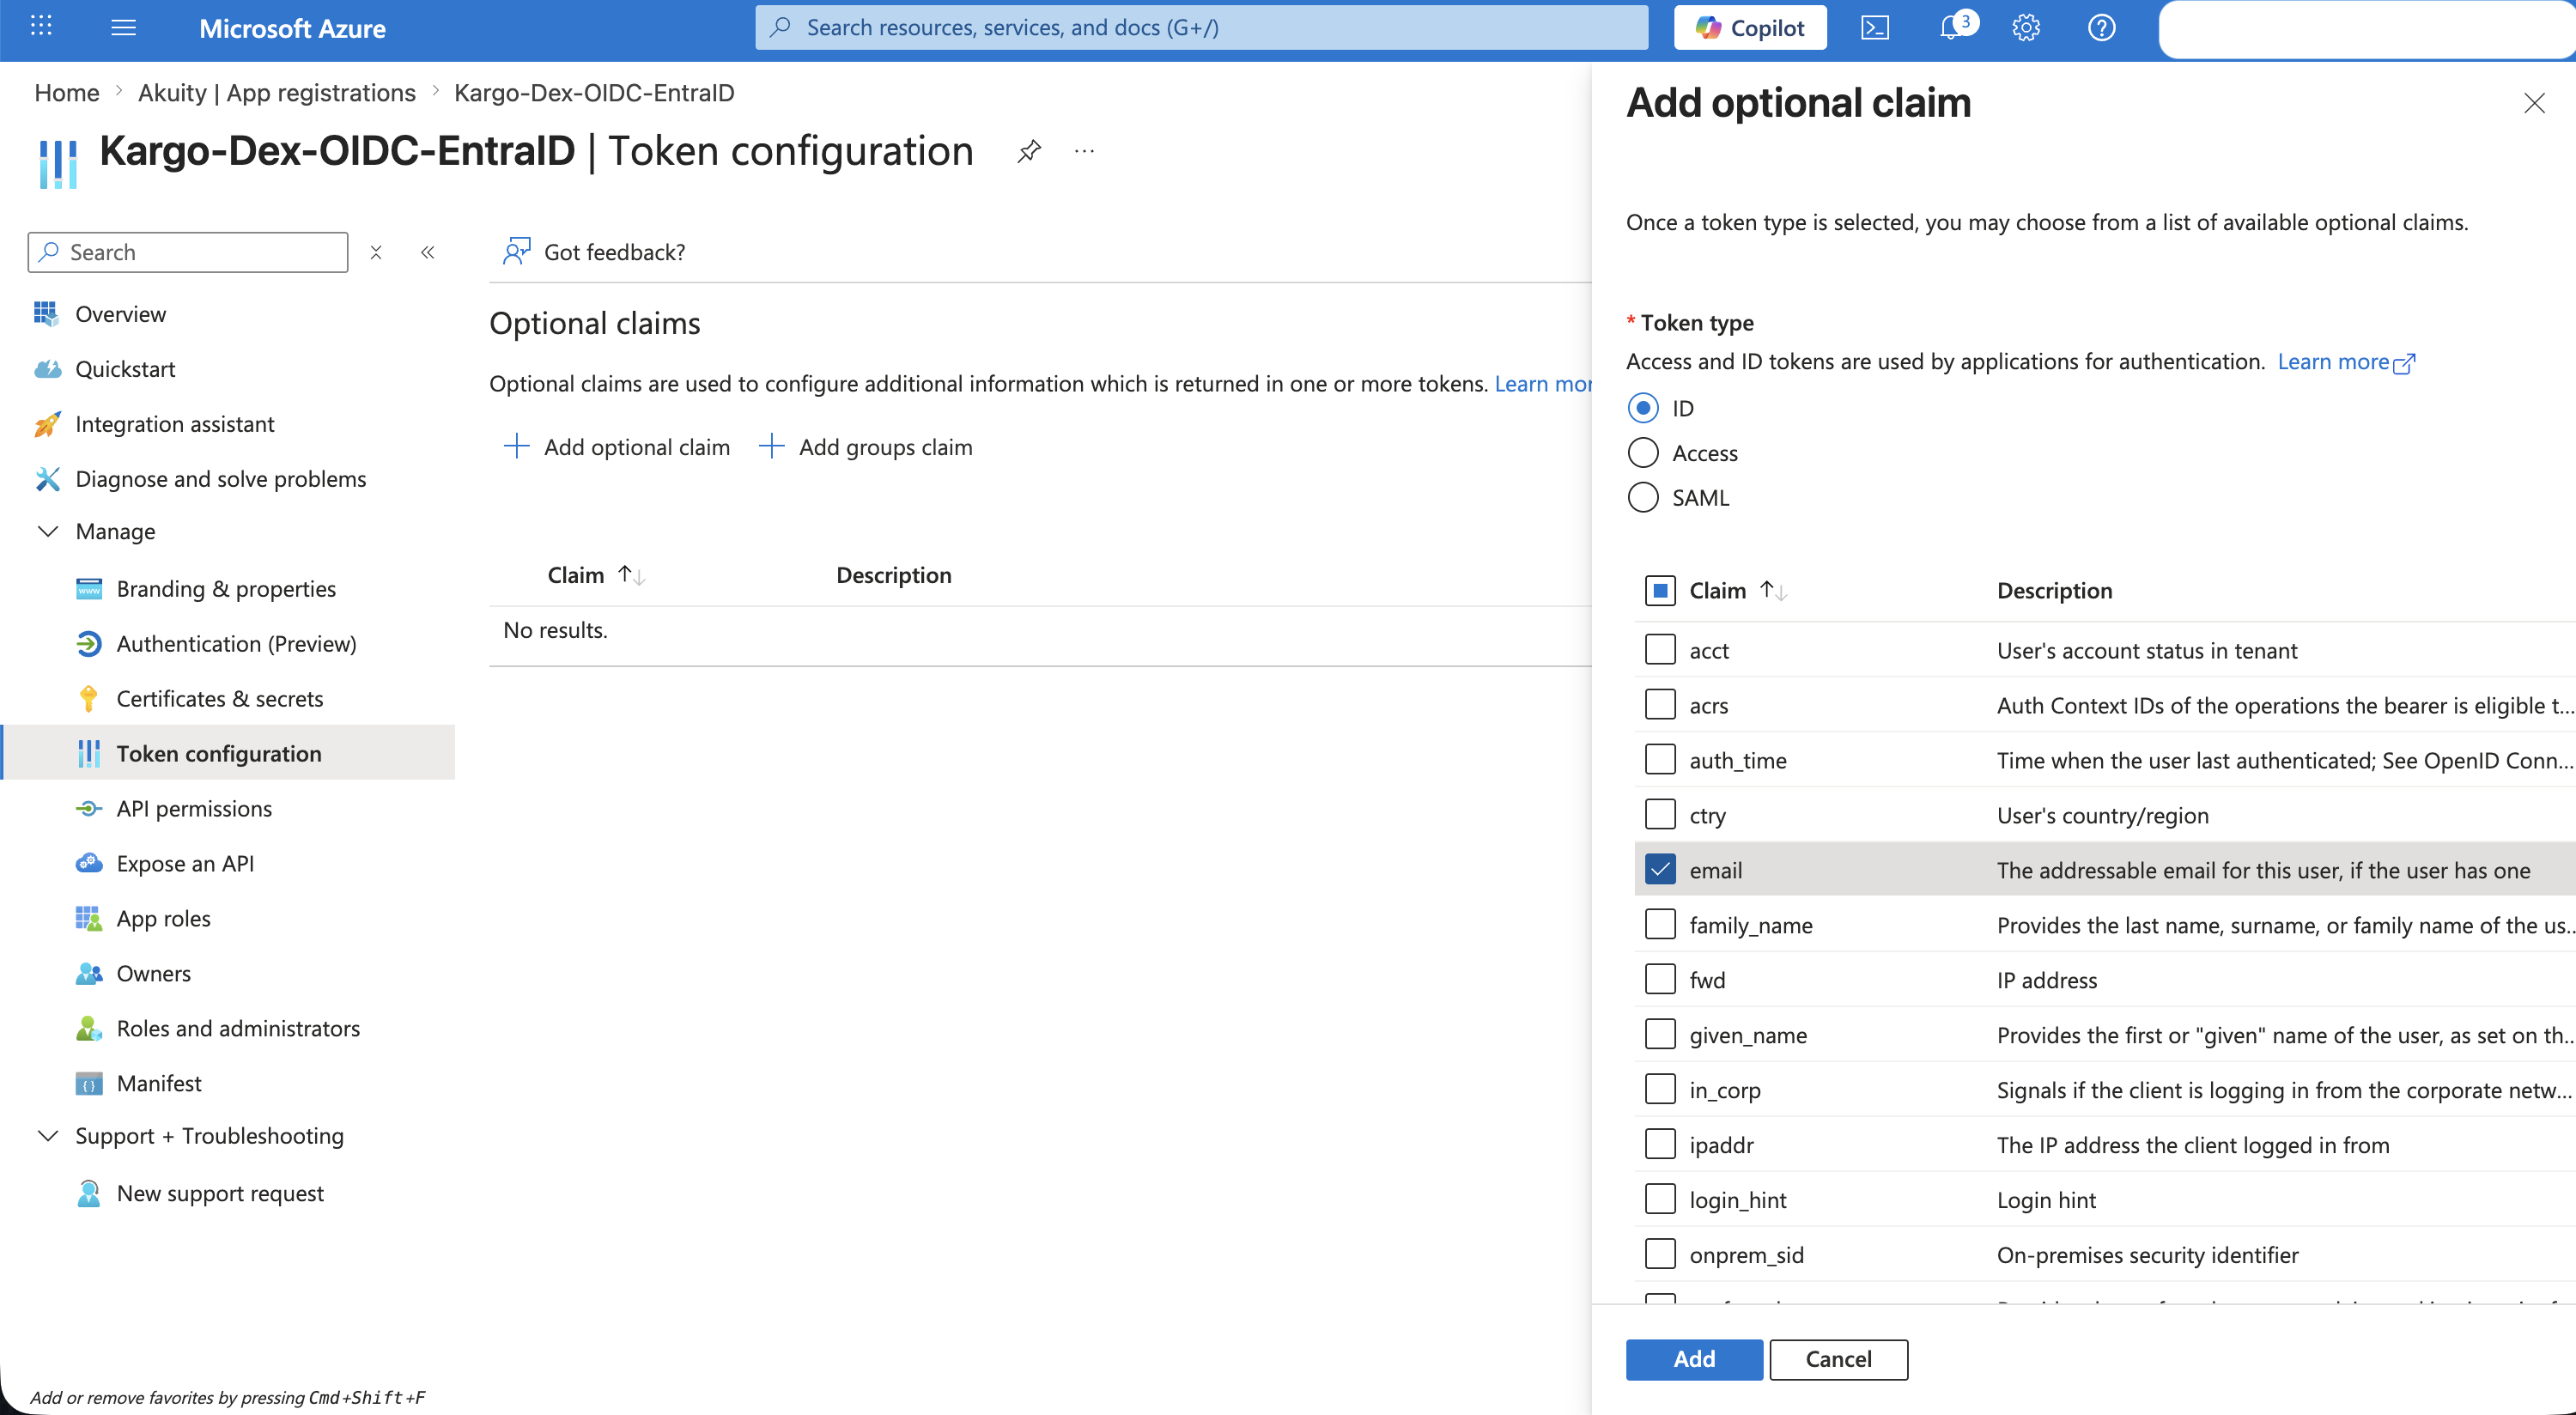
-
In the application, click Token configuration in the left sidebar.
-
Click + Add optional claim.
-
For Token type, select ID.
-
Check
email. Optionally also checkpreferred_usernameandupnas fallbacks. -
Click Add.
-
If prompted that the claim requires the Microsoft Graph profile permission, tick the box to turn it on, then click Add. This is a profile-level permission and does not require admin consent.
email claim only appears if the account has a populated mail attributeMany test and service accounts have a blank Email field, under Users → user → Contact Information → Email. This causes a missing email claim error at login even when everything else is correct.
See Dex OIDC troubleshooting for both the proper fix and a Dex-side fallback.
Add a groups claim for RBAC
Add this if you want to map Entra ID groups to Kargo roles.
-
On the Token configuration page, click + Add groups claim.
-
Select Security groups, or Groups assigned to the application — see the limit below.
-
Under the ID token section, select Group ID.
-
Click Add.
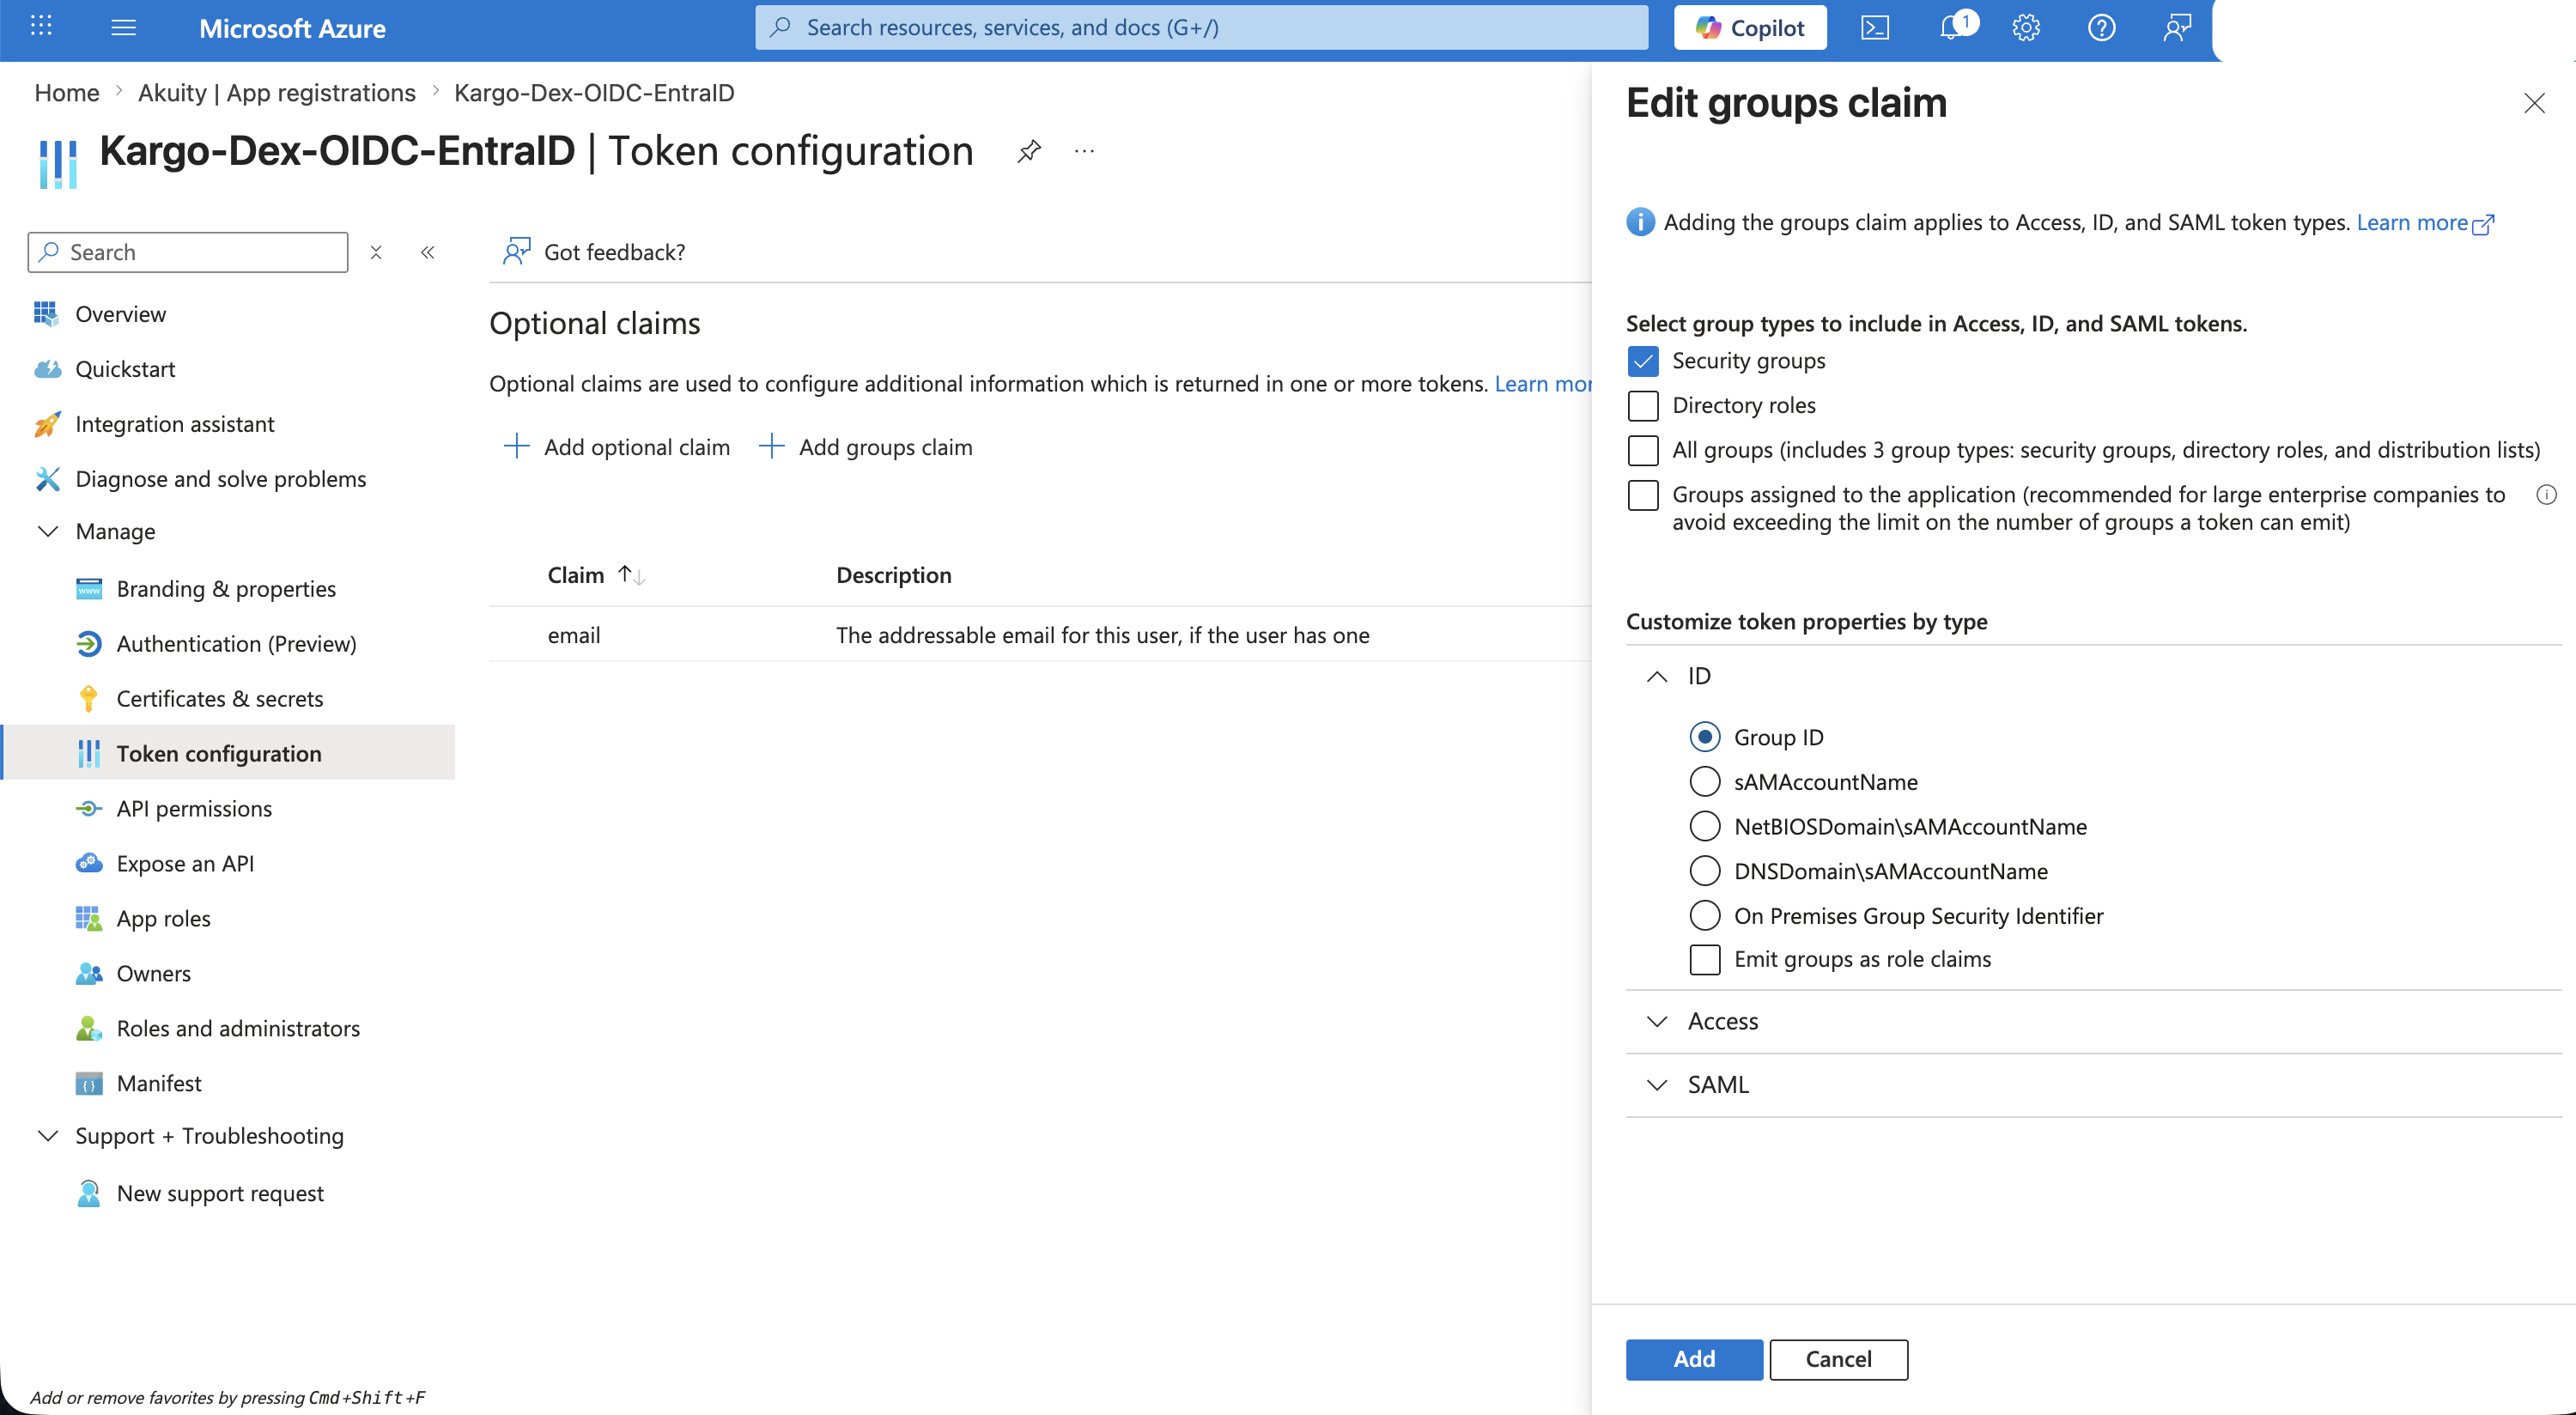
If a user belongs to more than 200 groups, Entra ID silently drops the extras from the JWT, which can break group-based RBAC and is hard to diagnose.
To avoid this, configure a groups claim filter: select Groups assigned to the application instead of Security groups, so only groups explicitly assigned to the application are emitted.
Assigning groups to an application requires Entra ID P1 or P2. On lower tiers you can still emit security groups, but stay mindful of the 200-group limit.
Step 6: Configure the Dex connector in Kargo
Back on the Kargo OIDC Config page with Dex enabled, open the Configuration tab and enter the following in the Dex Config editor:
connectors:
- type: oidc
  id: azure
  name: Azure Entra ID
  config:
    issuer: https://login.microsoftonline.com/<YOUR_TENANT_ID>/v2.0
    clientID: <YOUR_CLIENT_ID>
    clientSecret: $ENTRA_CLIENT_SECRET
    redirectURI: https://<your-kargo-hostname>/dex/callback
    scopes:
      - openid
      - profile
      - email
    insecureEnableGroups: true
Replace the placeholders:
<YOUR_TENANT_ID>— your Directory (tenant) ID from Step 3<YOUR_CLIENT_ID>— your Application (client) ID from Step 3<your-kargo-hostname>— your Kargo instance hostname from Step 1
Configuration fields explained
| Field | Description |
|---|---|
type | Must be oidc for the generic Dex OIDC connector |
id | Unique identifier for this connector |
name | Display name for the connector |
issuer | Your Entra ID v2.0 issuer URL |
clientID | The Application (client) ID from Azure |
clientSecret | Reference to the secret stored in the Secrets tab, prefixed with $ |
redirectURI | Must exactly match the redirect URI registered in Azure (/dex/callback) |
scopes | OIDC scopes to request — openid, profile and email are standard |
insecureEnableGroups | Tells Dex to forward the groups claim through to Kargo, needed for group-based roles. The "insecure" naming is Dex's standard wording. |
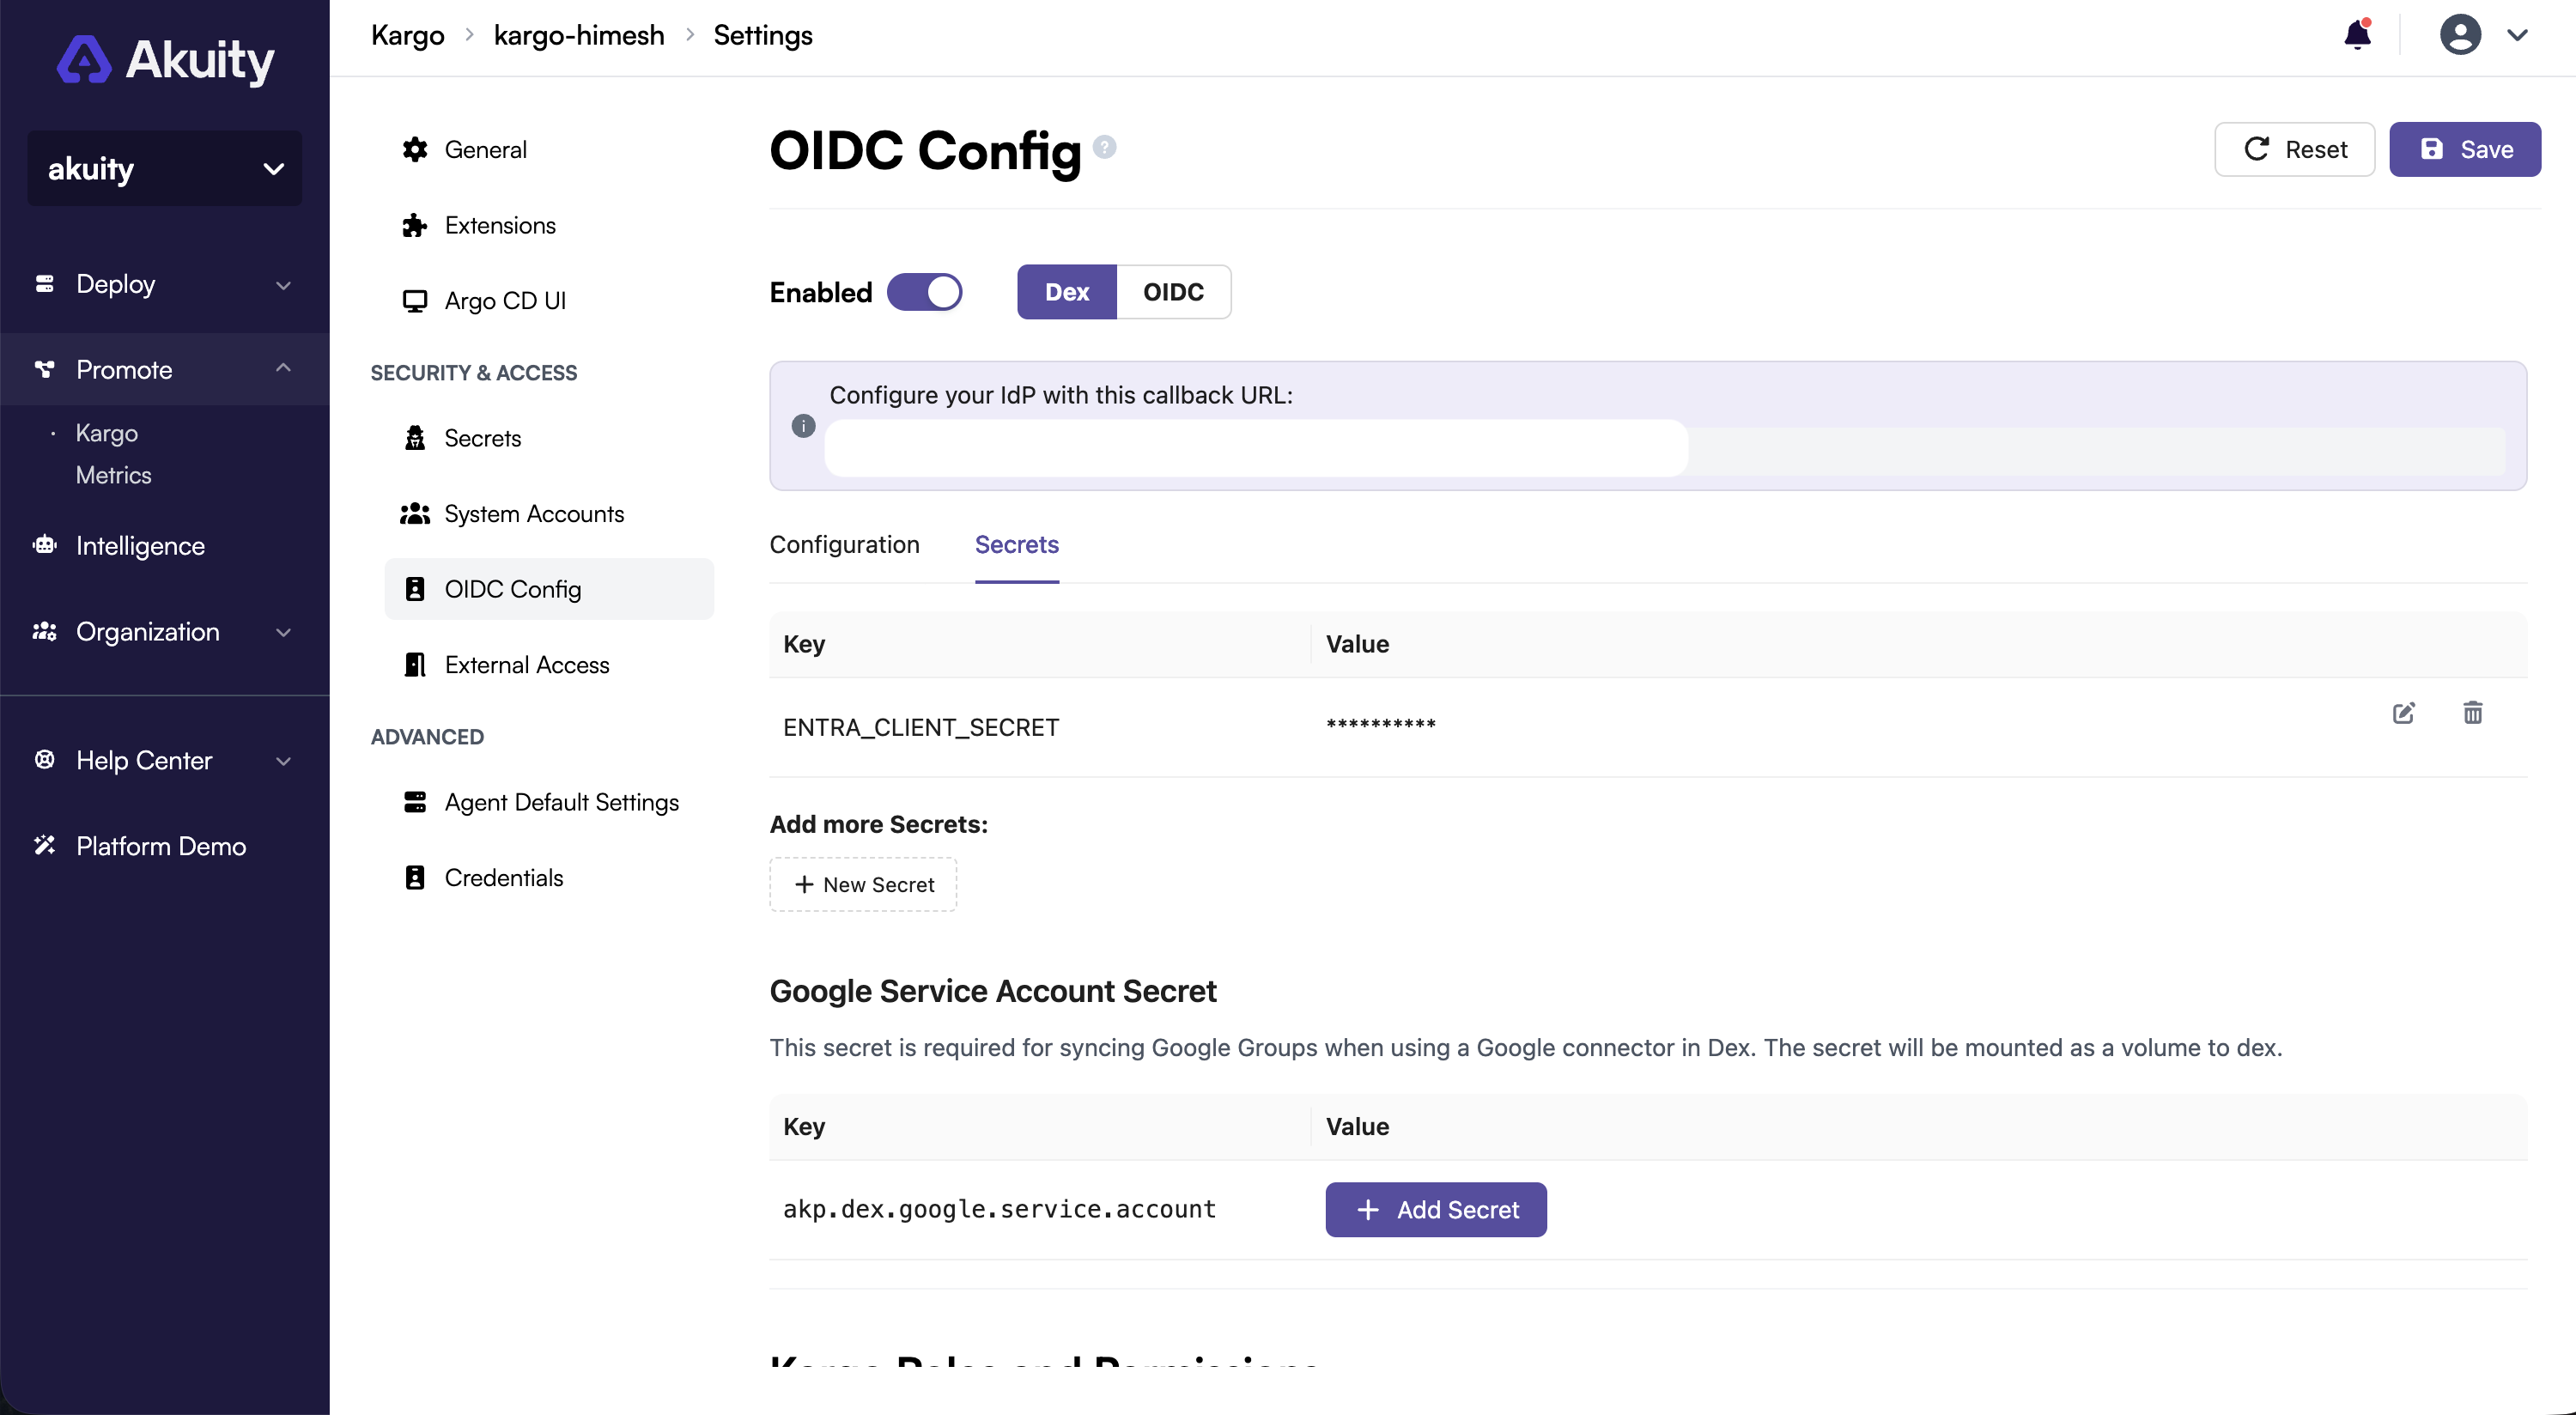
Step 7: Add the client secret
-
Click the Secrets tab.
-
Add a new secret:
- Key:
ENTRA_CLIENT_SECRET— no$, just the name - Value: the client secret value you copied from Azure
- Key:
-
The
$ENTRA_CLIENT_SECRETreference in the Dex config resolves to this value.
Step 8: Map users to Kargo roles
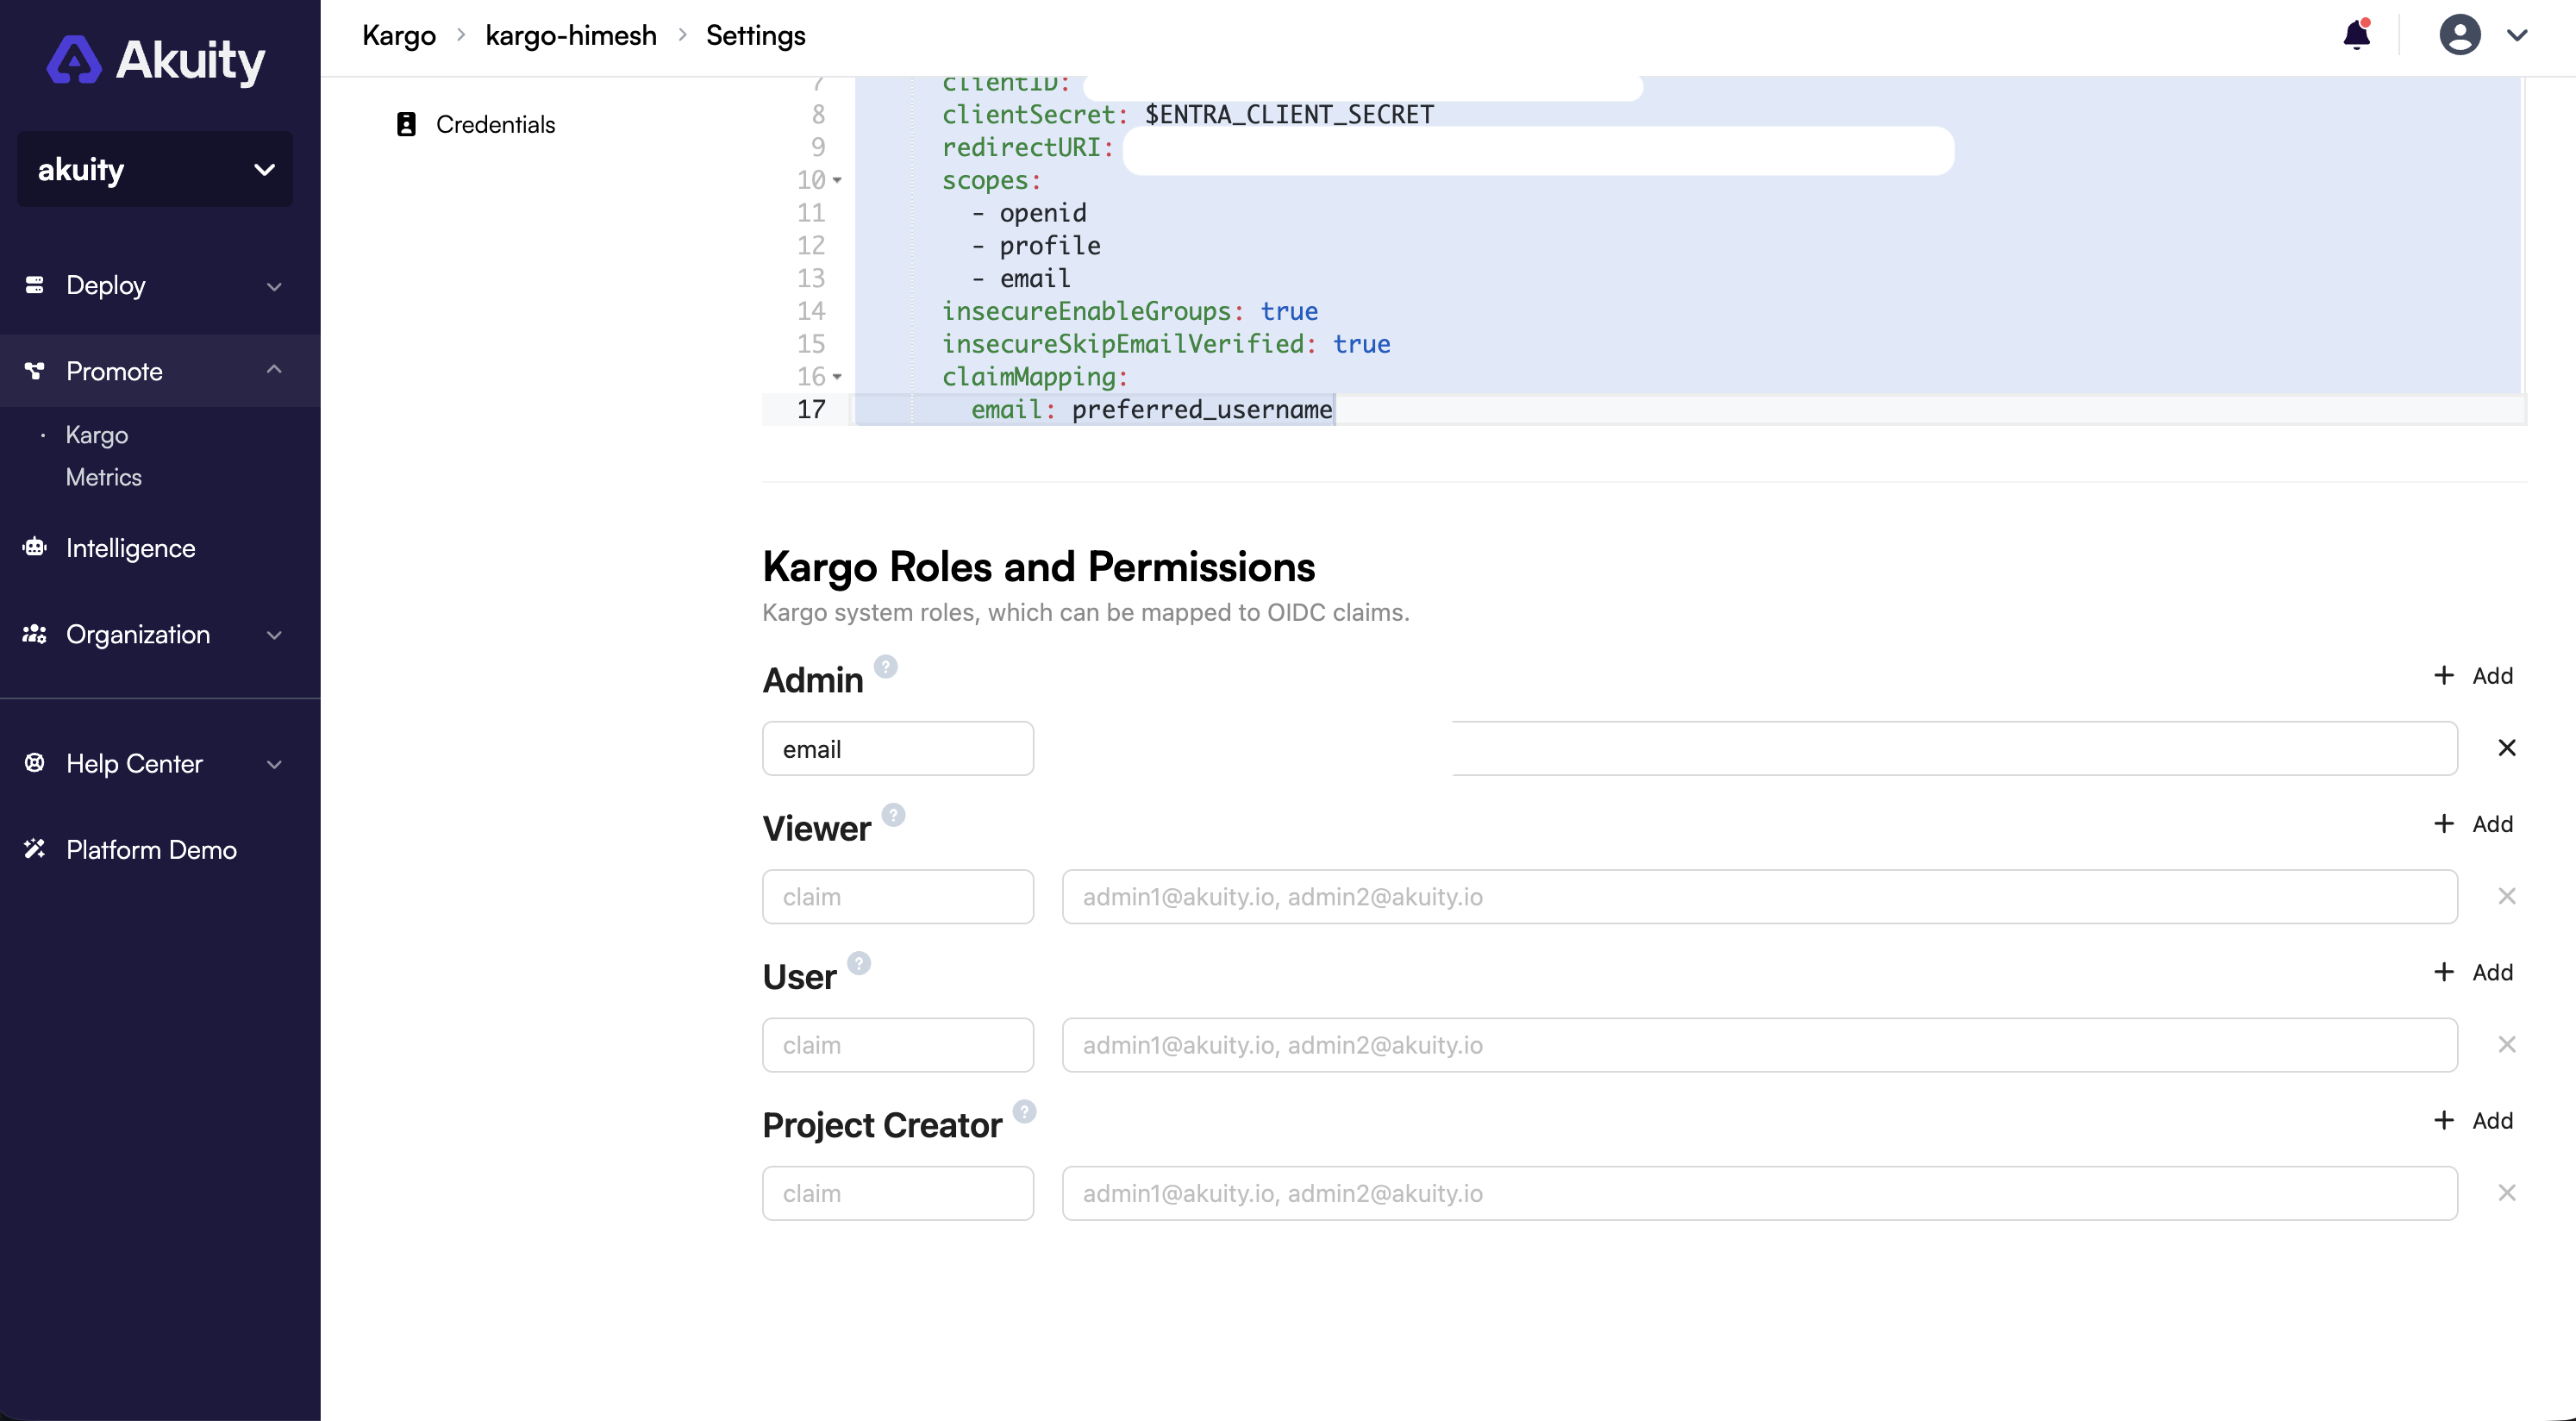
Without a role mapping, a user can authenticate but will have no permissions. Scroll to the Kargo Roles and Permissions section and map a claim to a role.
For the Admin role:
-
Claim key:
email -
Claim value: your email address, for example
you@yourcompany.com -
Click Add.
This grants Admin to any SSO user whose email claim matches.
Once group claims are flowing, you can instead map by groups — claim key groups, value being an Entra ID group's Object ID. This is the more scalable pattern for teams. Available roles are Admin, Viewer, User, and Project Creator.
Step 9: Save and test
-
Click Save in the top right.
-
Open an incognito or private browser window and go to your Kargo URL,
https://<your-kargo-hostname>. -
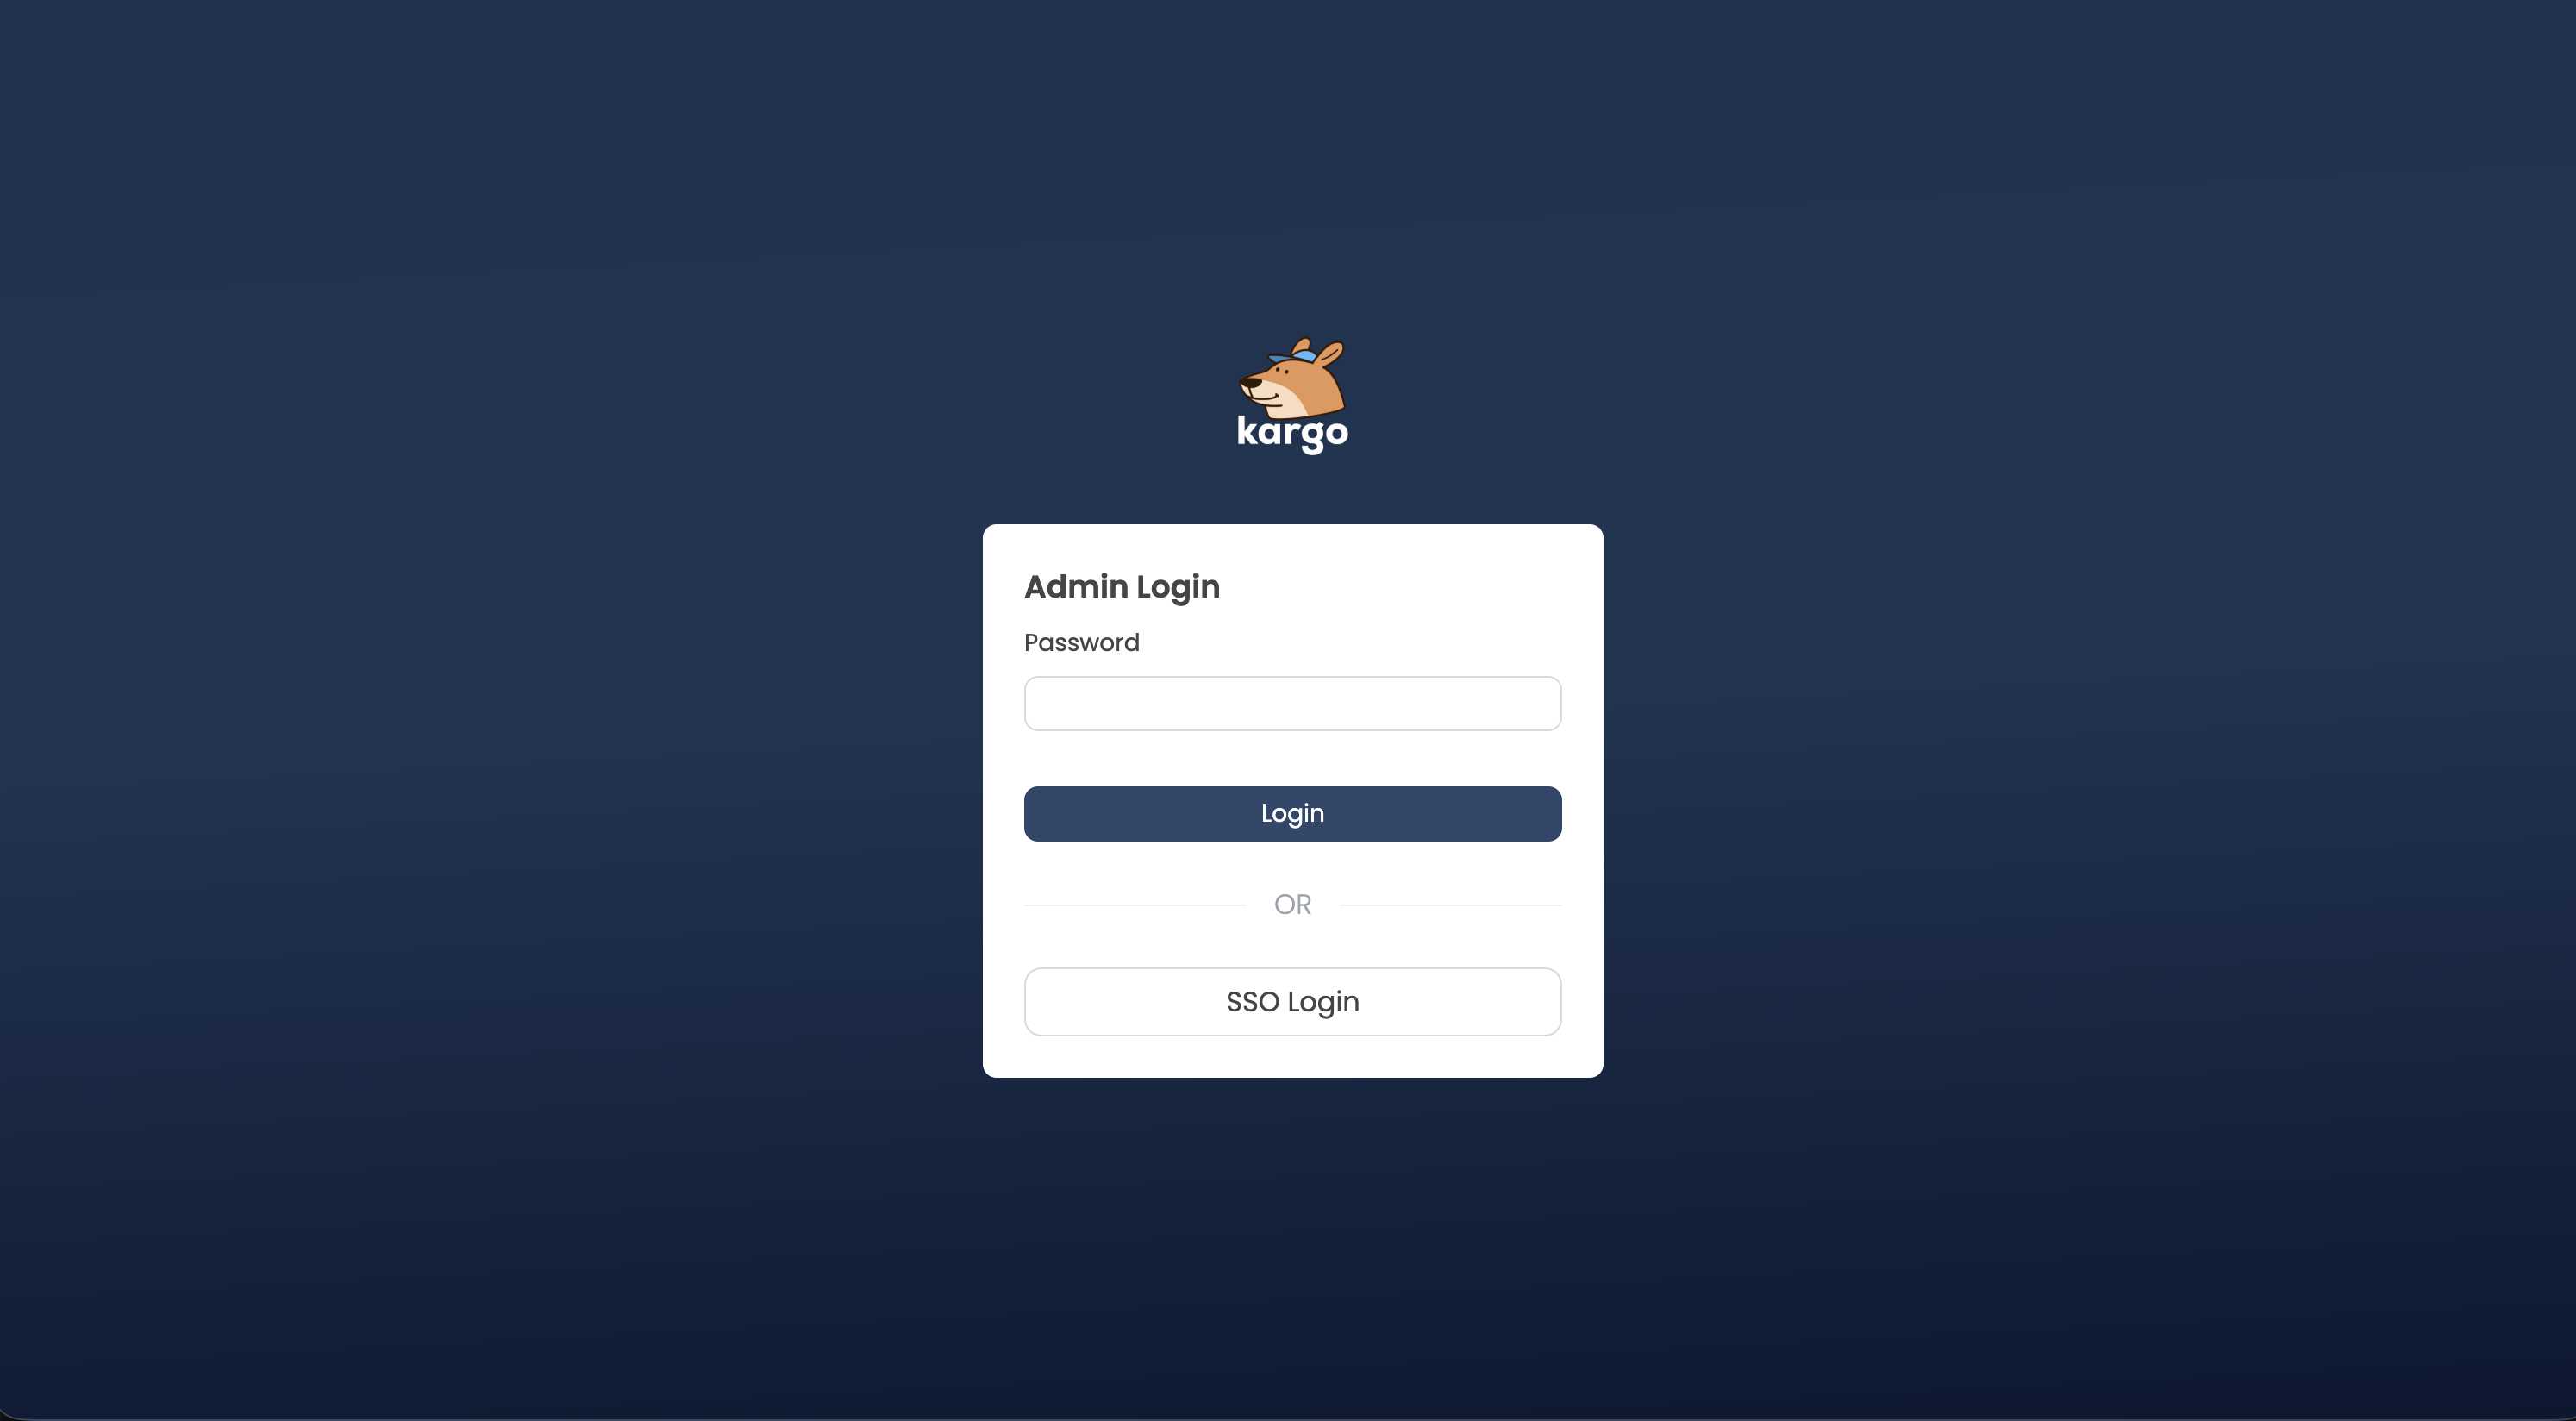
On the Kargo login screen, click SSO Login.
-
You are redirected to Microsoft. Sign in with your Entra ID account.
-
Accept the user consent prompt if shown. This is basic profile access and requires no admin consent.
-
You are redirected back and land in the Kargo UI with the role you mapped.
Dex OIDC troubleshooting
Failed to authenticate: missing email claim, not found "email" key
Dex could not find an email claim in the token from Entra ID. There are two parts to the fix.
The proper fix, recommended for real users:
-
Add the
emailoptional claim to the ID token (Step 5), and -
Ensure the user account has its Email (
mail) attribute populated, under Users → user → Contact Information → Email. Setting this requires User Administrator rights.
The fallback, for accounts whose mail attribute cannot be set such as test or service accounts: tell Dex to read the email from the preferred_username claim, which Entra ID emits by default as the user's UPN. Add these two lines to the connector config:
    insecureSkipEmailVerified: true
    claimMapping:
      email: preferred_username
claimMapping.email: preferred_username— Dex uses thepreferred_usernameclaim as the email.insecureSkipEmailVerified: true— required becausepreferred_usernamehas no accompanyingemail_verifiedflag.
The resulting email will be the user's UPN, for example user@yourcompany.com. Make sure your Kargo role mappings use that value.
AADSTS54005: OAuth2 Authorization code was already redeemed
This is not a configuration problem. An authorization code was used twice, usually from refreshing the callback page or using the browser back button on a URL containing ?code=…. Start a fresh login from the Kargo login page, and do not refresh the callback page.
Groups not appearing, or RBAC not working
- Confirm
insecureEnableGroups: trueis in the connector config - Confirm a groups claim is added in Azure Token configuration (Step 5)
- Map roles using the group's Object ID, not the display name
- Check whether the user exceeds the 200-group token limit (Step 5)
Client secret errors
- Ensure the Secrets tab key matches the
$reference in the YAML exactly (ENTRA_CLIENT_SECRET) - Verify the secret has not expired in Azure, under Certificates & secrets
Dex OIDC summary
| Component | Value |
|---|---|
| Azure app type | App registration (single tenant) |
| Redirect URI | https://<kargo-hostname>/dex/callback |
| Kargo SSO mode | Dex, type: oidc connector |
| OIDC issuer | https://login.microsoftonline.com/<TENANT_ID>/v2.0 |
| Required scopes | openid, profile, email |
| Secret reference | $ENTRA_CLIENT_SECRET |
| Admin consent | Not required |
| Group token limit | 200 (OIDC) |
| Key gotcha | Entra ID omits the email claim by default — add the optional claim and ensure the mail attribute is set, or use the claimMapping fallback |
Dex SAML
Connect Entra ID through Dex's saml connector, using a non-gallery Enterprise Application and a signing certificate.
SAML SSO can only be configured on a non-gallery Enterprise Application. If you create the app via App registrations → New registration, or the "Register an application…" option, you get an OIDC app whose Single sign-on page offers no SAML option, and it cannot be converted.
You must create it via Enterprise applications → Create your own application → Integrate any other application you don't find in the gallery (Non-gallery).
For this method you need Azure Entra ID access with permission to create Enterprise Applications — Application Administrator, Cloud Application Administrator, or Owner of the app.
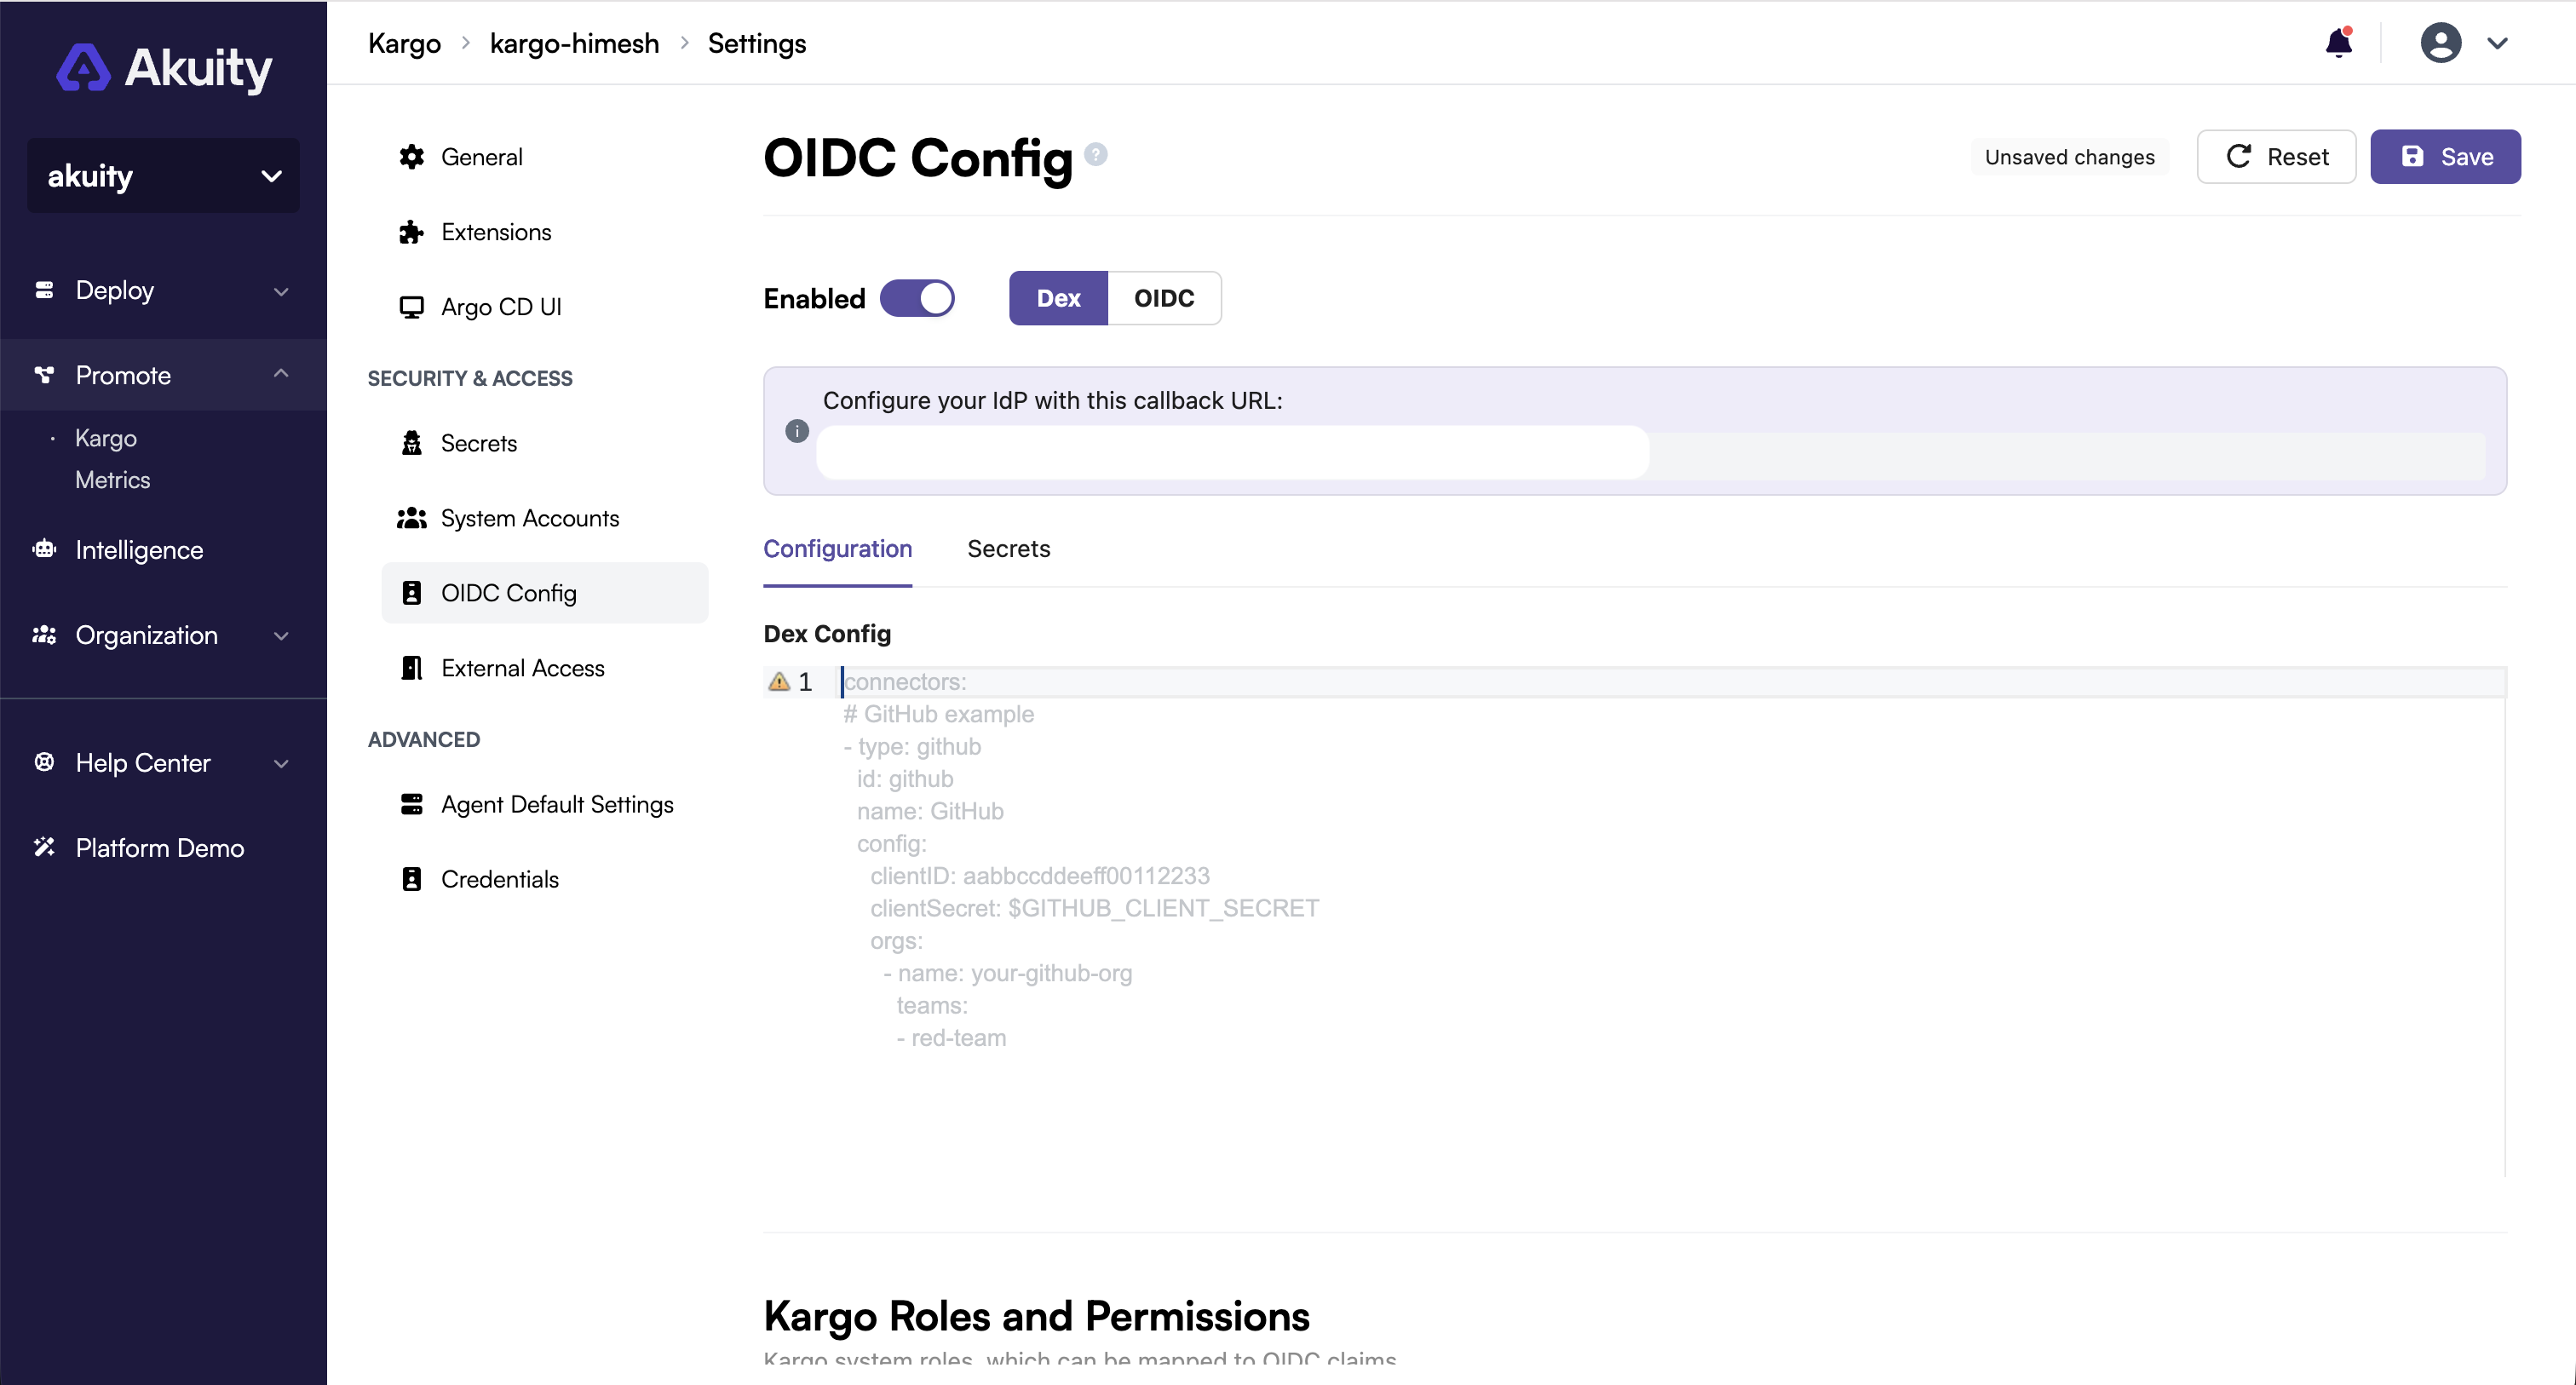
Step 1: Get your Kargo callback URL for SAML
-
In your Kargo Instance, go to Settings.
-
In the left panel, search for Access and go to OIDC Config.
-
Toggle Enabled to on.
-
Select the Dex option.
-
Copy the callback URL shown:
https://<your-kargo-hostname>/dex/callback
Kargo's Dex callback path is /dex/callback. This single URL is used as both the SAML Identifier (Entity ID) and the Reply URL (ACS).
Step 2: Create a non-gallery Enterprise Application
-
In the Azure Portal, go to Microsoft Entra ID → Enterprise applications.
-
Click + New application → + Create your own application.
-
Enter a name, for example
kargo-saml. -
Select Integrate any other application you don't find in the gallery (Non-gallery) — the bottom option.
-
Click Create.
Step 3: Configure basic SAML configuration
-
In the new application, click Single sign-on in the left sidebar and select the SAML card.
-
In section 1, Basic SAML Configuration, click the pencil icon and set:
Field Value Identifier (Entity ID) https://<your-kargo-hostname>/dex/callbackReply URL (ACS URL) https://<your-kargo-hostname>/dex/callbackSign on URL https://<your-kargo-hostname>/loginRelay State / Logout URL Leave empty -
Click Save.
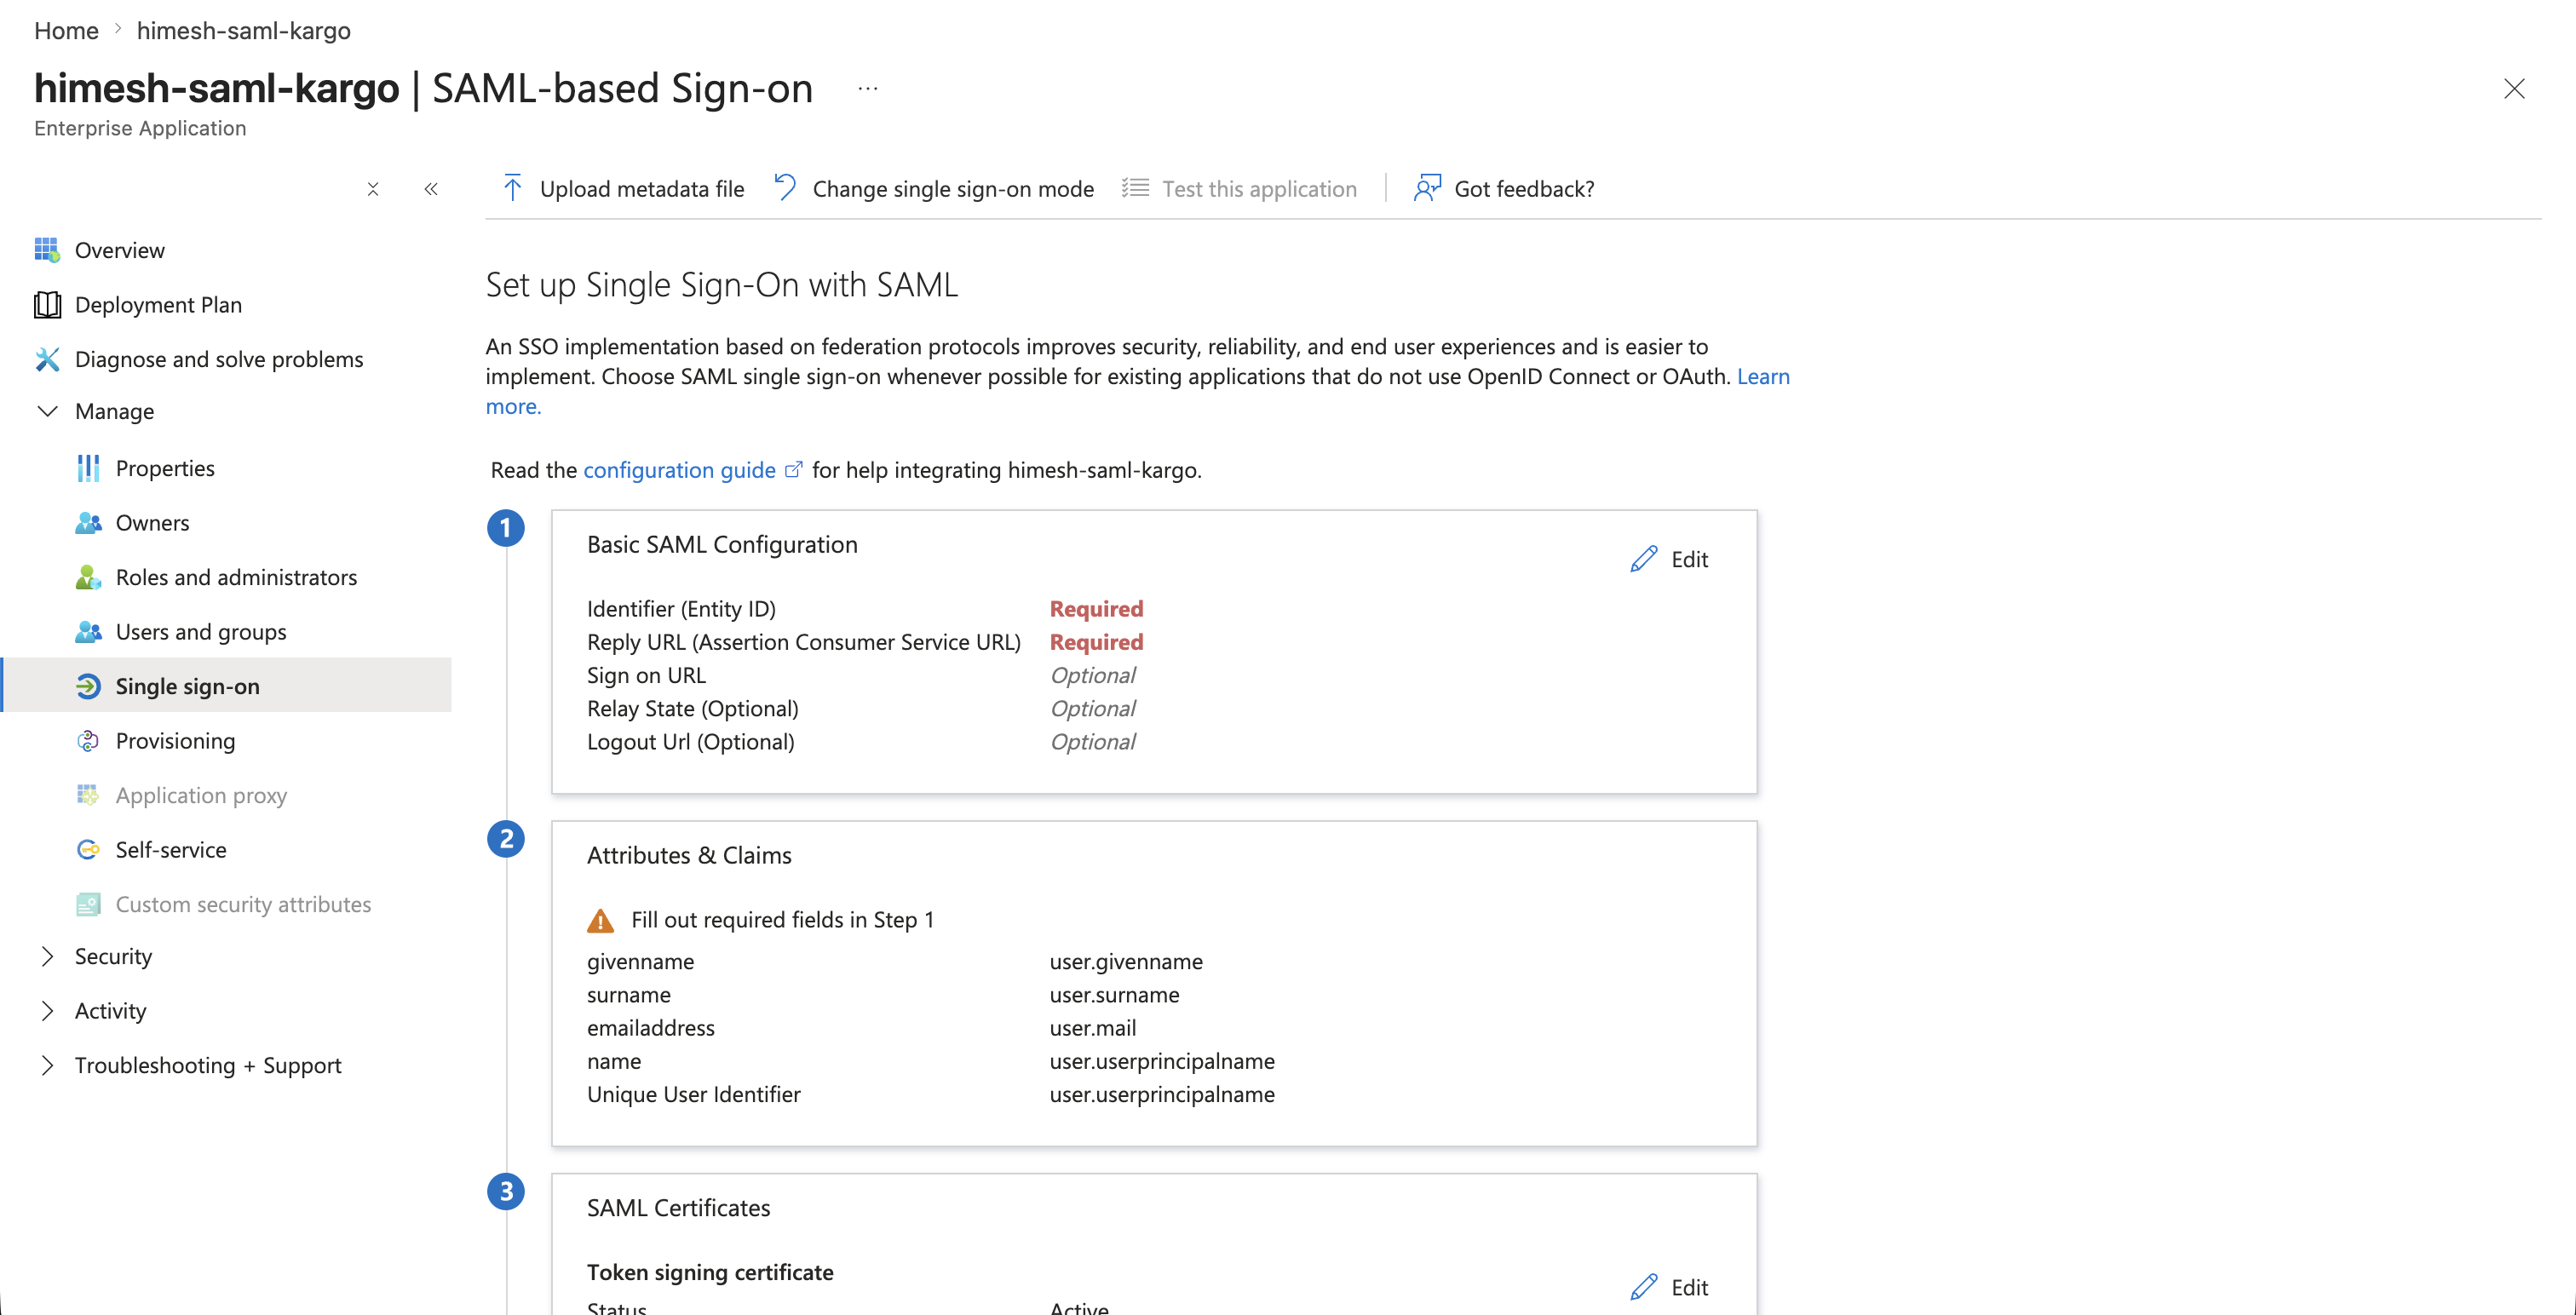
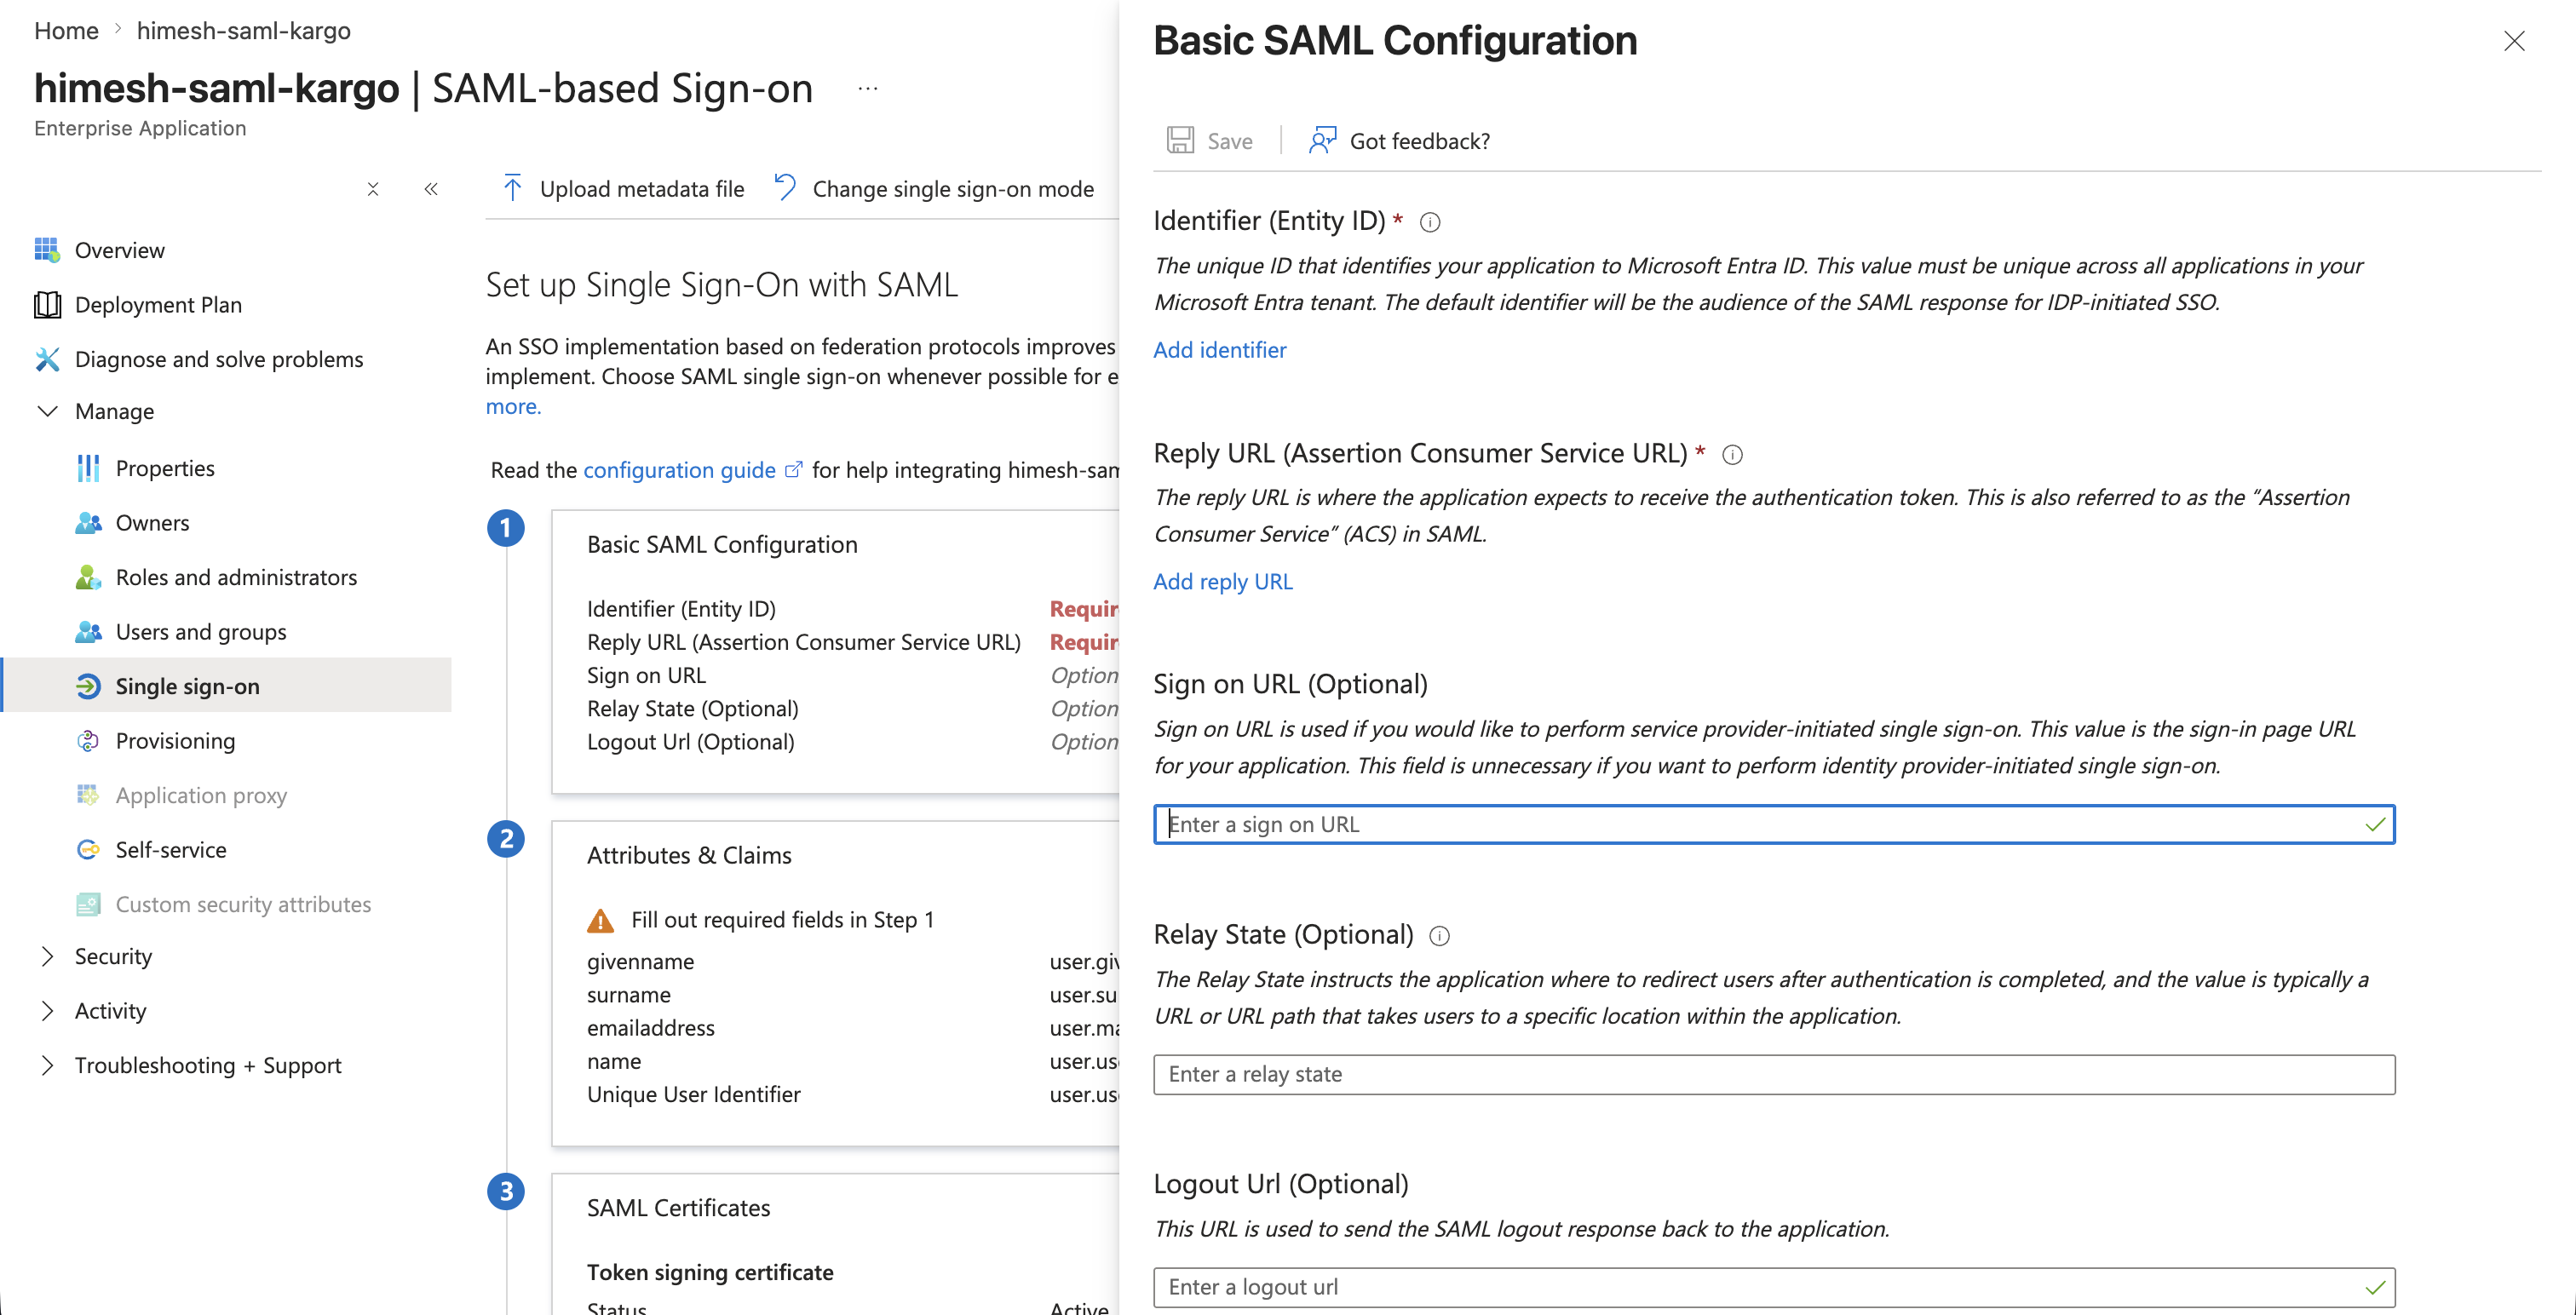
Step 4: Configure user attributes and claims
In section 2, Attributes & Claims, click Edit.
Add the email attribute by clicking + Add new claim:
- Name:
email - Namespace: leave empty
- Source: Attribute
- Source attribute:
user.mail - Click Save
If the account's Email (mail) attribute is blank, which is common for test and service accounts, use user.userprincipalname as the source attribute instead. Otherwise the email attribute will be empty and login fails. Check under Users → user → Contact Information → Email.
Add the group attribute by clicking + Add a group claim:
- Which groups: Security groups, or Groups assigned to the application — see the limit below
- Source attribute: Group ID
- Tick Customize the name of the group claim
- Name:
Group - Leave Emit groups as role claims unchecked
- Click Save
Leave the Unique User Identifier / Name ID at its default, user.userprincipalname.
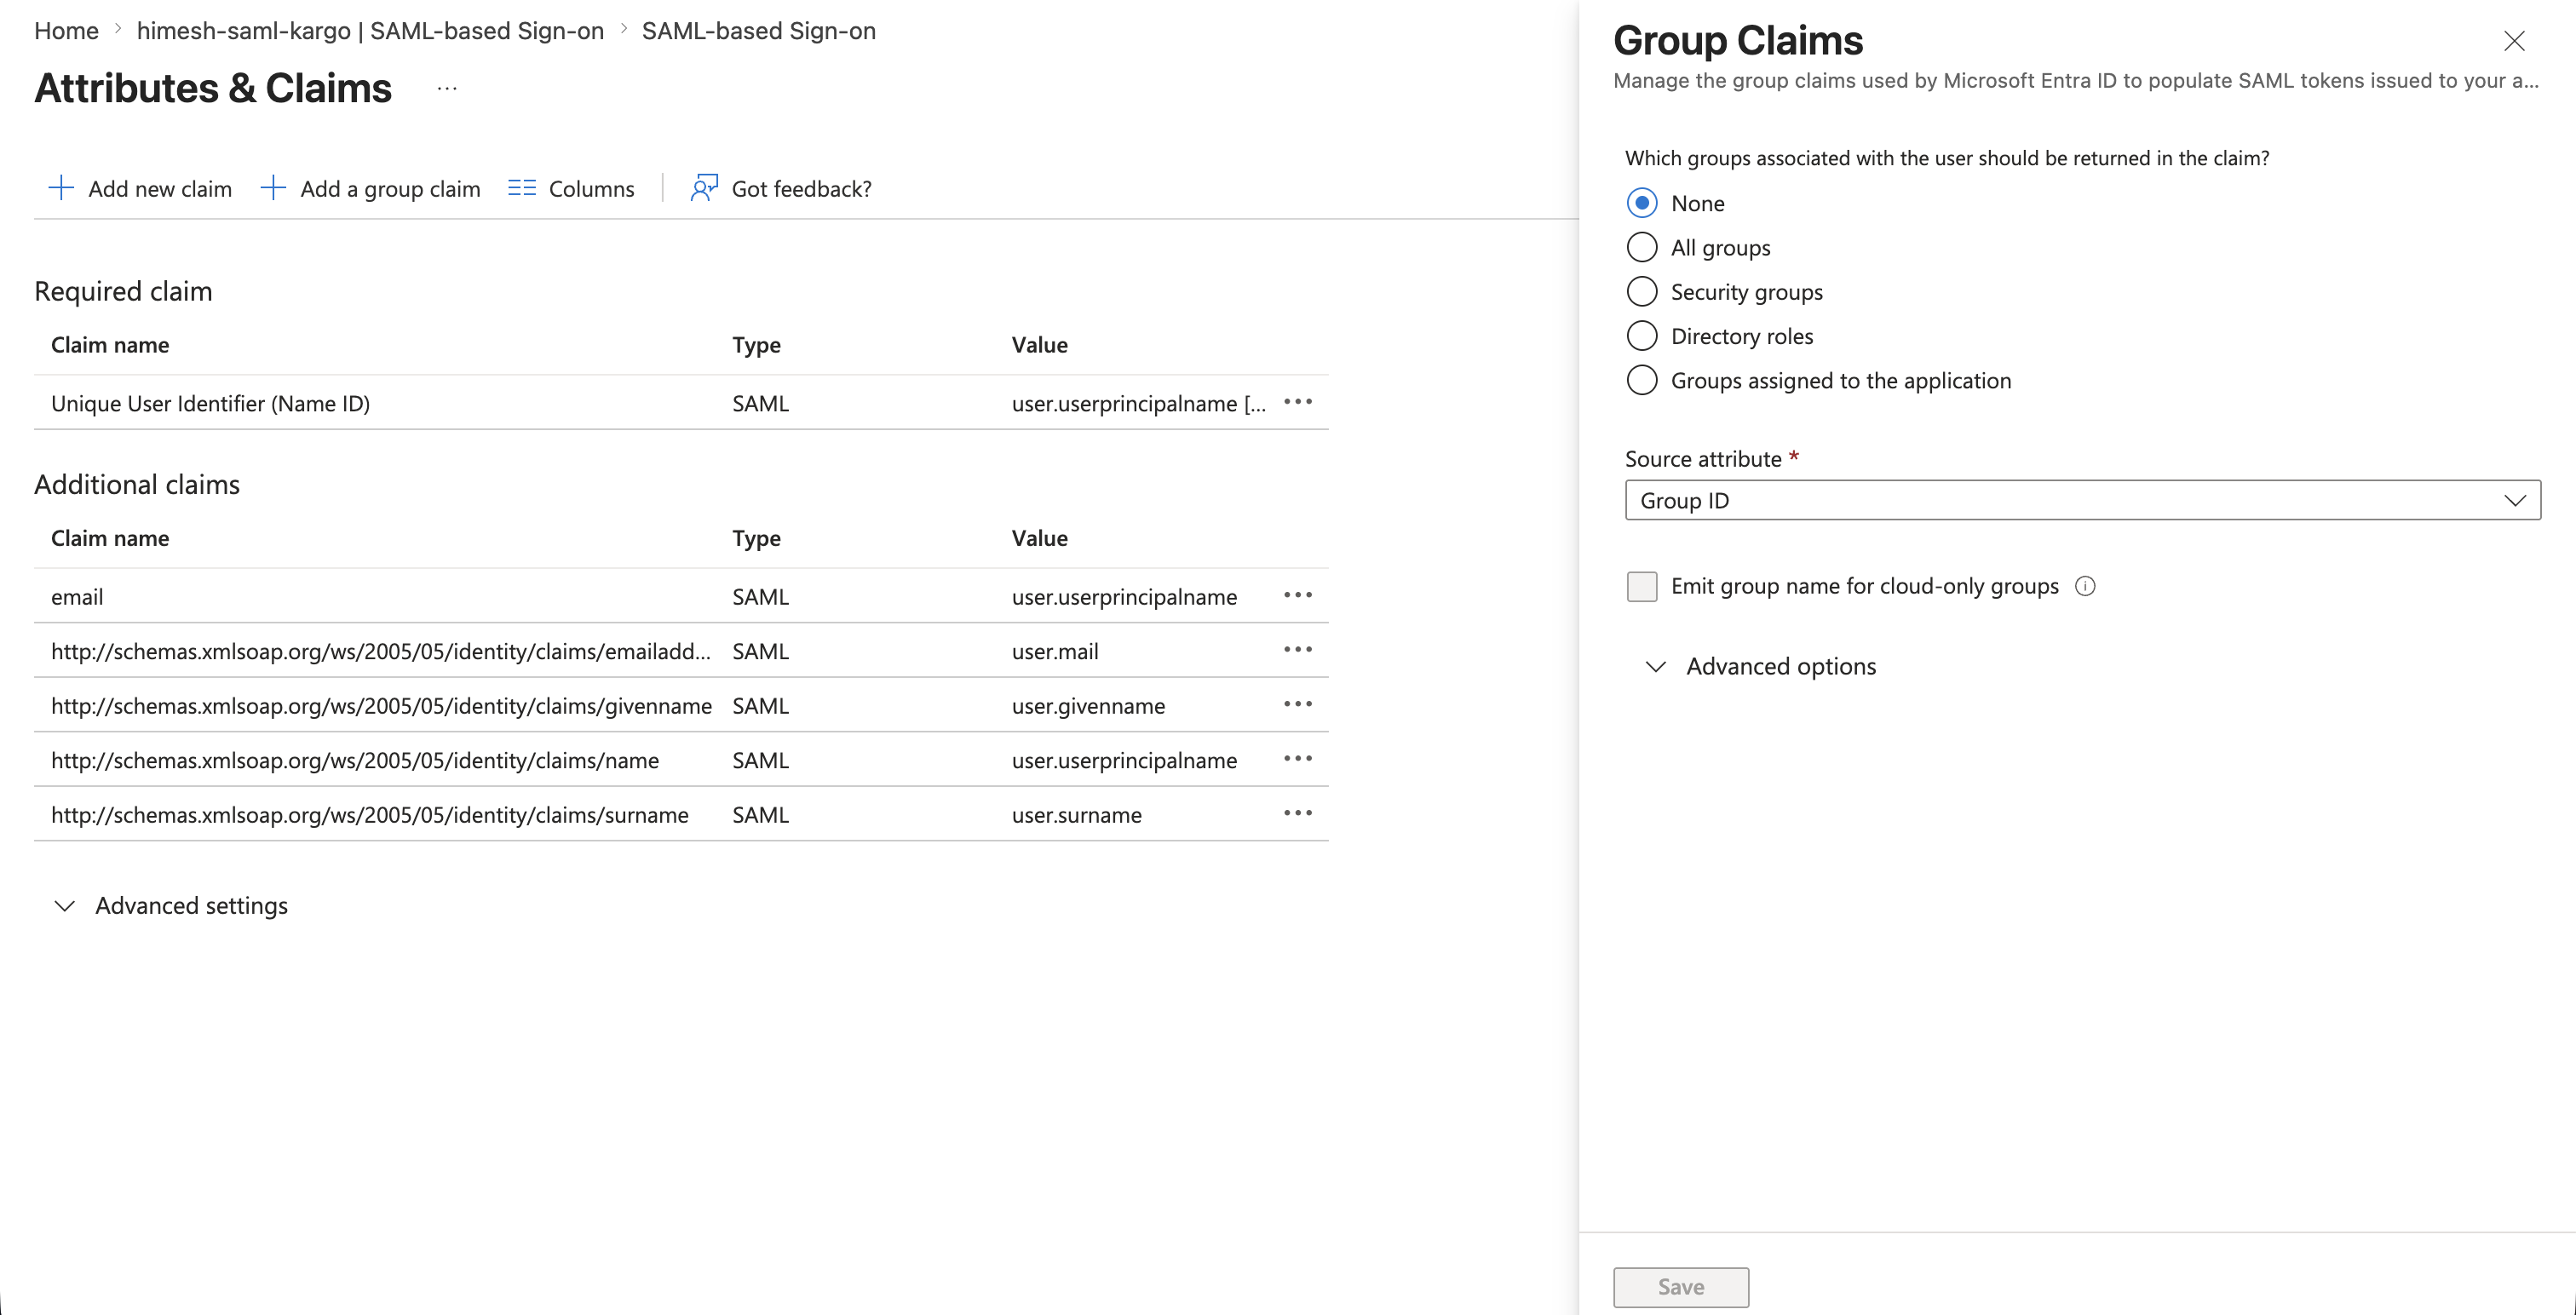
If a user is a member of more than 150 groups, Entra ID silently drops the extras from the SAML assertion, which can break group-based RBAC and is hard to diagnose.
To avoid this, configure a groups claim filter: choose Groups assigned to the application instead of Security groups, so only groups explicitly assigned to the application are emitted. Assigning groups to an application requires Entra ID P1 or P2.
Step 5: Download the SAML signing certificate
-
In section 3, SAML Certificates, find Certificate (Base64).
-
Click Download and save the
.cerfile.
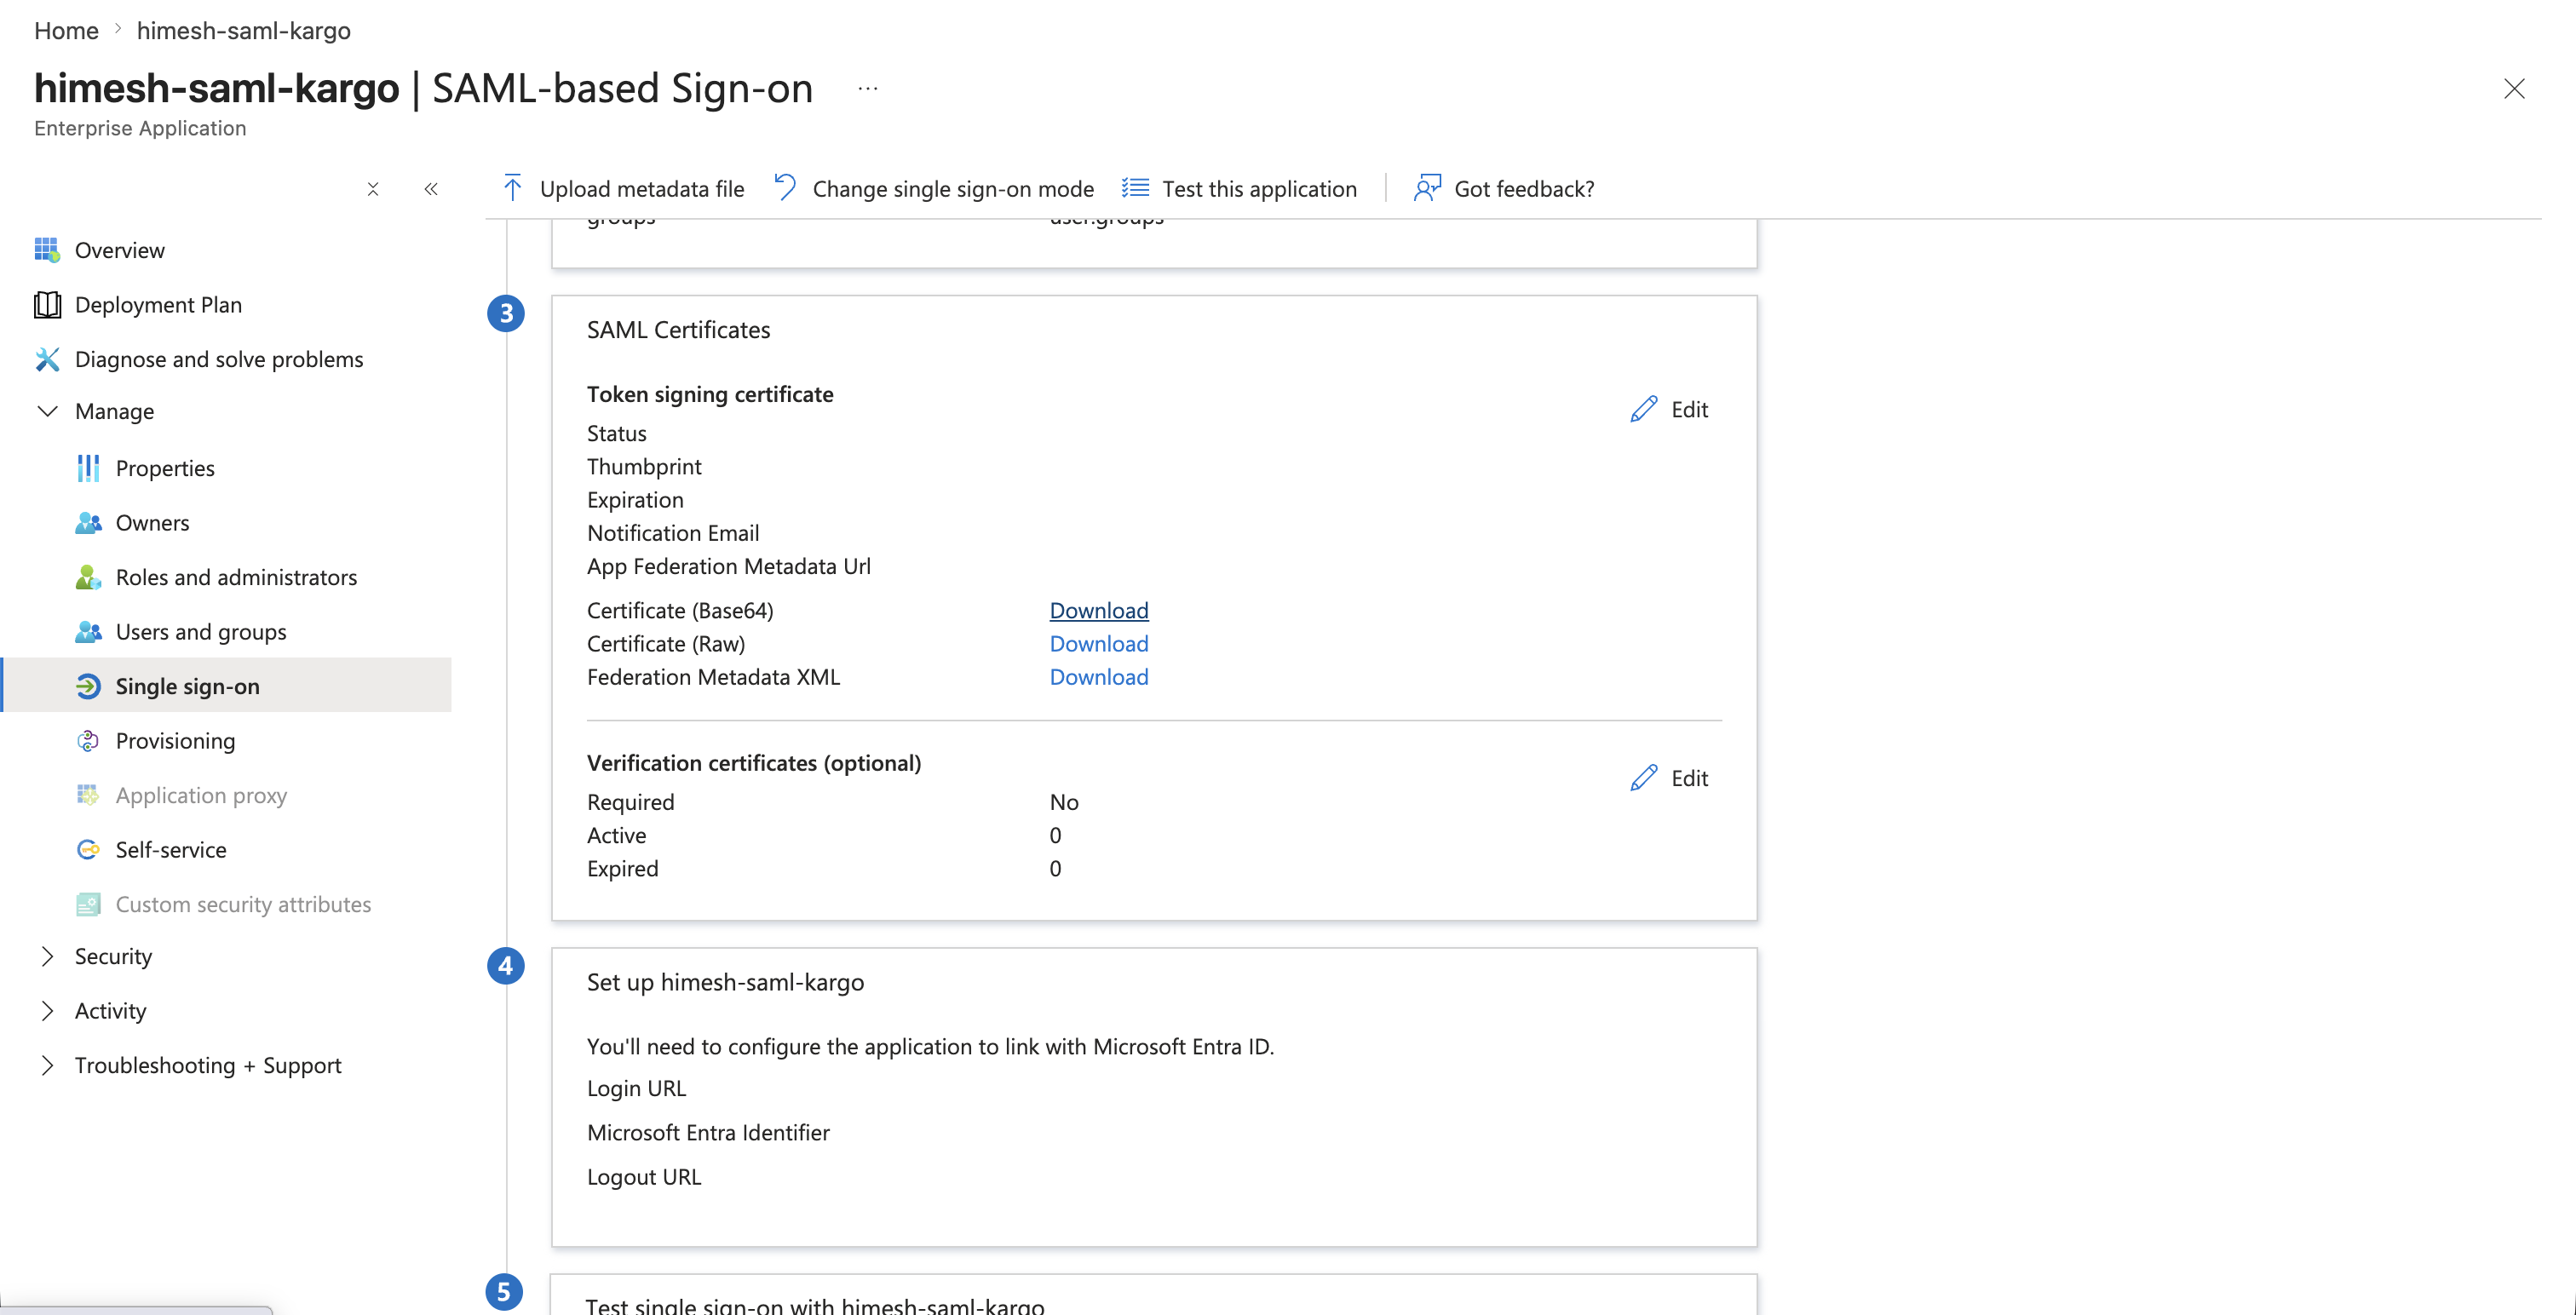
Step 6: Copy the login URL
In section 4, Set up app name, copy the Login URL. It will look like:
https://login.microsoftonline.com/<YOUR_TENANT_ID>/saml2
This becomes ssoURL in the Dex config.
Step 7: Assign users to the application
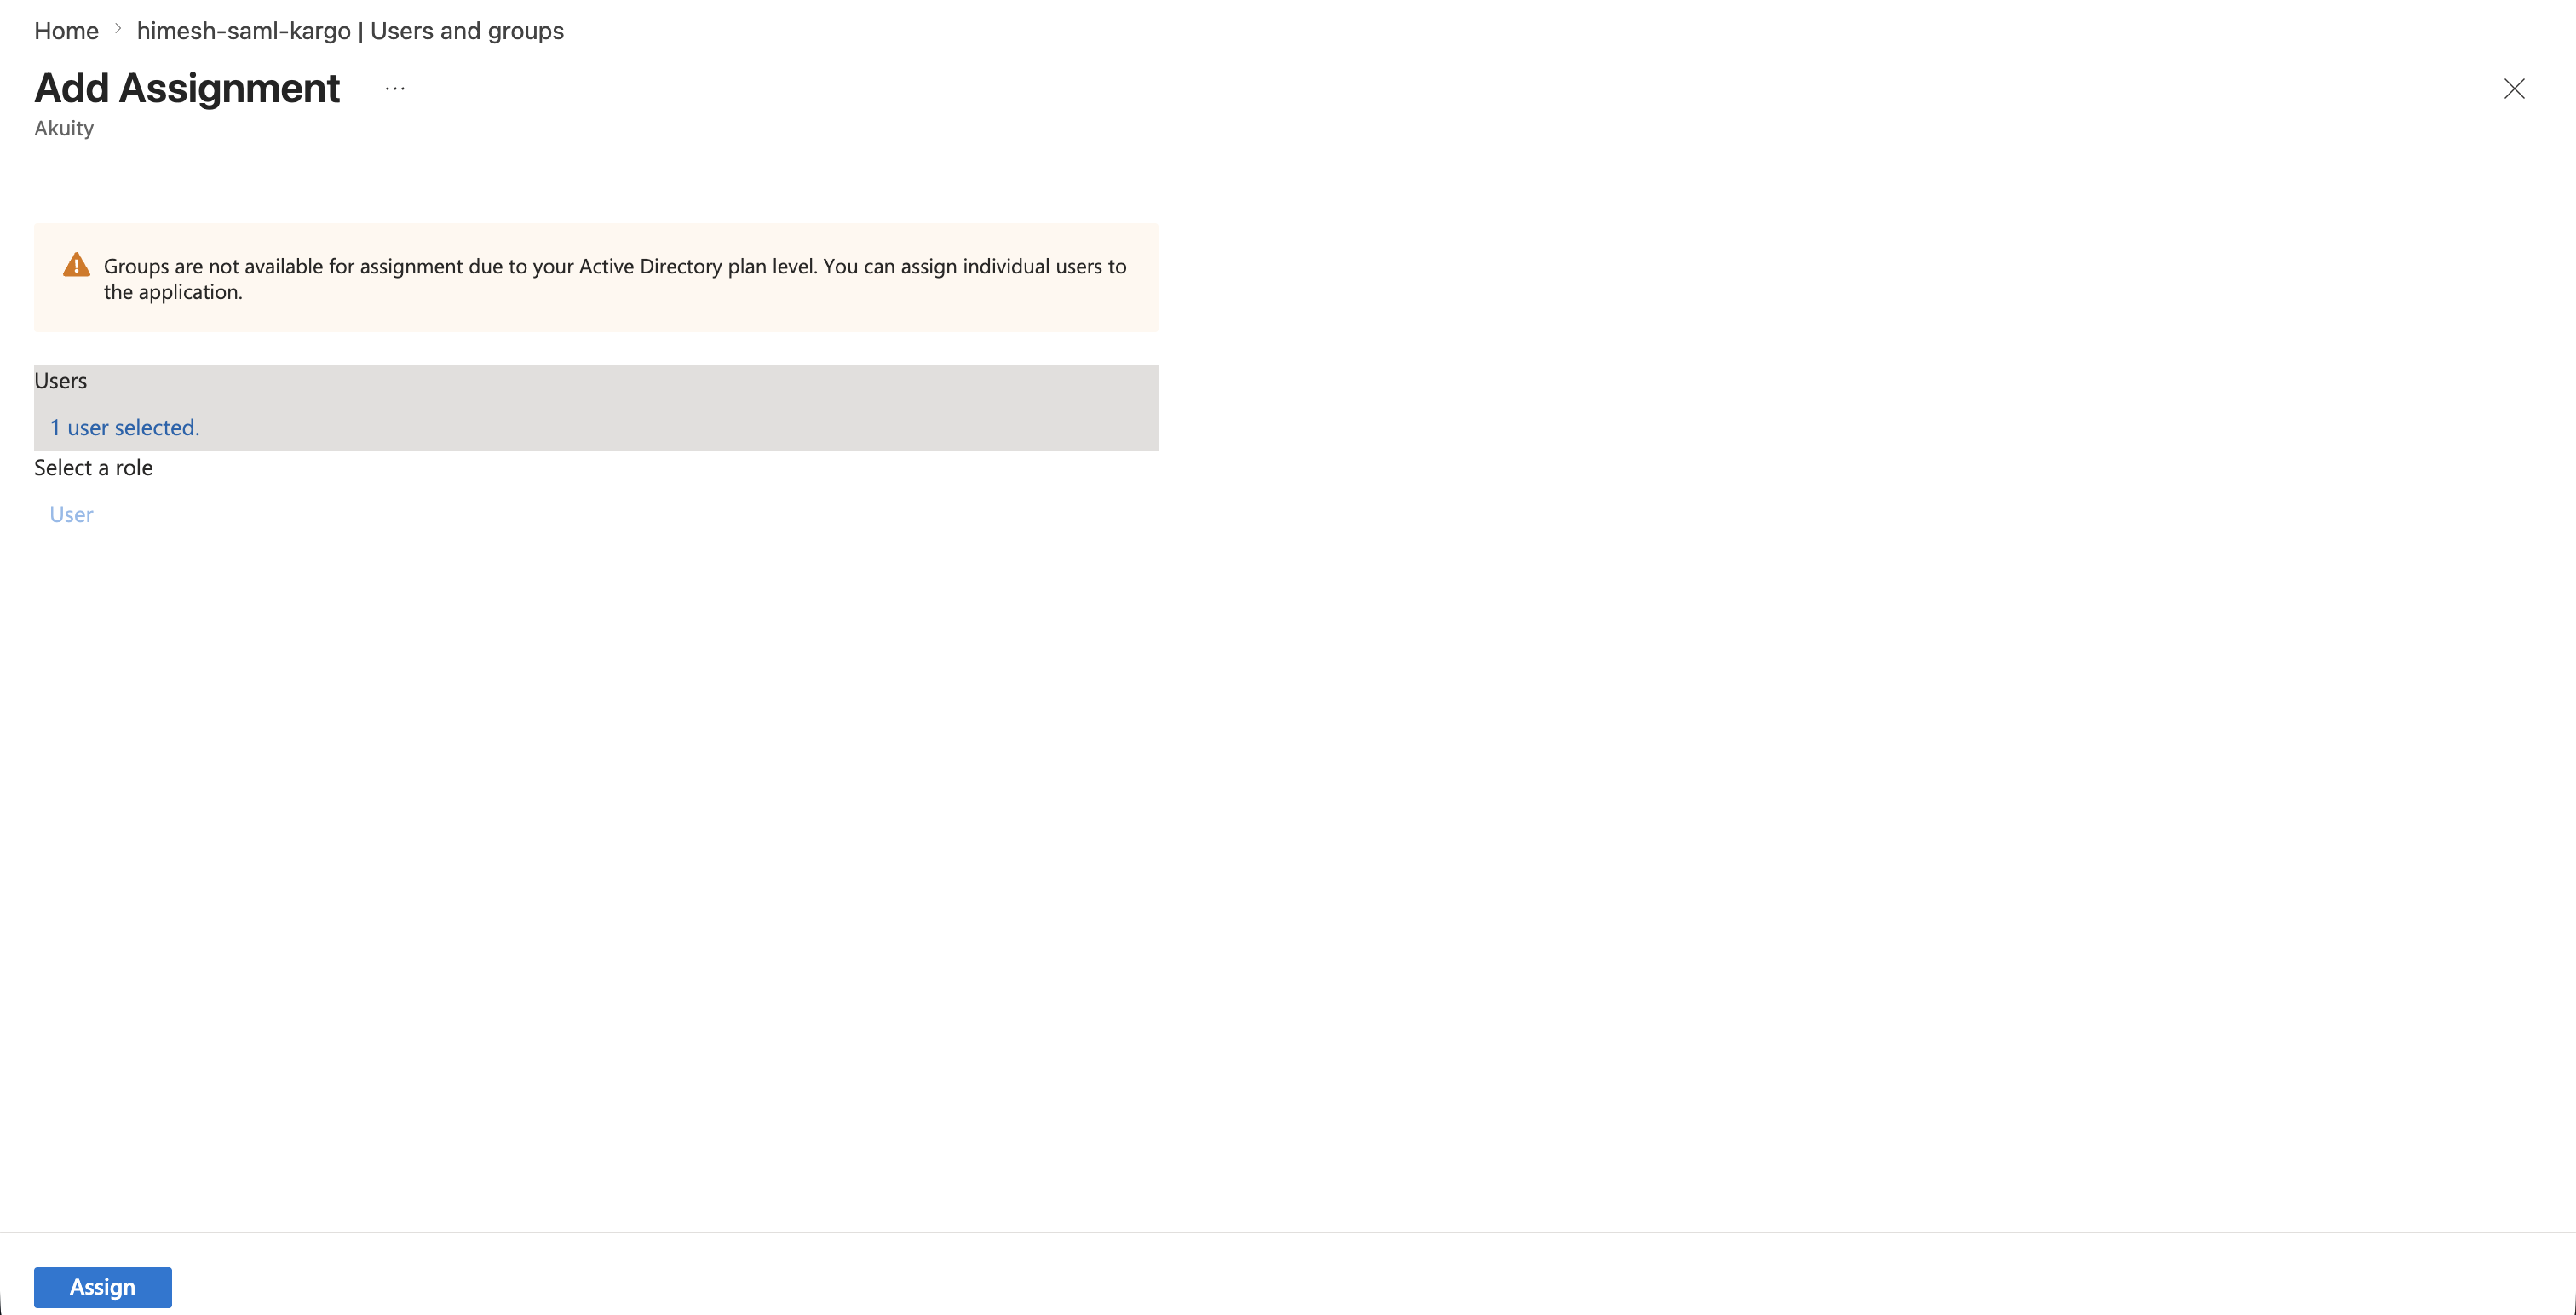
SAML only issues assertions for assigned users.
-
In the application, go to Users and groups in the left sidebar, then click + Add user/group.
-
Add your user, and any groups, then click Assign.
Step 8: Base64-encode the certificate
The Dex caData field needs the certificate as a single-line base64 string. On macOS:
cat ~/Downloads/<your-cert>.cer | base64 | tr -d '\n' | pbcopy
This copies a clean single-line base64 value to your clipboard. The signing certificate is public — it is not a secret.
Step 9: Configure the Dex SAML connector in Kargo
Back on the Kargo OIDC Config page with Dex enabled, open the Configuration tab and replace the Dex Config with the following:
connectors:
- type: saml
  id: saml
  name: Azure Entra ID
  config:
    ssoURL: https://login.microsoftonline.com/<YOUR_TENANT_ID>/saml2
    entityIssuer: https://<your-kargo-hostname>/dex/callback
    redirectURI: https://<your-kargo-hostname>/dex/callback
    caData: <PASTE_SINGLE_LINE_BASE64_CERT>
    usernameAttr: email
    emailAttr: email
    groupsAttr: Group
Replace the placeholders:
<YOUR_TENANT_ID>— your Directory (tenant) ID<your-kargo-hostname>— your Kargo instance hostname from Step 1<PASTE_SINGLE_LINE_BASE64_CERT>— the base64 string from Step 8
No Secrets tab entry is needed for SAML — the certificate is inline and public.
groupsAttr is optionalIf your test user is not a member of any group, remove the groupsAttr: Group line. Otherwise Dex fails with no attribute with name "Group", because Entra ID omits the group claim entirely when the user has no groups. Add it back once the user belongs to at least one group.
Configuration fields explained
| Field | Description |
|---|---|
type | Must be saml |
ssoURL | The Login URL from Azure, the /saml2 endpoint |
entityIssuer | Must match the Identifier (Entity ID) set in Azure (/dex/callback) |
redirectURI | Must match the Reply URL / ACS in Azure (/dex/callback) |
caData | Base64-encoded SAML signing certificate |
usernameAttr | SAML attribute used as the username (email) |
emailAttr | SAML attribute used as the email (email) |
groupsAttr | SAML attribute used for groups (Group) — optional |
Step 10: Map users to Kargo roles
Scroll to Kargo Roles and Permissions. For the Admin role:
- Claim key:
email - Claim value: your email or UPN, for example
you@yourcompany.com - Click Add
Available roles are Admin, Viewer, User, and Project Creator. Once group claims are flowing, you can map by groups, with the value being the group's Object ID, for team-based RBAC.
Step 11: Save and test the SAML login
-
Click Save and confirm the "Unsaved changes" indicator clears.
-
Open a fresh incognito window, go to
https://<your-kargo-hostname>, and click SSO Login. -
You are redirected to Microsoft. Sign in.
-
You land in the Kargo UI with the role you mapped.
The redirect URL should be https://login.microsoftonline.com/<tenant>/saml2?SAMLRequest=… — note /saml2 and SAMLRequest.
If you instead see /oauth2/v2.0/authorize?…client_id=…, Kargo is still using an OIDC connector. Re-check that the Dex Config contains only the saml connector and was saved, then start the login from a fresh window.
Dex SAML troubleshooting
Single sign-on page only offers OIDC, with no SAML option
The app was created as an App registration (OIDC), not a non-gallery Enterprise Application. App-registration apps cannot do SAML and cannot be converted. Delete it and recreate via Enterprise applications → Create your own application → Integrate any other application… (Non-gallery).
Login redirects to /oauth2/v2.0/authorize instead of /saml2
Kargo is still running an OIDC connector. Make sure the Dex Config contains only the type: saml connector, with no leftover type: oidc block, that it was saved, and start the login from a brand-new window. A stale tab can replay the old OIDC URL.
Failed to authenticate: no attribute with name "Group"
Entra ID only emits the group claim if the user belongs to at least one group. If groupsAttr is set but the user has no groups, Dex fails. Either add the user to a group, or remove groupsAttr if you do not need group-based RBAC.
Failed to authenticate: missing email claim, or an empty email
The email SAML claim is empty. Ensure the email claim exists in Attributes & Claims and that its source attribute points at a populated field — user.mail for accounts with a mailbox, or user.userprincipalname for accounts whose mail attribute is blank.
Certificate or signature errors
- Confirm
caDatais the base64-encoded signing certificate from Step 8, with no stray line breaks - Confirm you downloaded Certificate (Base64), not Raw or Federation Metadata
- Re-download and re-encode if Azure rotated the signing certificate
Dex SAML summary
| Component | Value |
|---|---|
| Azure app type | Enterprise Application (non-gallery) |
| SAML Identifier / Reply URL | https://<kargo-hostname>/dex/callback |
| Sign on URL | https://<kargo-hostname>/login |
| Kargo SSO mode | Dex, type: saml connector |
ssoURL | https://login.microsoftonline.com/<TENANT_ID>/saml2 |
| Credential | SAML signing certificate, inline caData, public |
| Secret reference | None — SAML uses the certificate |
| Admin consent | Not required |
| Group token limit | 150 (SAML) |
| Key gotchas | Must use a non-gallery Enterprise App; email source user.mail or user.userprincipalname; groupsAttr is optional, since Entra ID omits it when the user has no groups |