Okta
Configure Okta as the Single Sign-On provider for your Kargo instance.
There are two ways to connect Okta. Pick one:
| Method | Kargo mode | Okta object | Credential | Groups from |
|---|---|---|---|---|
| Native OIDC | OIDC | OIDC app integration (SPA) + custom Authorization Server | PKCE | ID-token claim |
| Dex SAML | Dex, saml connector | SAML 2.0 app integration | Signing certificate, inline | SAML assertion |
Native OIDC is the simpler of the two at login time: Kargo talks to Okta directly, with no Dex hop and no client secret. It is also the only method documented here for CLI login. This guide builds it on a custom Authorization Server in Okta, which is what gives you the scope-gated groups claim, the regex filter and the access policy used below. Dex SAML routes through Kargo's built-in Dex instance and needs no Authorization Server.
Before you start, you need:
- An Akuity Platform account with a Kargo instance, for example
https://myinstance.kargo.akuity.cloud - Admin access to your Kargo instance settings
- Admin access to an Okta organization, with permission to create app integrations and, for native OIDC, Authorization Servers
Native OIDC
Connect Okta directly over OIDC with PKCE. Kargo's UI runs the authorization-code flow as a public client, so there is no client secret and no Dex hop.
Kargo stores the Dex configuration and the direct-OIDC fields side by side and uses a flag to select between them, so you can switch between Dex and OIDC without losing either configuration.
For CLI login (Step 7) you also need the kargo CLI installed.
Step 1: Switch to OIDC mode and note the callback URL
-
In your Kargo Instance, go to Settings.
-
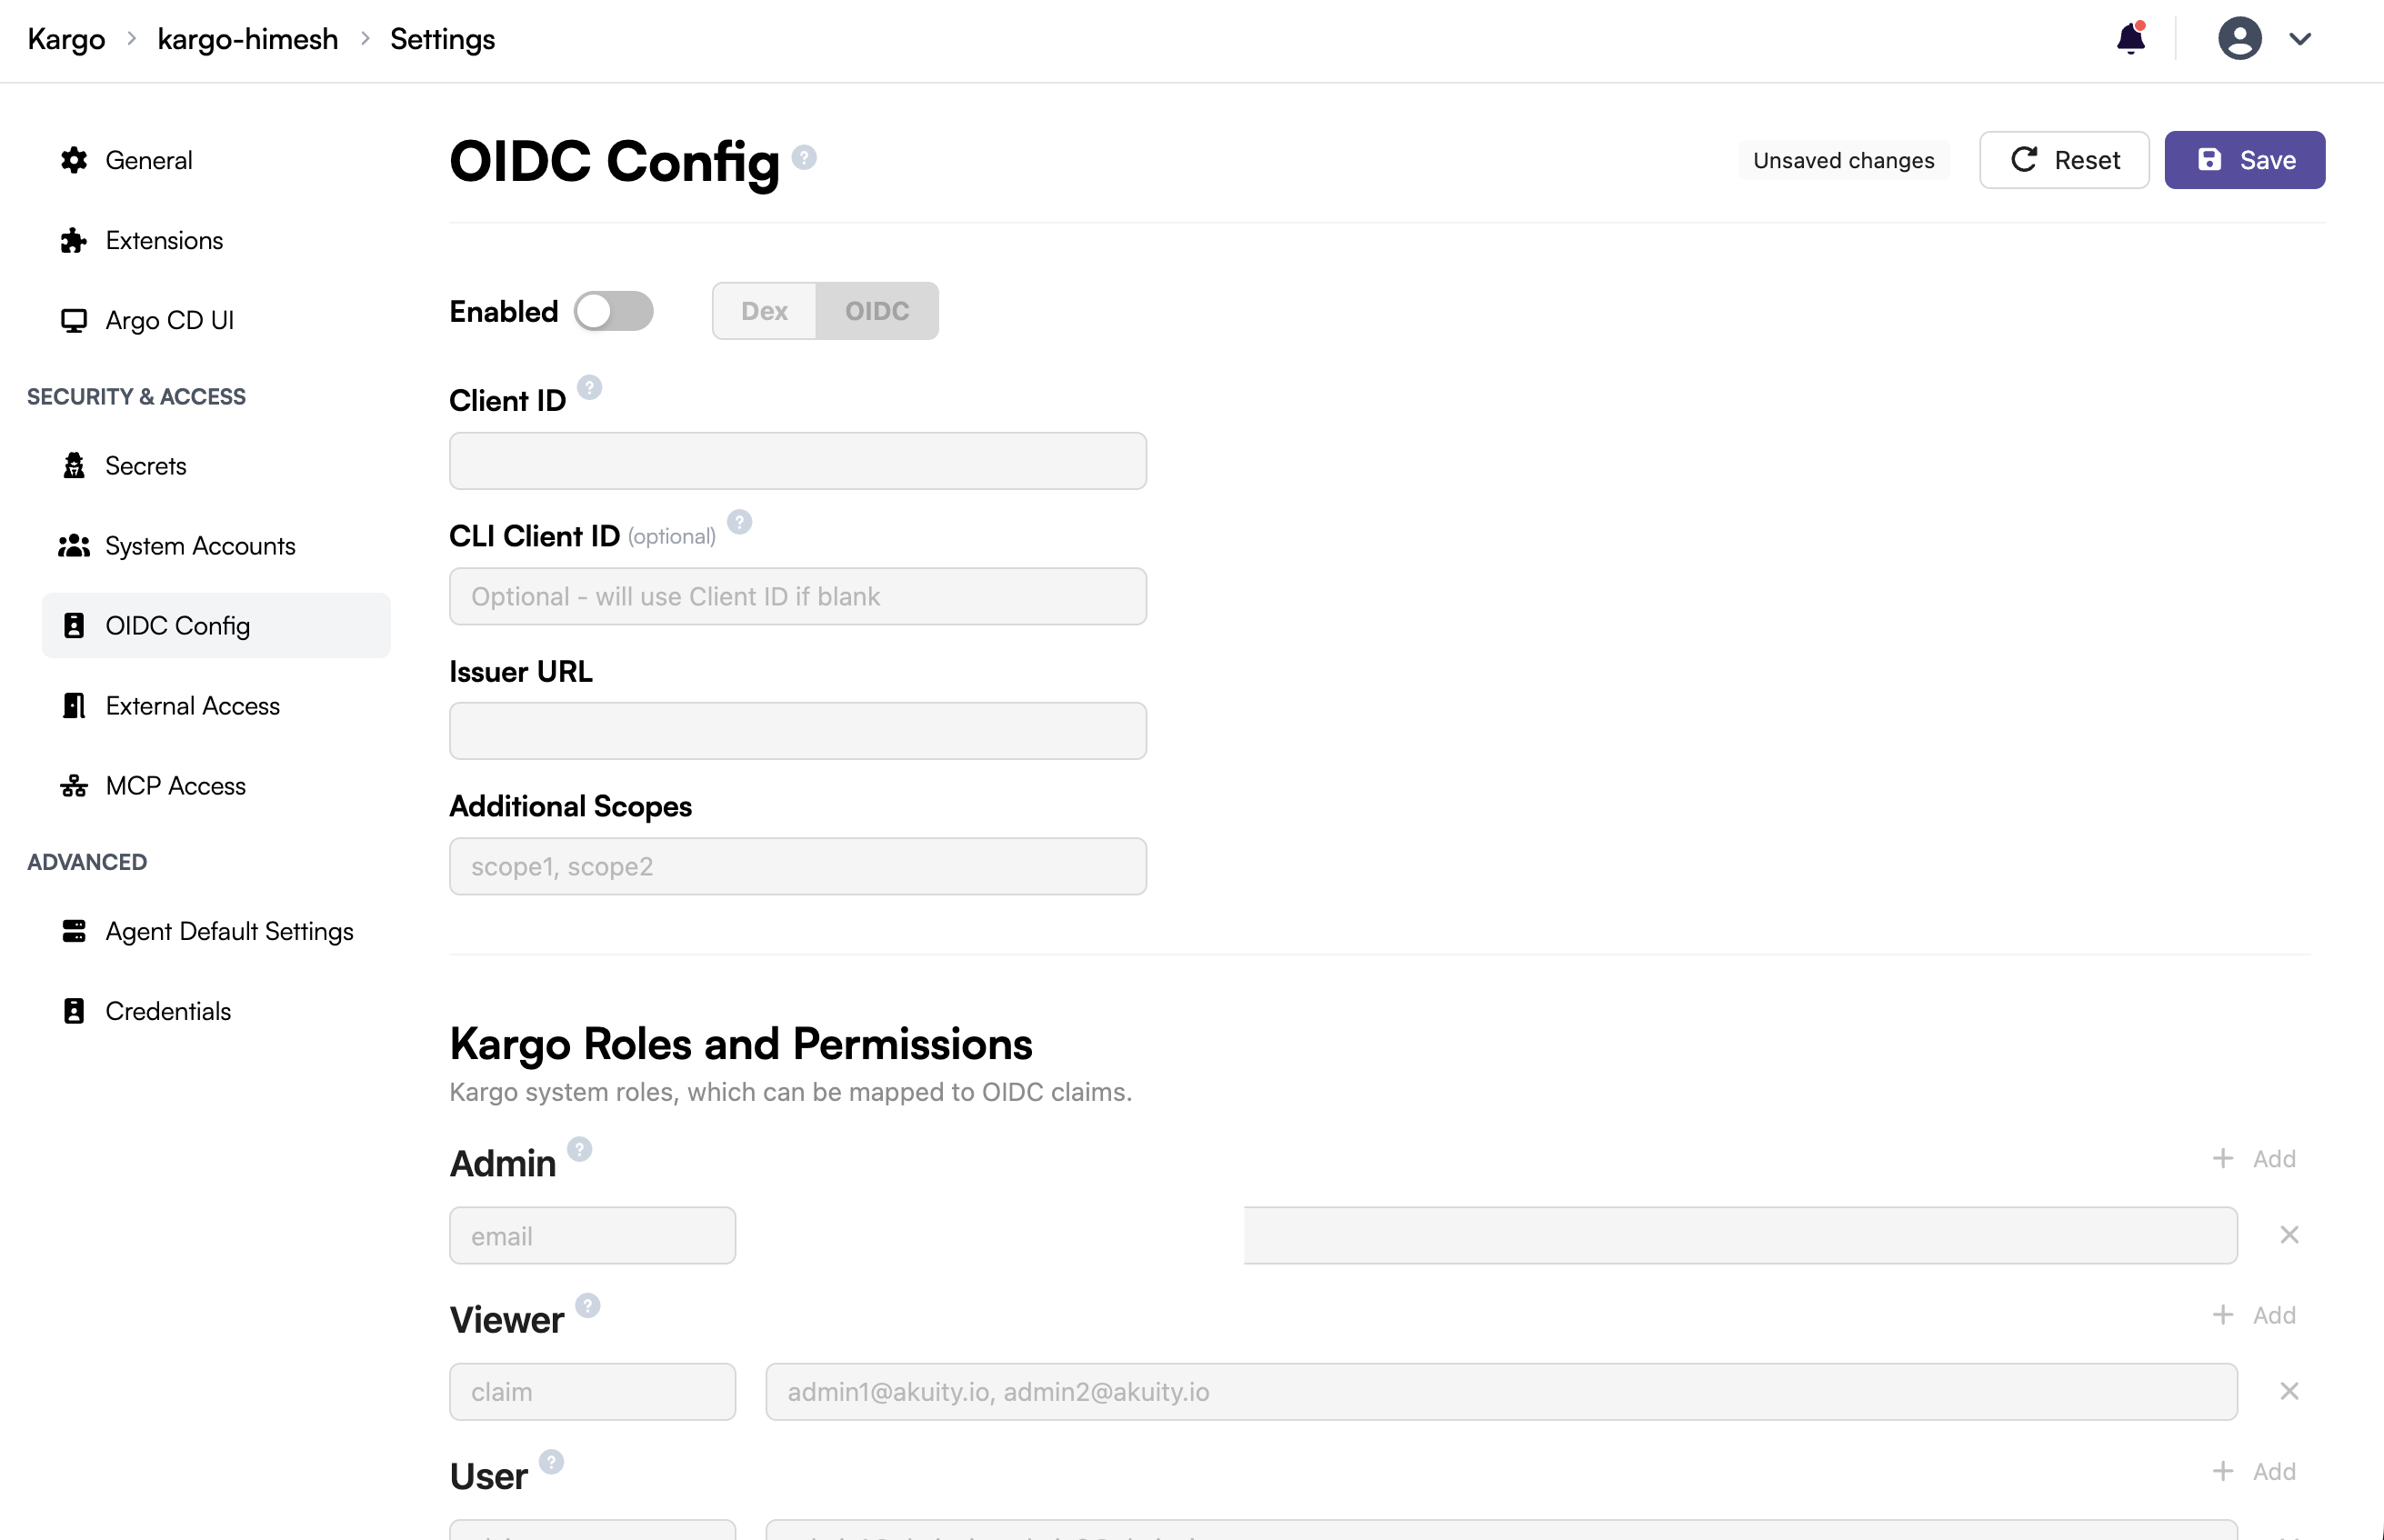
In the left panel, search for Access and go to OIDC Config.
-
Toggle Enabled to on.
-
Select OIDC, not Dex.
-
The callback URL banner shows:
https://<your-kargo-hostname>/login
The form changes completely compared with Dex mode: you get Client ID, CLI Client ID, Issuer URL and Additional Scopes instead of a YAML editor and a Secrets tab.
Copy that URL exactly as the banner shows it — it is the value Okta must have registered as a sign-in redirect URI. Leave this page open; you will return to it in Step 8.
Step 2: Create the OIDC app integration for the UI
-
In the Okta Admin Console, go to Applications → Applications → Create App Integration.
-
In the Create a new app integration dialog:
- Sign-in method: OIDC - OpenID Connect
- Application type: Single-Page Application
-
Click Next.
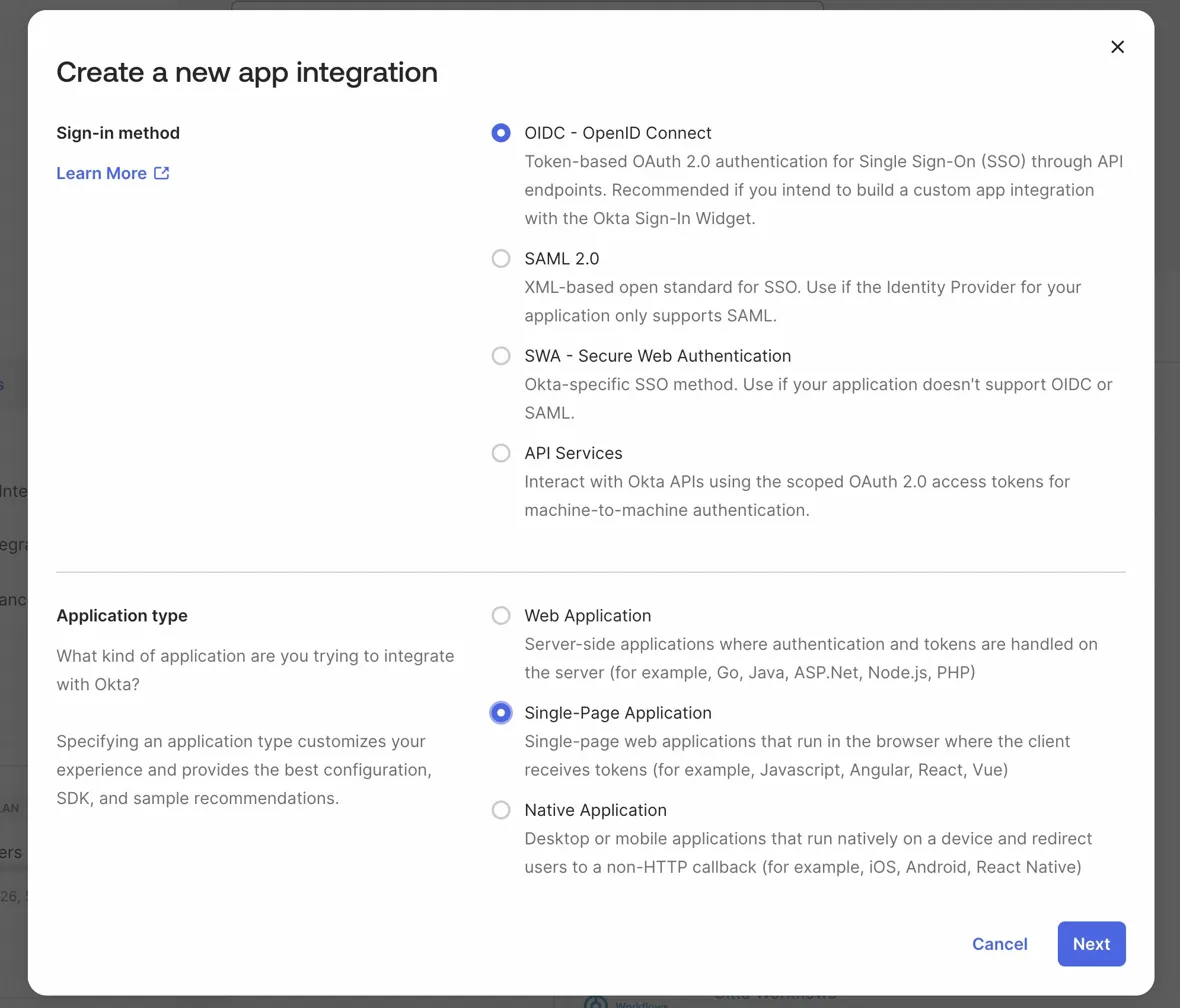
Kargo's UI runs the authorization-code and PKCE exchange from the browser as a public client, with no client secret. Okta's Web Application type expects a client secret; Single-Page Application is the type that supports public-client PKCE with CORS.
Okta SPA integrations do not support client secrets at all. That is the intended shape here — Kargo needs none.
-
On the New Single-Page App Integration page, fill in:
Field Value App integration name A descriptive name, for example kargoakpGrant type Authorization Code only Sign-in redirect URIs https://<your-kargo-hostname>/login— the callback URL from Step 1Sign-out redirect URIs https://<your-kargo-hostname> -
Click Save.
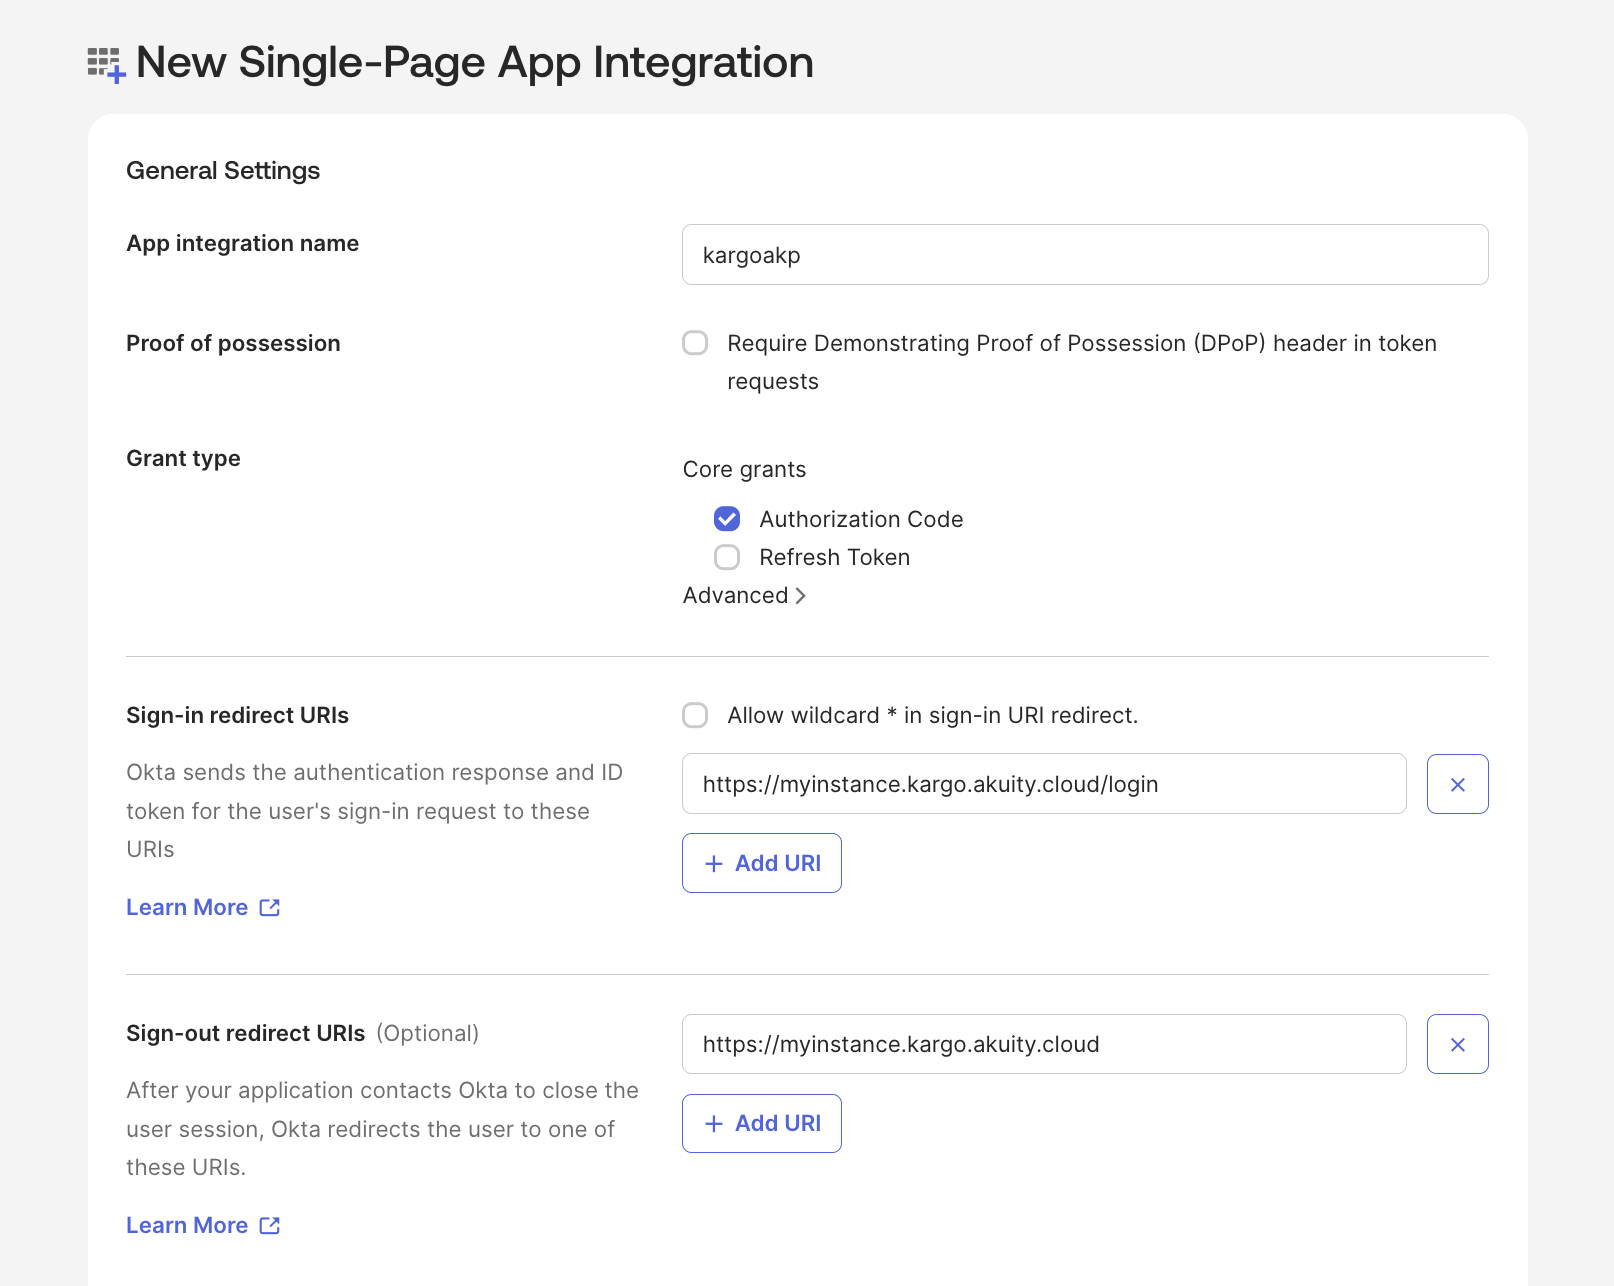
The redirect URI must match what Kargo sends in its authorization request, character for character, or Okta rejects the callback with redirect_uri_mismatch. Copy it from the Kargo banner rather than typing it.
Leave Allow wildcard * in sign-in URI redirect unchecked in production.
On the app's General tab, note the Client ID — you will need it in Step 8.
Step 3: Create a custom Authorization Server
Kargo needs its own Authorization Server so you can define the custom groups scope and claim used for role mapping.
-
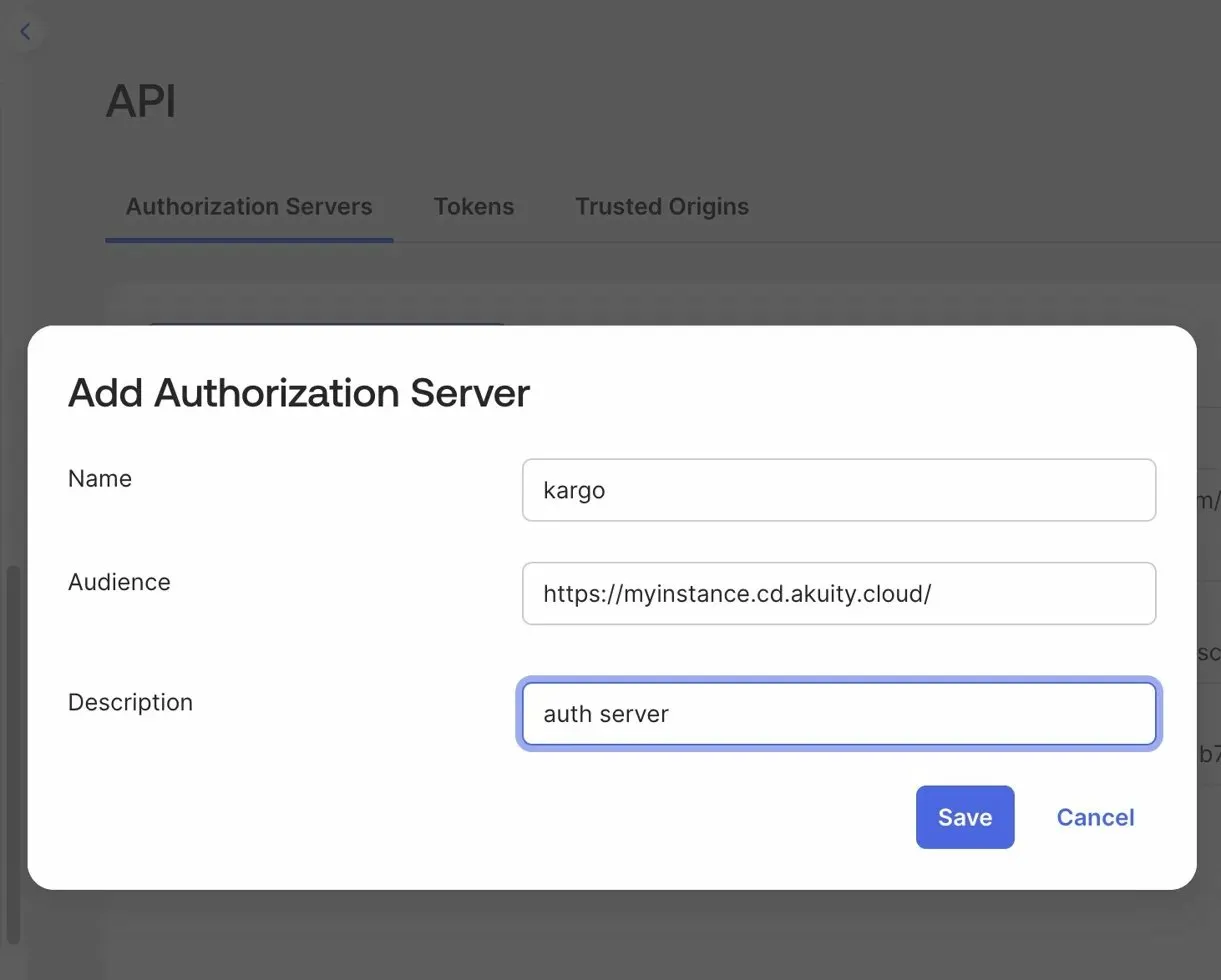
Go to Security → API → Authorization Servers, then click Add Authorization Server.
-
Fill in:
Field Value Name kargoAudience https://<your-kargo-hostname>Description Anything descriptive, for example auth server -
Click Save.
Okta's built-in Org Authorization Server can emit a groups claim — you configure it on the app itself, under Sign On → OpenID Connect ID Token → Group claim type → Filter, rather than on an Authorization Server. If that covers your needs, it is a shorter path and you can skip Steps 3 to 5.
The Org server is the more limited of the two. Okta does not let you customize its audience, claims, policies, or scopes, and it can put a groups claim in an ID token only, never an access token. A custom Authorization Server gives you the scope-gated groups claim, the regex filter, the access policy and the token lifetimes configured over the next three steps, so that is what the rest of this walkthrough assumes.
The Audience value becomes the aud claim on every token this server issues.
Step 4: Add the groups scope and claim
Skip this step only if you intend to map Kargo roles on email alone.
Add the groups scope
-
Inside the
kargoAuthorization Server, open the Scopes tab and click Add Scope. -
Fill in:
Field Value Name groupsDisplay phrase For example grp membershipDescription For example Allows Kargo to see what group you belong toUser consent Implicit -
Click Create.
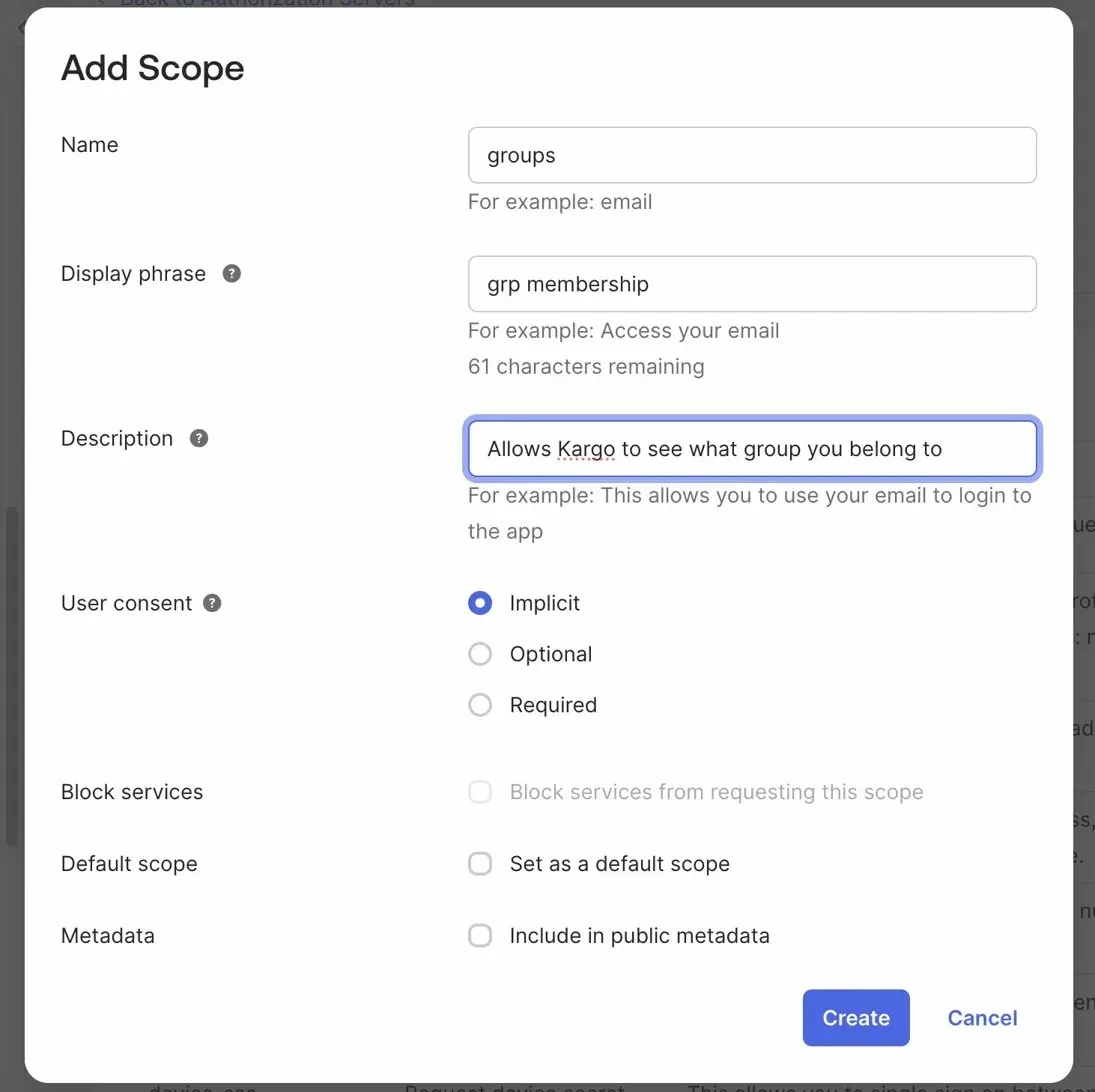
Kargo must request this scope at login for the claim to appear, so you will add groups to Additional Scopes in Step 8.
Add the groups claim
-
Still inside the
kargoAuthorization Server, open the Claims tab and click Add Claim. -
Fill in:
Field Value Name groupsInclude in token type ID Token, Always Value type Groups Filter Matches regex, kargo-.*Include in The following scopes → groups -
Click Create.
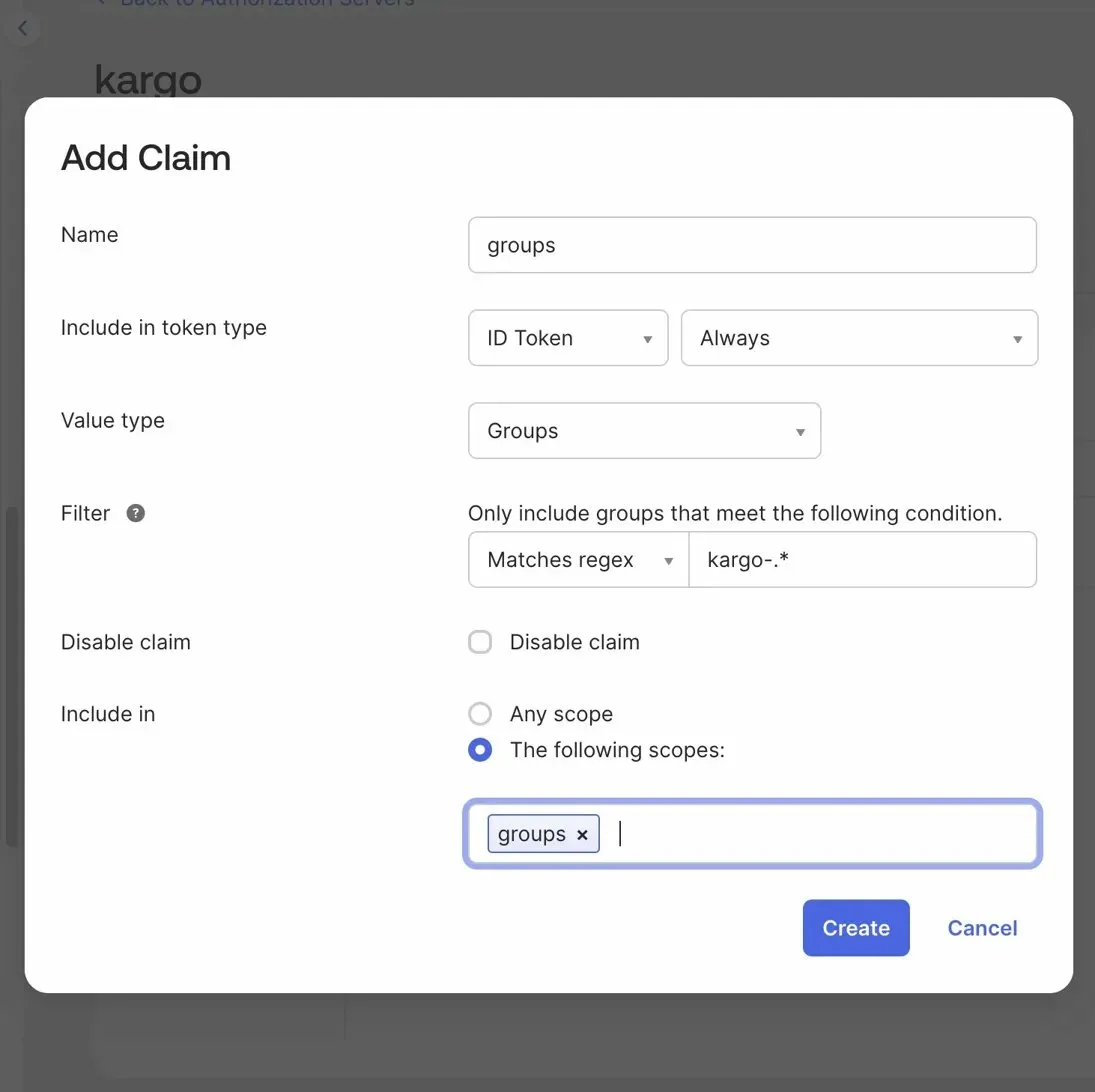
The kargo-.* filter emits only groups whose names start with kargo-. That keeps the token small and avoids leaking unrelated group memberships to Kargo.
Okta enforces a token size limit. A user who belongs to a large number of matching groups can produce an ID token too large to be accepted, which fails authentication. Adjust the regex to your naming convention, but keep it as specific as you can.
Step 5: Create an access policy
Access policies control which clients may obtain tokens from this Authorization Server.
-
Inside the
kargoAuthorization Server, open the Access Policies tab and click Add Policy. -
Fill in:
Field Value Name kargoDescription For example Access to KargoAssign to The following clients → your UI app, kargoakp -
Click Create Policy.
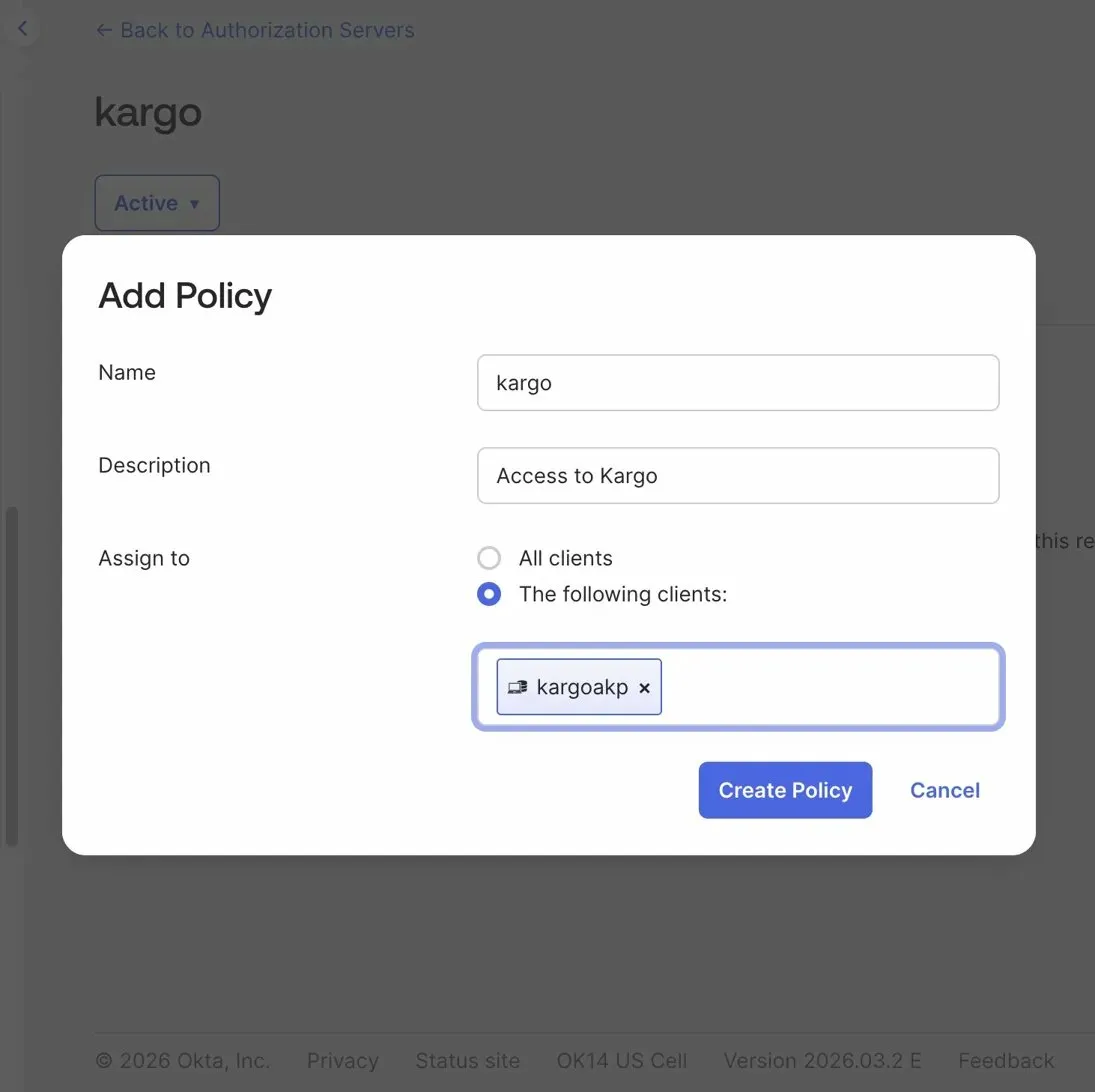
Without a policy assigned to your client, Okta refuses every token request with 401 unauthorized_client, even though the app integration exists.
-
On the policy detail page, click Add Rule and fill in:
Field Value Rule Name Anything, for example defaultIF Grant type is Authorization Code AND User is Any user assigned the app AND Scopes requested Any scopes AND Access token lifetime For example 6 hours AND Refresh token lifetime For example 5 days -
Click Create Rule.
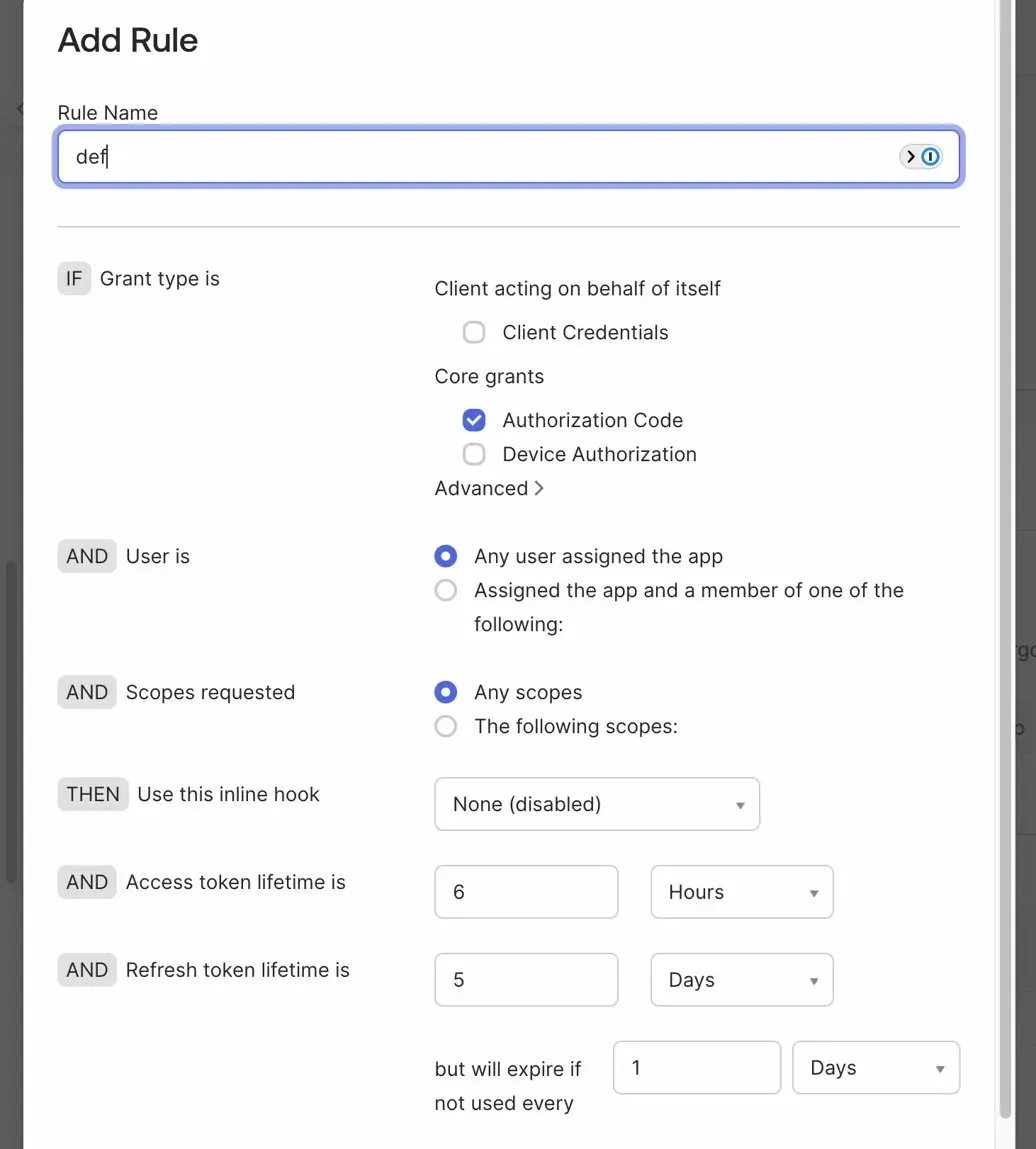
The access token lifetime here does not set how long a Kargo UI session lasts — that follows the ID token lifetime and Kargo's own session settings. Tune both to your organization's security policy.
Step 6: Create Okta groups and assign users
Kargo maps users to roles through the groups claim, so create one Okta group per Kargo role.
-
Go to Directory → Groups → Add group.
-
Name the group so it matches the claim regex from Step 4, for example
kargo-akpt1, and click Save.
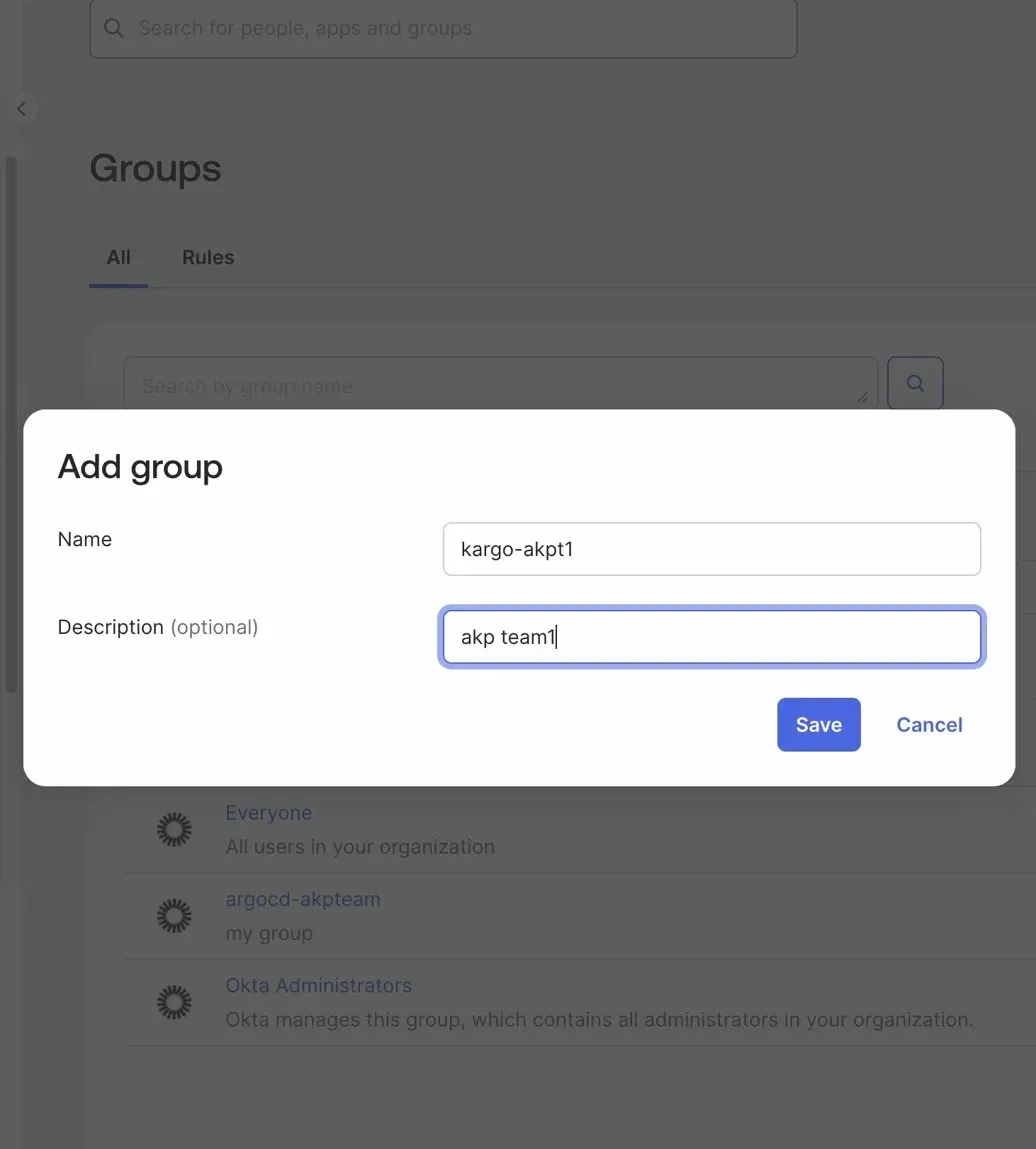
Something like kargo-<project>-admin and kargo-<project>-viewer scales well. Renaming groups later means updating both Okta and every Kargo role mapping that referenced the old name.
A group whose name does not match the regex never reaches the token, so its members get no Kargo role even though the group membership is correct in Okta.
- Open the group, click Assign People, then click + next to each user you want to add.
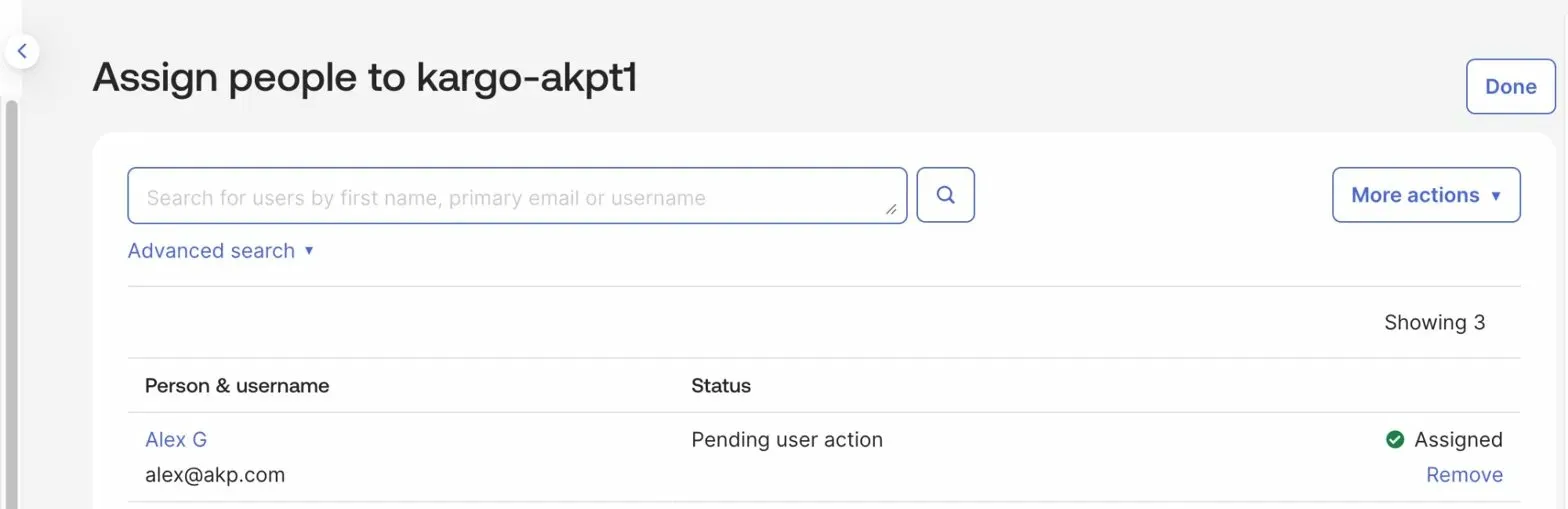
A status of "Pending user action" means the user has been assigned but has not yet activated their Okta account. They receive the group claim once the account is active.
- Open the group's Applications tab, click Assign applications, and select your UI app,
kargoakp.
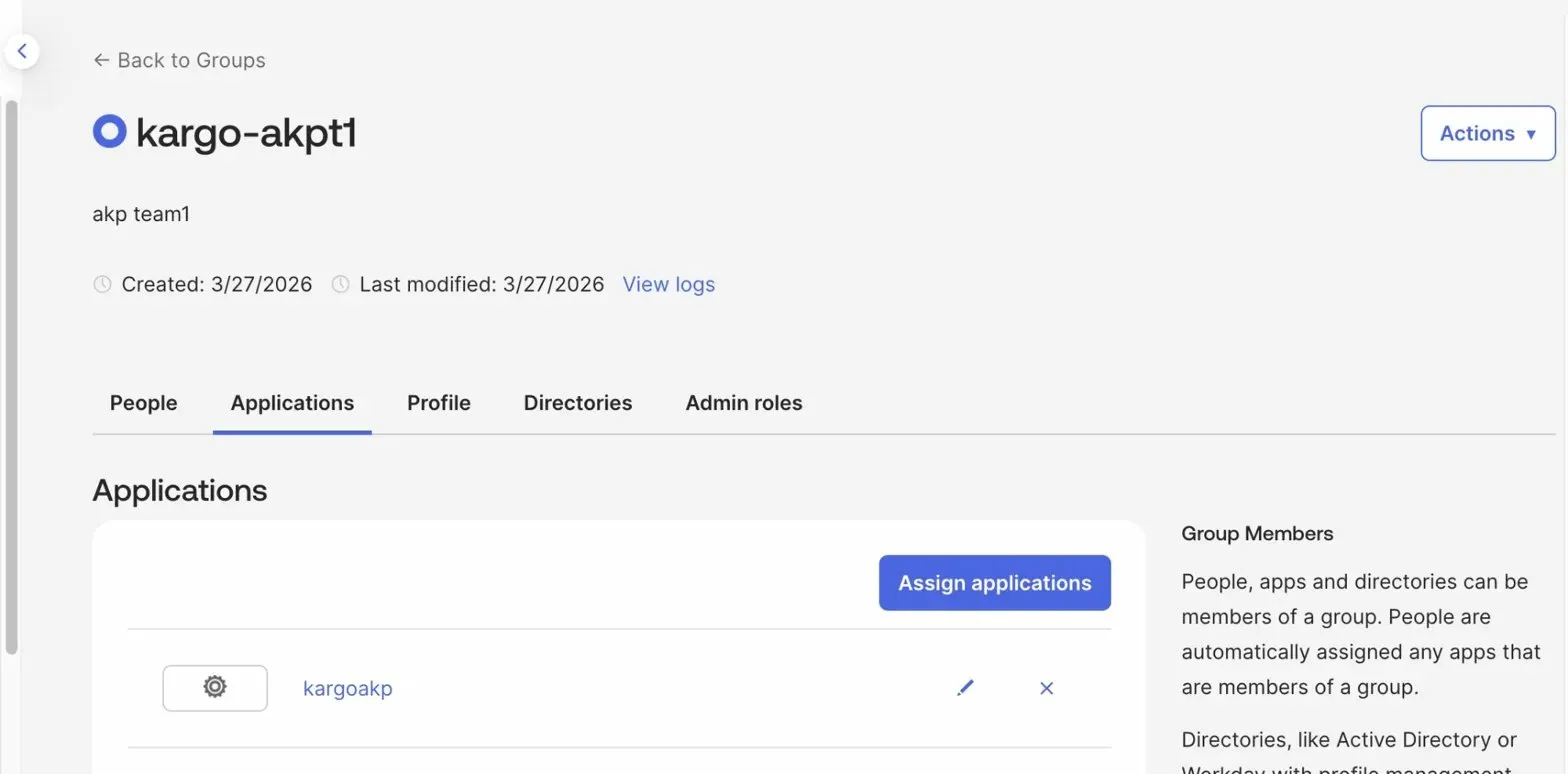
Skipping this assignment is a common cause of User is not assigned to the client application. Group membership alone grants nothing — Okta blocks the login unless the user is also assigned to the app.
Step 7: Create a second app integration for the CLI
kargo login --sso runs the same authorization-code and PKCE flow, but it starts a temporary local HTTP server and receives the callback on a loopback URL. Okta matches redirect URIs exactly, including the port, so the CLI needs its own app integration.
-
Go to Applications → Applications → Create App Integration, select OIDC - OpenID Connect and Single-Page Application, then click Next.
-
Fill in:
Field Value App integration name kargoakpcliGrant type Authorization Code only Sign-in redirect URIs http://localhost:54321/auth/callbackSign-out redirect URIs http://localhost:54321 -
Click Save, then note the Client ID from the General tab.
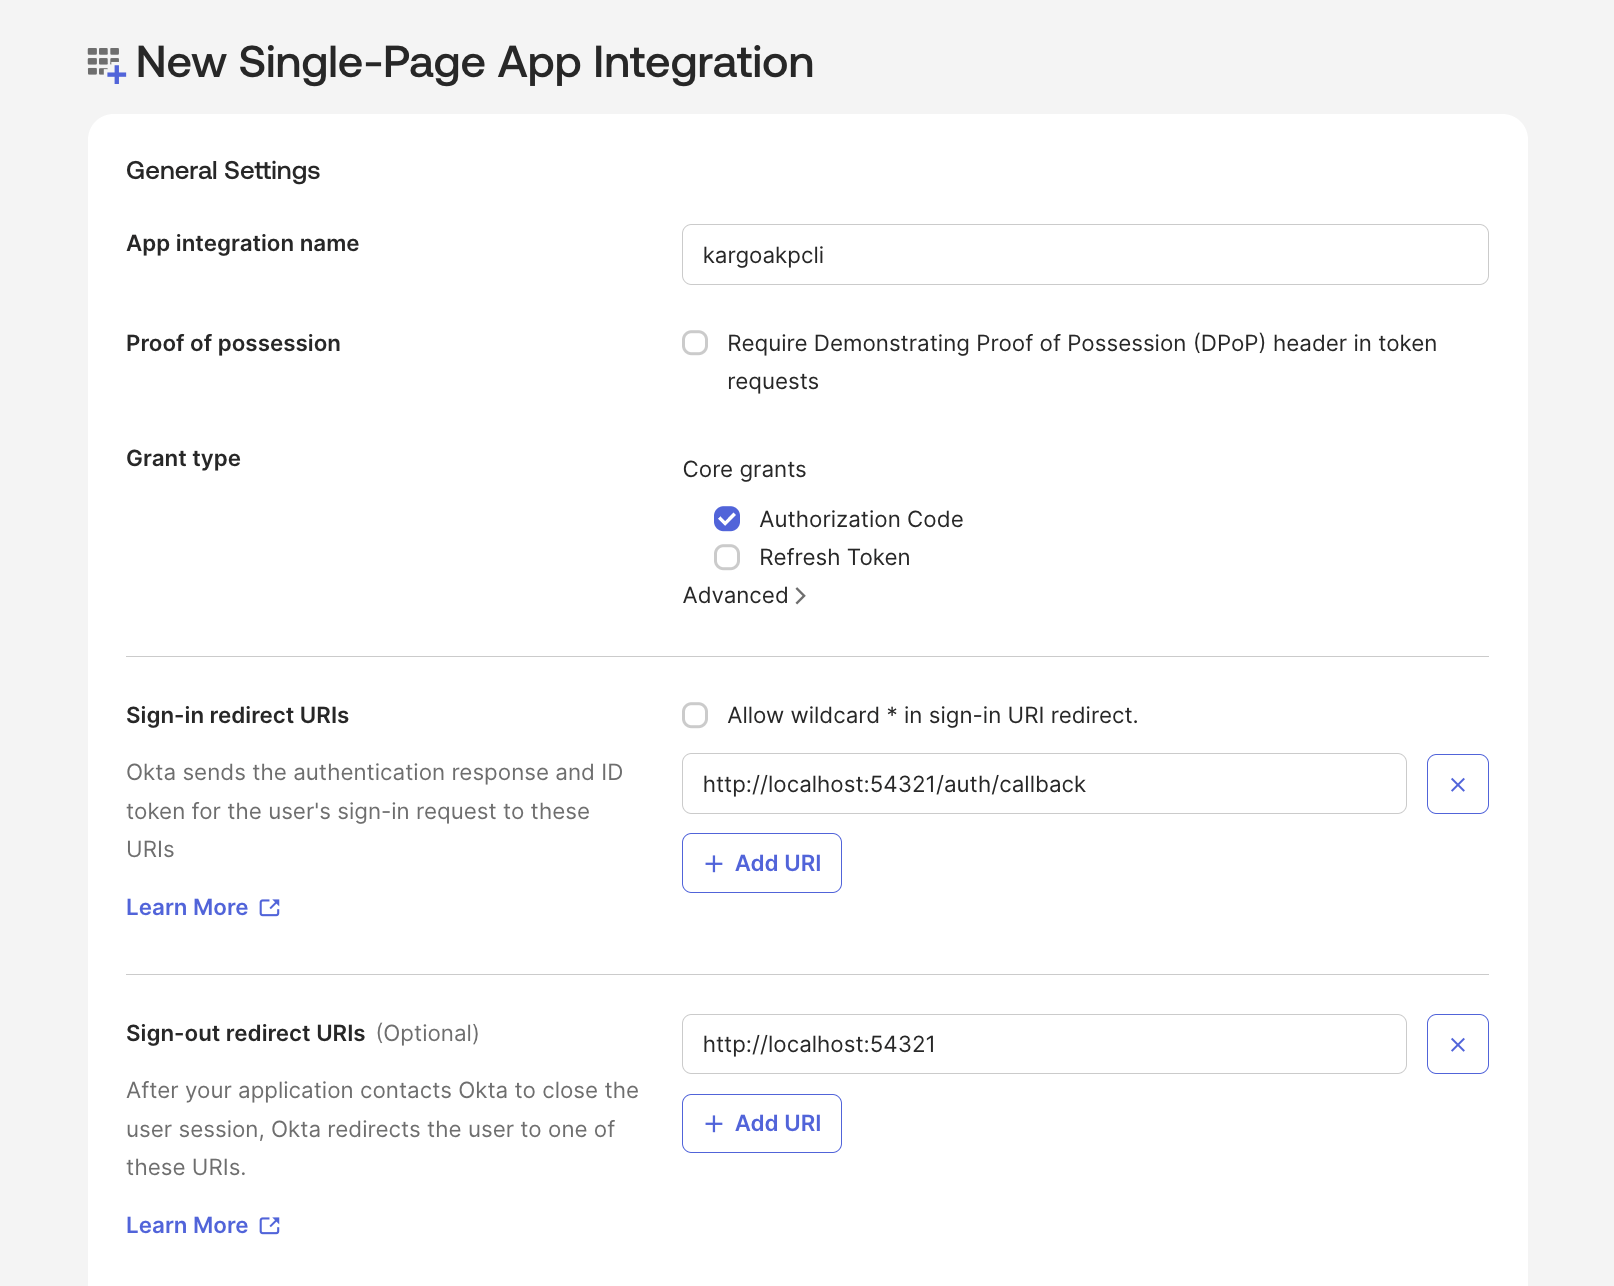
Okta does not treat loopback redirect URIs specially: http://localhost/auth/callback and http://localhost:54321/auth/callback are different URIs. Register a fixed port here and pass it to the CLI with --port, otherwise the CLI picks a random port and the callback fails with redirect_uri_mismatch.
- On the
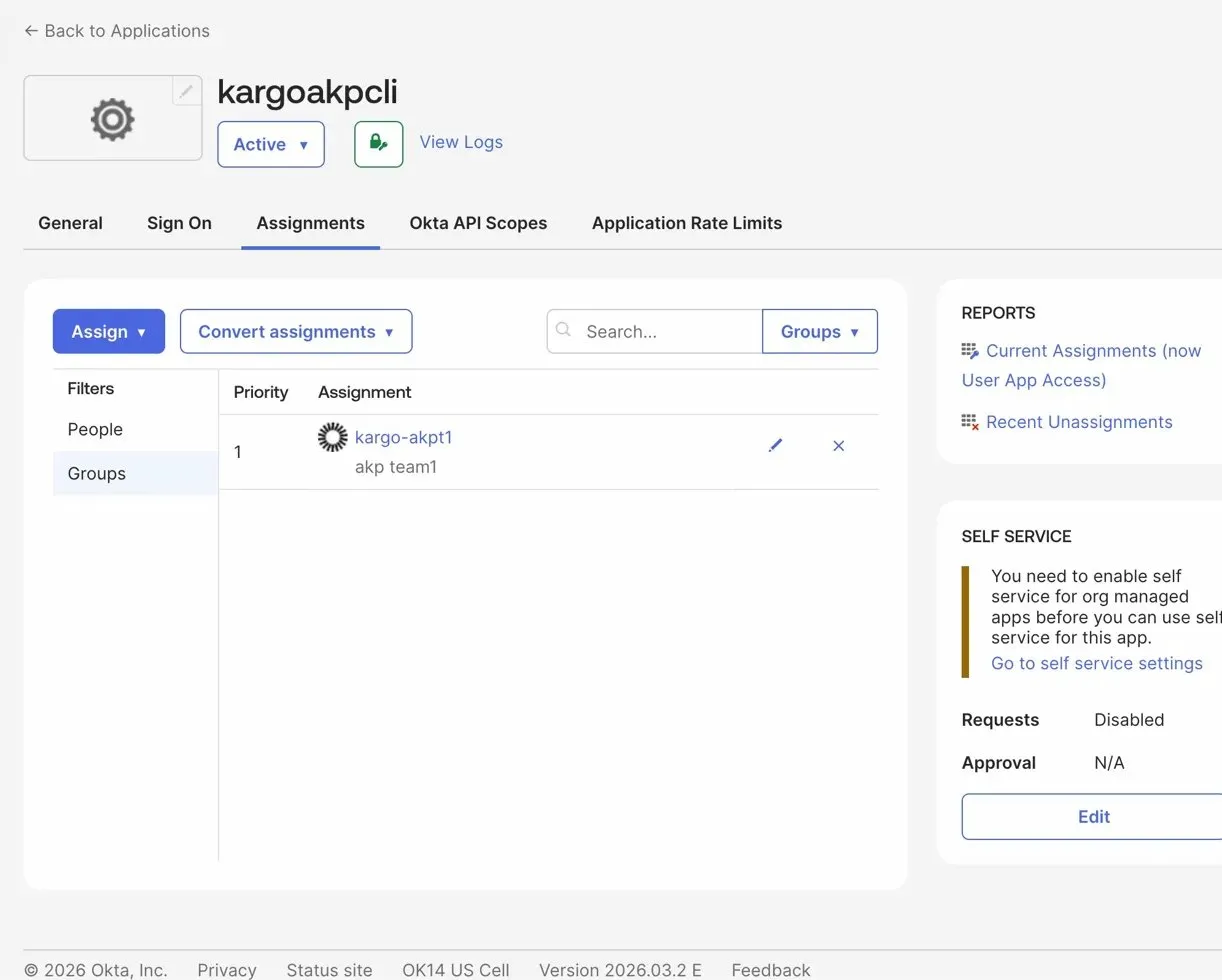
kargoakpcliapp's Assignments tab, click Assign → Assign to Groups and select the groups that need CLI access, for examplekargo-akpt1.
- Go back to Security → API → Authorization Servers →
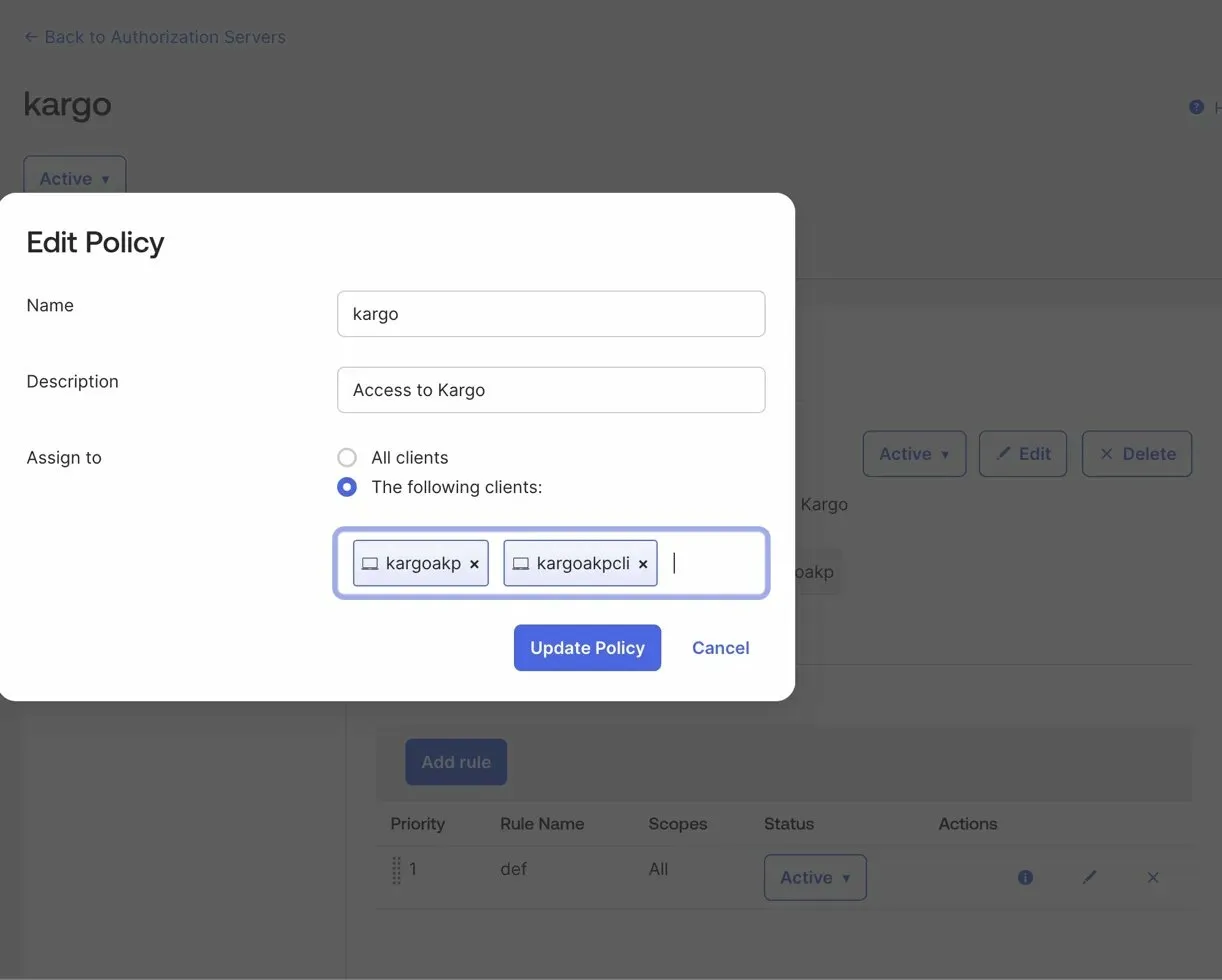
kargo→ Access Policies, click Edit on thekargopolicy, addkargoakpclito Assign to alongsidekargoakp, and click Update Policy.
Step 8: Complete the Kargo OIDC configuration
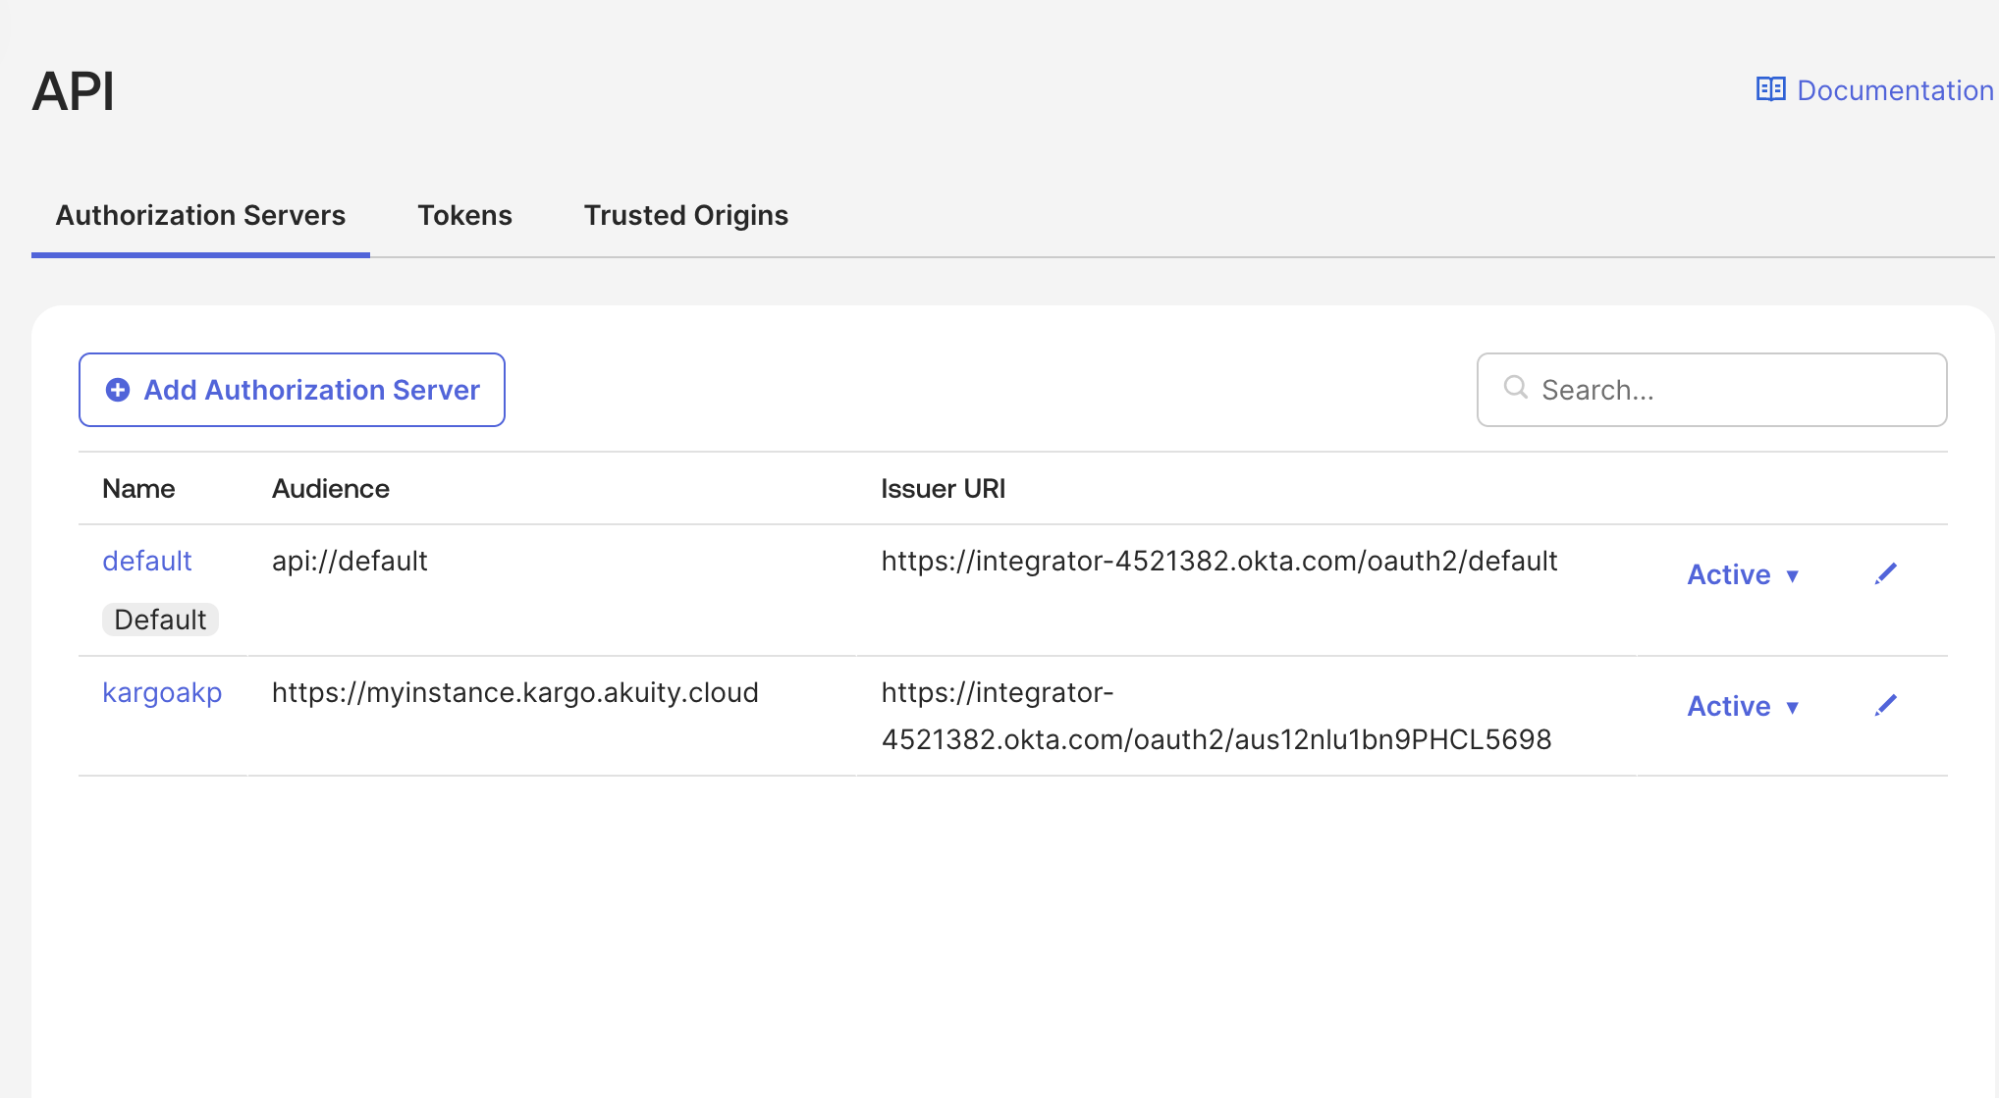
First get the issuer URL: in Okta, go to Security → API → Authorization Servers and read the Issuer URI column for your kargo server. It looks like https://<your-okta-domain>/oauth2/<authServerId>.
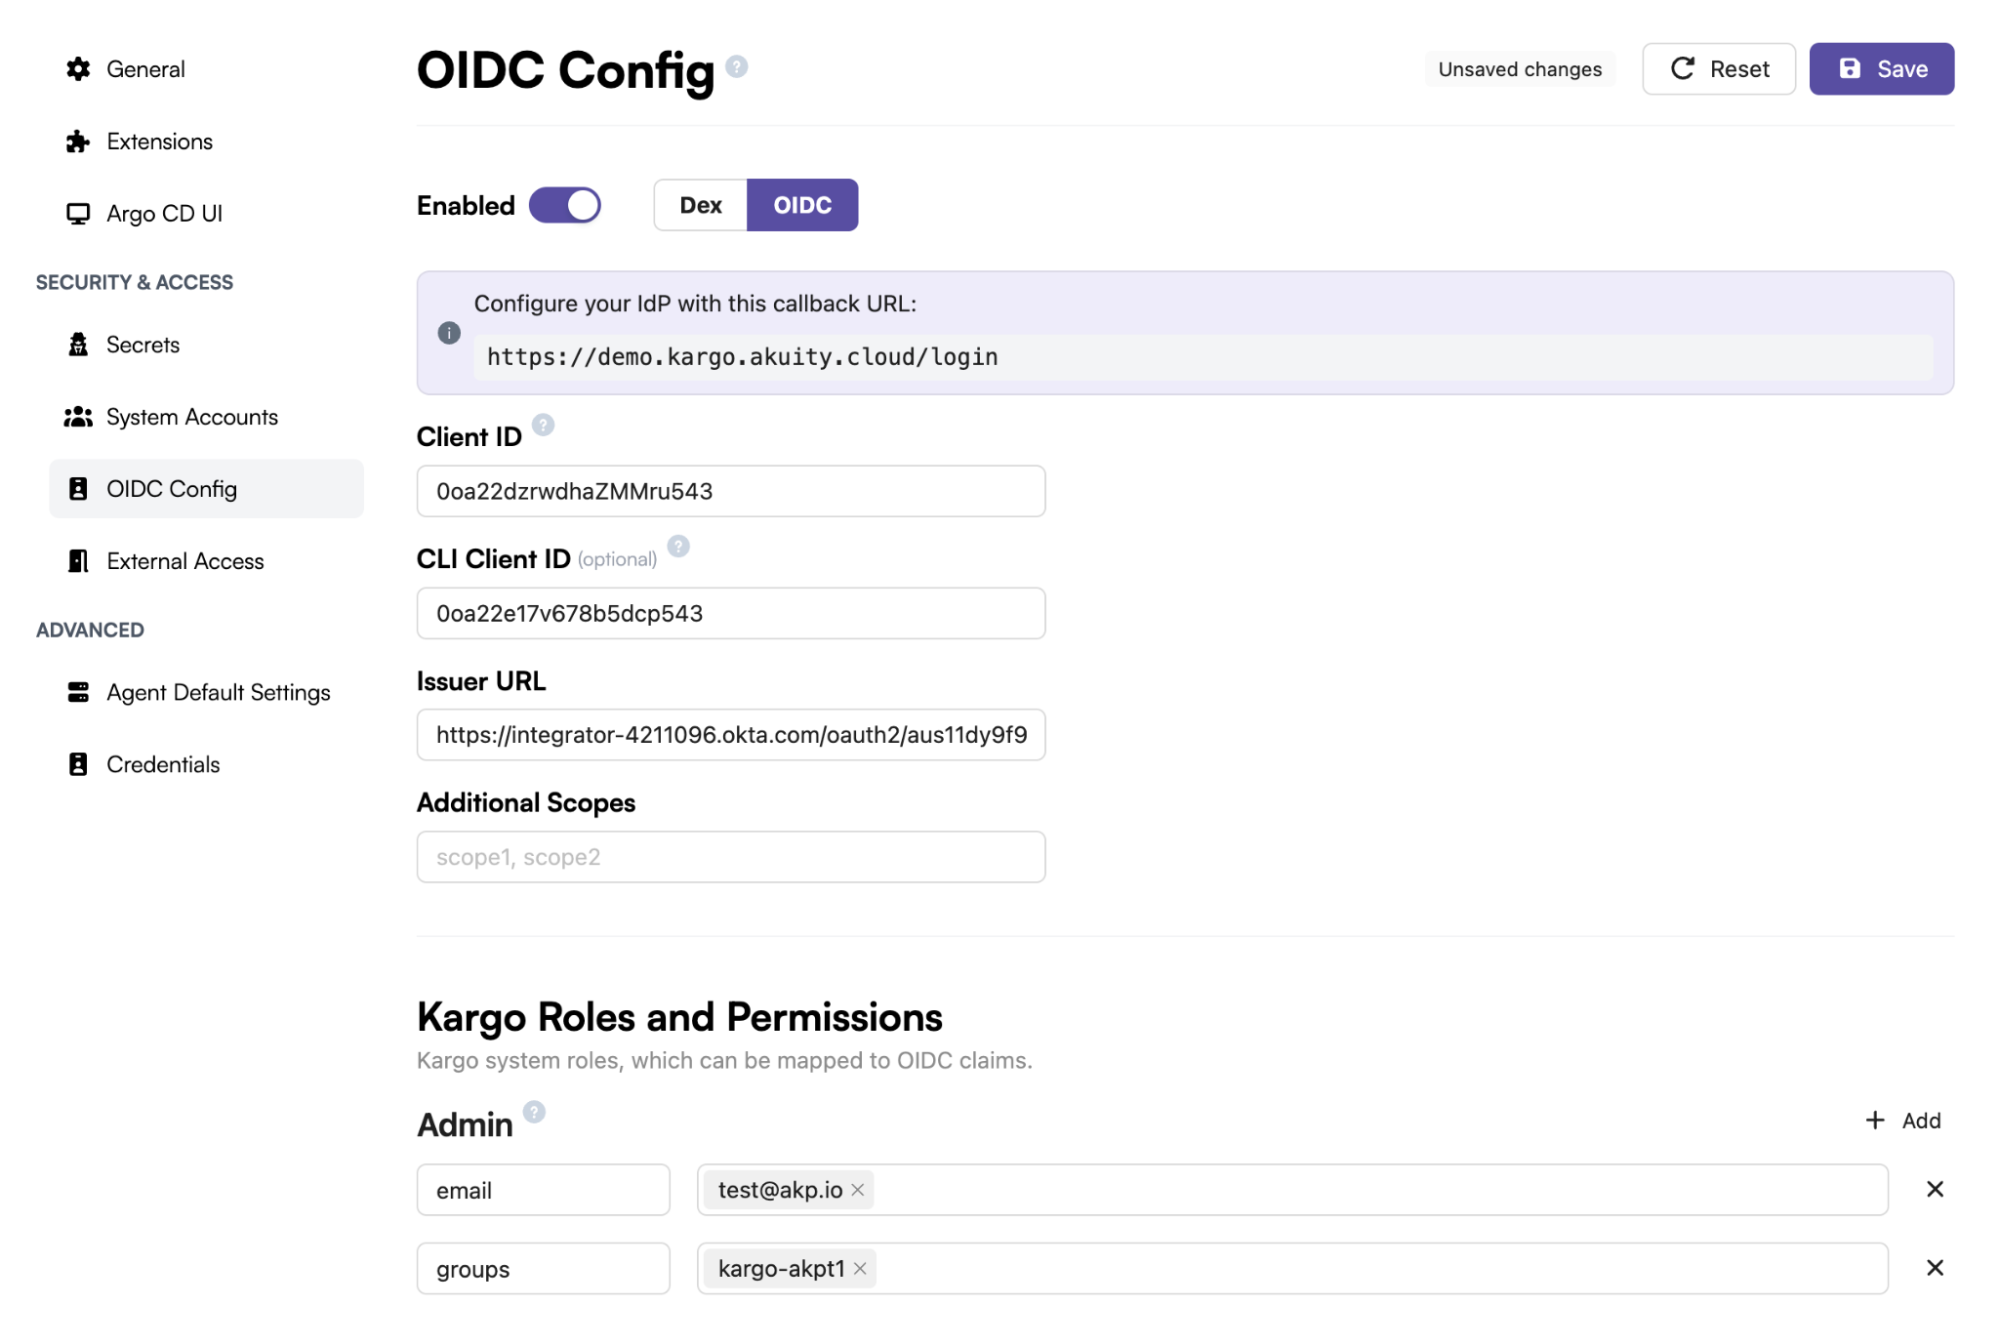
Back on the Kargo OIDC Config page with OIDC mode selected, fill in:
| Field | Value |
|---|---|
| Client ID | The Client ID of the UI app, kargoakp, from Step 2 |
| CLI Client ID | The Client ID of the CLI app, kargoakpcli, from Step 7 |
| Issuer URL | https://<your-okta-domain>/oauth2/<authServerId> |
| Additional Scopes | groups |
Neither app has a client secret, and neither needs one — both use PKCE.
CLI Client ID is optional, and when it is blank Kargo falls back to the UI Client ID. With Okta that fallback fails, because the UI app has no http://localhost:54321/auth/callback redirect URI registered. Always set it to the CLI app's Client ID.
Step 9: Map users to Kargo roles
Scroll to Kargo Roles and Permissions. For the Admin role:
- Claim key
email, claim value your email address, then click Add - Or claim key
groups, claim valuekargo-akpt1, then click Add
Available roles are Admin, Viewer, User, and Project Creator.
Claim matching is exact string equality — no wildcards, no substring matching, no case folding. The value must be the Okta group name exactly as it appears in the token. If you later change your group naming convention, every existing mapping must be rewritten.
Click Save.
Step 10: Test the UI and CLI logins
-
Open a fresh incognito or private window and go to
https://<your-kargo-hostname>. -
Click SSO Login, sign in with your Okta account, and you land in the Kargo UI with the role you mapped.
Then test the CLI, using the same port you registered in Step 7:
kargo login https://<your-kargo-hostname> --port 54321 --sso
Verify you are authenticated:
kargo get projects
The redirect URL should contain:
<your-okta-domain>/oauth2/<authServerId>/v1/authorize?…&code_challenge=…&code_challenge_method=S256&redirect_uri=…%2Flogin
code_challenge_method=S256 confirms PKCE, and a redirect_uri ending in /login with no /dex/callback anywhere confirms Dex is bypassed.
Native OIDC troubleshooting
redirect_uri_mismatch on the UI login
The sign-in redirect URI registered on kargoakp does not match what Kargo sent. Read the redirect_uri parameter out of the browser URL when you are redirected to Okta — that is the exact value Okta must have registered. Watch for a trailing slash or a stray character pasted in with the URL.
redirect_uri_mismatch on kargo login --sso
Either --port does not match the port registered on kargoakpcli, or CLI Client ID is blank in Kargo so the CLI is using the UI client. Register http://localhost:<port>/auth/callback on the CLI app, set CLI Client ID, and pass the same --port.
401 unauthorized_client
The client is not assigned to an access policy on the kargo Authorization Server. Add it under Access Policies — both kargoakp and kargoakpcli need to be listed.
Login succeeds but the user has no permissions
No role mapping matched. Check Kargo Roles and Permissions: the claim key and value must match the token exactly. Decode the ID token and compare the values character for character.
groups claim missing
- Confirm
groupsis in Additional Scopes in Kargo — the claim is scoped togroupsin Step 4, so it is only emitted when the scope is requested - Confirm the Issuer URL points at the custom Authorization Server you configured, not the Org one — the claim and scope in Step 4 live on the custom server
- Confirm the group name matches the claim's regex filter
- Confirm the user is assigned to the app, not only to the group
User is not assigned to the client application
Assign the group to the app under the group's Applications tab (Step 6), or assign the user directly on the app's Assignments tab.
Login fails for users in many groups
The ID token has outgrown Okta's size limit. Narrow the claim's regex filter so fewer groups are emitted.
Native OIDC summary
| Component | Value |
|---|---|
| Okta UI app | OIDC app integration, Single-Page Application |
| UI redirect URI | https://<kargo-hostname>/login |
| Okta CLI app | OIDC app integration, Single-Page Application |
| CLI redirect URI | http://localhost:<port>/auth/callback — the port is required |
| Authorization Server | Custom, for example kargo |
| Kargo SSO mode | OIDC, not Dex |
| Issuer URL | https://<your-okta-domain>/oauth2/<authServerId> |
| Client secret | PKCE |
| Additional scopes | groups |
| Groups claim | Name groups, ID token, value type Groups, regex kargo-.* |
| CLI command | kargo login https://<kargo-hostname> --port <port> --sso |
| Key gotchas | Point Issuer URL at the custom Authorization Server, since that is where the scope and claim live; register the CLI port; set CLI Client ID; assign the app to the group, not just the users |
Dex SAML
Connect Okta through Dex's saml connector, using a SAML 2.0 app integration and its signing certificate.
Step 1: Get your Kargo callback URL
-
In your Kargo Instance, go to Settings.
-
In the left panel, search for Access and go to OIDC Config.
-
Toggle Enabled to on.
-
Select the Dex option, not OIDC.
-
A banner displays your callback URL. Copy it — you will register it in Okta:
https://<your-kargo-hostname>/dex/callback
The Kargo Dex callback path is /dex/callback. This single URL is used as both the SAML Single sign-on URL and the Audience URI (SP Entity ID).
When Dex is selected the page shows the /dex/callback URL; when OIDC is selected it shows a /login URL. Make sure you copy the /dex/callback one.
Leave this page open — you will come back to it in Step 5.
Step 2: Create a SAML app integration in Okta
-
In the Okta Admin Console, go to Applications → Applications → Create App Integration.
-
Under Sign-in method, select SAML 2.0, then click Next.
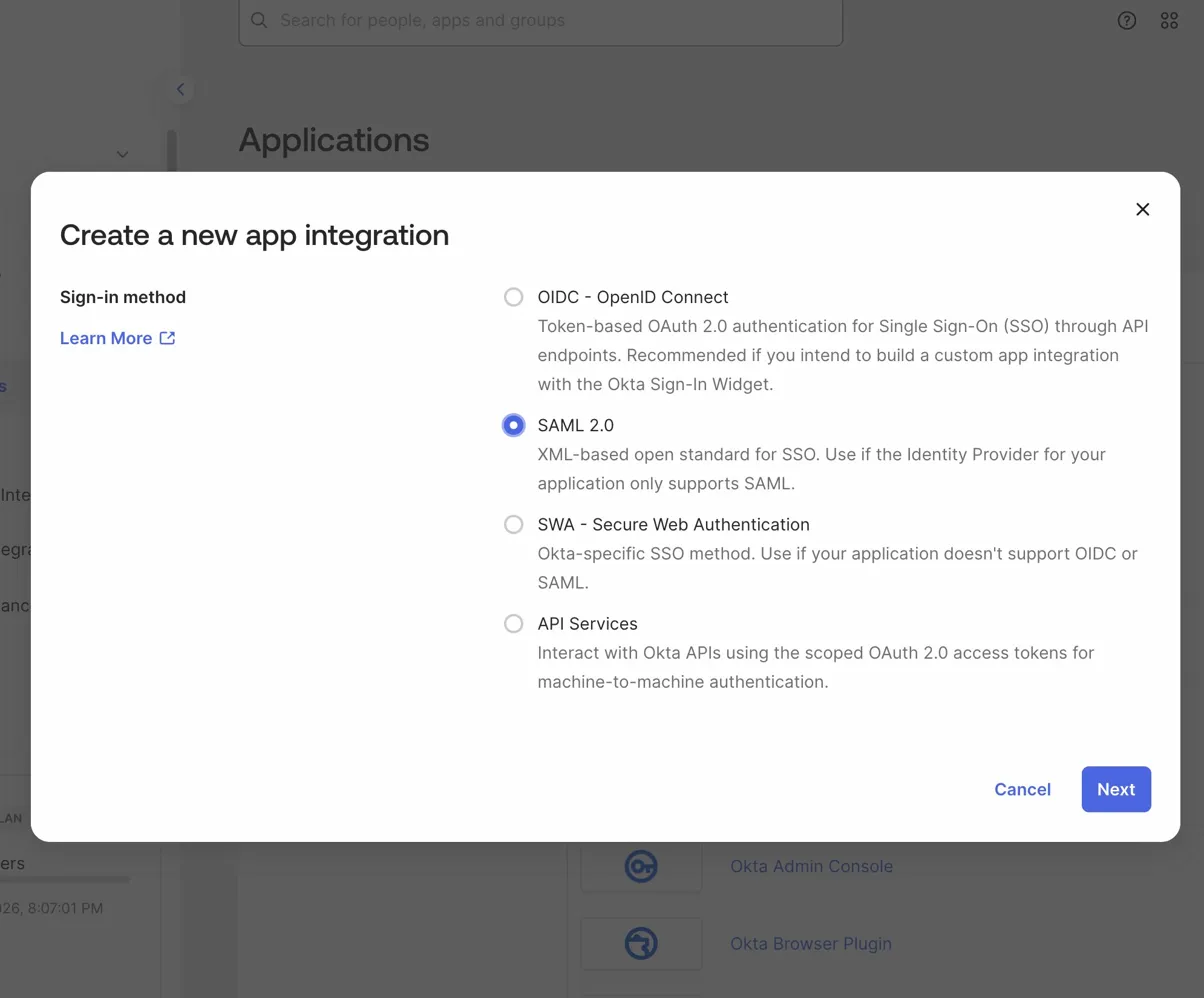
Dex is the OIDC layer in this method, so Okta only needs to speak SAML. OIDC - OpenID Connect is for the native OIDC method above; SWA and API Services do not apply.
- On Step 1: General Settings, enter an app name — this guide uses
kargoakpdex— and click Next.
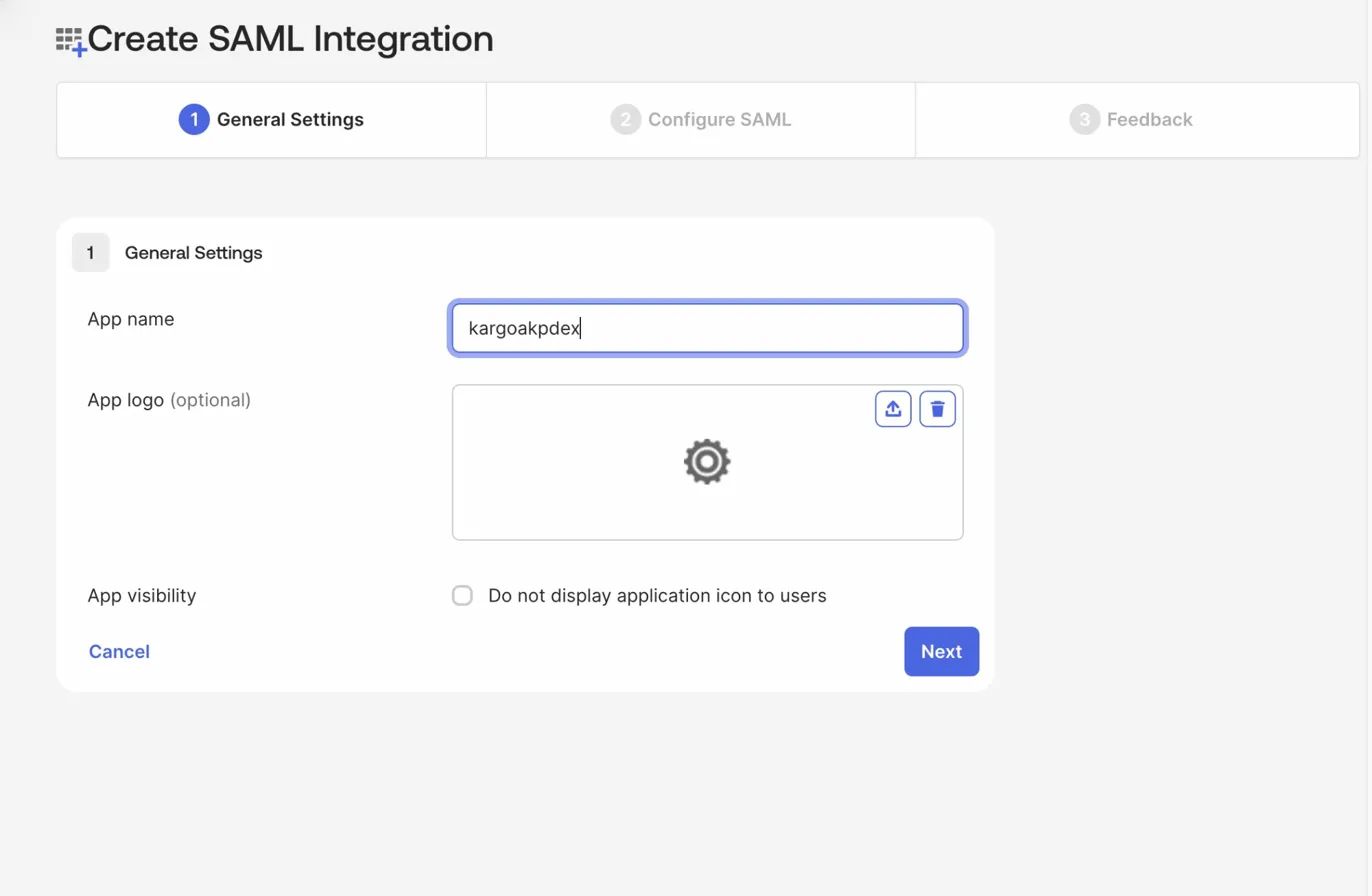
Including both the Kargo instance name and dex in the name keeps the app easy to identify later. Leave Do not display application icon to users unchecked unless you want to hide the tile from the Okta dashboard.
Step 3: Configure the SAML settings
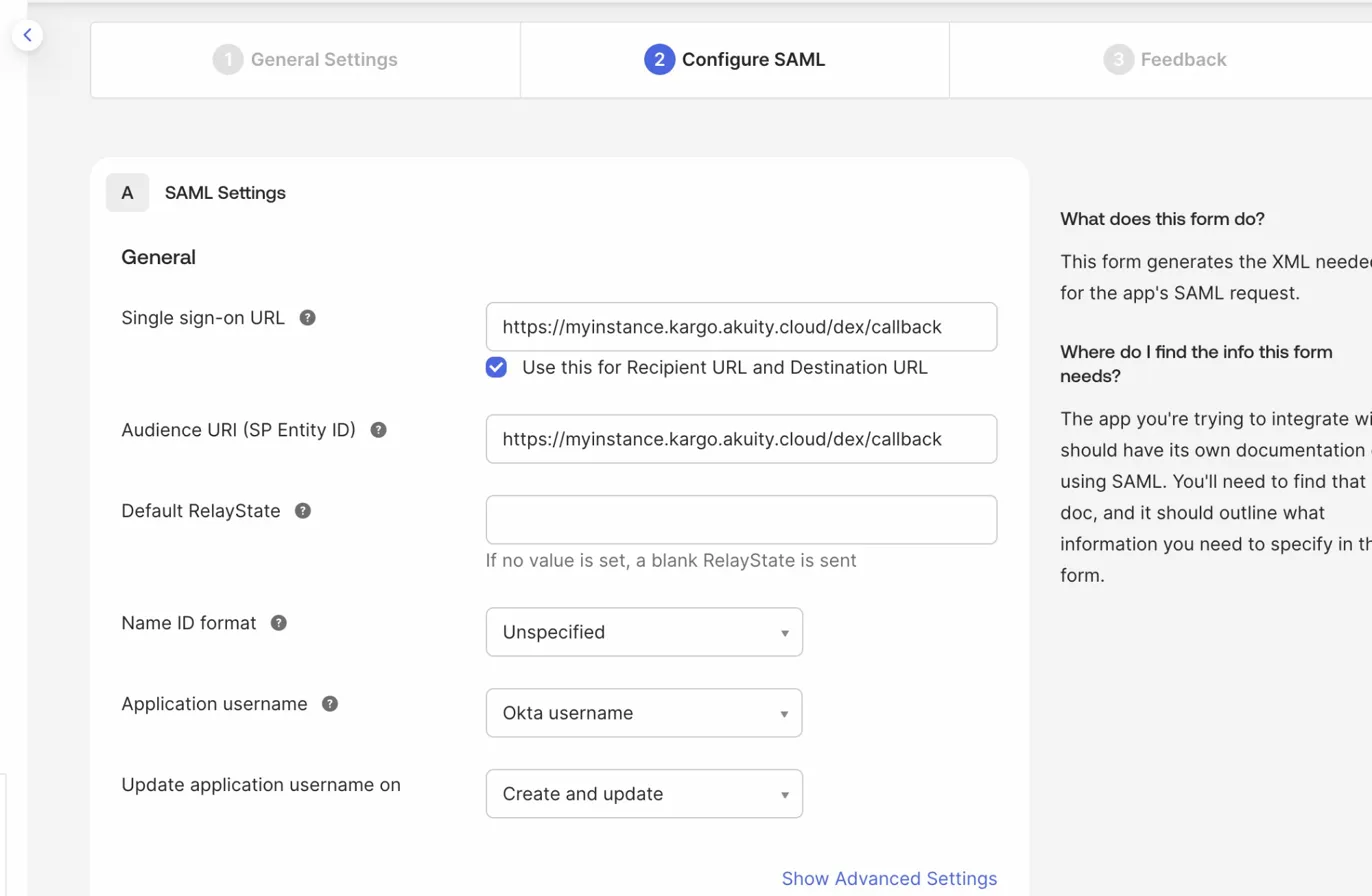
You are now on Step 2: Configure SAML.
| Field | Value | Notes |
|---|---|---|
| Single sign-on URL | https://<your-kargo-hostname>/dex/callback | The Dex callback endpoint from Step 1 |
| Use this for Recipient URL and Destination URL | Checked | Okta then uses the same URL for all three fields |
| Audience URI (SP Entity ID) | https://<your-kargo-hostname>/dex/callback | The same value as the SSO URL |
| Default RelayState | Leave blank | Dex does not use RelayState |
| Name ID format | Unspecified | Dex accepts any NameID format |
| Application username | Okta username | Sent to Dex as the NameID |
| Update application username on | Create and update |
Step 4: Configure attribute and group statements
Still on Configure SAML, scroll to Attribute Statements — under Show Advanced Settings if you do not see it — and add:
| Name | Name format | Value |
|---|---|---|
email | Unspecified | user.email |
name | Unspecified | user.fullName |
These map Okta profile fields to the SAML attributes Dex reads to build the user's identity, and they line up with emailAttr and usernameAttr in the connector config in Step 5.
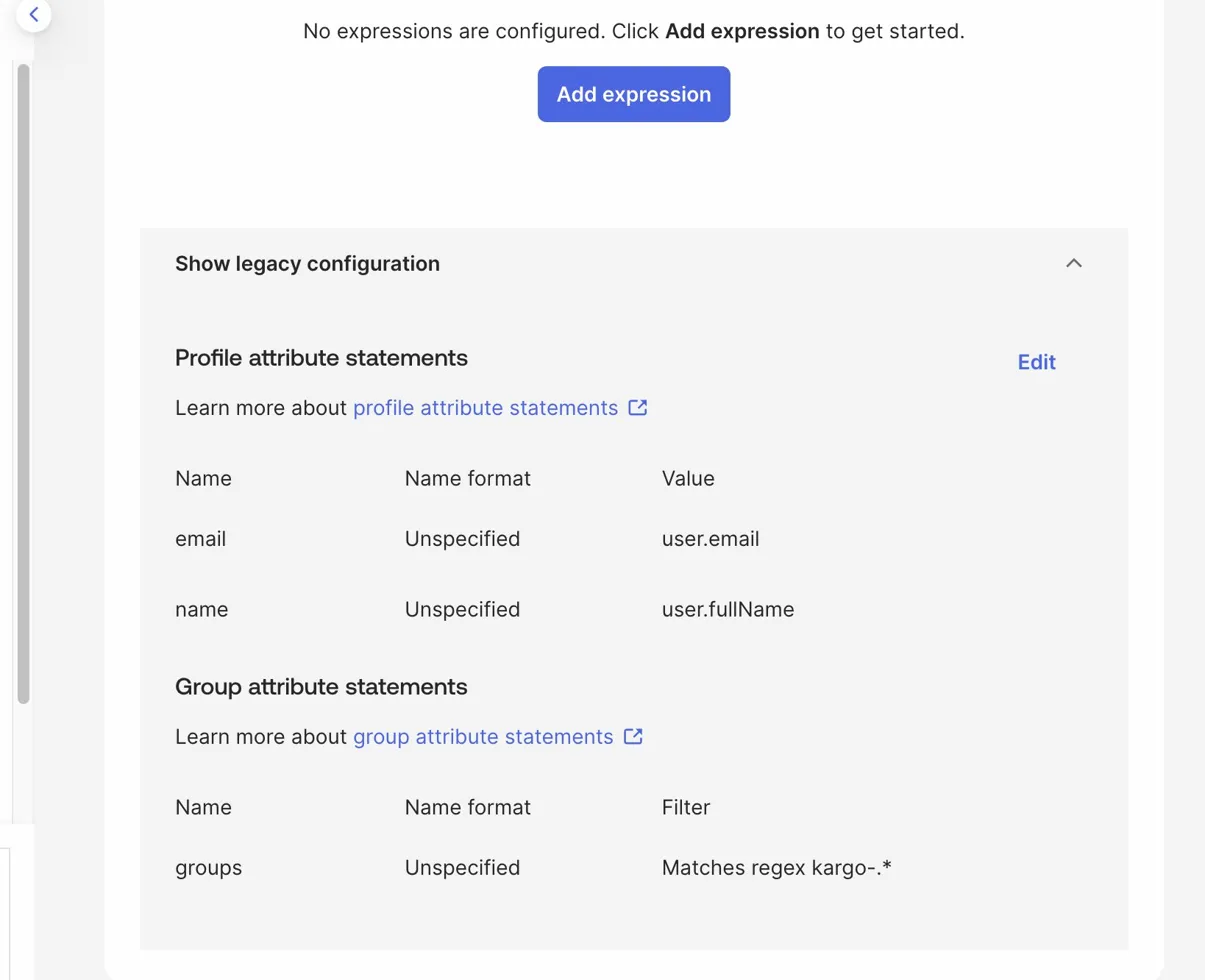
Then scroll to Group Attribute Statements and add:
| Name | Name format | Filter |
|---|---|---|
groups | Unspecified | Matches regex, kargo-.* |
Okta includes every group whose name starts with kargo- in the SAML assertion, and Dex passes them through to Kargo for role mapping. Adjust the regex if your naming convention differs.
Click Next and Finish.
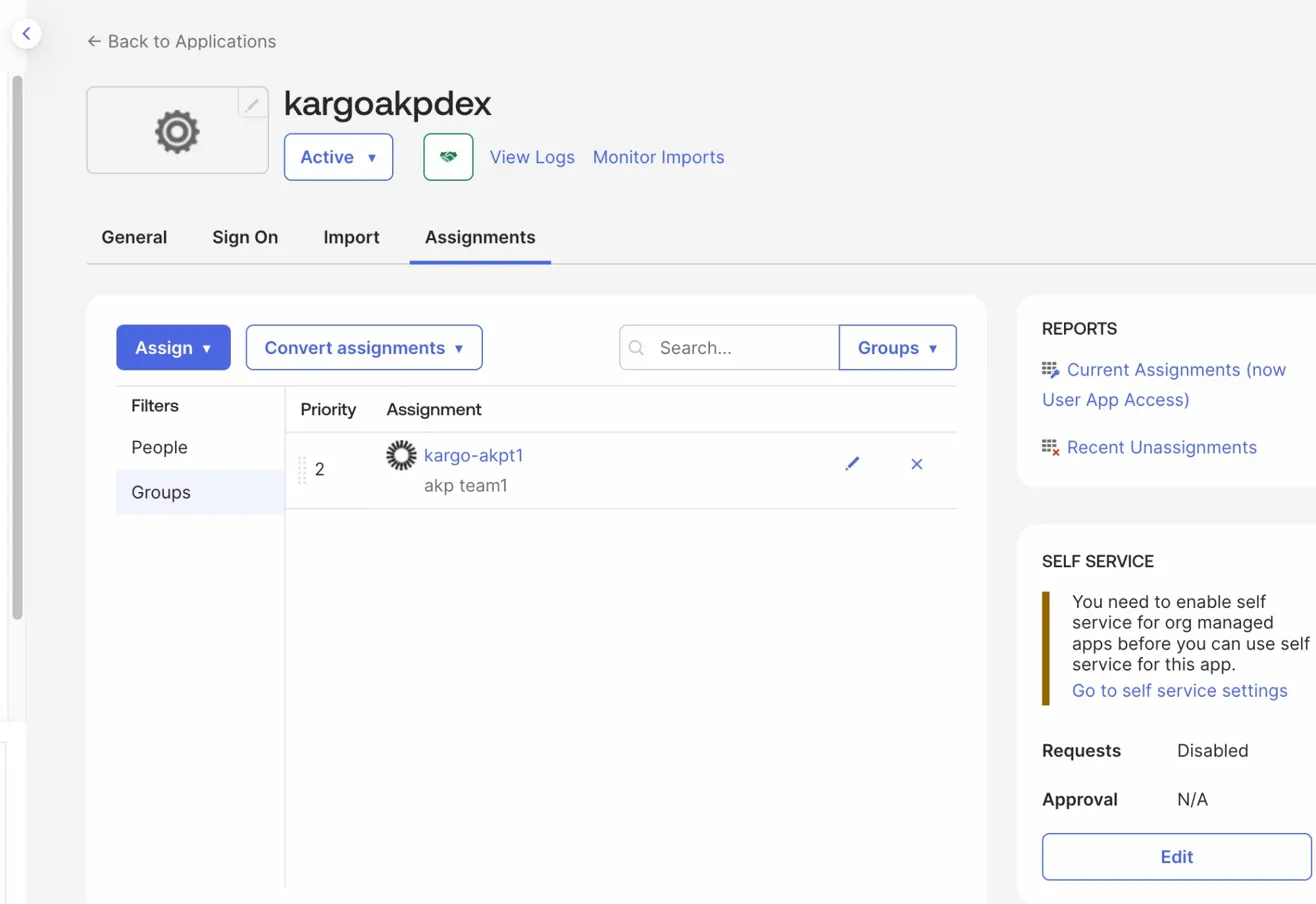
Assign groups to the application
-
On the
kargoakpdexapplication page, open the Assignments tab. -
Click Assign → Assign to Groups.
-
Assign every group that should have access to Kargo, for example
kargo-akpt1, then click Done.
Get the IdP metadata
-
On the application page, open the Sign On tab.
-
Click View SAML setup instructions.
-
Copy the Identity Provider Single Sign-On URL — this is
ssoURLin the connector config. -
Download the X.509 Certificate and base64-encode it — this is
caData. The metadata URL,https://<your-okta-domain>/app/<app-id>/sso/saml/metadata, serves the same certificate as XML if you prefer to pull it that way.
Step 5: Configure the Dex connector in Kargo
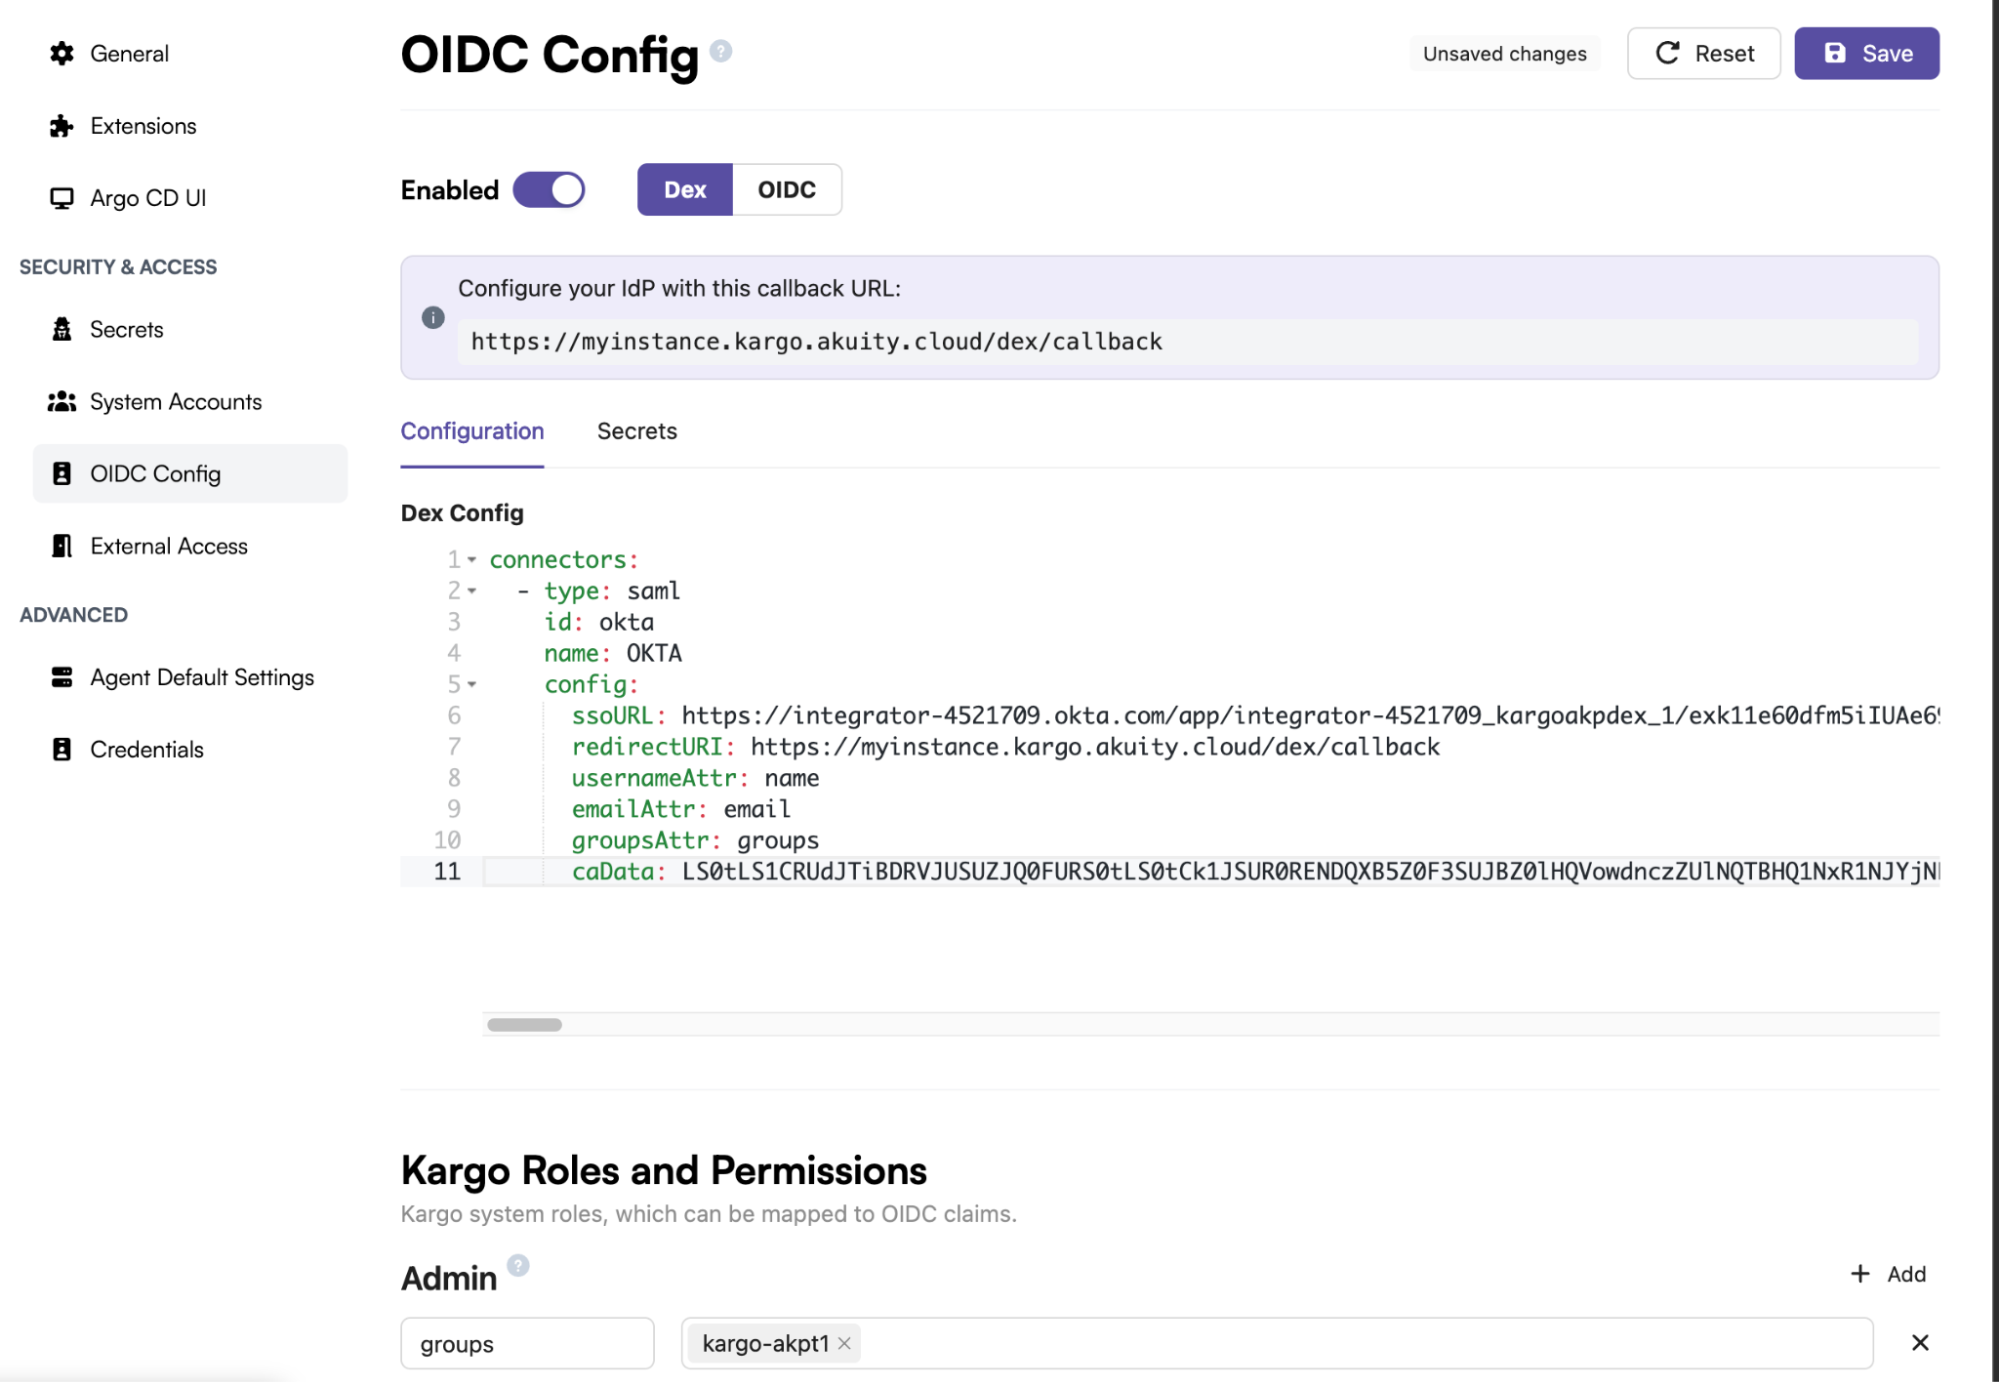
Back on the Kargo OIDC Config page with Dex selected, open the Configuration tab and enter the following in the Dex Config editor:
connectors:
  - type: saml
    id: okta
    name: OKTA
    config:
      ssoURL: https://<your-okta-domain>/app/<app-name>/<app-id>/sso/saml
      redirectURI: https://<your-kargo-hostname>/dex/callback
      usernameAttr: name
      emailAttr: email
      groupsAttr: groups
      caData: <base64-encoded certificate from Okta>
Configuration fields explained
| Field | Description |
|---|---|
type | Must be saml for the Dex SAML connector |
id | Unique identifier for this connector |
name | Display name shown on the Dex login screen |
ssoURL | The Identity Provider Single Sign-On URL from Step 4 |
redirectURI | Must exactly match the Single sign-on URL registered in Okta (/dex/callback) |
usernameAttr | The SAML attribute holding the display name — name, from Step 4 |
emailAttr | The SAML attribute holding the email — email, from Step 4 |
groupsAttr | The SAML group attribute — groups, from Step 4 |
caData | The base64-encoded X.509 signing certificate from Okta |
Full connector reference: Dex SAML connector.
Step 6: Map users to Kargo roles and test
Scroll to Kargo Roles and Permissions and map a claim to a role. For the Admin role, use claim key groups and claim value kargo-akpt1, then click Add. Mapping on email works the same way.
Click Save, then open an incognito or private window, go to https://<your-kargo-hostname>, click SSO Login, and sign in with your Okta account.
Dex SAML troubleshooting
Okta shows User is not assigned to the application
The user's group is not assigned to the Okta app. Assign it on the Assignments tab (Step 4).
Dex returns Failed to authenticate
The Audience URI in Okta and the redirectURI in the Dex config do not match. Compare them exactly — a trailing slash on one side is enough to break it.
The user authenticates but has no Kargo permissions
The group names do not match the regex filter, or the role mapping value does not match the group name. Check the regex in Step 4 and compare the mapping value against the group name in Okta.
Groups do not appear in the Dex claims
The groups are not assigned to the app, or the regex is too narrow. Assign them (Step 4) and confirm kargo-.* covers your group names.
Redirect loop after the Okta login
The redirectURI in the Dex config does not match the Okta Single sign-on URL. Align Step 3 and Step 5.
Dex SAML summary
| Component | Value |
|---|---|
| Okta app type | SAML 2.0 app integration |
| Single sign-on URL | https://<kargo-hostname>/dex/callback |
| Audience URI (SP Entity ID) | https://<kargo-hostname>/dex/callback |
| Name ID format | Unspecified, application username Okta username |
| Attribute statements | email → user.email, name → user.fullName |
| Group attribute statement | groups, matches regex kargo-.* |
| Kargo SSO mode | Dex, type: saml connector |
| Certificate | Okta X.509 signing certificate, base64-encoded into caData |
| Key gotchas | Assign groups to the app or login is blocked; redirectURI, the SSO URL and the Audience URI must match exactly |