Notifications
Notifications are a way to keep track of important events on the Akuity Platform. You can receive notifications for a variety of events, such as usage alerts of applications, audit logs, and more. Notifications can be sent using 3 different methods: email, webhook, and Akuity Platform UI.
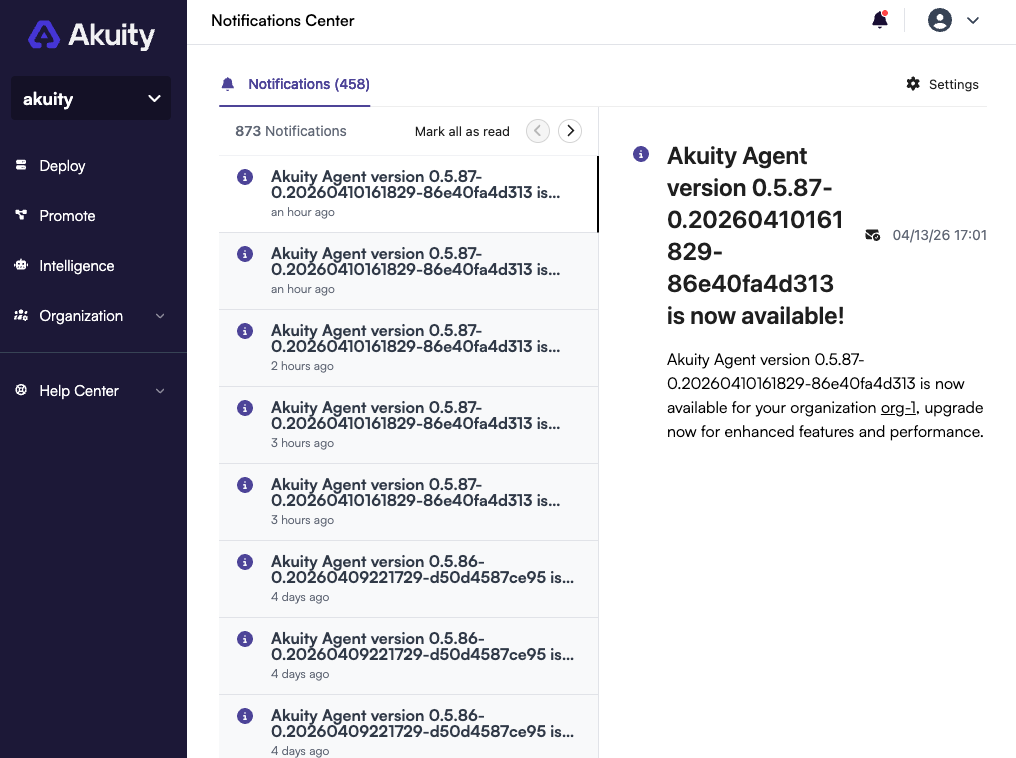
Notification Center
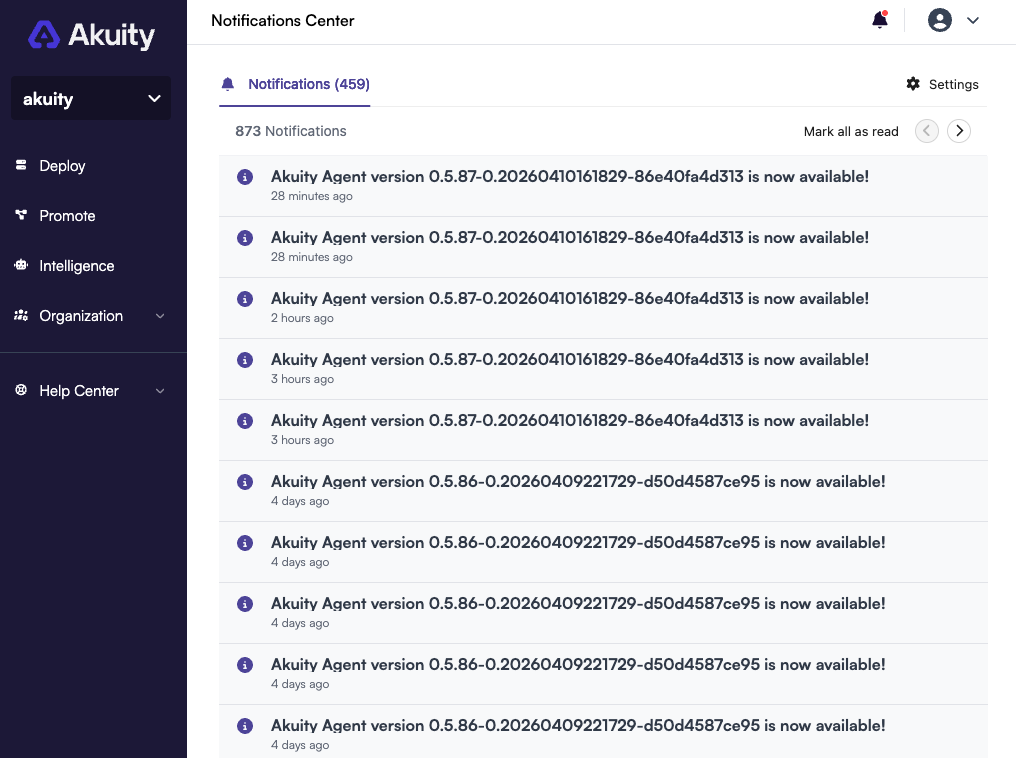
The Notification Center is where you can view all the notifications that have been sent to you through Akuity Platform UI. You can access the Notification Center by clicking on the bell icon (🔔) in the top right corner of the Akuity Platform and then clicking on Notifications Center. The Notification Center will display all the notifications that have been sent to you, and you can view the details of each notification by clicking on it.
Settings
You can manage your notification settings by going to the Settings tab in the Notification Center page. You can enable or disable notifications for each event type. You can also choose the method of notification for each event type. You can choose to receive notifications via email, or the Akuity Platform UI.
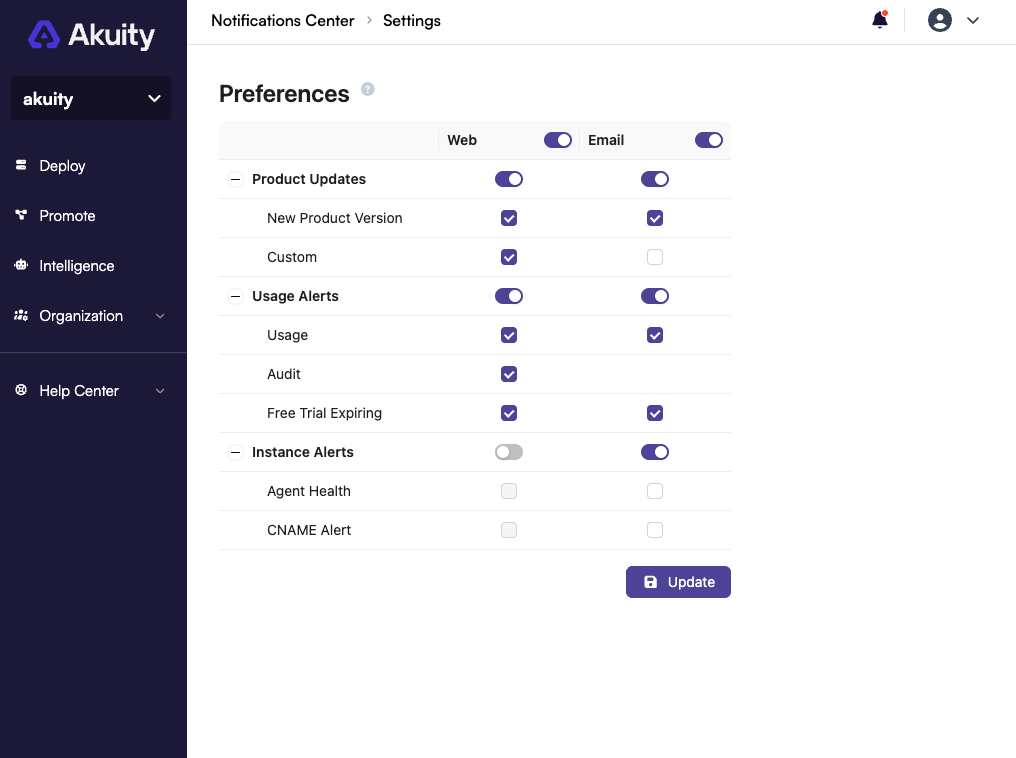
Notifications Categories
The different categories of notifications are:
- Product Updates - Notifications related to product updates, such as new releases, bug fixes, etc.
- New Product Version - New product versions related to Akuity Platform.
- Custom - Custom alerts used by Akuity team.
- Usage Alerts - Notifications related to usage alerts, such as reaching usage limits, etc.
- audit - Audit log events.
- free-trial-expiring - Trial expiration.
- usage - Usage alert events.
- Instance Alerts - Notifications related to your instances state.
- agent-health - Agent health events (connected/disconnected).
- cname-alert - Domain misconfiguration or expiration.
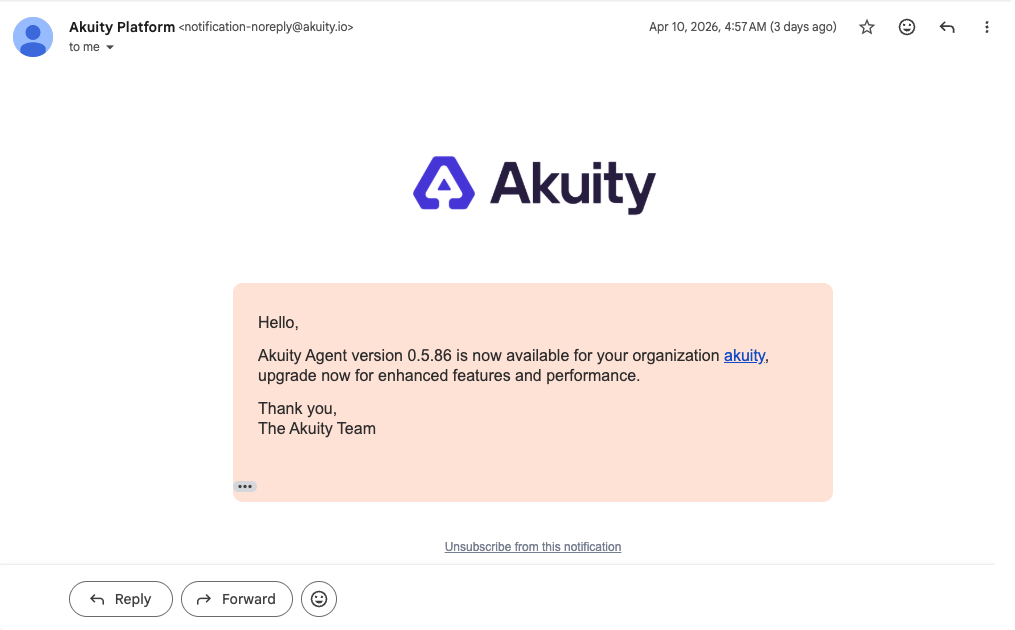
Email Notifications
Email notifications are sent to the email address associated with your account. An email notification is sent when an event occurs that you have subscribed to. You can manage your email notifications by going to the Settings tab in the Notification Center page. You can enable or disable email notifications for each event type.
An example of an email notification for Usage Alerts is shown below:
Akuity Platform UI Notifications (Web Notifications)
Akuity Platform UI notifications are notifications that are displayed in the Akuity Platform UI. These notifications are displayed in the top right corner of the Akuity Platform, and you can view them by clicking on the bell icon (🔔). Akuity Platform UI notifications are sent when an event occurs that you have subscribed to. You can manage your Akuity Platform UI notifications by going to the Settings tab in the Notification Center page. You can enable or disable Akuity Platform UI notifications for each event type.
An example of an Akuity Platform UI notification for Product Updates is shown below:
Organization Notifications
Organization notifications allow you to receive alerts for events happening within your organization. These can be configured to be sent via Webhook, Email or Akuity Platform UI (Web). Some notifications like for example usage related are set up by default.
Webhook Notifications
Webhook notifications are sent to a URL that you specify.
When a webhook notification is sent, the Akuity Platform will send a POST request to the specified URL with the notification details in the request body. The request body will contain a JSON object with the following fields:
- eventTime - The time at which the event occurred.
- eventType - The type of event that occurred.
- organizationId - The ID of the organization to which the event is related.
- eventId - The ID of the event.
- <eventTypeData> - Additional data related to the eventType.
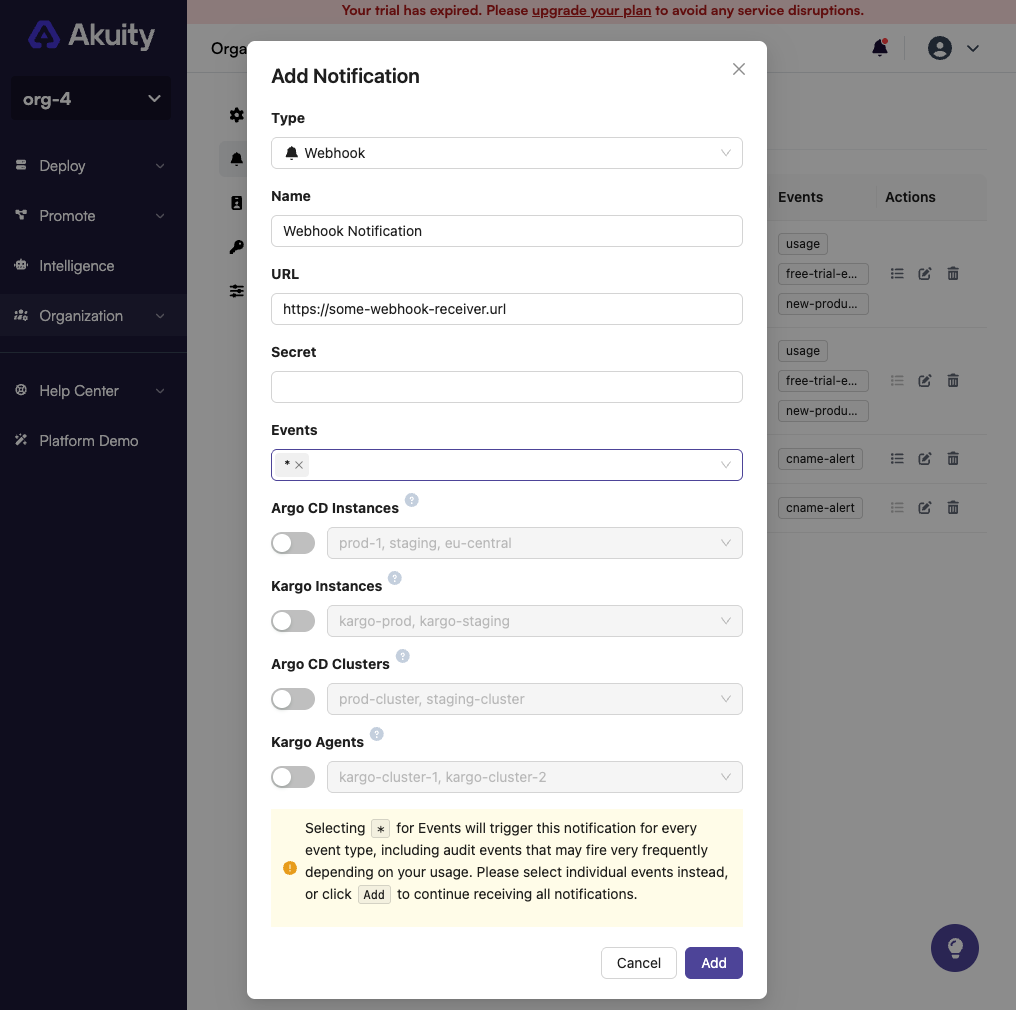
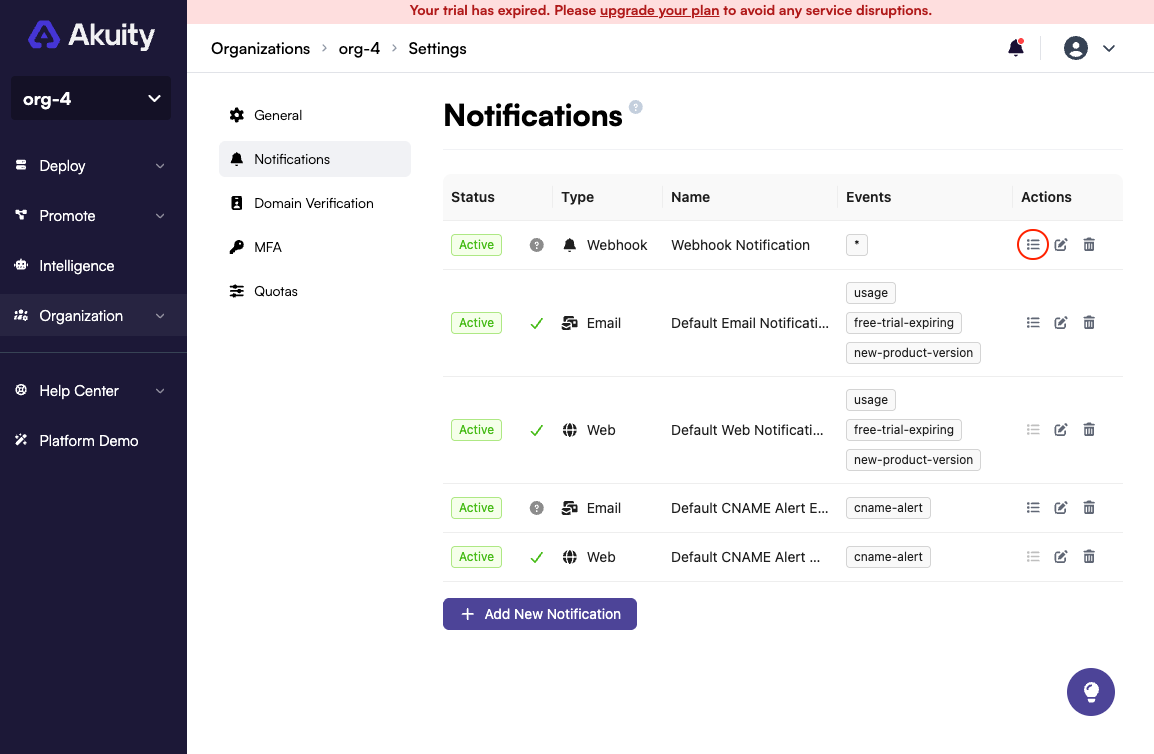
To set up an organization notification, follow these steps:
-
Select the Organization you want to create a notification for, from the pull down menu.
-
Click on the Settings button.
-
Switch to the Notifications tab.
-
Click the + Add New Notification button.
-
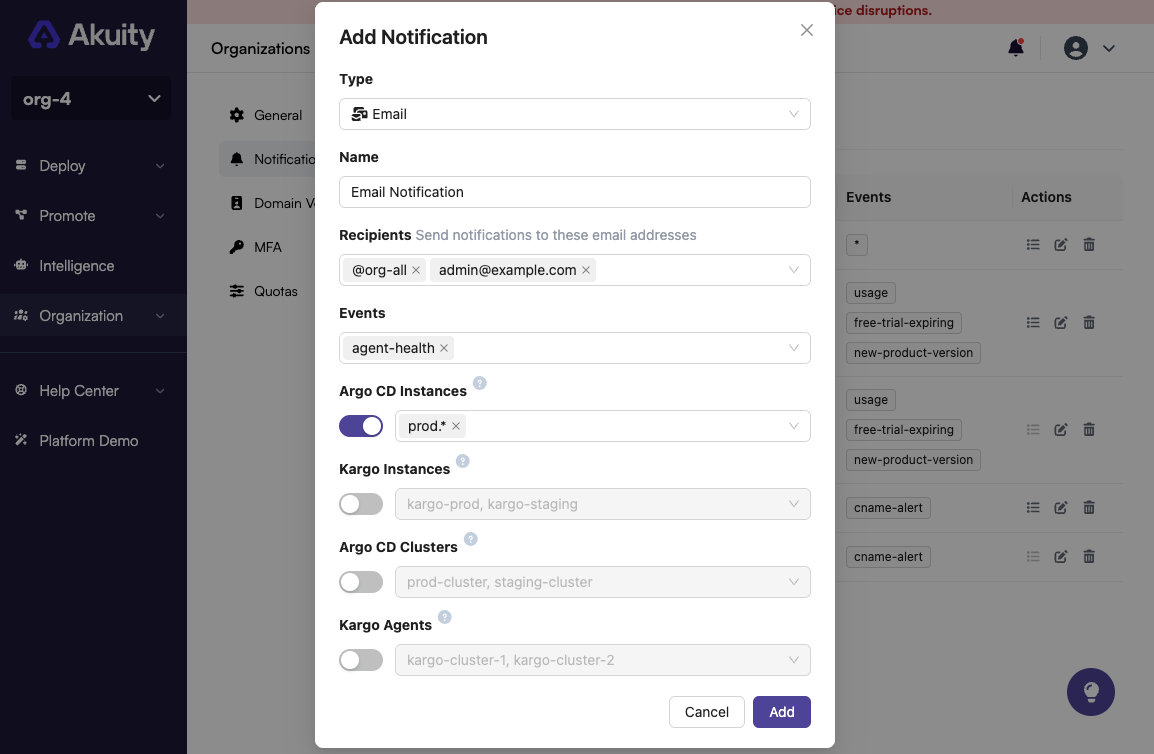
Fill notification details in the dialog.
- Type: Select Webhook.
- Name: Name of the webhook.
- URL: URL of the webhook.
- Secret: Secret for validate webhook payload signature.
- Events: Event types to subscribe (
*for all events). Please refer to notification categories for information about specific events. - Argo CD Instances: If set, webhook will receive events that only related to the chosen Argo CD instances.
- Kargo Instances: If set, webhook will receive events that only related to the chosen Kargo instances.
- Argo CD Clusters: Only applicable for
agent-healthevents. If set, webhook will receive events that only related to the chosen Argo CD clusters. - Kargo Agents: Only applicable for
agent-healthevents. If set, webhook will receive events that only related to the chosen Kargo agents.
noteThe filter fields above support regular expressions. The value is wrapped in
^...$. For example,test.*matches all names starting withtest. -
Click the Add button.
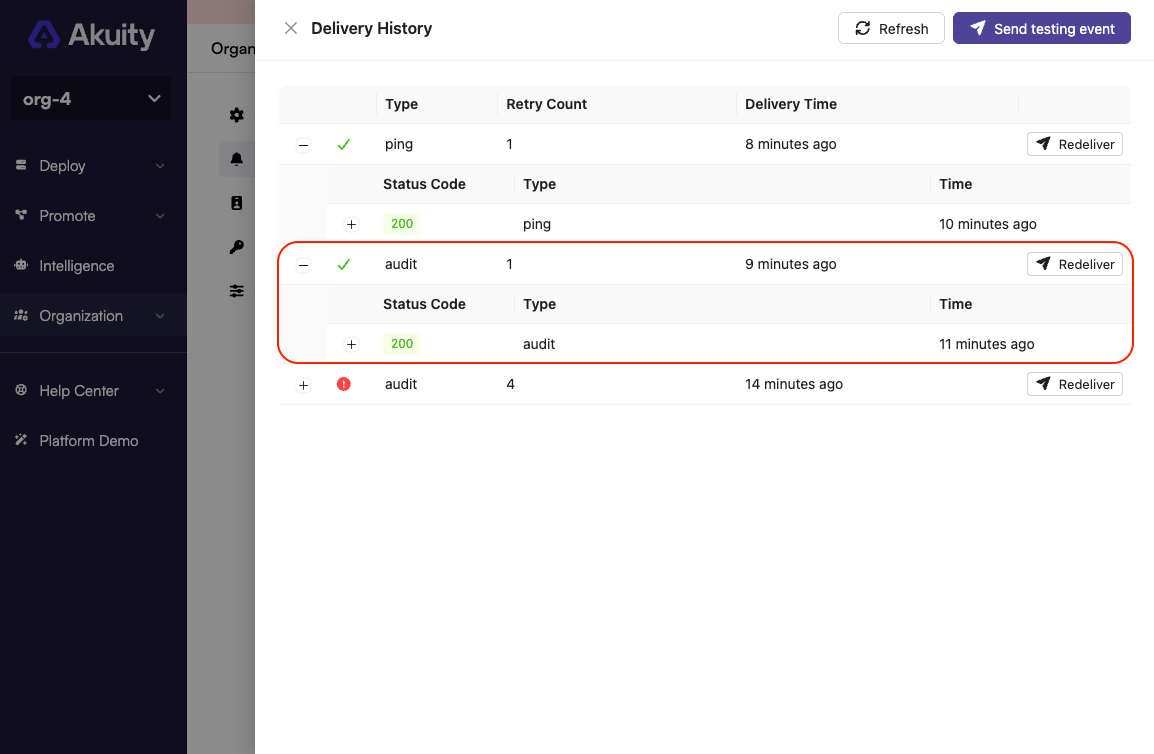
The notification will be added to the list. To view the delivery history, click on the View button.
Click on the Send testing event button to send a test event.
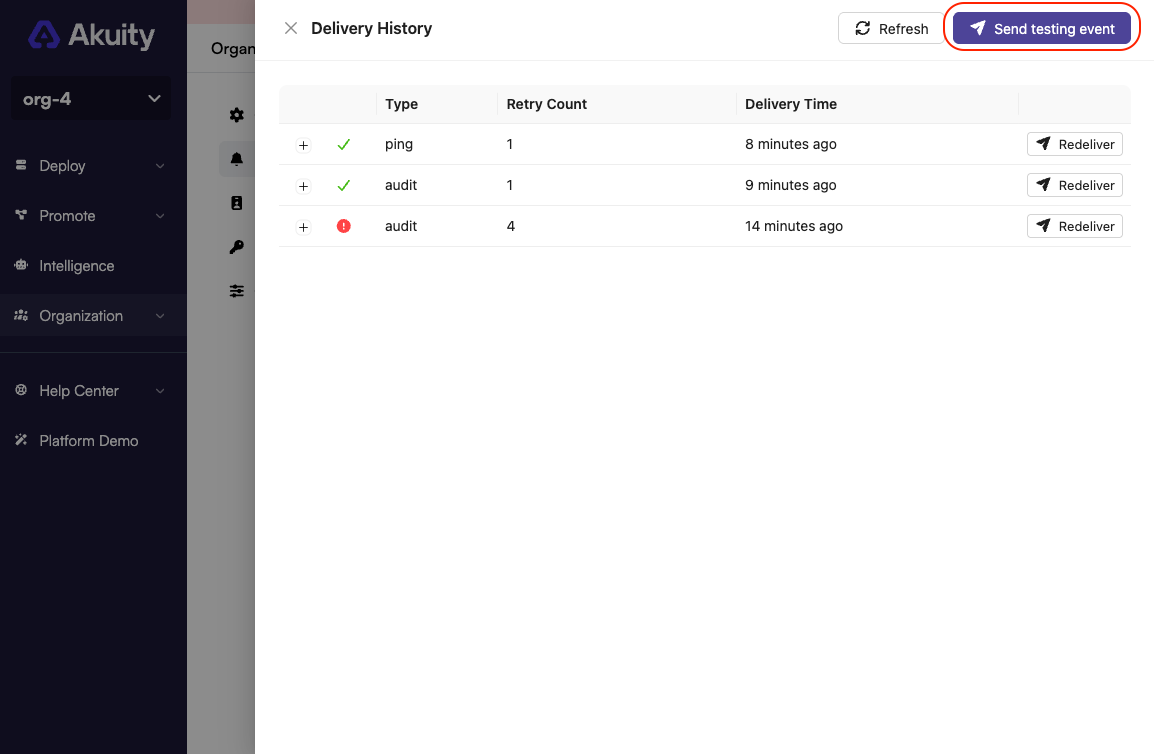
The webhook will be sent a test ping event and the response will be displayed. If you see a tick mark, the webhook was successfully sent. You can click on the + icon to view the response.
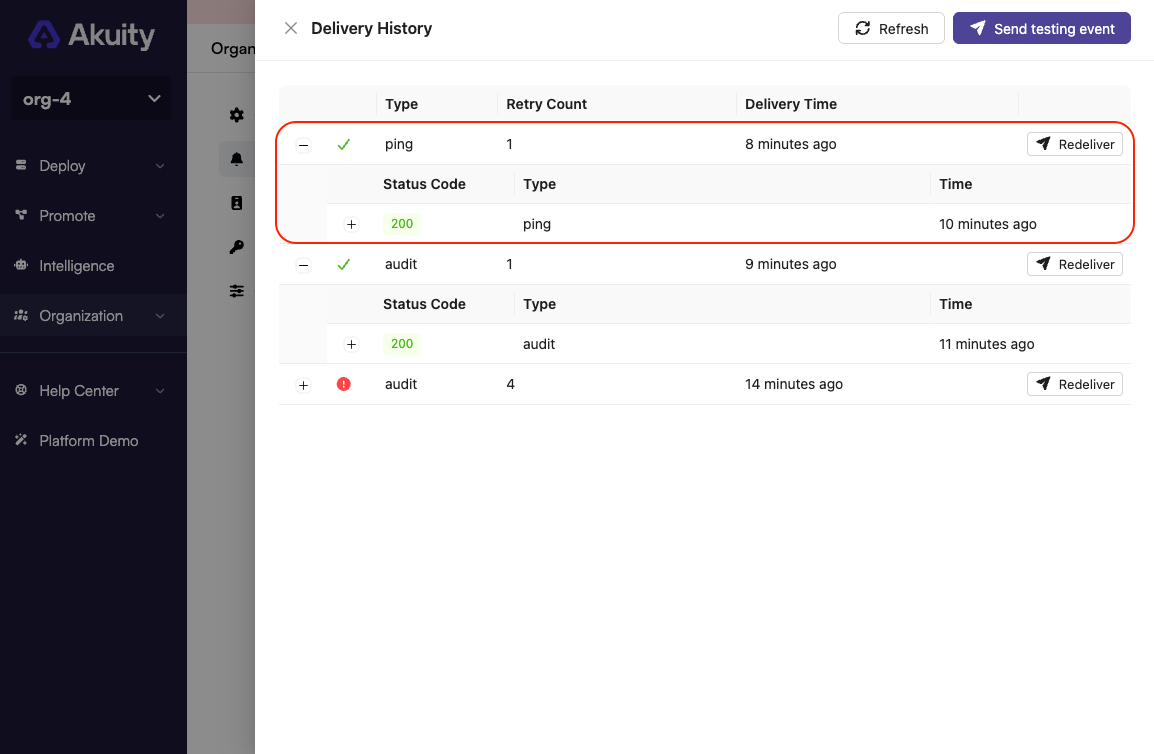
An example of a webhook notification for audit event is shown below:
{
  "eventTime": "2024-08-23T13:21:30.647737Z",
  "eventType": "WEBHOOK_EVENT_TYPE_AUDIT",
  "organizationId": "yswhibye4b9xy0e",
  "eventId": "c2txb45sbae7m5m9",
  "auditEvent": {
    "timestamp": "2024-08-23 13:21:30.622450296 +0000 UTC",
    "action": "created",
    "actor": {
      "type": "akuity_user_email",
      "id": "user@example.com"
    },
    "object": {
      "type": "custom_role",
      "id": {
        "name": "test",
        "kind": "",
        "group": ""
      },
      "parentId": {
        "name": "",
        "parentName": "",
        "applicationName": ""
      }
    },
    "details": {
      "message": "",
      "patch": "",
      "actionType": ""
    }
  }
}
For more information on the webhook schema, refer to the Notification Webhook Schema.
Email Notifications
Email notifications are sent to the email addresses that you specify.
To set up an email notification, follow these steps:
-
Select the Organization you want to create a notification for, from the pull down menu.
-
Click on the Settings button.
-
Switch to the Notification tab.
-
Click the + Add New Notifications button.
-
Fill notification details in the dialog.
- Type: Select Email.
- Name: Name of the notification configuration.
- Recipients: List of email addresses to send notifications to. You can also select org owner through
@org-owner, everyone in the org with@org-alland everyone in the workspace by@workspace-alloptions. - Events: Event types to subscribe (
*for all events). Please refer to notification categories for information about specific events. - Argo CD Instances: If set, emails will be sent for events that only related to the chosen Argo CD instances.
- Kargo Instances: If set, emails will be sent for events that only related to the chosen Kargo instances.
- Argo CD Clusters: Only applicable for
agent-healthevents. If set, emails will be sent for events that only related to the chosen Argo CD clusters. - Kargo Agents: Only applicable for
agent-healthevents. If set, emails will be sent for events that only related to the chosen Kargo agents.
noteThe filter fields above support regular expressions. The value is wrapped in
^...$. For example,test.*matches all names starting withtest. -
Click the Add button.
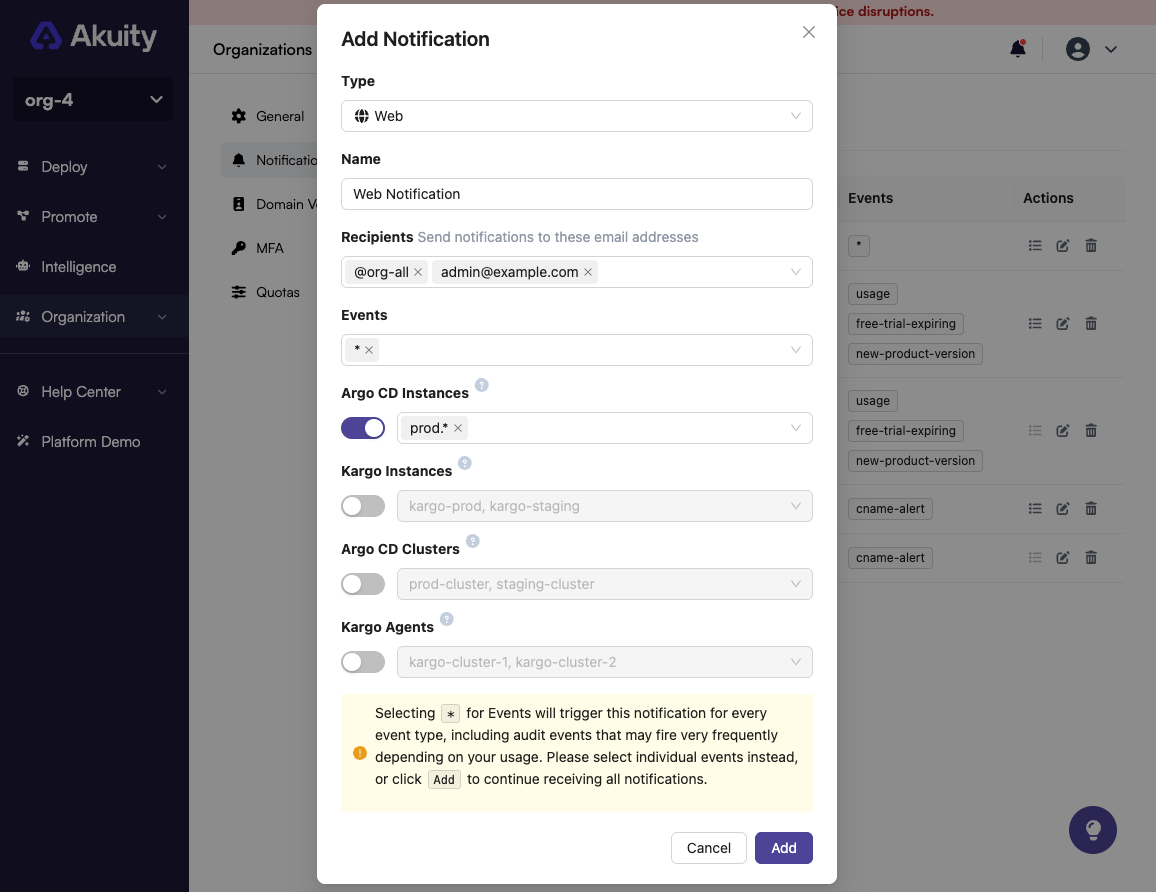
Web Notifications
Web notifications are displayed in Akuity Platform Notifications Centre UI.
To set up a web notification, follow these steps:
-
Select the Organization you want to create a notification for, from the pull down menu.
-
Click on the Settings button.
-
Switch to the Notifications tab.
-
Click the + Add New Notification button.
-
Fill notification details in the dialog.
- Type: Select Email.
- Name: Name of the notification configuration.
- Recipients: List of users to send notifications to. You can also select org owner through
@org-owner, everyone in the org with@org-alland everyone in the workspace by@workspace-alloptions. - Events: Event types to subscribe (
*for all events). Please refer to notification categories for information about specific events. - Argo CD Instances: If set, emails will be sent for events that only related to the chosen Argo CD instances.
- Kargo Instances: If set, emails will be sent for events that only related to the chosen Kargo instances.
- Argo CD Clusters: Only applicable for
agent-healthevents. If set, emails will be sent for events that only related to the chosen Argo CD clusters. - Kargo Agents: Only applicable for
agent-healthevents. If set, emails will be sent for events that only related to the chosen Kargo agents.
noteThe filter fields above support regular expressions. The value is wrapped in
^...$. For example,test.*matches all names starting withtest. -
Click the Add button.